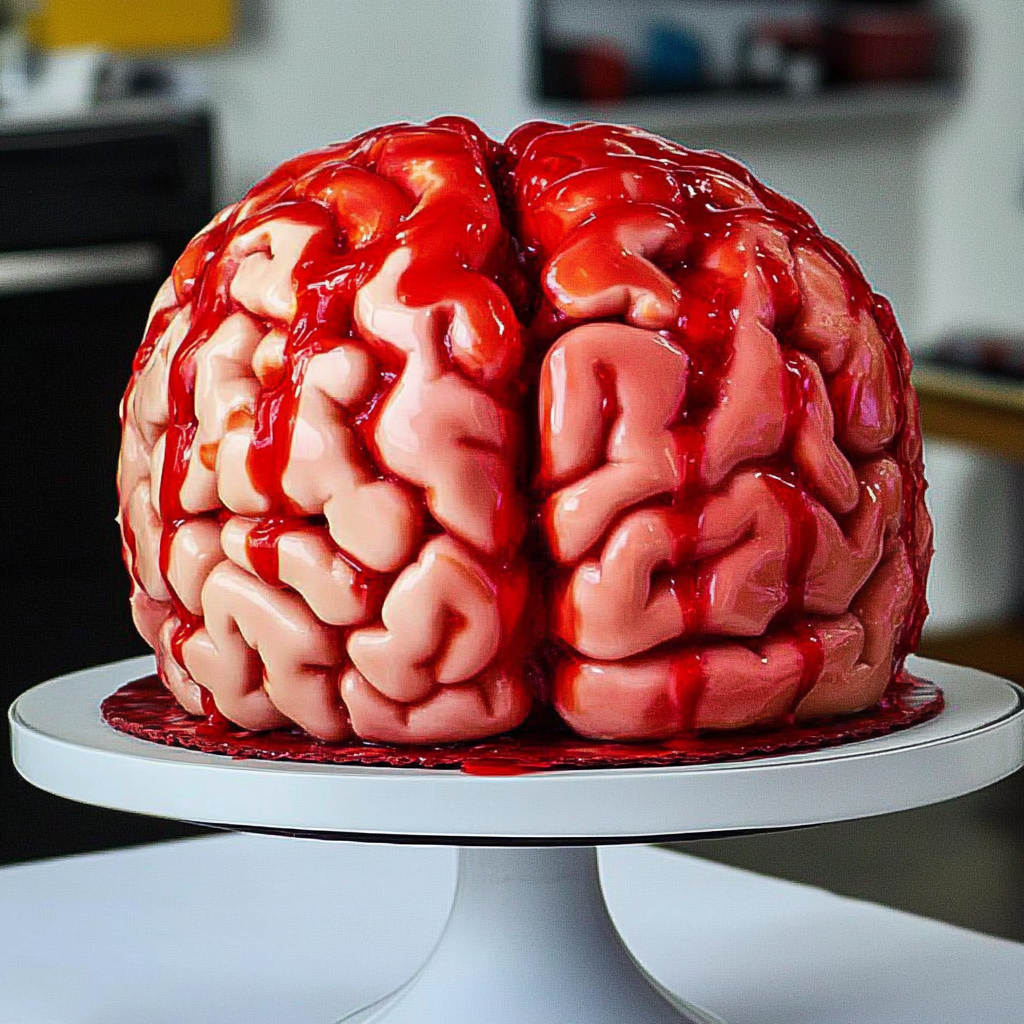
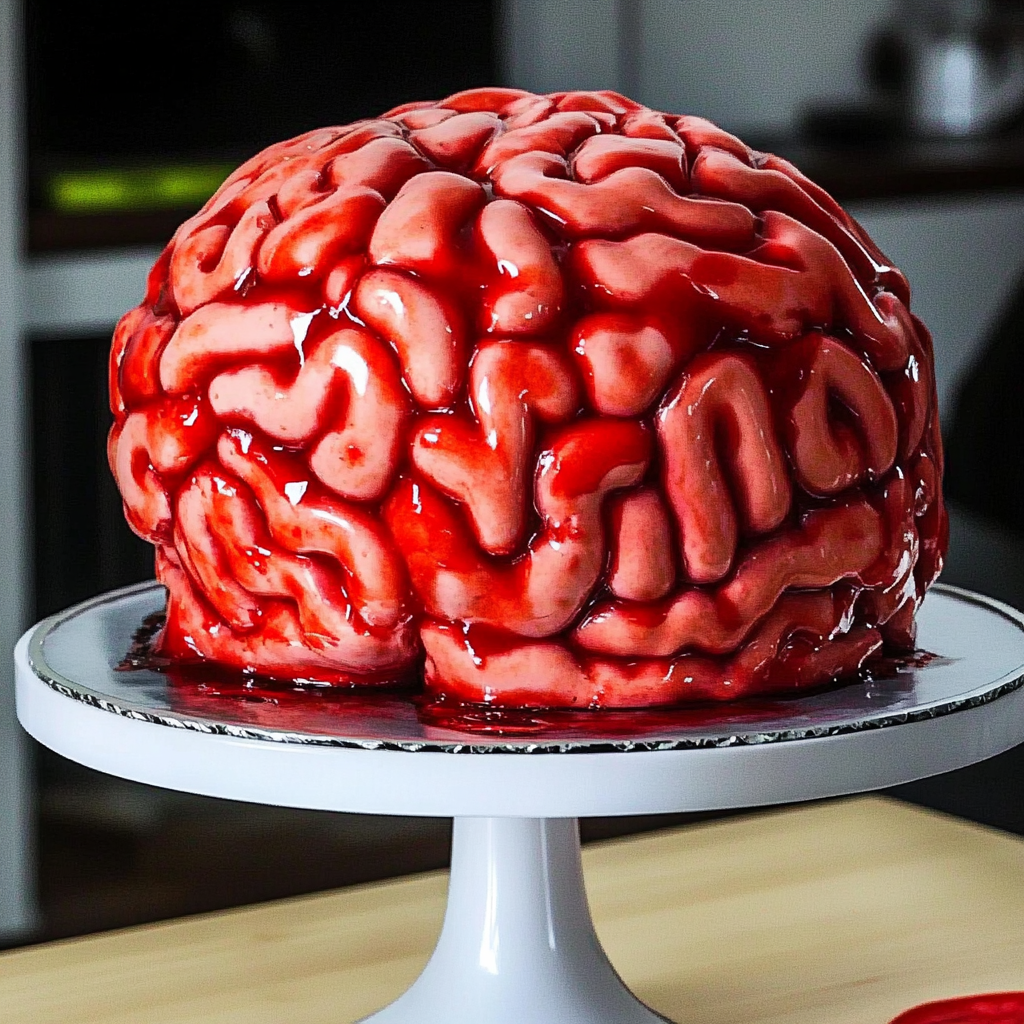
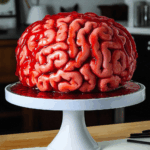
Brain Cake
If you’re looking for the perfect showstopper for your next Halloween gathering, look no further! This Brain Cake is a delightful treat that combines the rich flavor of red velvet with a fun and spooky twist. The layers of moist cake, pink buttercream, and raspberry jam blood make this cake not just delicious but also a fantastic centerpiece for your celebration. It’s such a favorite in my house because it combines creativity with taste, making it perfect for parties, family gatherings, or even just a fun baking project with the kids!
This cake is sure to impress anyone who sees and tastes it! Plus, it’s easy to prepare, so you won’t feel overwhelmed trying to pull off something special.
Why You’ll Love This Recipe
- Fun Presentation: The brain shape and vibrant colors make this cake an eye-catching addition to any table.
- Deliciously Moist: The red velvet layers are rich and tender, ensuring every bite is packed with flavor.
- Family-Friendly: Kids love the fun theme, and everyone enjoys the sweet raspberry jam paired with creamy buttercream.
- Customizable: You can easily adapt this recipe to fit different themes or dietary preferences.
- Simple Ingredients: With just a few basic ingredients, you can create something truly spectacular without a lot of fuss.
Ingredients You’ll Need
To make this fabulous Brain Cake, you’ll need some simple and wholesome ingredients that you might already have in your kitchen. Gather these up and get ready for some fun baking!
For the Cake
- 2 1/2 cups cake flour (300g)
- 2 Tbsp unsweetened cocoa powder, sifted (10g)
- 1 tsp baking soda (6g)
- 1/2 tsp fine salt (3g)
- 1/2 cup unsalted butter, room temperature (113g)
- 1 3/4 cups granulated sugar (350g)
- 2 large eggs, room temperature (112g)
- 1 1/4 cups buttermilk, room temperature (300g)
- 1/2 cup vegetable or canola oil (120g)
- 2 tsp vanilla extract or vanilla bean paste (8g)
- 1 tsp white vinegar (4g)
- 1 tsp red gel food coloring (or 1 Tbsp liquid food coloring)
For the Buttercream
- 1 1/2 cups unsalted butter, room temperature (339g)
- 1 cup full-fat cream cheese, room temperature (226g)
- 1 Tbsp vanilla extract or vanilla bean paste (12g)
- 1 tsp fine salt (6g)
- 7 cups powdered sugar (904g or a 2lb. bag)
- 3 Tbsp heavy whipping cream, room temperature (45g)
- Small squirt of red gel food coloring (or 1 tsp liquid food coloring)
For the Raspberry Jam Filling
- 1/2 cup seedless raspberry or strawberry jam
- 3 Tbsp water (45g)
Variations
One of the best things about this Brain Cake is how flexible the recipe is! Here are some fun variations to consider:
- Change the Color: Swap out red food coloring for another color like green or purple for a different theme!
- Different Fillings: Use other fruit jams like strawberry or blueberry for a unique twist on flavor.
- Add a Crunch: Mix in some crushed nuts or sprinkles into the buttercream for added texture.
- Vegan Option: Substitute eggs with flaxseed meal and use dairy-free alternatives for butter and cream cheese.
How to Make Brain Cake
Step 1: Prepare Your Cake Batter
Start by preheating your oven to 350°F (175°C). Grease and flour two round cake pans. In a large bowl, whisk together the dry ingredients: cake flour, cocoa powder, baking soda, and salt. Mixing these first helps ensure even distribution of leavening agents throughout your batter.
Step 2: Cream Butter and Sugar
In another bowl, beat together your unsalted butter and granulated sugar until it’s light and fluffy. This step is crucial as it incorporates air into your batter, giving you that lovely rise during baking. Add in your eggs one at a time while mixing well after each addition.
Step 3: Combine Wet Ingredients
Now it’s time to mix in your buttermilk, vegetable oil, vanilla extract, white vinegar, and red food coloring until everything is well combined. The vinegar reacts with the baking soda to help give our cake its moist texture while contributing to that delightful red velvet taste.
Step 4: Mix Dry and Wet Ingredients
Gradually add your dry ingredient mixture into the wet mixture. Stir gently until just combined. Be careful not to overmix; we want our cake light and fluffy!
Step 5: Bake Your Cakes
Pour equal amounts of batter into each prepared pan. Bake in your preheated oven for about 27 minutes or until a toothpick inserted into the center comes out clean. Let them cool completely before frosting!
Step 6: Make Your Buttercream
While your cakes are cooling down, let’s whip up that delicious pink buttercream! Beat together unsalted butter and cream cheese until smooth. Gradually add powdered sugar while mixing until fluffy. Then mix in heavy cream and add just enough red food coloring for that perfect pink hue.
Step 7: Assemble Your Cake
Once cooled completely, place one layer on your serving platter. Spread raspberry jam on top before adding a generous layer of pink buttercream over it. Add the second layer of cake on top and cover the entire cake with more buttercream. Use a spatula to create brain-like swirls if you’d like!
Now you’ve crafted an unforgettable Brain Cake that’s sure to thrill both eyes and taste buds alike! Enjoy every slice!
Pro Tips for Making Brain Cake
Creating a stunning Brain Cake is easier than you think! With a few helpful tips, you can impress your friends and family with this festive dessert.
- Use room temperature ingredients: Allowing your butter, eggs, and buttermilk to come to room temperature ensures that they blend smoothly into the batter, resulting in a lighter and fluffier cake.
- Sift your dry ingredients: Sifting the flour, cocoa powder, baking soda, and salt helps to aerate the mixture and break up any clumps. This creates a uniform batter that rises beautifully in the oven.
- Don’t overmix the batter: Mix just until combined after adding the dry ingredients to avoid developing too much gluten, which can lead to a dense cake. A light hand results in a tender crumb that will melt in your mouth!
- Let the cake cool completely: Before decorating, ensure your cakes are fully cooled. This prevents the buttercream from melting and sliding off, allowing for clean layers and neat decorations.
- Experiment with food coloring: If you’re feeling bold, try mixing different shades of red gel food coloring into your frosting for a more realistic blood effect. It adds visual interest and makes your cake even more eye-catching!
How to Serve Brain Cake
Presenting your Brain Cake can be as fun as making it! With some creative touches, you can elevate its spooky aesthetic while keeping it deliciously inviting.
Garnishes
- Fresh raspberries: These little bursts of tartness complement the sweetness of the cake and add a pop of color.
- Chocolate shavings: Sprinkling some dark chocolate shavings on top adds an elegant touch while providing a delightful contrast in flavor.
Side Dishes
- Spooky Cupcakes: Create mini versions of your Brain Cake using red velvet cupcakes topped with pink buttercream. They make for perfect finger food at any Halloween gathering!
- Pumpkin Soup: A comforting bowl of pumpkin soup pairs wonderfully with the rich flavors of red velvet cake. Its warmth tones down the sweetness while adding seasonal flair.
- Fruit Salad: A refreshing fruit salad with seasonal fruits like apples, pears, and pomegranate seeds balances out the richness of the cake and adds a crisp texture.
- Savory Cheese Platter: Offer an assortment of cheeses paired with crackers for guests who may prefer something salty alongside their sweet treats!
With these serving ideas and pro tips in mind, your Brain Cake will shine at any celebration! Enjoy creating this delightful dessert that’s sure to be a hit during Halloween or any fun occasion.
Make Ahead and Storage
This Brain Cake is not only a fun and spooky treat for Halloween, but it’s also perfect for meal prep! You can bake the cake layers ahead of time and store them to assemble your masterpiece later.
Storing Leftovers
- Allow the cake to cool completely before wrapping.
- Store leftover Brain Cake in an airtight container at room temperature for up to 3 days.
- If you prefer, refrigerate the cake to extend its freshness for up to a week.
Freezing
- Wrap each cake layer individually in plastic wrap and then in aluminum foil to prevent freezer burn.
- Freeze the layers for up to 3 months.
- To thaw, place the wrapped layers in the refrigerator overnight before decorating.
Reheating
- If you prefer a warm slice, preheat your oven to 350°F (175°C).
- Unwrap the cake and place it on a baking sheet.
- Heat for about 10-15 minutes or until warmed through.
FAQs
Here are some common questions that might pop up while making this delightful Brain Cake!
How do I make a Brain Cake without fondant?
You can create an impressive Brain Cake without fondant by using buttercream frosting shaped into brain-like contours. Just pipe the pink buttercream creatively on top of your red velvet layers!
What’s the best way to decorate my Brain Cake?
Decorate your Brain Cake with pink buttercream swirls and drizzle raspberry jam to mimic blood. Get creative with piping techniques; there are many tutorials available online!
Can I use other flavors besides red velvet for a Brain Cake?
Absolutely! While red velvet adds a festive touch, you can use any flavor of cake you love. Just remember that the color may affect the overall look if you’re aiming for that classic brain appearance.
What occasions is this Brain Cake suitable for?
The Brain Cake is perfect for Halloween parties, themed birthday celebrations, or even as a playful dessert at gatherings!
Final Thoughts
I hope you enjoy creating this wonderfully whimsical Brain Cake! It’s not just about the looks; it’s about bringing joy and laughter to those who indulge in it. Happy baking, and don’t forget to share your spooky creations with friends and family!
Brain Cake
Create a fun and spooky Brain Cake with moist red velvet layers and raspberry jam blood. Try this recipe for an unforgettable Halloween treat!
- Prep Time: 30 minutes
- Cook Time: 27 minutes
- Total Time: 57 minutes
- Yield: Approximately 12 servings 1x
- Category: Dessert
- Method: Baking
- Cuisine: American
Ingredients
- 2 1/2 cups cake flour (300g)
- 2 Tbsp unsweetened cocoa powder, sifted (10g)
- 1 tsp baking soda (6g)
- 1/2 tsp fine salt (3g)
- 1/2 cup unsalted butter, room temperature (113g)
- 1 3/4 cups granulated sugar (350g)
- 2 large eggs, room temperature (112g)
- 1 1/4 cups buttermilk, room temperature (300g)
- 1/2 cup vegetable or canola oil (120g)
- 2 tsp vanilla extract or vanilla bean paste (8g)
- 1 tsp white vinegar (4g)
- 1 tsp red gel food coloring (or 1 Tbsp liquid food coloring)
- 1 1/2 cups unsalted butter, room temperature (339g)
- 1 cup full-fat cream cheese, room temperature (226g)
- 1 Tbsp vanilla extract or vanilla bean paste (12g)
- 1 tsp fine salt (6g)
- 7 cups powdered sugar (904g or a 2lb. bag)
- 3 Tbsp heavy whipping cream, room temperature (45g)
- Small squirt of red gel food coloring (or 1 tsp liquid food coloring)
- 1/2 cup seedless raspberry or strawberry jam
- 3 Tbsp water (45g)
Instructions
- Preheat oven to 350°F (175°C) and grease two round cake pans.
- In a bowl, whisk together cake flour, cocoa powder, baking soda, and salt.
- In another bowl, beat unsalted butter and granulated sugar until fluffy. Add eggs one at a time.
- Mix in buttermilk, vegetable oil, vanilla extract, vinegar, and red food coloring until combined.
- Gradually add dry ingredients to wet mixture; mix gently until just combined.
- Divide batter between prepared pans and bake for 27 minutes or until a toothpick comes out clean.
- Allow cakes to cool completely before frosting with pink buttercream and filling with raspberry jam.
Nutrition
- Serving Size: 1 serving
- Calories: 410
- Sugar: 45g
- Sodium: 210mg
- Fat: 18g
- Saturated Fat: 8g
- Unsaturated Fat: 9g
- Trans Fat: 0g
- Carbohydrates: 60g
- Fiber: 1g
- Protein: 4g
- Cholesterol: 50mg