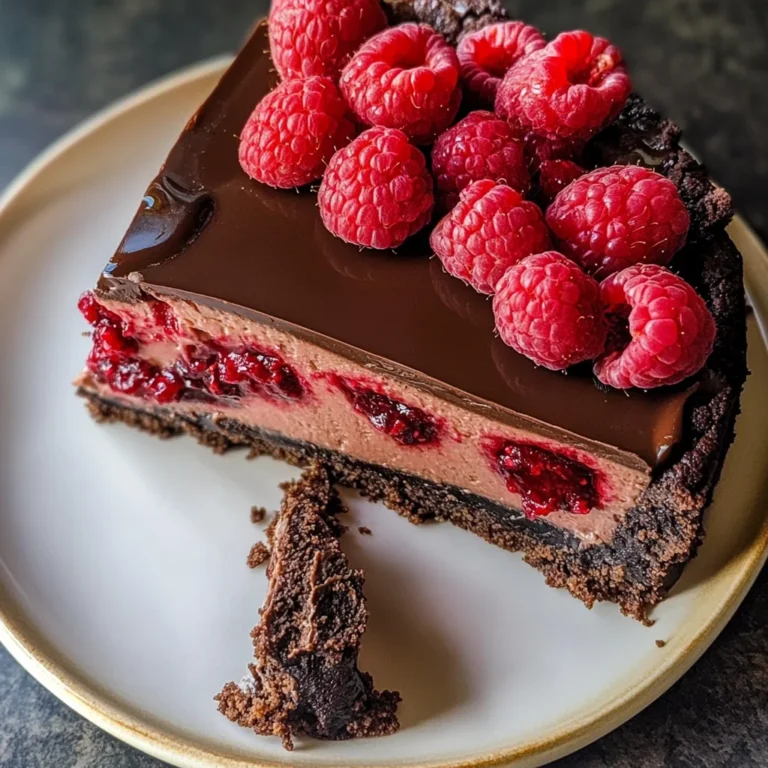
Raspberry Mousse Recipe
There’s something truly magical about the way food can bring us together, isn’t there? I’ve always been captivated by the elegance and simplicity of desserts, particularly when they evoke such vivid memories. When I think of Raspberry Mousse, it’s not just about indulging in a sweet treat; it’s an experience that wraps you in a comforting embrace, reminiscent of sun-drenched summer days spent at picnics with laughter echoing through the air. The vibrant, jewel-like raspberries, glistening like tiny droplets of joy, dance together with creamy textures to create a symphony of flavors that is both refreshing and utterly intoxicating. This Raspberry Mousse Recipe holds a special place in my heart because it transforms everyday ingredients into something truly extraordinary. It’s light yet rich, airy yet indulgent — a perfect balance that keeps you coming back for more.
As we dive into this delightful recipe, let me assure you that this is not just a dessert; it is an invitation to create moments filled with joy and connection. Picture yourself serving this luscious mousse at a gathering, watching your friends’ faces light up with delight as they savor each spoonful. It’s versatile too! Whether you’re celebrating an occasion or simply treating yourself after a long day, this Raspberry Mousse has got you covered. And trust me, every bite feels like a little celebration in itself. So let’s embark on this culinary journey together, shall we?
Raspberry Mousse Recipe: A Blissful Experience in Every Spoon
I couldn’t be more excited to share with you this Raspberry Mousse Recipe! This rich yet airy dessert is incredibly easy to whip up and will leave your taste buds dancing with delight. With each velvety spoonful, you’ll find yourself enveloped in waves of sweet-tart raspberry flavor that feels both sophisticated and comforting at the same time. Plus, the bright color adds such an inviting touch to any table setting!
Ingredients:
As we prepare to create our heavenly Raspberry Mousse, let’s take a moment to appreciate each ingredient’s role in this delightful concoction. Every component plays its part in crafting that perfect texture and flavor profile.
- 2 cups fresh raspberries (plus a few extra for garnish): Fresh raspberries are the stars of our show! Their vibrant color and tangy sweetness will infuse our mousse with flavor that’s simply irreplaceable. When selecting raspberries, look for plump berries that are deep red without any signs of mushiness or mold; freshness is key! If you’re feeling adventurous or want to mix things up a bit, consider using other berries like blackberries or strawberries as well — they can create delightful variations while keeping that beautiful berry essence.
- 1/4 cup granulated sugar: This humble sweetener serves as the bridge between tartness and sweetness in our mousse. It not only enhances the natural fruity flavors but also helps balance out the acidity from the raspberries. Granulated sugar dissolves beautifully when mixed with the raspberries during preparation, creating that luscious berry puree we crave. If you’d like to reduce sugar intake without sacrificing taste, feel free to use alternatives like agave syrup or honey — just remember these may alter the final consistency slightly.
- 1 tbsp lemon juice (optional): While this ingredient is optional, I highly recommend adding it if you’re looking to amp up that tartness! The zesty brightness from lemon juice cuts through the richness of the cream and elevates the raspberry flavor profile even further. Just imagine how blissfully refreshing that tartness will feel on your tongue! If you’re not keen on lemons or want something milder, consider using lime juice instead for a different twist.
- 1 cup heavy whipping cream (chilled): Here lies our cloud-like texture — heavy whipping cream! It’s absolutely paramount for achieving that airy fluffiness we adore in mousse recipes. Chilling it beforehand ensures that it whips up beautifully into soft peaks without turning grainy or watery; temperature makes all the difference here! When shopping for heavy cream, seek out options with at least 36% fat content for optimal results since higher fat means richer flavor and creamier texture.
- 2 tbsp powdered sugar: This fine sugar is used primarily for sweetening our whipped cream while helping it maintain its structure over time. Unlike granulated sugar which can weigh things down if not dissolved properly, powdered sugar incorporates seamlessly into whipped mixtures without any grittiness — giving us smoothness that’s essential for our mousse’s overall mouthfeel.
- 1/2 tsp vanilla extract: Ahh… vanilla — my favorite secret weapon! This aromatic extract adds depth and warmth to our mousse while complementing the tangy notes of raspberry beautifully. Look for pure vanilla extract rather than imitation products whenever possible; trust me on this one! A splash of quality vanilla elevates flavors from good to unforgettable.
- 1 tsp unflavored vegan gelatin powder (optional): For those who prefer their mousse with a firmer texture rather than purely airy softness, incorporating vegan gelatin can be your answer! This plant-based alternative allows us to achieve stability without compromising on taste or integrity of ingredients used here. Just ensure you follow instructions carefully when mixing since using too much gelatin might lead to unwanted chewiness!
- 2 tbsp cold water (if using vegan gelatin): Cold water serves as our vehicle for blooming gelatin powder before incorporating it into the mixture later on; this process ensures even distribution throughout ensuring no lumps remain—absolutely non-negotiable if aiming for silky-smooth results!
Equipment You’ll Need:
Before we dive into crafting our glorious Raspberry Mousse recipe together, let’s take stock of some essential tools that will make your cooking experience smoother and much more enjoyable! Trust me; having reliable equipment can significantly impact your success in any recipe.
- Mixing bowls – You’ll need various sizes but focus mainly on two medium-sized bowls to keep things organized while working through your steps. Glass bowls are great because they allow you to see what’s happening inside easily!
- Electric mixer – Having an electric mixer handy will save you time and energy when whipping cream into those luscious peaks we crave so much! A hand whisk could work too if you’re feeling brave but be prepared for quite a workout (and possibly sore arms!).
- Rubber spatula – This tool should become your best friend throughout this process; it’s perfect for folding whipped cream gently into raspberry puree without deflating all those lovely air bubbles we’ve worked hard to create!
- Fine mesh strainer – While optional depending on personal preference regarding raspberry seeds’ presence in final product—it might help achieve smoothest possible texture by straining out seeds after pureeing raspberries before mixing them with whipped cream.
Now that we have everything we need set aside let’s get started preparing our delicious Raspberry Mousse!
Preparing the Raspberry Mousse Recipe
Step 1: Create Your Berry Bliss
To begin crafting your masterpiece of a Raspberry Mousse Recipe, start by placing those gorgeous fresh raspberries into your mixing bowl along with granulated sugar (remember the 1/4 cup?). Using either a fork or potato masher (which does wonders!), gently mash them until they break down into a vibrant puree bursting with flavor — about 2 minutes should suffice here! If you’re feeling fancy and want an ultra-smooth finish later on (which I totally recommend), then pour this mixture through your fine mesh strainer now—this will catch all pesky seeds while leaving behind nothing but pure berry goodness.
Step 2: Add Zest & Cream
Next comes an exciting moment where we introduce lemon juice if desired—this bright addition brings another layer of complexity perfectly balancing sweetness within our dessert creation! Now let’s turn attention towards whipping some chilled heavy cream—grab your electric mixer set at medium speed until soft peaks form after roughly 3 minutes’ worth of mixing time passes by… Don’t forget—patience plays an important role here so don’t rush this step; over-whipping can lead us down paths we don’t want!
Step 3: Sweeten & Flavor
Once you’ve achieved those dreamy soft peaks indicating successful whipping success has occurred oh-so-beautifully now sprinkle powdered sugar over top alongside vanilla extract before continuing beating briefly just enough until fully combined—a mere minute should do nicely here!
Step 4: Fold It All Together
Now comes perhaps my favorite part where we combine everything harmoniously—the whipped cream blends effortlessly into raspberry puree bringing forth stunning textures reminiscent of fluffy clouds atop velvety skies making every spoonful feel profoundly satisfying… Make sure not rush through folding gently using rubber spatula allowing air pockets remain intact whilst ensuring thorough incorporation occurs throughout mixture yielding stunning visual appeal alongside unforgettable flavor experiences ahead!
And there you have it—the first steps towards creating an utterly divine dessert experience await as we continue exploring further stages soon enough… Stay tuned dear friend—we’re almost there together!
The Art of Creating Your Raspberry Mousse Recipe
Step 5: Blending the Ingredients to Create Magic
Now that we have our luscious raspberry purée ready, it’s time to bring everything together in a delightful marriage of flavors. In a spacious mixing bowl, take those vibrant, ruby-red raspberries that you’ve lovingly crushed and add in the granulated sugar. I always find this step particularly enchanting because it allows the sugar to draw out the natural juices from the berries, creating an utterly intoxicating mixture. Next, if you’re leaning towards that extra zing, drizzle in the lemon juice; this is not merely an optional step but rather a transformative one! The acidity brightens the flavor profile and adds a refreshing contrast to the sweetness of the raspberries.
Using a whisk or an immersion blender, blend these ingredients until they achieve a smooth consistency. You want to aim for an almost silky texture that feels luxurious on your tongue. Trust me on this: achieving that perfect balance between sweet and tart is crucial for a mousse that’s truly extraordinary. Once blended, set this aside for a moment while we focus on whipping up some heavenly cream.
Step 6: Whipping Cream – The Key to Lightness
Let’s dive into another fundamental aspect of our raspberry mousse recipe: whipping the cream! In a large mixing bowl—preferably metal or glass because they hold cold better—pour in your chilled heavy whipping cream. There’s something so satisfying about watching cream transform into soft peaks; it’s like magic happening right before your eyes! Begin whisking at medium speed until you see it start to thicken—a process that usually takes about 2 to 3 minutes.
Once you notice those soft peaks forming (when you lift the whisk out of the cream, it should hold its shape but still gently fold over), pause and add in your powdered sugar and vanilla extract. The powdered sugar not only sweetens but also helps stabilize the whipped cream, ensuring it holds its form perfectly when combined with our raspberry mixture. This is why using powdered sugar instead of granulated sugar is non-negotiable here; it dissolves more easily and gives you that airy texture we’re aiming for. Continue whisking until stiff peaks form—this means when you lift your whisk out, the peaks stand straight up without toppling over. Remember not to overwhip; if you do, it can turn grainy and eventually become butter!
Step 7: Folding with Care – The Gentle Touch
Now comes one of my favorite techniques: folding! This step is where we combine our two mixtures—the raspberry purée and the whipped cream—with great care. Start by taking about one-third of your whipped cream and gently folding it into the raspberry mixture using a spatula or large spoon. This initial addition lightens up the dense raspberry purée, making it easier to incorporate the rest of the whipped cream without deflating all that wonderful air we’ve just whipped in.
When folding, use a gentle motion—think of scooping from under and bringing it over rather than stirring vigorously. I’ve always been captivated by how this simple technique allows us to maintain volume while creating a harmonious blend of flavors and textures. Once fully combined with no streaks remaining, carefully fold in the remaining whipped cream until everything is beautifully swirled together in blush pink perfection. This stage is absolutely paramount because it determines how airy and cloud-like your mousse will be!
Step 8: Setting Up for Success – Chilling Time!
With our raspberry mousse now perfectly blended, it’s time for one last critical phase before serving: chilling! Transfer your mousse into individual serving glasses or bowls—this not only makes for an impressive presentation but also allows each guest their own delightfully portioned treat to enjoy. Cover them lightly with plastic wrap or simply place them in an airtight container if you’re making ahead.
Now here’s where patience comes into play; pop them into the refrigerator for at least 2 hours—or even better, overnight if time allows! Don’t rush this step; allowing your mousse to chill properly lets all those flavors meld together beautifully while giving it just enough time to firm up slightly without compromising its airy quality. When you finally serve your mousse after this waiting period (trust me; it’s worth every minute!), you’ll be greeted by a dessert that’s not only visually stunning but also boasts an unforgettable burst of fresh raspberry flavor with every bite.
Final Touches: Garnishing Your Masterpiece
Step 9: The Finishing Touches – Garnishing Like a Pro
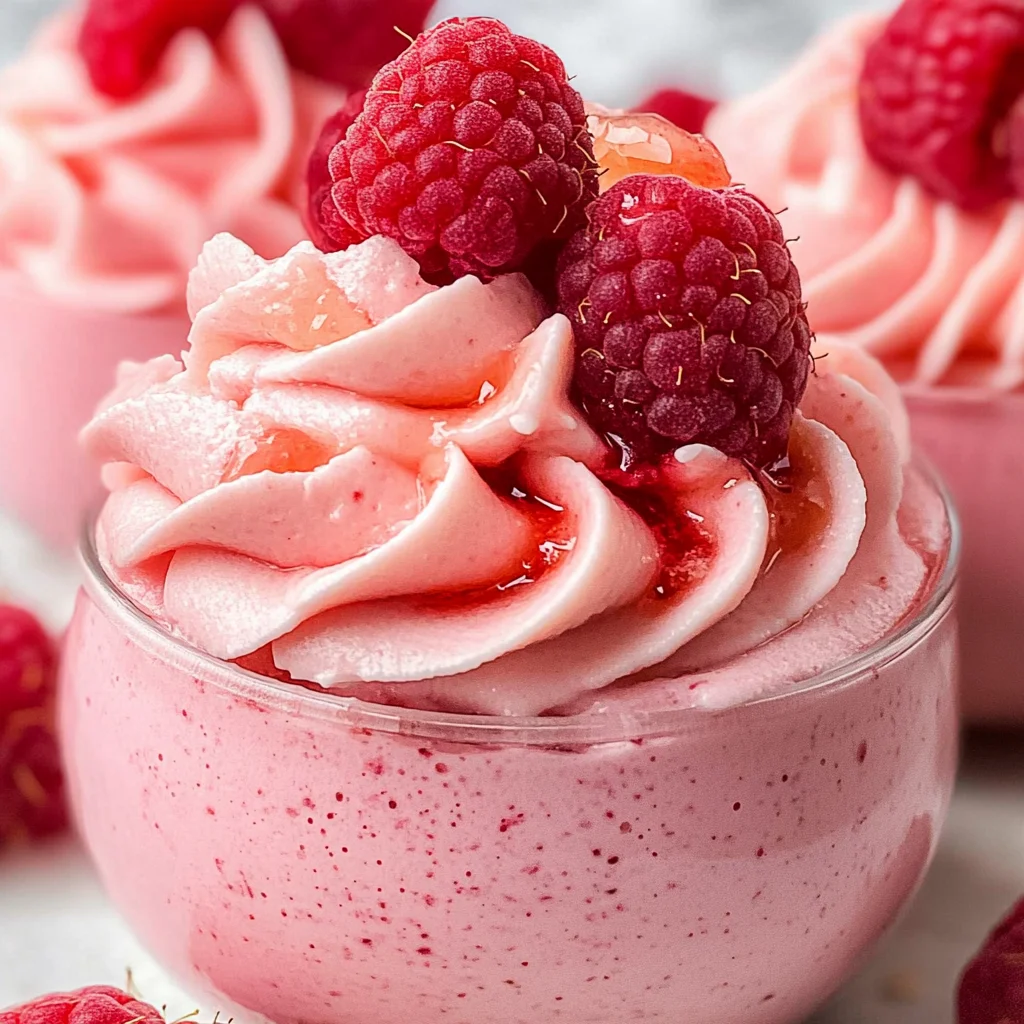
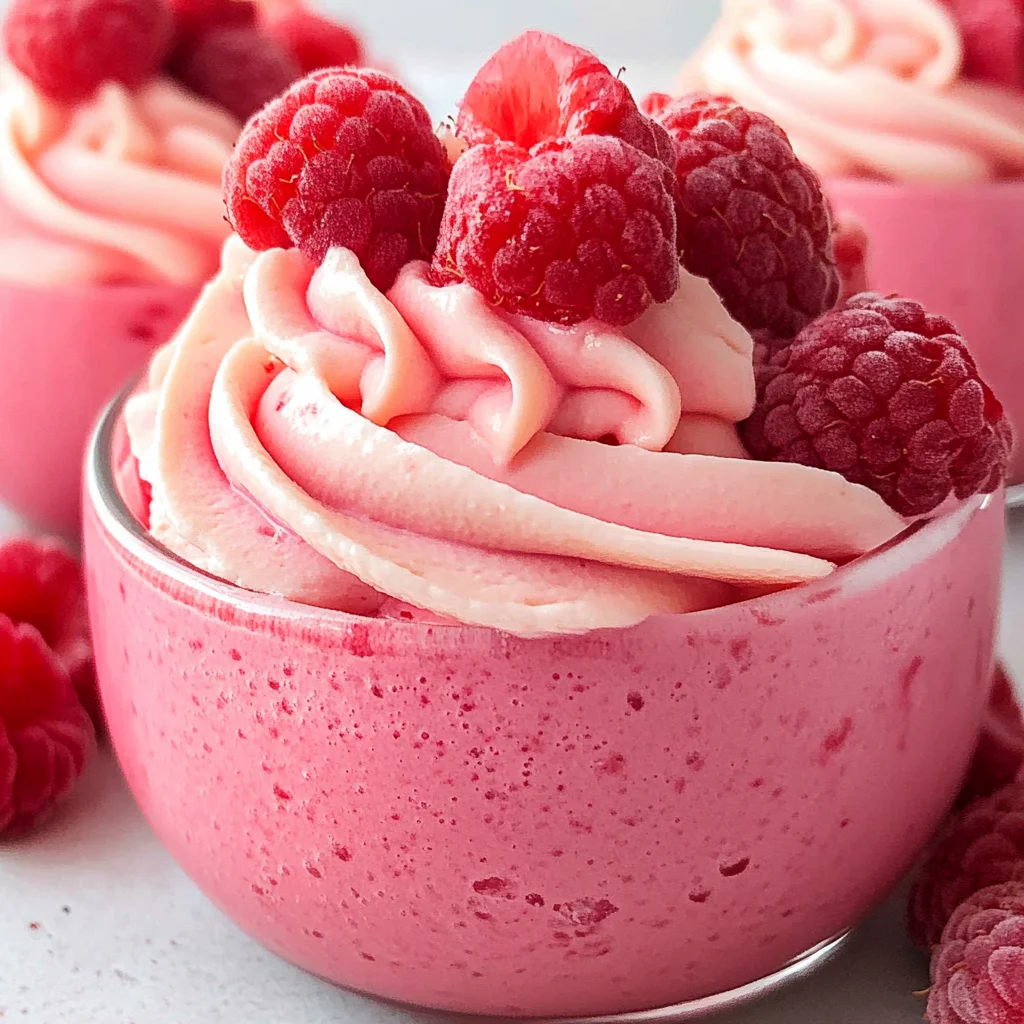
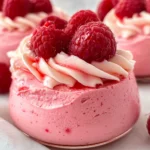
As you prepare to unveil your masterpiece, let’s talk about garnishing because presentation matters! Just before serving, take those extra raspberries you saved earlier—perhaps they’re still gleaming with freshness—and artfully place one or two on top of each mousse glass as though they’re jewels adorning a crown. Not only does this add an appealing visual element, but biting into those whole berries right alongside that creamy mousse creates an exquisite contrast in textures.
For added flair (and let’s be honest—who doesn’t love flair?), consider drizzling some vegan chocolate sauce or sprinkling finely grated dark chocolate over the top as well—this combination will elevate your dessert from delightful to indulgent! If you have some mint leaves lying around (fresh mint works wonders), toss one on each serving for color and freshness; it’s like nature’s confetti celebrating your creation! Finally, take a step back and admire what you’ve made—a Raspberry Mousse Recipe that’s not just easy but profoundly satisfying in every way.
And there you have it! Your journey through crafting this elegant Raspberry Mousse has culminated in something truly special—perfectly light yet rich enough to feel like pure luxury on your palate. Enjoy sharing this treat with friends or savoring it all by yourself; either way, I promise you’ll feel immense joy knowing you’ve created something extraordinary from scratch! Happy indulging!
Storage and Enjoyment Tips for Your Raspberry Mousse Recipe
Now that your Raspberry Mousse is beautifully whipped and ready to dazzle, let’s talk about how to store any leftovers—if there are any! I promise you, this dessert is so incredibly delightful that it may vanish in a flash, but just in case you’re lucky enough to have some left over, I want you to savor every last bite. Proper storage not only keeps the mousse fresh but also ensures that each spoonful retains its luscious flavor and creamy texture.
Storing Leftover Raspberry Mousse Recipe
To keep your delightful creation fresh, transfer the raspberry mousse into an airtight container. This is crucial because it prevents the delicate flavors from mingling with other odors in your refrigerator, ensuring that each time you dip in for a taste, it’s like taking a fresh bite. When stored properly in the fridge, your mousse will stay delicious for up to three days. Now, here’s a pro tip: if you want to maintain that cloud-like texture, you can place a slice of bread in the container—it helps absorb excess moisture! After chilling, the mousse may firm up slightly, but trust me when I say that it will still deliver that utterly intoxicating raspberry flavor with every creamy mouthful. When you’re ready to enjoy more of this sweet indulgence, simply serve it chilled straight from the fridge or allow it to sit at room temperature for a few minutes for an even silkier experience.
Freezing Raspberry Mousse for Later
If you find yourself with extra portions (or you’re just planning ahead—smart move!), freezing your raspberry mousse is an excellent option! To freeze properly, spoon the mousse into individual serving containers or a large freezer-safe bowl, making sure to leave some space at the top since it will expand as it freezes. Cover tightly with plastic wrap or a lid to prevent freezer burn and pop it into the freezer where it can stay good for up to a month. The beauty of this method lies in the convenience; when you’re craving something sweet on a busy day or want to impress unexpected guests without whipping up something new, simply take out your frozen mousse and let it thaw overnight in the refrigerator. You’ll find that while the texture may change slightly—becoming a bit denser—it still remains deliciously raspberry-flavored and creamy!
Dessert
Raspberry Mousse
Indulge in the delightful experience of making this Raspberry Mousse Recipe, a dessert that perfectly balances lightness and richness. With vibrant fresh raspberries at the forefront, this easy-to-make mousse transforms simple ingredients into an elegant treat.
- Prep Time: 15 minutes
- Cook Time: N/A
- Total Time: 0 hours
- Yield: Serves 4
- Category: Dessert
- Method: No-bake
- Cuisine: Dessert
Ingredients
- 2 cups fresh raspberries (plus extra for garnish)
- 1/4 cup granulated sugar
- 1 tbsp lemon juice (optional)
- 1 cup heavy whipping cream (chilled)
- 2 tbsp powdered sugar
- 1/2 tsp vanilla extract
- 1 tsp unflavored plant-based gelling agent (optional)
- 2 tbsp cold water (if using gelling agent)
Instructions
- In a mixing bowl, mash the fresh raspberries with granulated sugar until pureed. If desired, strain to remove seeds.
- If using lemon juice, add it to the raspberry puree and mix well.
- In another bowl, whip the chilled heavy cream until soft peaks form. Gently fold in powdered sugar and vanilla extract.
- Carefully combine the whipped cream with the raspberry puree until no streaks remain.
- If using a gelling agent, bloom it in cold water as per package instructions and incorporate it into the mousse mixture.
- Spoon the mousse into serving dishes and refrigerate for at least 2 hours until set.
- Garnish with additional raspberries before serving.
Nutrition
- Serving Size: 1/2 cup (125g)
- Calories: 180
- Sugar: 15g
- Sodium: 30mg
- Fat: 12g
- Saturated Fat: 7g
- Unsaturated Fat: 5g
- Trans Fat: 0g
- Carbohydrates: 17g
- Fiber: 3g
- Protein: 2g
- Cholesterol: 40mg