Reuben Sandwiches
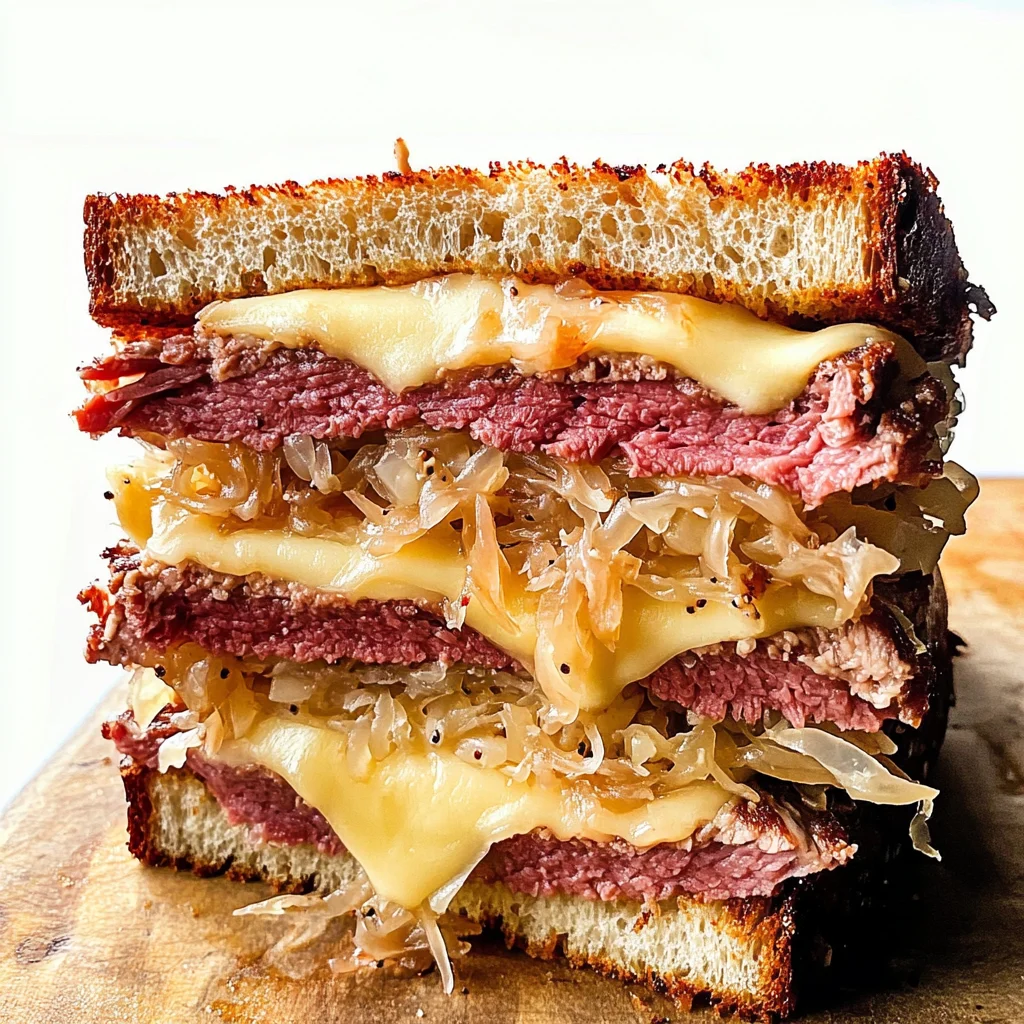
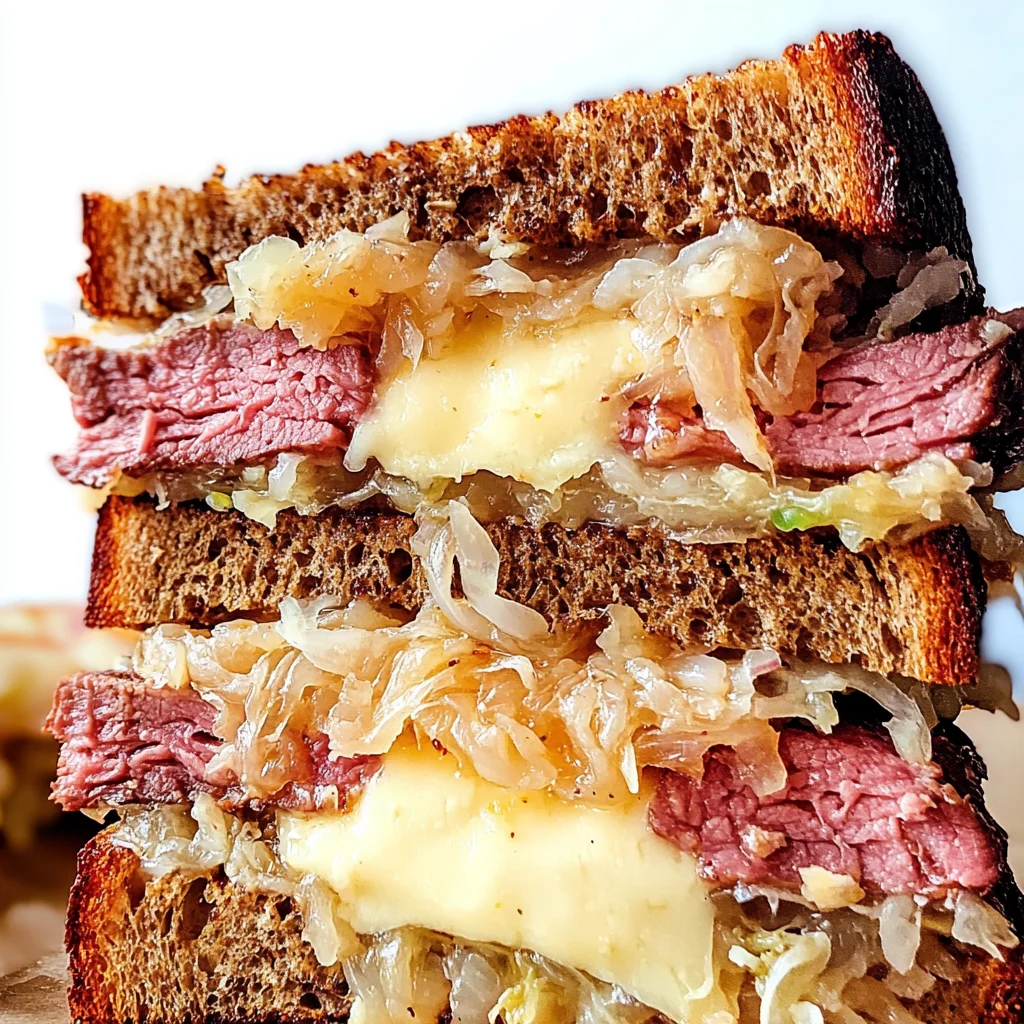
There’s something truly magical about the experience of crafting a Reuben Sandwich at home. It’s not just about throwing ingredients together; it’s a beautiful symphony of flavors that dances across your palate and warms your heart. Picture this: the moment you take that first bite, the crunchy, buttery rye bread gives way to layers of juicy, salty corned beef, tangy sauerkraut, and gooey Swiss cheese—all of which are perfectly melded together by a zesty Russian dressing. The textures and tastes mingle in such an exquisite way that it transports you to a cozy kitchen filled with laughter and the heavenly aroma of grilled sandwiches sizzling on the stove. Trust me when I say that there’s no need to dine out when you can whip up this beloved classic right in your own kitchen.
The Reuben Sandwich is more than just a meal; it’s woven into the fabric of comfort food traditions across America. Originating from deli counters in New York, this sandwich has evolved over time but always retains its core essence—a bold mix of flavors that satisfy both hunger and nostalgia. It’s perfect for everything from casual lunch gatherings to game nights with friends, or even a cozy dinner at home when you just want something hearty yet simple to prepare. When I share this recipe with you, I’m inviting you into my kitchen where we can celebrate food as a universal language that brings people together.
Reuben Sandwiches: The Ultimate Comfort Food Delight
Welcome to my kitchen! Today, I’m thrilled to share one of my all-time favorite recipes: the Reuben Sandwich. This dish is not only incredibly satisfying but also remarkably easy to put together—perfect for those busy weeknights or when you’re simply craving something deliciously comforting. The combination of flavors and textures makes each bite a delightful experience you won’t soon forget. So let’s dive into this culinary adventure together!
Ingredients:
Before we embark on our sandwich-making journey, let’s gather our ingredients! Each component plays an essential role in achieving that perfect balance of flavors and textures.
- 3 tablespoons butter, softened. Butter is an essential ingredient for creating that golden-brown crust on your sandwich—it’s what makes every bite feel like a warm hug! Make sure your butter is softened to room temperature; this ensures it spreads easily on your bread without tearing it apart. If you’re feeling adventurous, consider using herb-infused butter for an extra layer of flavor!
- 1 pound corned beef (thin deli slices or homemade). Corned beef is truly the star of our show here—its saltiness and richness bring depth to the sandwich. If you’re using deli slices, look for high-quality cuts that have been freshly sliced; they should be tender and flavorful. If making homemade corned beef, remember to slice it thinly against the grain for maximum tenderness.
- 8 slices rye bread. Rye bread offers a unique flavor profile that’s slightly tangy and earthy—perfect for complementing the rich fillings within our sandwich. Look for fresh loaves from your local bakery if possible; they tend to have better texture and taste than pre-packaged options.
- 8 slices Swiss cheese, preferably Swiss Gruyere. This cheese melts beautifully and adds that creamy texture we crave in any great sandwich. Gruyere has a slightly nutty flavor that enhances the overall taste—so don’t skimp on quality! If you’re in a pinch, feel free to use good-quality regular Swiss cheese.
- 1 1/4 cups sauerkraut, well drained. Sauerkraut introduces a tangy crunch that balances out the richness of the corned beef and cheese perfectly. Be sure to drain it well before adding it to your sandwich—you don’t want excess moisture making your bread soggy!
- Butter for grilling (in addition to what’s already listed). More butter? Absolutely! This extra layer helps ensure each side gets beautifully crisped during grilling—don’t skip this step!
- Vegetable oil or light olive oil for grilling. Using oil along with butter allows for higher cooking temperatures without burning while contributing additional flavor.
- 3/4 cup mayonnaise. Mayonnaise serves as our base for the luscious Russian dressing we’ll create later—it adds creaminess and helps bind our flavors together seamlessly.
- 1/4 cup sour cream (may sub more mayo). Sour cream introduces an extra zing while balancing out richness—if you’re looking for something lighter, feel free to increase the mayo instead.
- 1/4 cup ketchup. Yes, ketchup! It adds sweetness and depth while enhancing flavor complexity in our dressing—trust me on this one!
- 1 tablespoon grated onion (I use my zester). Freshly grated onion lends pungency that elevates your dressing significantly; don’t underestimate its impact!
- 1 tablespoon prepared horseradish. This ingredient brings in heat without overpowering—it gives our dressing a delightful kick!
- 1 tablespoon Frank’s Original RedHot Sauce. A touch of hot sauce adds subtle spice—a layer that makes every bite even more exciting!
- 1 teaspoon Worcestershire sauce. This condiment is crucial—it deepens flavor with its umami notes while tying everything together beautifully.
- 1/2 teaspoon EACH ground mustard & sweet paprika (may sub smoked or regular paprika). Mustard provides sharpness while paprika lends warmth; they’re both essential players in creating our signature dressing!
- 1/4 teaspoon EACH garlic powder, salt & pepper. These seasonings round out our dressing by enhancing all other flavors present—you cannot skip these essentials!
Equipment You’ll Need:
Having the right tools can make all the difference in achieving culinary success! While these items may not be ingredients, they play vital roles in bringing our Reuben Sandwiches to life with ease.
- Large mixing bowl – A sturdy bowl helps keep everything contained while we whisk up our delicious Russian dressing without any mess or fuss.
- Nonstick skillet or cast iron skillet – These pans are fantastic partners for grilling sandwiches evenly without sticking—a non-negotiable when crafting perfectly toasted Reubens!
- Spatula – A good spatula will allow you to flip those sandwiches with grace while ensuring every side gets equally golden brown.
- Parchment paper or wax paper – Laying out your sandwiches before grilling keeps everything organized; trust me—it’ll save you time during assembly!
Now that we’ve gathered all our essentials, let’s dive into preparing these delectable Reuben Sandwiches!
Step 1: Whisking Together Our Irresistible Dressing
Start by combining all those incredible dressing ingredients—the mayonnaise, sour cream, ketchup, grated onion, horseradish, hot sauce, Worcestershire sauce, mustard, paprika, garlic powder, salt & pepper—in a large mixing bowl. Using a whisk or fork (whatever feels comfortable!), blend everything until smooth and creamy! You want every ingredient fully incorporated because this dressing acts as both glue and flavor enhancer within your sandwich—it’s absolutely paramount not to rush through this step! Taste-test along the way; adjust seasoning if needed—it should sing with flavor!
Step 2: Prepping Your Corned Beef
If you’re using deli-sliced corned beef or homemade versions stored away lovingly in your fridge—the key here is warming it up gently before assembly so it melds beautifully within those layers once grilled together! You can microwave it briefly or heat it on low over stovetop until just warmed through but not hot enough to dry out—keep covered with foil afterward so moisture stays locked in waiting patiently until needed! This step might seem minor but believe me when I say keeping things warm ensures optimal melty goodness later on once assembled!
Step 3: Building Your Flavorful Layers
Now comes one of my favorite parts—the assembly process! Start by spreading parchment paper over flat surfaces where you’ll lay down all those glorious bread slices like canvas awaiting their masterpiece toppings! Spread half tablespoon butter onto one side each slice then flip them over so we can generously slather Russian dressing across their other sides—you’ll want ample amounts here since every bite deserves maximum flavor explosion! On four pieces (the ones destined as bottoms), add corned beef first followed closely by drained sauerkraut followed finally two slices Swiss cheese per sandwich atop—that final touch is crucial because melted cheesy goodness binds everything inside nicely once grilled up too!
Step 4: Grilling Those Toasted Beauties
Melt one tablespoon butter combined with one tablespoon oil over medium-low heat inside nonstick skillet—you need just enough fat sizzling away so nothing sticks during grilling process ahead next few minutes ahead! Add one-two sandwiches at time depending upon size skillet—you’ll want cover them lightly while cooking allowing steam build-up which helps melt cheese quickly while browning bread simultaneously—give them about three-four minutes until bottom turns golden brown along edges turning crisp then gently flip using spatula ensuring no filling spills out accidentally—return lid back again cooking remaining side another three-four minutes too till perfection achieved throughout entirety each morsel within that gorgeous crust outside too!
As we continue preparing these Reuben Sandwiches step-by-step without rushing through any element involved—we’re bound create memories around table sharing delicious bites alongside friends family alike—all coming together savoring magic happening within every mouthful enjoyed together forever cherished long after devoured completely!
Step 5: The Art of Grilling – Creating Golden Crunch
This step is where the magic happens! Now, let’s dive into grilling our Reuben Sandwiches. In a nonstick or cast iron skillet, melt 1 tablespoon of butter alongside 1 tablespoon of oil over medium-low heat. This combination not only provides a beautiful golden color but also enhances the flavor of the bread, creating that irresistible crunch we all crave in a sandwich. Trust me on this: using both butter and oil ensures the perfect balance; the butter gives richness while the oil raises the smoke point, preventing burning. Once your pan is ready and sizzling gently—around that sweet spot of medium-low heat—place one to two sandwiches in the skillet, depending on how comfortably they fit without crowding each other.
Covering the pan during cooking is crucial because it helps trap heat and steam, allowing the cheese to melt beautifully within those layers of savory goodness. As you grill, keep an eye on the bread; you’re looking for that stunning golden hue, which usually takes about 3-4 minutes. Remember, patience is key here! If you rush it, you might end up with unevenly toasted bread or cheese that hasn’t melted properly—a tragedy we want to avoid at all costs. Don’t hesitate to adjust your heat if the bread browns too quickly before the cheese has melted; you want a harmonious blend of crispy exterior and gooey interior.
Step 6: Flipping for Perfection – The Cheese Melting Moment
Now comes one of my favorite parts—the flip! Carefully lift a corner of your sandwich with a spatula to peek at that glorious golden crust you’ve achieved. If it’s just right, gently flip each sandwich over and continue cooking for another 3-4 minutes until both sides are perfectly toasted and the cheese has melted into a divine ooey-gooey state. This flipping technique not only allows for even cooking but also creates that delightful crunch we adore when biting into a sandwich.
As you grill this side, pay attention to any sounds—the sizzling should be rich and inviting rather than popping or burning. If things start to smell too charred or look darker than golden brown, don’t hesitate to reduce your heat further; it’s better to take your time than rush this process. I promise you, there’s nothing worse than a burnt crust overshadowing all those wonderful flavors inside! And remember: once you’ve flipped them over, resist the urge to press down heavily on the sandwiches—it can squeeze out all those delicious juices that we’ve worked so hard to layer in.
Step 7: The Grande Finale – Achieving Melty Bliss
After successfully flipping your sandwiches and letting them cook until both sides are perfectly crisped up and golden brown—oh, what an aroma fills your kitchen!—it’s time for some final touches before devouring these masterpieces. Once they’ve reached that pinnacle of perfection (you’ll know because they’ll be beautifully browned and you’ll see gooey cheese peeking out), carefully remove them from the skillet onto a cutting board.
Before diving in headfirst into this comforting delight, let them rest for just a minute or two. This resting period is non-negotiable! It allows the cheese to firm up slightly so when you slice into these Reuben Sandwiches—oh my goodness—you won’t have hot cheese spilling out everywhere like an uncontainable lava flow. Instead, you’ll enjoy each slice revealing well-defined layers of corned beef, sauerkraut, Swiss cheese, and that creamy dressing—an absolute joy for both eyes and taste buds alike!
Step 8: Slicing & Serving – Presentation Matters
Now comes the fun part—slicing those beautiful sandwiches! With a sharp knife in hand (a serrated knife works wonders here), cut each sandwich diagonally from corner to corner. This not only gives it that classic deli-style presentation but also makes for easier eating (and let’s be honest—it looks so much more appealing on Instagram!). As you make each cut, see how everything holds together beautifully; it’s such a rewarding sight after all your hard work!
To serve these Reuben Sandwiches like they were crafted right in your favorite little diner around the corner, plate them alongside some crunchy dill pickles or crispy potato chips for contrast. A light side of tangy coleslaw or even creamy tomato basil soup can elevate this meal further while adding some freshness against those rich flavors. Whatever you choose as sides, don’t forget to drizzle any extra Russian dressing over each sandwich or serve it on the side for dipping—because just like life itself, dipping is always encouraged!
Conclusion:
As we wrap up this delightful journey through crafting homemade Reuben Sandwiches, I can’t help but feel a rush of excitement! This recipe encapsulates everything that makes cooking so incredibly rewarding—the dance of flavors between the tangy sauerkraut and spicy dressing paired with the rich melty cheese truly elevates it beyond a mere meal into something profoundly satisfying. Each bite is not just food; it’s an experience wrapped in memories and warmth.
I wholeheartedly believe that this recipe is a must-try not just for its taste but for the joy it brings during its preparation. The aroma wafting through your kitchen as you grill those sandwiches will have everyone flocking to see what magic is happening! Whether you’re hosting friends for a game night or simply treating yourself after a long day, these Reuben Sandwiches shine bright in any setting. Imagine pulling them from the skillet, golden brown and oozing with melted cheese—it’s enough to make anyone’s heart skip a beat!
For serving suggestions, allow your imagination to soar! Picture enjoying one alongside a crisp side salad bursting with seasonal veggies for a refreshing contrast. For an afternoon pick-me-up, why not pair it with some zesty potato chips? Or take it up a notch by enjoying your sandwich with a comforting bowl of tomato basil soup; the creamy warmth complements the flavors beautifully! The possibilities are endless—and that’s what makes this dish so special.
Feeling adventurous? This recipe is wonderfully adaptable! You might swap out rye bread for whole grain or even gluten-free options if needed—after all, inclusivity makes any gathering even sweeter! Add pickles or different cheeses like pepper jack for an extra kick; or perhaps substitute turkey if you’re inclined toward lighter meats! I’m genuinely excited to hear how you make this recipe your own—so please share your experiences and variations with me! Let’s connect over our mutual love for cooking; together we can weave new stories into our kitchens.
Reuben Sandwiches
Crafting a Reuben Sandwich at home is a delightful culinary adventure that brings together a symphony of flavors and textures. Imagine sinking your teeth into perfectly grilled rye bread, giving way to layers of juicy corned beef, tangy sauerkraut, and gooey Swiss cheese, all brought together by a zesty homemade dressing. This beloved sandwich has roots in American deli culture but can easily be recreated in your kitchen for lunch gatherings, cozy dinners, or casual game nights.
- Prep Time: 15 minutes
- Cook Time: 10 minutes
- Total Time: 25 minutes
- Yield: Serves 4
- Category: Main
- Method: Grilling
- Cuisine: American
Ingredients
- 3 tablespoons softened butter
- 1 pound corned beef (thinly sliced)
- 8 slices rye bread
- 8 slices Swiss cheese
- 1¼ cups drained sauerkraut
- ¾ cup mayonnaise
- ¼ cup sour cream (or more mayo)
- ¼ cup ketchup
- 1 tablespoon grated onion
- 1 tablespoon prepared horseradish
- 1 tablespoon hot sauce
- 1 teaspoon Worcestershire sauce
- 1 teaspoon ground mustard
- 1 teaspoon sweet paprika
- ½ teaspoon garlic powder
- ¼ teaspoon salt
- ¼ teaspoon pepper
- Vegetable oil or light olive oil for grilling
Instructions
- In a large mixing bowl, whisk together mayonnaise, sour cream, ketchup, grated onion, horseradish, hot sauce, Worcestershire sauce, mustard, paprika, garlic powder, salt & pepper until smooth.
- Warm corned beef gently to enhance flavor and tenderness.
- Spread softened butter on one side of each slice of rye bread. On the other side of half the slices, generously spread the prepared dressing.
- Layer corned beef on four slices of bread followed by sauerkraut and Swiss cheese. Top with remaining slices.
- Heat a nonstick skillet over medium-low heat with additional butter and oil. Grill the sandwiches until golden brown on both sides and cheese melts (about 3-4 minutes per side).
- Let rest for a minute before slicing diagonally and serving.
Nutrition
- Serving Size: 1 sandwich (250g)
- Calories: 670
- Sugar: 6g
- Sodium: 1420mg
- Fat: 38g
- Saturated Fat: 14g
- Unsaturated Fat: 22g
- Trans Fat: 0g
- Carbohydrates: 52g
- Fiber: 4g
- Protein: 32g
- Cholesterol: 85mg