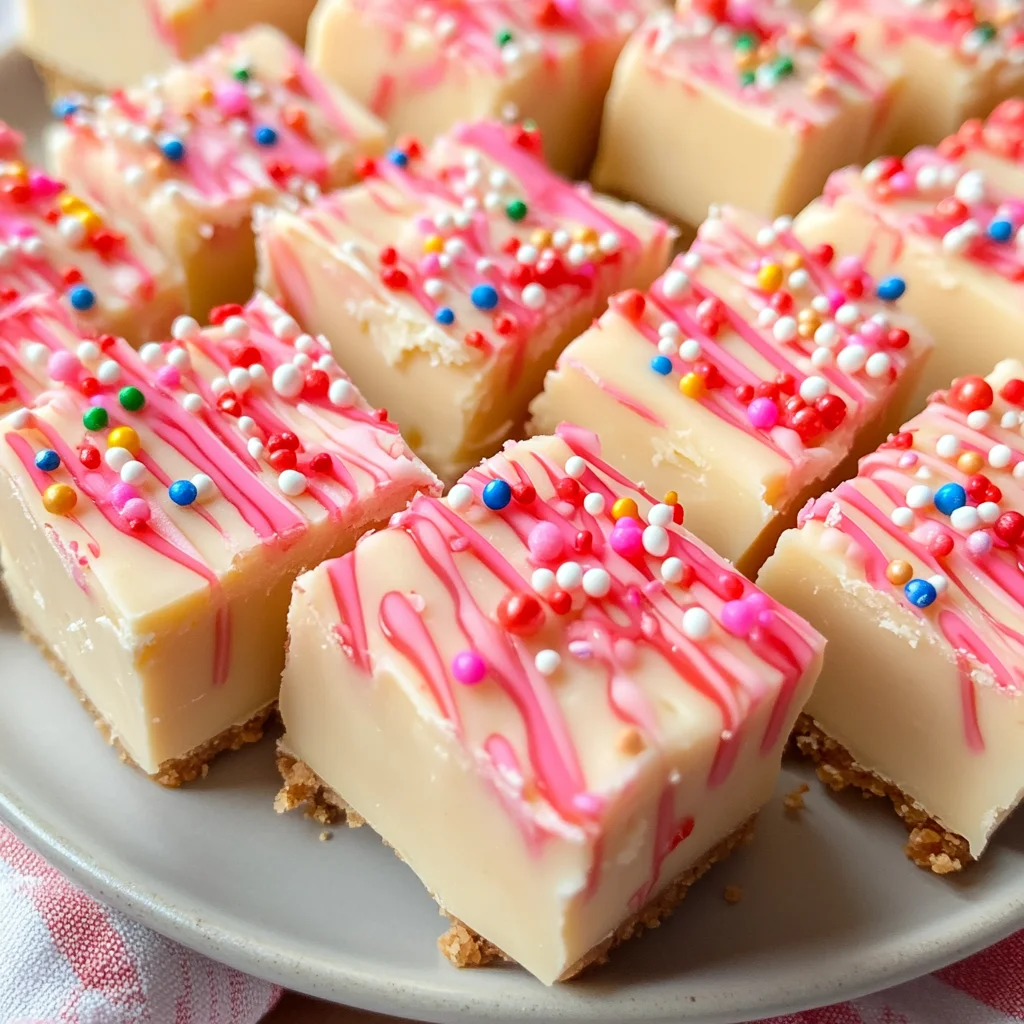
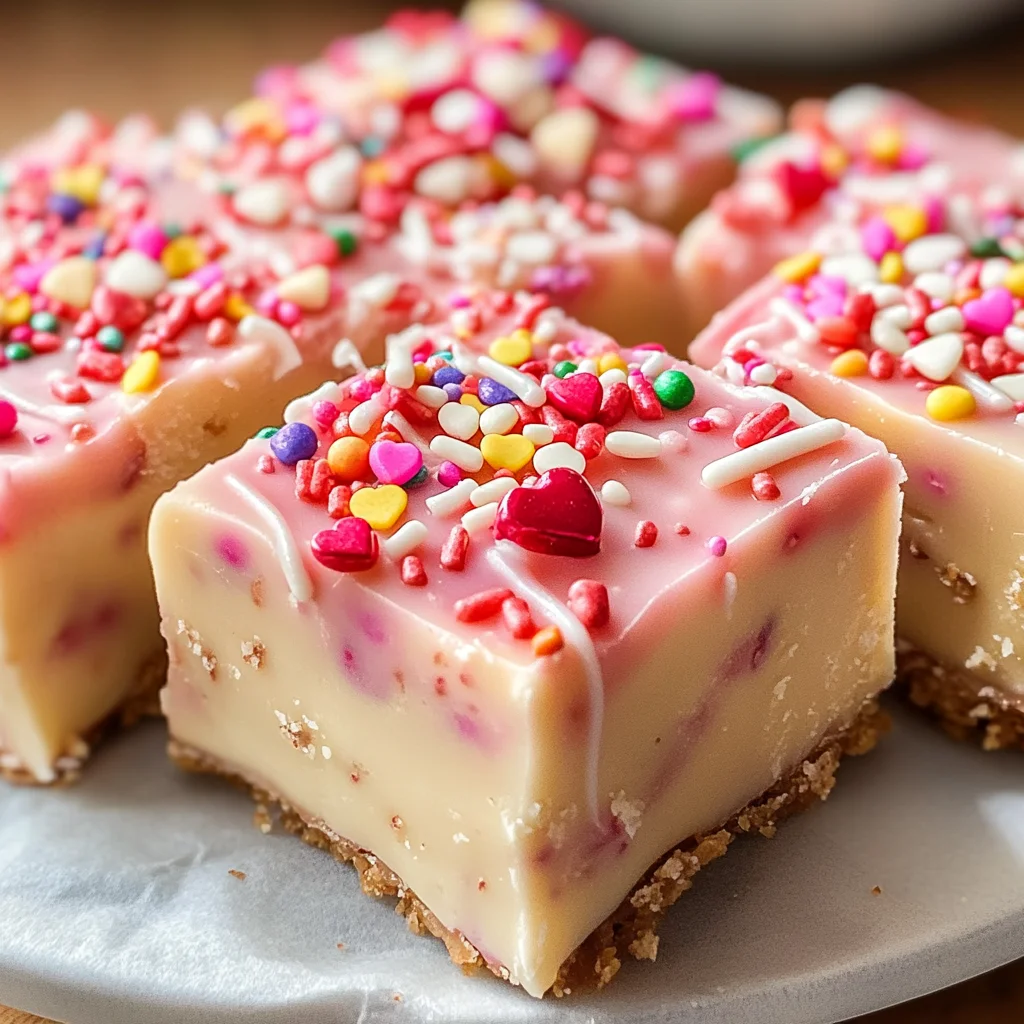
Valentine’s Day Sugar Cookie Fudge Recipe
There’s something profoundly special about cooking, isn’t there? It’s not just about the ingredients or the technique; it’s about the love and warmth you pour into every dish. As I think about Valentine’s Day, I’m reminded of how food has a unique way of bringing people together, transforming ordinary moments into cherished memories. Today, I’m excited to share with you my Valentine’s Day Sugar Cookie Fudge Recipe! This delightful treat is more than just a dessert; it’s an experience that captures the essence of celebration and affection. The creamy sweetness of white chocolate combined with the nostalgic flavor of sugar cookies creates a symphony of flavors that dances on your palate and warms your heart. Trust me when I say, this fudge will be the star of your holiday gathering!
Imagine unwrapping a beautifully decorated piece of fudge, adorned with colorful sprinkles that reflect the joy of love and friendship. The moment you take a bite, you’ll feel the smooth, melt-in-your-mouth texture that’s both rich and comforting. It’s like a warm hug on a chilly evening—one that reminds you of all those sweet moments spent with loved ones around the table. This Valentine’s Day Sugar Cookie Fudge Recipe is incredibly easy to make and requires no baking at all, making it perfect for anyone looking to whip up something special without spending hours in the kitchen. So grab your favorite mixing bowl and let’s embark on this delicious journey together!
Valentine’s Day Sugar Cookie Fudge Recipe: A Delightful Treat for Your Loved Ones
This recipe is effortlessly charming and perfect for sharing with friends and family. Whether you’re hosting a cozy get-together or simply want to brighten someone’s day, this fudge is sure to impress.
Ingredients:
As we dive into the world of sweets, let’s gather our ingredients for this enchanting concoction. Each element plays a vital role in creating that rich flavor profile we’re aiming for.
- 3 cups white chocolate chips. These little gems are the foundation of our fudge! White chocolate chips bring an undeniable sweetness and creaminess that blends beautifully with other flavors. When selecting them, look for high-quality brands that list cocoa butter as one of their primary ingredients—this ensures you’re getting that luscious mouthfeel. If you’re feeling adventurous or have dietary restrictions, you can also substitute part or all of these with vegan white chocolate chips available in many health food stores.
- 1 cup sugar cookie mix (I used Betty Crocker). This mix adds a delightful touch of nostalgia reminiscent of baking sugar cookies during childhood holidays. It brings both flavor and texture to our fudge while simplifying our process significantly! Feel free to use any brand you prefer; just ensure it’s a classic sugar cookie mix for the best results.
- 1 can (14 ounces) sweetened condensed milk. This ingredient is absolutely paramount in achieving that smooth, creamy consistency that melts in your mouth! Sweetened condensed milk adds richness and helps bind everything together beautifully. Make sure you choose full-fat milk; low-fat options won’t yield the same luxurious texture.
- 1 tablespoon unsalted butter. Butter may seem like a small player but trust me—it’s crucial! The unsalted variety allows us to control the overall saltiness in our fudge while providing richness and depth to its flavor profile.
- 1 teaspoon pure vanilla extract. Ahh, vanilla—the secret ingredient that elevates almost any dessert! Its warm aroma complements the sweetness perfectly and enriches every bite with an inviting complexity that will have your guests asking for seconds.
- 1/2 cup holiday sprinkles (divided). Sprinkles are like confetti for desserts! They not only add visual appeal but also bring a playful crunch to each bite. You can choose any color scheme or theme that resonates with your celebrations—after all, it’s Valentine’s Day!
- 3-4 ounces of almond bark or white chocolate. This will be used later for drizzling over our fudge—adding an extra layer of elegance! Almond bark melts beautifully and sets nicely; however, if you’re opting for white chocolate instead, ensure it’s tempered properly so it doesn’t seize up when cooled.
Equipment You’ll Need:
Before we get started on crafting this delectable fudge, let me share some essential tools you’ll need along the way. Having the right equipment makes everything smoother—and trust me; it can turn an average cooking experience into something truly enjoyable!
- Double boiler – This tool is perfect for gently melting chocolate without scorching it—a technique that’s absolutely crucial here! If you don’t have one, don’t fret; simply place a heatproof bowl over simmering water as a makeshift double boiler.
- 9×9-inch baking dish – A must-have for setting your fudge perfectly! This size allows enough room to spread out your mixture evenly while ensuring an ideal thickness once set.
- Parchment paper – Line your baking dish with parchment paper to prevent sticking—removing the fudge later becomes effortless when you’ve got this handy!
- Spatula – A good spatula is essential for scraping down bowls and ensuring every last bit of deliciousness ends up in your fudge instead of stuck on the sides!
With our ingredients gathered and equipment ready at hand, we’re all set to embark on this delicious adventure together!
Preparing the Valentine’s Day Sugar Cookie Fudge Recipe
Step 1: Melting Magic
To begin this enchanting creation, we start by utilizing our trusty double boiler—a method that gently melts our chocolate without fear of burning it. In your medium-sized double boiler saucepan, combine those glorious white chocolate chips along with the sugar cookie mix, sweetened condensed milk, and butter. Now here’s where patience pays off: heat everything slowly over medium heat while stirring continuously until you’ve reached a smooth melting point where all components harmonize beautifully—a glossy liquid gold waiting to transform into something magical! Don’t rush this step; allowing it to melt gradually helps preserve its silky texture.
Step 2: Stirring Up Sweetness
Once everything has melted into one harmonious blend (about 2-3 minutes should do), keep stirring as you remove it from heat—but leave it resting atop your double boiler to maintain warmth while we add even more flavor goodness! Here comes my favorite part: add in that fragrant pure vanilla extract along with half of those vibrant holiday sprinkles you’ve prepared earlier! Mixing them thoroughly ensures they’re evenly distributed throughout our fudgy masterpiece—this step infuses each bite with delightful bursts of color as well as texture!
Step 3: Prepping Our Fudgy Canvas
Now it’s time to prepare our baking dish so we can transfer this luscious mixture into its new home! Line your 9×9-inch baking dish with parchment paper—don’t skip this step because trust me; nobody wants sticky fudge clinging stubbornly to their pan when they could be enjoying every last morsel instead! Once lined securely within its boundaries (and generously sprayed with cooking spray), carefully pour in our delectable fudge mixture from above while smoothing it out evenly across every corner using either an offset spatula or simply another spatula if that’s what you’ve got handy!
Step 4: Sprinkle With Love
Ahh yes—the final touch before chilling begins! Gently press those remaining holiday sprinkles into the top surface so they nestle beautifully within their fudgy abode—it enhances both aesthetics and taste alike! Now we embrace patience once more as we slide this beauty into our refrigerator where it’ll chill for about 2–3 hours until fully hardened—a crucial waiting period because skipping it could lead us straight down heartbreak lane when attempting cuts later on…so stay strong!
As we continue through these steps together, you’ll find not only satisfaction but excitement building as each phase unfolds into something delightful—stay tuned because soon enough we’ll drizzle on some almond bark perfection before indulging ourselves entirely!
Step 5: Prepare Your Baking Dish with Love
Now that we’ve combined our rich, creamy mixture of white chocolate goodness, it’s time to prepare our baking dish. Trust me when I say this step is absolutely paramount for achieving that perfect fudge texture! Grab a 9×9-inch baking dish and line it with parchment paper—think of this as giving your fudge a cozy little home. The parchment will not only help you lift out the fudge once it’s set but will also ensure that every piece comes out beautifully without sticking. It’s like a warm hug for your sweet creation!
Next, give the parchment a light spray with cooking spray; this creates an additional non-stick barrier, ensuring that your fudge doesn’t cling to the edges. I recommend using a non-stick spray that’s neutral in flavor to avoid any uninvited flavor surprises. Be generous but don’t overdo it—just enough so it glistens lightly should do the trick. Once you have your dish ready and waiting, you can now transfer our luscious fudge mixture into its new home!
Step 6: Pouring in the Fudge Magic
With your baking dish prepared, it’s time to pour in that heavenly mixture we just crafted. Gently transfer all of the melted fudge into the lined dish, using a spatula to scrape out every last bit—this stuff is liquid gold! As you spread the mixture evenly across the bottom of the dish, take a moment to revel in its glossy sheen and intoxicating aroma. This is where you can let your creativity shine through: use the spatula to smooth out the top until it’s nice and level. This smooth surface isn’t just for looks; it allows for even cooling, which is crucial for achieving that perfect texture when we slice into it later.
While pouring and smoothing, be sure not to rush this step. Take your time enjoying the process and imagining how delightful these treats will be for your loved ones. You’ll want to make sure that no air bubbles are trapped within—if they are, they could mar your beautiful finish later on! So gently tap the pan against your countertop a couple of times; this helps release any stubborn air pockets that might be hiding underneath.
Step 7: Sprinkle Some Holiday Cheer
Now comes one of my favorite parts—decorating our fudge masterpiece! Remember those vibrant holiday sprinkles we set aside earlier? It’s time to bring them back into play! With careful hands, sprinkle them generously over the top of your fudge while it’s still soft and warm. Not only does this add a delightful pop of color, but it also brings texture and that joyful crunch when you take a bite later on!
As you scatter those delightful sprinkles like confetti over a celebration cake, think about how each sprinkle represents joy and sweetness—perfect for Valentine’s Day or any occasion where love is in the air! Press them down lightly into the surface just enough so they adhere well as we chill our fudge in the refrigerator next. This step may seem minor, but I promise you it adds an extra special touch that elevates this treat from ordinary to extraordinary.
Step 8: The Chilling Transformation
Here comes the moment where patience truly pays off—it’s time to let our fudge chill in the refrigerator! Place your prepared dish in the fridge and allow it to set for about 2-3 hours; yes, I know waiting can be tough when all you want is to dive into those scrumptious squares right away! But trust me on this; chilling is crucial because it allows all those decadent flavors to meld together beautifully while firming up our fudge into perfect slices.
During this chilly interlude, something magical happens—the heat dissipates, allowing sugar crystals to settle and creating that wonderfully creamy yet solid structure we’re aiming for. You might find yourself peeking into the fridge periodically (I know I do!) just imagining how delicious they’ll taste once ready. As you’re waiting, feel free to catch up on some Valentine’s Day planning or perhaps indulge in another sweet treat—after all, balance is key!
When you check back after a couple of hours, look for a slight firmness around the edges and an inviting glossy sheen across its surface; these are telltale signs that your fudge has set perfectly. If you’re feeling adventurous (or impatient), give one corner a gentle poke—you should feel resistance without any stickiness indicating it’s ready for slicing!
Conclusion:
As we wrap up our journey through this delightful Valentine’s Day Sugar Cookie Fudge Recipe, I hope you’re feeling as excited as I am! Each step was infused with love and creativity, transforming simple ingredients into something truly extraordinary. The combination of sweet white chocolate with the playful crunch of holiday sprinkles creates a symphony of flavors that dances on your palate while evoking warm memories of cherished moments spent together with loved ones. Allow yourself to relish in this experience; after all, cooking is about more than just food—it’s about connection.
This recipe isn’t just a treat; it’s an invitation to create joy and spread love. Whether you’re making it for a gathering or simply treating yourself on a cozy evening at home, every bite embodies happiness and warmth. Imagine pulling out a square of this luscious fudge from your fridge—it glistens under soft light while tempting you with its creamy texture and festive pops of color. It’s perfect for sharing at parties or gifting to friends who could use some sweetness in their lives.
For serving suggestions, consider pairing these delightful squares with a steaming cup of herbal tea or rich hot cocoa on chilly evenings. Picture savoring one alongside an afternoon coffee break; the sweetness harmonizes beautifully with aromatic notes of espresso! Or perhaps serve them as part of an indulgent dessert platter featuring fresh berries and velvety whipped cream—each element enhancing the next like an exquisite performance on stage.
Feeling adventurous? This recipe is wonderfully adaptable! How about adding crushed peppermint candies for a refreshing twist? Or perhaps infusing some citrus zest into the mix? Cinnamon would add warmth and spice—the possibilities are endless! I encourage you to experiment and make this recipe uniquely yours because there’s no wrong way to create something special in your kitchen. So roll up your sleeves, gather those ingredients once more, share your creations online or with friends—let’s connect through food in ways that are personal and heartfelt!
Valentine’s Day Sugar Cookie Fudge

Indulge in the joy of celebration with this Valentine’s Day Sugar Cookie Fudge Recipe. This delightful no-bake treat perfectly captures the essence of love and nostalgia, combining creamy white chocolate with the nostalgic taste of sugar cookies. Adorned with colorful sprinkles, each square is a visual feast that invites you to share happiness and warmth with loved ones. Ideal for gifting or enjoying during cozy gatherings, this fudge is incredibly easy to make—perfect for bakers of any skill level. So grab your mixing bowl and let’s create a sweet masterpiece that will make every moment special.
- Prep Time: 15 minutes
- Cook Time: None
- Total Time: 0 hours
- Yield: About 16 servings 1x
- Category: Dessert
- Method: No-Bake
- Cuisine: American
Ingredients
- 3 cups white chocolate chips
- 1 cup sugar cookie mix
- 1 can (14 ounces) sweetened condensed milk
- 1 tablespoon unsalted butter
- 1 teaspoon pure vanilla extract
- 1/2 cup holiday sprinkles (divided)
- 3–4 ounces almond bark or additional white chocolate for drizzling
Instructions
- Melt white chocolate chips in a double boiler along with sugar cookie mix, sweetened condensed milk, and butter until smooth.
- Remove from heat and stir in vanilla extract and half of the holiday sprinkles.
- Line a 9×9-inch baking dish with parchment paper, spray lightly with cooking spray, and pour in the fudge mixture. Smooth it out evenly.
- Press remaining sprinkles into the top of the fudge.
- Chill in the refrigerator for 2-3 hours until set.
- Melt almond bark (or additional white chocolate), drizzle over the chilled fudge, and let it set before cutting into squares.
Nutrition
- Serving Size: 1 piece (40g)
- Calories: 150
- Sugar: 20g
- Sodium: 30mg
- Fat: 7g
- Saturated Fat: 4g
- Unsaturated Fat: 2g
- Trans Fat: 0g
- Carbohydrates: 22g
- Fiber: <1g
- Protein: 1g
- Cholesterol: 10mg