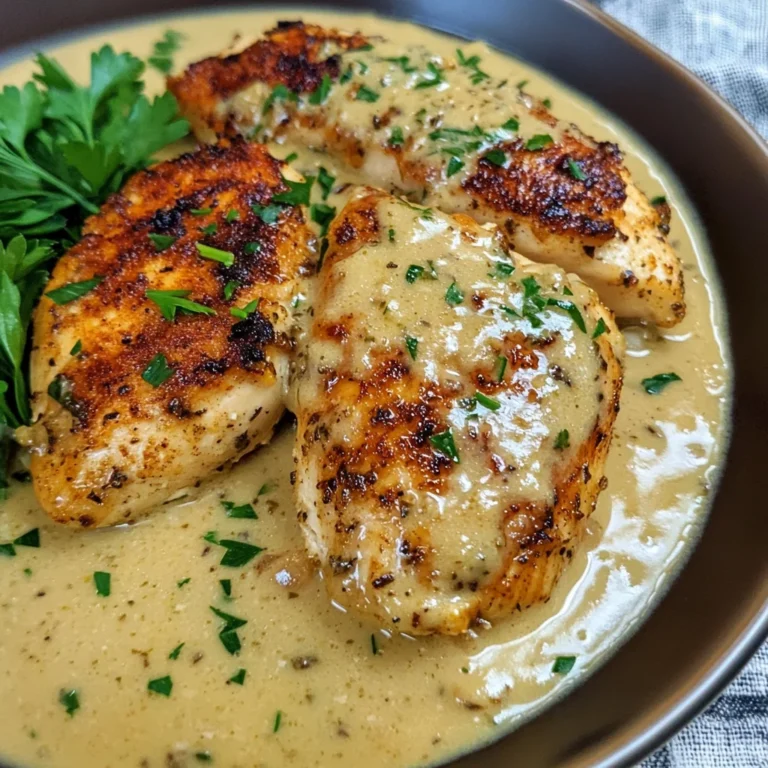
Crispy Spicy Buttermilk Fried Chicken
There’s something utterly magical about the experience of cooking, isn’t there? It’s not just about putting together a meal; it’s a beautiful tapestry woven from memories, flavors, and that indescribable sense of comfort. When I think about Crispy Spicy Buttermilk Fried Chicken, my heart swells with affection for those warm afternoons spent in the kitchen, creating something truly special. It’s the kind of dish that transforms an ordinary dinner into an event—each bite brimming with a symphony of textures and flavors that dance on your palate. The golden crust crackles invitingly before giving way to succulent chicken, perfectly seasoned with a zesty kick that keeps you reaching for more. Trust me when I say this isn’t just food; it’s a flavorful masterpiece that will linger in your memory long after the last bite.
As we embark on this culinary journey together, I want you to understand why each step is so vital to achieving that perfect balance of crunch and spice. This recipe has been passed down through generations, evolving yet remaining true to its roots. It’s a celebration of flavor that pays homage to traditions while allowing room for creativity. Whether you’re hosting friends for game night or preparing a comforting family meal, this Crispy Spicy Buttermilk Fried Chicken is sure to impress. Are you ready to dive in and whip up some magic in your own kitchen? Let’s get started!
Crispy Spicy Buttermilk Fried Chicken: A Flavorful Adventure Awaits
Let’s talk about the star of our show: Crispy Spicy Buttermilk Fried Chicken! This recipe is not just about frying chicken; it’s an exploration of rich flavors and textures that create comfort food at its finest. The buttermilk marinade tenderizes the chicken while infusing it with flavor, making every bite an explosion of savory goodness. Plus, who can resist that crispy coating? It’s like biting into pure joy. I promise you will find yourself craving this chicken again and again—so let’s gather our ingredients and make some delicious memories!
Ingredients:
As we step into the heart of this recipe, let’s take a moment to appreciate each ingredient we’ll be using. Each one plays a crucial role in crafting our crispy delight, ensuring every bite is bursting with flavor.
- 2 cups buttermilk. This liquid gold is essential for marinating our chicken—it helps tenderize the meat while adding moisture and richness. Buttermilk has a slight acidity that breaks down proteins in the chicken, resulting in tender pieces that are juicy inside yet crispy outside. Look for full-fat buttermilk if possible, as it provides a creamier texture that clings beautifully to the chicken during frying.
- 1 tablespoon hot sauce. A dash of heat elevates our dish from ordinary to extraordinary! The hot sauce not only brings spice but also adds depth to the flavor profile without overwhelming the palate. You can adjust the amount based on your heat preference—trust me; it makes all the difference in creating those mouthwatering layers of flavor.
- 1 teaspoon garlic powder. Garlic powder is a fantastic way to add robust flavor without any fuss! It melds seamlessly into our buttermilk mixture, imparting an aromatic warmth that complements both the chicken and spices beautifully. Fresh garlic can be used as well; however, powder ensures even distribution throughout.
- 1 teaspoon onion powder. Much like garlic powder, onion powder brings depth and sweetness without introducing any raw onion crunchiness—keeping everything perfectly smooth! It enhances savory notes while harmonizing with other spices in our batter.
- 1 teaspoon smoked paprika. This ingredient adds not just color but also a wonderful smoky flavor reminiscent of summer barbecues! Smoked paprika creates a beautiful balance between sweetness and spice, amplifying every element in our dish—don’t skip this one!
- 1 teaspoon ground black pepper. A classic seasoning that enhances every dish it touches! Black pepper adds warmth and complexity while accentuating other flavors present in our marinade and crust.
- 1 tablespoon kosher salt. Salt plays several roles here: it seasons our chicken thoroughly and helps draw moisture out during marination—resulting in improved texture and juiciness! Kosher salt is preferred due to its larger crystals which dissolve nicely into marinades.
- 2 cups all-purpose flour. This is crucial for creating that delightful crispy coating we all crave! All-purpose flour gives structure while allowing other flavors to shine through; if you’re feeling adventurous, consider adding some whole wheat flour for added nuttiness!
- 1 tablespoon cornstarch. This magical ingredient works wonders by enhancing crispiness during frying—it absorbs moisture while forming an extra-crunchy outer layer! If you don’t have cornstarch on hand, potato starch can be used as an excellent substitute.
- 1 teaspoon cayenne pepper. Here comes the fiery kick! Cayenne pepper elevates heat levels significantly while pairing perfectly with other spices listed here—adjust according to your taste buds’ desires!
- 1 teaspoon dried oregano & 1 teaspoon dried thyme each. These herbs bring fragrant earthiness into play—a delightful contrast against spiciness! Dried oregano pairs beautifully with fried foods due its slightly bitter notes balancing richness; meanwhile thyme introduces subtle floral hints enhancing overall complexity.
- 1 teaspoon ground cumin & 1 teaspoon chili powder each. These spices give depth reminiscent of various global cuisines—their unique combinations transport you straight into culinary adventures! Cumin adds warmth while chili powder rounds things off with smokiness.
- 2 pounds chicken pieces (drumsticks, thighs, wings, etc.). Choose cuts based on personal preferences—I love drumsticks for their meatiness! Ensure uniformity among sizes so they cook evenly throughout—this helps achieve consistent results in texture!
- Vegetable oil (for frying). Opt for oils with high smoke points such as canola or peanut oil—both are ideal choices due their ability withstand high temperatures ensuring optimal fry without burning!
Equipment You’ll Need:
Before we dive into cooking up this masterpiece, let’s chat briefly about some essential tools you’ll want by your side during this flavorful adventure! Having the right equipment makes all the difference—not only does it streamline your process but also ensures success at every turn.
- Large mixing bowl: A spacious bowl allows ample room for marinating those glorious chicken pieces without spilling over; look for one made from sturdy material like glass or stainless steel which won’t absorb flavors over time.
- Whisk: This trusty tool will help blend ingredients thoroughly when mixing marinades and dry ingredients together—ensuring consistent seasoning throughout each bite!
- Wire rack: Essential for draining excess oil post-frying allowing air circulation around fried pieces preventing sogginess while maintaining crispness—we want crunchy goodness here!
- Deep skillet or Dutch oven: Choose one large enough hold sufficient oil comfortably deep enough fry multiple pieces simultaneously without overcrowding—a must-have when aiming perfection!
- Meat thermometer: An invaluable tool ensuring perfectly cooked chicken every time—you’ll know when doneness achieved minimizing risk undercooked meals leading disappointment at table!
Now that we’ve gathered everything needed let’s embrace excitement as we prepare step-by-step towards creating our Crispy Spicy Buttermilk Fried Chicken masterpiece!
Step 1: Marinate Your Chicken
The first step in crafting your Crispy Spicy Buttermilk Fried Chicken begins with marination—the most critical phase where flavors meld beautifully together! Pour 2 cups of buttermilk into a large mixing bowl—it should feel creamy yet silky smooth against fingers as you whisk vigorously until combined thoroughly alongside hot sauce followed by garlic powder, onion powder smoked paprika ground black pepper along with kosher salt creating luscious mixture enveloping each piece once added later on – trust me no shortcuts here will yield same results!
Once everything is mixed well—you’ll notice how inviting aroma wafts through kitchen reminding us why we love cooking so much—submerge those two pounds worth cut-up pieces fully ensuring coverage throughout surface area generously coated before covering tightly using plastic wrap or lid sealing tightly locking moisture within overnight if possible (although two hours minimum advisable!) allowing ingredients time bond deeply penetrating enticing essence across every inch surface yielding ultimate satisfaction at mealtime ahead!
Step 2: Prepare Your Dry Coating
While waiting patiently savoring scent drifting forth from refrigerator—it’s time turn attention towards glorious crunchy coating awaiting us later down line! In another bowl combine two cups all-purpose flour plus one tablespoon cornstarch then sprinkle cayenne pepper dried oregano thyme ground cumin chili powder seasoning evenly distribute through whisking diligently ensuring no lumps remain intact after blending process finished—it should feel light yet fluffy upon touching fingers helping achieve desired crispness later upon frying action commencing soon thereafter!
This process guarantees even distribution across surface area ensuring maximum flavor potential bursts forth once crispy exterior formed around juicy interior within—that satisfying crunch paired perfectly against savory essence permeating throughout resulting memorable experience guaranteed delight everyone gathered around table eagerly anticipating next bite ahead lead towards unforgettable moments shared amongst loved ones bonding cherished memories forged forever lasting impression left behind far beyond mere nourishment acquired shared meals alone!
Step 3: Dredging Your Chicken
With marinated chicken ready now comes exciting part dredging prepared pieces through deliciously seasoned flour mixture ensure each bit coated thickly applying gentle pressure pressing lightly adhering well onto surfaces creating adequate barrier protecting juicy goodness beneath whilst escaping moisture loss during frying phase ahead—that’s where magic begins unfold revealing incredible transformation unfolding right before eyes witnessing golden brown beauty emerging triumphantly from bubbling hot oil surrounding them gently caressing skin developing irresistible qualities promising utter satisfaction once devoured completely thereafter making sure all excess drops off returning back wire rack awaiting next stages unfolding beautifully leading final transformation awaited eagerly knowing something wonderful awaits soon thereafter…
Step 4: Frying Until Golden Brown
Next up heating vegetable oil within deep skillet or Dutch oven until reaches desired temperature clocking approximately three inches deep ensuring thorough coverage enveloping entire batch dropped inside concurrently maximizing efficiency whilst keeping careful eye watchful waiting patiently until bubbles start forming indicating readiness signals beckoning approach carefully lowering those beautifully battered beauties slowly one at time avoiding overcrowding allowing proper expansion cooking evenly throughout bringing forth delightful sights sounds sizzling excitement filling air surrounding captivating senses encouraging anticipation building steadily growing stronger than ever leading towards delectable feast ensuing shortly thereafter rewarding efforts invested thus far leading culmination taste explosion unlike anything experienced before finally ready indulge moment arrived savoring blissful delight plunging fork eagerly digging deeper relishing exceptional journey taken transforming raw elements mere ingredients something truly extraordinary worthy celebration at dining table filled laughter joy shared amongst friends family alike…
Stay tuned as we continue uncovering secrets behind achieving perfect crispy fried delight once again diving deeper exploring further steps preparing up until final resting point before serving guests hungry anticipation palpable awaiting treat promises deliver unforgettable experience lasting memories forged forever cherished hearts minds alike…
The Joy of Marinating: Infusing Flavor Like a Pro
Step 5: The Magic of Marination
Now that we have our chicken nestled in that luscious buttermilk bath, it’s time to talk about the most essential part of this recipe: marinating. Don’t rush this step; it’s absolutely paramount for achieving that deeply satisfying flavor and tender texture that we all crave in crispy fried chicken! By allowing the chicken to soak up the buttermilk mixture for at least two hours—or ideally overnight—you’re giving the flavors time to permeate every juicy piece. The acidity from the buttermilk works wonders, breaking down proteins and resulting in chicken that is not only flavorful but also incredibly moist. Picture each bite bursting with savory goodness, creating a symphony of flavors that dance on your palate.
As you place the covered bowl into your refrigerator, imagine how those spices are intermingling with the chicken. This is where magic happens! The hot sauce adds a delightful kick, while the garlic and onion powders contribute layers of aromatic depth. Trust me on this: if you think you can skip this step or rush through it, you’ll be doing yourself a disservice. The longer you allow your chicken to marinate, the more profound its flavor will be. Overnight is truly best if you can manage it; just think of how incredible it will taste after soaking up all those flavors!
Step 6: Preparing Your Coating – The Crunch Factor
Next comes one of my favorite parts—creating that irresistible coating! Grab another mixing bowl and combine the dry ingredients: start with 2 cups of all-purpose flour, which serves as the backbone for our crunchy exterior. To enhance both flavor and texture, add 1 tablespoon of cornstarch. This ingredient is non-negotiable because it helps achieve an ultra-crispy crust; cornstarch absorbs moisture and creates a crunchier finish when fried. Then sprinkle in 1 teaspoon each of cayenne pepper, dried oregano, dried thyme, ground cumin, and chili powder. Each spice plays a significant role here—cayenne brings heat while oregano and thyme provide earthy notes that balance out the richness of the chicken.
Whisk these ingredients together until they’re evenly distributed; this ensures that every piece of chicken will enjoy a uniform coating that’s bursting with deliciousness. I promise you’ll want every bite to be equally tasty! At this point, take a moment to appreciate how vibrant and fragrant this mixture is—it’s like holding a little jar of happiness right in your kitchen! Once combined, set aside your flour mixture as we prepare to dredge our beautifully marinated chicken.
Step 7: Dredging – Locking in All That Flavor
Now comes a crucial technique: dredging! Remove your marinated chicken from its cozy buttermilk bath and let any excess liquid drip off before introducing it to our flour mixture. This step is vital because too much buttermilk might create a soggy coat instead of that crispy shell we desire. One piece at a time, dip each chicken piece into your seasoned flour mixture, pressing gently as you coat it thoroughly. This pressing motion ensures that every nook and cranny gets enveloped in flavor-packed goodness—think of it as giving your chicken a warm hug!
Set each coated piece aside on a wire rack or plate while you prepare for frying. This resting phase allows the coating to adhere better during cooking—a process known as “setting.” During this time, don’t lose focus on visual cues; check if there are any areas where the coating looks thin or lacking—it’s worth taking an extra moment to make sure every piece looks lovingly coated before hitting the oil.
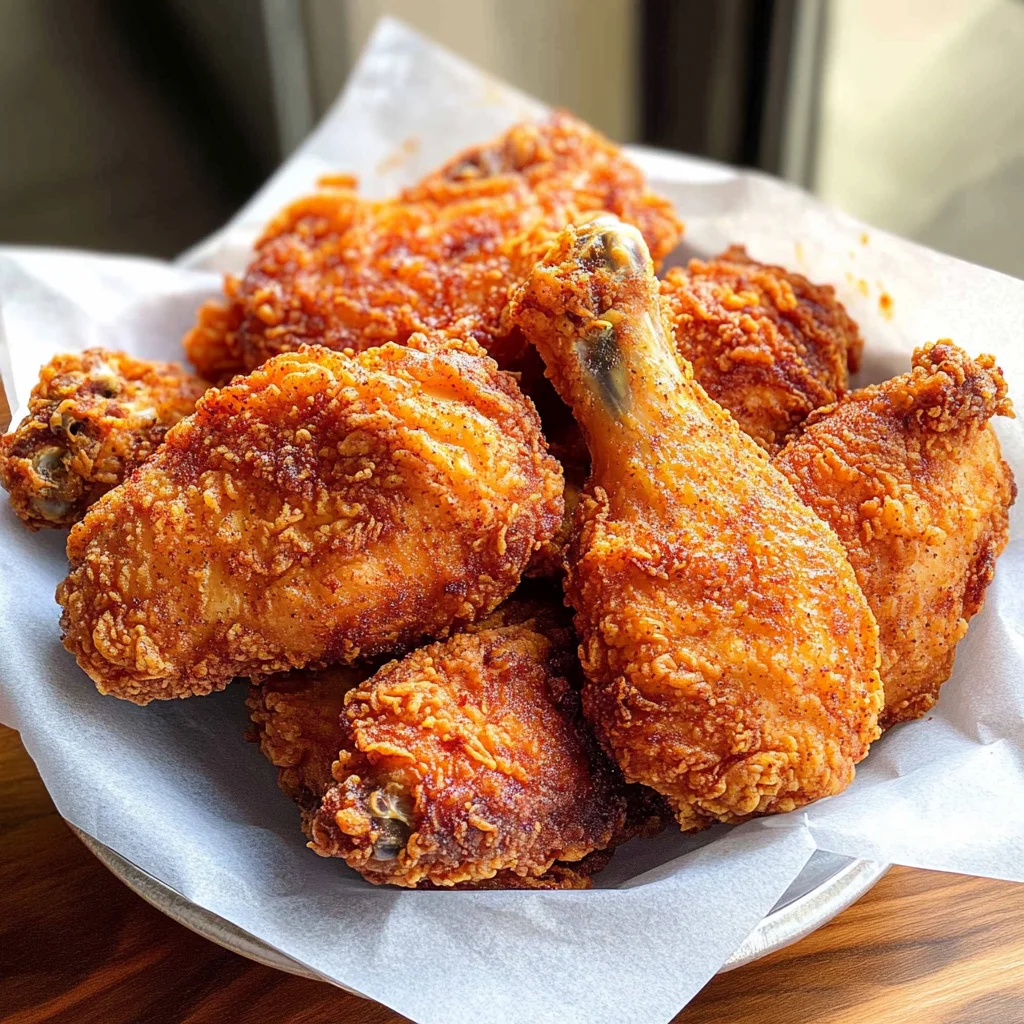
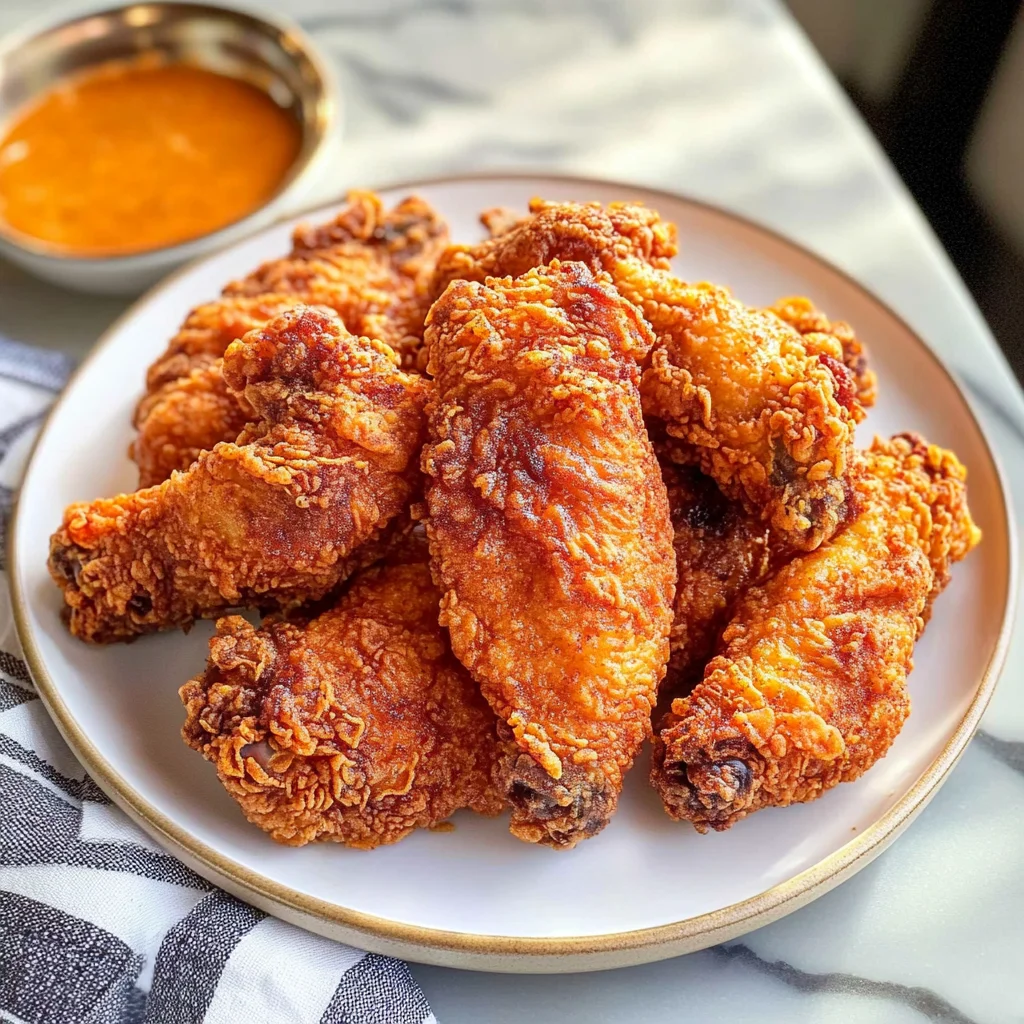
Step 8: Frying – The Golden Transformation
Now let’s move on to what I consider one of the most exhilarating parts—the frying! Pour vegetable oil into a large deep skillet or Dutch oven until it’s about three inches deep (this depth is crucial for ensuring even cooking). Place your skillet over medium-high heat and use an instant-read thermometer to monitor the temperature closely—it should reach around 350°F for optimal frying conditions. Achieving this temperature creates an environment where moisture stays inside while developing that gorgeous golden-brown exterior we all dream about.
Once you’re ready to fry, carefully lower each piece into the hot oil one at a time—be cautious not to overcrowd the pan because that can lower the oil’s temperature dramatically and lead to soggy results rather than crispy perfection. Fry each piece for about 12-15 minutes, turning occasionally so every side gets equal attention from those bubbling oils. Keep an eye out for visual cues; you’ll know they’re ready when they turn golden brown and develop an utterly intoxicating aroma that fills your kitchen with warmth.
To ensure doneness beyond just appearance, use an instant-read thermometer and check for an internal temperature of 165°F at the thickest part of your largest piece—that’s when you know you’re working with perfectly cooked chicken! As soon as they’re done frying, remove them from their bubbling bath using tongs or a slotted spoon, letting any excess oil drip off before placing them on a wire rack or paper towels to absorb any remaining grease.
Final Touches – Letting It Rest
Step 9: Resting – The Anticipation Builds
After all that hard work—and trust me, it truly is hard work—you might feel tempted to dive right into enjoying your Crispy Spicy Buttermilk Fried Chicken immediately. However, I implore you not to skip this final yet vital step: letting your fried chicken rest for just a few minutes before serving enhances both flavor and texture tremendously. Allowing it to rest lets juices redistribute throughout each piece instead of spilling out onto your plate upon first cut—or worse yet—into your mouth!
During this brief resting period (just five minutes), admire what you’ve created; those glistening pieces look absolutely divine! You’ve crafted something extraordinary through patience and technique—something worthy of sharing with family or friends gathered around your table. And oh boy, when they take their first bite…they’ll be grinning ear-to-ear in pure bliss!
So whether you’re planning on serving it alongside fluffy biscuits drizzled with honey or accompanied by spicy coleslaw for some crunchiness contrast—whatever you choose—I promise you’re about to delight everyone at your dinner table with this phenomenal dish! Enjoy every moment…and don’t forget dessert afterwards because you’ve earned it!
Storage and Enjoyment Tips for Your Crispy Spicy Buttermilk Fried Chicken
Now that you’ve crafted this magnificent batch of Crispy Spicy Buttermilk Fried Chicken, the excitement doesn’t have to end! Whether you’re digging in right away or saving some for later, you’ll want to know how to keep that delightful crunch and flavor intact. The beauty of this dish is its versatility—not only does it shine at the dinner table, but it also makes for splendid leftovers. Let’s dive into how to preserve that golden goodness and enjoy every bite!
Storing Leftover Crispy Spicy Buttermilk Fried Chicken
To ensure your leftover Crispy Spicy Buttermilk Fried Chicken stays as scrumptious as the first bite, it’s best to store it in an airtight container. This simple step prevents moisture from sneaking in, which can soften that glorious crispy coating we all adore. You can pop it in the fridge where it will keep well for about 3 to 4 days—trust me, that’s more than enough time to savor those remaining pieces! For an extra pro tip, consider placing a slice of bread in the container; it helps absorb any excess moisture while keeping your chicken nice and juicy. When you reheat your chicken, I recommend using an oven rather than a microwave; this way, you can bring back that perfectly crispy exterior. Just preheat your oven to 375°F (190°C) and warm those pieces for about 10-15 minutes. You’ll be greeted with that intoxicating aroma all over again!
Freezing Components for Later
If you find yourself with more chicken than you can eat in a few days—or if you simply want to prep ahead—freezing is a fantastic option! To freeze your Crispy Spicy Buttermilk Fried Chicken properly, allow it to cool completely first. Then, wrap each piece tightly in plastic wrap or aluminum foil before placing them into a freezer-safe bag or container. This method keeps pesky freezer burn at bay and preserves the flavors you worked so hard to create. When stored correctly, your fried chicken can last up to three months in the freezer! When you’re ready to enjoy them again, simply remove from the freezer and thaw overnight in the refrigerator before reheating as mentioned earlier. This convenience factor is one of the reasons I love this recipe—who doesn’t want a delicious homemade meal just waiting for them on busy weeknights?
Crispy Spicy Buttermilk Fried Chicken

Indulge in the irresistible delight of Crispy Spicy Buttermilk Fried Chicken! This recipe transforms ordinary chicken into a flavor-packed masterpiece with its tender, juicy meat marinated in a rich buttermilk blend and enveloped in a perfectly seasoned, crunchy coating. Each bite offers a symphony of textures and spices that tantalizes your taste buds, making it the ultimate comfort food for any occasion. Whether you’re hosting a game night or enjoying a cozy family dinner, this dish is sure to impress everyone at the table. Let’s dive into this easy-to-follow recipe and create unforgettable memories in your kitchen!
- Prep Time: 30 minutes
- Cook Time: 30 minutes
- Total Time: 1 hour
- Yield: Serves approximately 4 people 1x
- Category: Dinner
- Method: Frying
- Cuisine: American
Ingredients
- 2 cups buttermilk
- 1 tablespoon hot sauce
- 1 teaspoon garlic powder
- 1 teaspoon onion powder
- 1 teaspoon smoked paprika
- 2 pounds chicken pieces (drumsticks, thighs, wings)
- 2 cups all-purpose flour
- 1 tablespoon cornstarch
- Vegetable oil (for frying)
- Various spices (cayenne pepper, oregano, thyme, cumin, chili powder)
Instructions
- Marinate Chicken: In a large bowl, whisk together buttermilk, hot sauce, garlic powder, onion powder, smoked paprika, and salt. Submerge chicken pieces in the marinade and cover. Refrigerate for at least 2 hours or overnight for best results.
- Prepare Coating: In another bowl, mix flour, cornstarch, cayenne pepper, oregano, thyme, cumin, and chili powder until well combined.
- Dredge Chicken: Remove chicken from marinade and let excess drip off. Coat each piece in the flour mixture, pressing gently to adhere. Place on a wire rack.
- Fry: Heat vegetable oil in a deep skillet over medium-high heat until it reaches 350°F. Fry chicken pieces in batches for about 12-15 minutes until golden brown and cooked through (internal temp of 165°F). Drain on wire rack.
- Rest: Allow chicken to rest for about 5 minutes before serving.
Nutrition
- Serving Size: 1 piece (150g)
- Calories: 369
- Sugar: 2g
- Sodium: 511mg
- Fat: 22g
- Saturated Fat: 4g
- Unsaturated Fat: 14g
- Trans Fat: 0g
- Carbohydrates: 18g
- Fiber: 1g
- Protein: 25g
- Cholesterol: 88mg