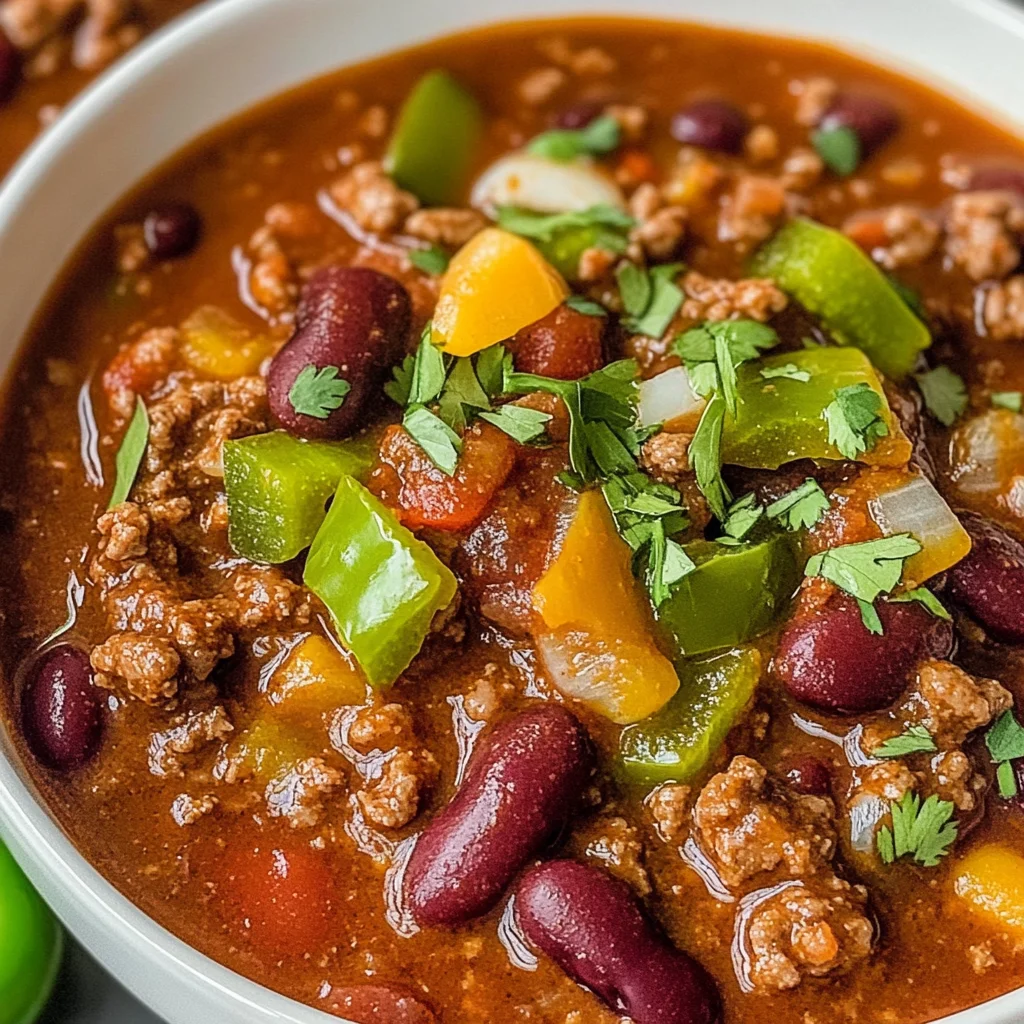
Best Homemade Chili
There’s something profoundly comforting about a bowl of chili, isn’t there? It’s more than just a meal; it’s a hug in a dish, a fragrant reminder of cozy family gatherings, and a celebration of flavors that can warm the coldest of days. When I think of my childhood, I can vividly recall the aroma wafting through my grandmother’s kitchen as she prepared her legendary chili. The way the spices danced together, creating an intoxicating symphony of warmth and depth, made every spoonful feel like pure magic. This Best Homemade Chili recipe captures all that nostalgia and more! With its hearty ingredients and robust flavor, it transcends mere sustenance and becomes an experience you’ll want to share with those you love.
Imagine this: you’re gathered around the table with friends or family, laughter ringing out as bowls are passed around. The first taste brings smiles; it’s rich and savory with just the right amount of kick. You can practically feel the love that went into every simmering moment. Trust me when I say this chili isn’t just food—it’s tradition blended with modern flair. Whether you’re looking for a crowd-pleasing dish for game day or simply craving something comforting on a chilly evening, this recipe is your go-to. Now let’s dive into creating this culinary delight together!
Best Homemade Chili: A Warm Embrace in Every Bowl
This recipe is all about bringing people together and creating memories over a shared meal. It’s hearty enough to fill you up while still being light enough to leave room for dessert—if you can resist! Each ingredient plays a vital role in crafting that unforgettable flavor profile that makes this chili stand out from the rest.
Ingredients:
As we embark on this culinary journey together, let’s take a moment to appreciate each ingredient that makes this dish truly special. Each one has its own story to tell and contributes uniquely to our Best Homemade Chili.
- 2 pounds ground beef (or turkey). This is the backbone of our chili, providing not only protein but also essential flavor and texture. Ground turkey offers a leaner option without sacrificing taste; however, if you choose beef, opt for 80/20 ground chuck for that perfect balance of flavor and fat content. When searing the meat, we’re aiming to develop those beautiful caramelized bits because they add depth to our dish. Just remember not to overcook it—it’s okay if there’s still a hint of pink before we introduce other ingredients!
- 2 small green peppers (about 2 cups diced). These vibrant veggies bring freshness and crunch to our chili while balancing out the rich flavors from the meat and spices. When selecting your peppers, look for ones that are firm and unblemished; they should have a bright color that indicates ripeness. Dicing them finely ensures even distribution throughout the dish so every spoonful packs maximum flavor!
- 1 small yellow onion (about 1 ½ cups diced). Ah, onions—the aromatic base of countless dishes! They add sweetness as they cook down, transforming into golden morsels that deepen our chili’s complexity. It’s essential to sauté them until they’re translucent; trust me on this step! This process brings out their natural sugars and enhances their flavor profile significantly.
- 2 cans tomatoes (diced (15-ounce cans)). Juicy diced tomatoes are like little bursts of summer in your bowl! They contribute acidity which helps balance the richness from our meat while also providing moisture for simmering. Look for high-quality canned tomatoes—they should be bright in color with no added preservatives or excessive sodium.
- 15-ounce can tomato sauce. This liquid gold adds body to our chili while enhancing its overall richness without overpowering other flavors. It creates that perfect thick texture we all crave! Again, aim for brands with simple ingredients; remember—less is more when it comes to quality.
- 6-ounce can tomato paste. Tomato paste is what takes our sauce from good to extraordinary! It’s concentrated goodness adds depth and intensity of flavor that really ties everything together beautifully. Don’t skip this ingredient—it’s absolutely non-negotiable!
- 15 ounces water. Water may seem mundane compared to other ingredients but it helps create just the right consistency for simmering without diluting any rich flavors we’ve built up thus far.
- 2 cans kidney beans (drained and rinsed (15-ounce cans)). Kidney beans provide heartiness as well as fiber—and let’s be honest: what’s chili without beans? Rinsing them removes excess sodium which can make your bowl taste overly salty. Plus, their creamy texture complements all those gorgeous spices we’re about to add.
- 3 tablespoons chili powder. This spice blend is where things start getting exciting! Chili powder is packed with warmth from dried chilies along with earthy undertones—think smoky sweetness mingling with heat—that create layers upon layers of flavor in our chili.
- 2 tablespoons garlic powder & 2 tablespoons onion powder each. These two powders are like secret weapons in your spice arsenal! They intensify flavors without adding extra moisture or texture but ensure nobody misses out on those aromatic notes typical in traditional chili recipes.
- 3 tablespoons cumin. Cumin adds an exotic depth that’s both warm and slightly nutty—just what we need to elevate our Best Homemade Chili beyond ordinary levels! It’s one of those spices you don’t want to run low on; trust me when I say it’s worth keeping stocked at all times.
- 1 tablespoon paprika & 1 teaspoon chipotle powder & ½ teaspoon cayenne pepper each. Paprika gives us color while adding mild sweetness; meanwhile chipotle powder lends smokiness alongside heat from cayenne pepper if we’re feeling adventurous! Adjust these according to your spice tolerance—don’t be afraid to experiment until it feels right!
- ½ tablespoon salt & 1 teaspoon white pepper. Salt enhances everything we’ve created thus far—it’s crucial for balancing flavors—but don’t go overboard since canned goods already contain some sodium! White pepper offers subtle heat without altering color which keeps our beautiful red sauce looking vibrant.
- ½ teaspoon baking soda (optional). Here’s a little trick: adding baking soda helps cut down acidity from tomatoes allowing our flavors come through even more clearly—not mandatory but definitely worthwhile if you’re after perfection!
Equipment You’ll Need:
Before we jump into making this delicious dish, let’s gather some essential tools that’ll help us along the way! Having the right equipment makes all the difference in cooking; it’s like having trusted friends by your side throughout each step!
- Large Dutch oven or heavy-bottomed pot: A sturdy pot is crucial because it evenly distributes heat while allowing us control over simmering time without burning any ingredients—a must-have when crafting such complex flavors!
- Wooden spoon or spatula: This trusty tool will help us stir without scratching up our precious pot surface during sautéing tasks—all while ensuring ingredients mingle properly throughout cooking phases too!
- Cutting board & sharp knife: A good quality cutting board paired with a sharp knife makes chopping veggies easy-peasy while keeping fingers safe—a key investment every home cook should consider!
Now that we’ve got everything lined up perfectly let’s dive into preparing this magical concoction that’ll soon become your favorite go-to recipe!
Preparing the Best Homemade Chili
Step 1: Sautéing Aromatics
To kick things off beautifully, let’s start by heating up your Dutch oven over medium heat until hot but not smoking—this ensures an inviting environment where flavors meld seamlessly as everything cooks down perfectly together! Add in those diced green peppers along with onions once it reaches temperature; stir occasionally until both soften up beautifully—that lovely translucent look means they’re ready for seasoning fun ahead! You’ll know they’re done when they give off an enticing aroma mingling sweet notes from onions alongside fresh pepper essence—a sign you’re headed toward greatness here!
Step 2: Spice It Up
Once your veggies have reached peak deliciousness—don’t rush this step—you’ll want to sprinkle in those aromatic seasonings minus baking soda at first glance here! Stir continuously over medium heat for about one minute; this process known as “blooming” allows essential oils within spices release their full potential into surrounding air creating an utterly intoxicating scent wafting through kitchen spaces around you—it doesn’t get better than this folks! Keep an eye on things though—we don’t want anything burning during such joyful moments either…
Step 3: Browning Your Meat
Next up is adding either ground beef or turkey straight into flavorful mix awaiting its chance at glory here! Cook until browned nicely being careful not going too far past medium temperature range since we want some juiciness left intact still within meat itself before proceeding onward…it should have just begun releasing juices into surrounding vegetable medley bringing forth incredible richness everyone will adore later on served warm within bowls waiting patiently nearby…
Step 4: Building Flavor Foundations
Now let’s pour ourselves some liquid sunshine by introducing tomato sauce alongside diced tomatoes plus water gracefully cascading down within bubbling pot filled halfway full already then continuing onward adding rich tomato paste next—watch how everything transforms instantly blending beautifully together creating vibrant colors across surface area appearing almost alive itself bubbling away joyously beneath stirring spoon movement swirling harmoniously throughout rhythmically dancing away…
As we continue crafting these steps one after another marvelously unfolding magic within kitchen space around us—it becomes clear why this Best Homemade Chili deserves special mention—I promise you’ll fall head over heels once tasting final product towards end soon arriving shortly thereafter…
The Best Homemade Chili: A Hearty, Flavorful Experience
As we dive deeper into this cherished family recipe for the Best Homemade Chili, I can’t help but think back to the countless Sundays spent in my grandmother’s kitchen, the aroma of simmering spices wafting through the air like an inviting hug. This chili is a symphony of flavors that comes together beautifully, offering warmth and satisfaction in every bite. Now let’s get back to cooking; trust me, you’re going to want to savor each step of this process!
Step 5: Simmering to Perfection
Now that we have all our ingredients harmoniously combined, it’s time for the magic to happen! Gently pour in the tomato sauce, diced tomatoes, water, and tomato paste into your pot. This mixture is going to create a luscious base that will cradle all those beautiful flavors we’ve developed so far. As you stir everything together, take a moment to appreciate the vibrant colors and textures—this is when your kitchen starts to feel alive. Turn your heat up slightly and bring it all to a gentle simmer over medium-low heat. You’ll know it’s ready when you see tiny bubbles beginning to break the surface.
Why is simmering so important? Well, during this stage, flavors meld together in a way that’s utterly transformative! The tomatoes release their sweetness, while the spices deepen and expand their profiles—it’s like they’re having a dance party in your pot! Allow this mixture to simmer for about 15 minutes; don’t rush this step! Stir occasionally to ensure nothing sticks or burns on the bottom. If you notice any splattering, just adjust your heat slightly; we want a lovely simmering sound rather than a vigorous boil. After this time, you’ll start to see that rich red hue intensifying—now that’s what you want!
Step 6: The Beans Join the Party
Once your chili has been bubbling away and filling your home with its intoxicating aroma, it’s time for our star ingredient: beans! Carefully add in those drained and rinsed kidney beans; they are not just there for texture; they bring heartiness and protein that make this dish both filling and nutritious. Stir gently but thoroughly; you want them well integrated into the mix without mashing them up—nobody wants mushy beans in their chili!
At this stage, you’re continuing to build flavor complexity by allowing everything to mingle for another 10 minutes at a low simmer. As your chili cooks away, keep an eye out for any signs of thickening; if it seems too thick for your liking (and trust me—it could become quite hearty), just add a splash more water until it reaches your desired consistency. This is where your personal touch really comes into play—thicker chili offers a different experience than a brothier version! Remember though: whatever you do, don’t skip on tasting as you go. It’s one of the best ways to ensure your chili turns out truly extraordinary!
Step 7: The Science of Baking Soda
Here comes one of my favorite steps—the secret weapon: baking soda! After letting those beans find their place in our pot of goodness, sprinkle in half a tablespoon of baking soda. This may seem odd at first glance; however, I promise you it plays an essential role! The baking soda helps balance acidity from the tomatoes while also enhancing the overall richness of flavors within your chili. You might notice some bubbling as soon as you add it—that’s completely normal! Just give it a good stir over medium heat until those bubbles subside.
Don’t rush this crucial step; allow yourself a minute or two here as those flavors continue developing depth and complexity thanks to that little pinch of chemistry at play. The addition of baking soda creates an environment where flavors can shine brighter—think of it as giving them a little nudge toward perfection! Once everything is well mixed and bubbling subsides, you’ll be left with an incredible foundation for what will soon be an unforgettable meal.
Step 8: Resting Before Serving
Ahh… here we are at one of the most underrated yet vital stages—the resting period! Once you’ve removed the pot from heat after cooking, resist that urge to serve right away! I know it’s tempting because your kitchen smells divine right now—but hear me out! Letting your Best Homemade Chili rest for about 10-15 minutes allows flavors to settle down and integrate even further. It gives time for those bold spices we added earlier to fully bloom within each spoonful.
Trust me on this: resting isn’t just about patience—it’s about giving every taste bud its due respect! As chili sits quietly off heat, you’ll notice how it thickens slightly while retaining that luscious sauciness we adore so much. So set aside some bowls or plates while eagerly awaiting those final moments before digging in—it will be worth every second!
Final Touches: Serving Up Comfort
Step 9: Garnishing Your Masterpiece
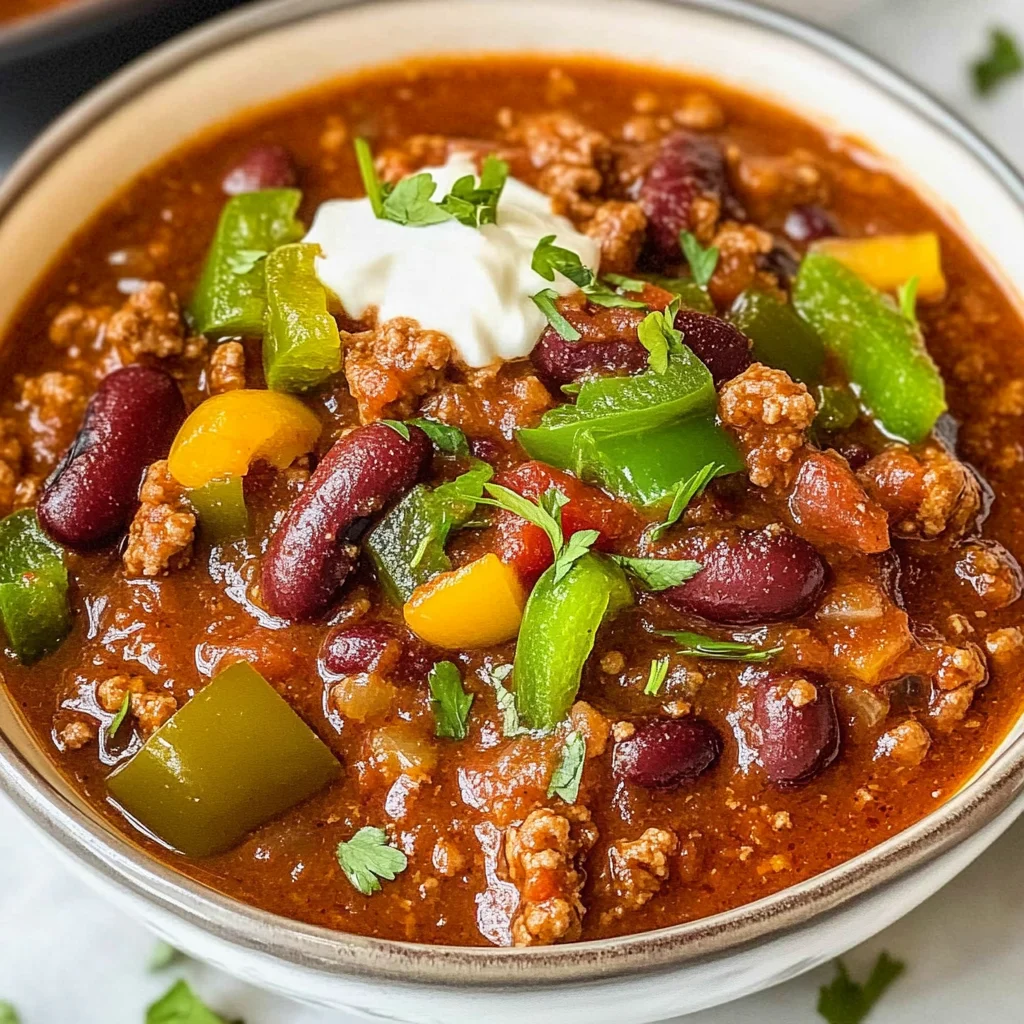
Now we arrive at perhaps one of my favorite moments—the grand reveal! Ladle out generous portions of that steaming Best Homemade Chili into bowls—you’ve worked hard for this moment! But wait—don’t forget about garnishing because presentation plays its part too! Consider adding fresh toppings like chopped green onions or cilantro for brightness and color contrast against that rich red base you’ve created. A dollop of creamy avocado or non-dairy sour cream can also elevate each bite with smoothness that’s simply divine!
As you serve up this delicious dish filled with love and nostalgia, I hope it brings back memories of cozy gatherings around tables filled with laughter and warmth just like mine did growing up. Each spoonful embodies comfort—a chance for connection among friends and family over shared food experiences.
And there you have it—the Best Homemade Chili made easy with love and care poured into every step along the way! Enjoy every bite knowing you’ve created something truly special—a dish crafted not only from ingredients but from heartwarming memories waiting to unfold anew each time it’s served. Happy cooking!
Storage and Enjoyment Tips for Your Best Homemade Chili
Now that your kitchen is filled with the heavenly aroma of your Best Homemade Chili, it’s time to dig in! But let’s be real—this recipe is so hearty and delicious that you might find yourself with leftovers. Fear not, my friend! Leftover chili can be just as delightful as the first serving, and with the right storage techniques, you’ll enjoy its flavors for days to come. So, let’s talk about how to keep that liquid gold safe and sound for your future cravings!
Storing Leftover Best Homemade Chili
When it comes to storing your leftover Best Homemade Chili, the key is to choose the right container. I recommend using airtight glass or BPA-free plastic containers—these not only keep your chili fresher longer but also prevent any unwelcome odors from mingling in your fridge. Just allow the chili to cool at room temperature before sealing it up tight. Properly stored in the refrigerator, your chili will stay delicious for about 3 to 4 days. If you want to maintain its quality even further, you can place a slice of bread in the container; this little trick helps absorb excess moisture and keeps your chili from becoming soggy while enhancing its flavor as it melds over time. When it comes to reheating, simply warm it on the stove over low heat, stirring occasionally until it’s heated through—a process that not only revives those flavors but also fills your home with that comforting scent all over again.
Freezing Best Homemade Chili for Later
Now, if you find yourself with more than just a couple of servings left (or perhaps you’re preparing for a cozy night in), freezing is an excellent option! To freeze your Best Homemade Chili properly, allow it to cool completely before transferring it into freezer-safe bags or containers. Make sure to leave some space at the top of bags since liquids expand when frozen—trust me; you don’t want an explosion of chili in your freezer! When stored correctly, it can last for up to 3 months without losing its robust flavor. The beauty of having homemade chili in the freezer is that on a chilly day or after a long week, you can simply pull out a bag and let it thaw overnight in the fridge before reheating on the stovetop or microwave. Imagine coming home from work and knowing that a bowl of comforting warmth awaits you—what could be better?
With these storage tips under your belt, you’re all set to enjoy every last drop of your wonderful creation!
Best Homemade Chili

Embrace the heartwarming comfort of our Best Homemade Chili, a delightful dish that brings together family and friends around the table. This chili recipe is more than just a meal; it’s an experience filled with rich flavors and satisfying warmth.
- Prep Time: 20 minutes
- Cook Time: 45 minutes
- Total Time: 1 hour 5 minutes
- Yield: Approximately 8 servings 1x
- Category: Main
- Method: Simmering
- Cuisine: American
Ingredients
- 2 pounds ground beef or turkey
- 2 small green peppers, diced
- 1 small yellow onion, diced
- 2 cans diced tomatoes (15-ounce cans)
- 15-ounce can tomato sauce
- 6-ounce can tomato paste
- 15 ounces water
- 2 cans kidney beans, drained and rinsed (15-ounce cans)
- 3 tablespoons chili powder
- 2 tablespoons garlic powder
- 2 tablespoons onion powder
- 3 tablespoons cumin
- 1 tablespoon paprika
- 1 teaspoon chipotle powder
- ½ teaspoon cayenne pepper
- ½ tablespoon salt
- 1 teaspoon white pepper
- ½ teaspoon baking soda (optional)
Instructions
- In a large Dutch oven over medium heat, sauté diced green peppers and onions until they are soft and translucent.
- Add your choice of ground beef or turkey to the pot; cook until browned.
- Stir in both canned tomatoes, tomato sauce, tomato paste, and water; mix well.
- Incorporate the drained kidney beans and all spices; stir to combine.
- Bring to a gentle simmer over medium-low heat for about 15 minutes while occasionally stirring.
- Optionally sprinkle in baking soda to reduce acidity; stir well.
- Allow the chili to rest for about 10-15 minutes before serving.
Nutrition
- Serving Size: 1 cup (240g)
- Calories: 350
- Sugar: 6g
- Sodium: 640mg
- Fat: 12g
- Saturated Fat: 5g
- Unsaturated Fat: 7g
- Trans Fat: 0g
- Carbohydrates: 43g
- Fiber: 12g
- Protein: 24g
- Cholesterol: 70mg