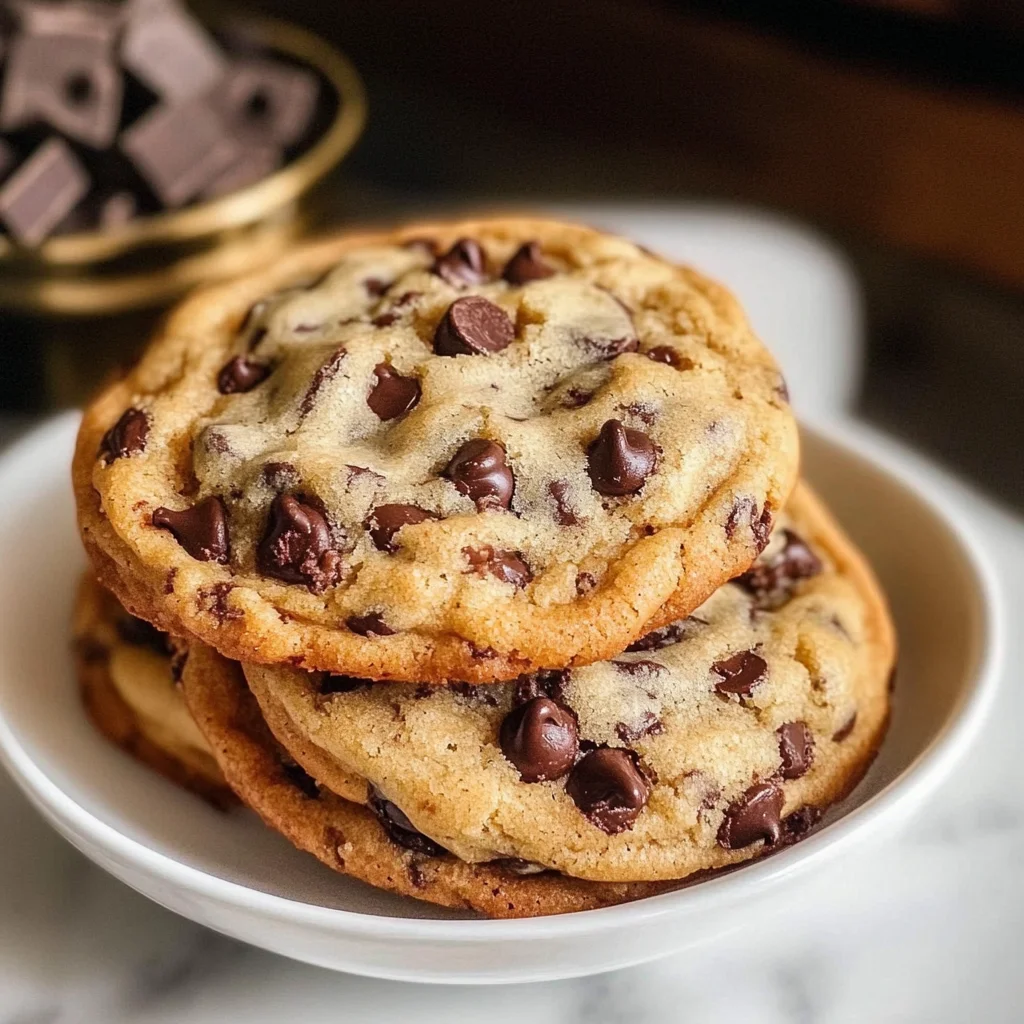
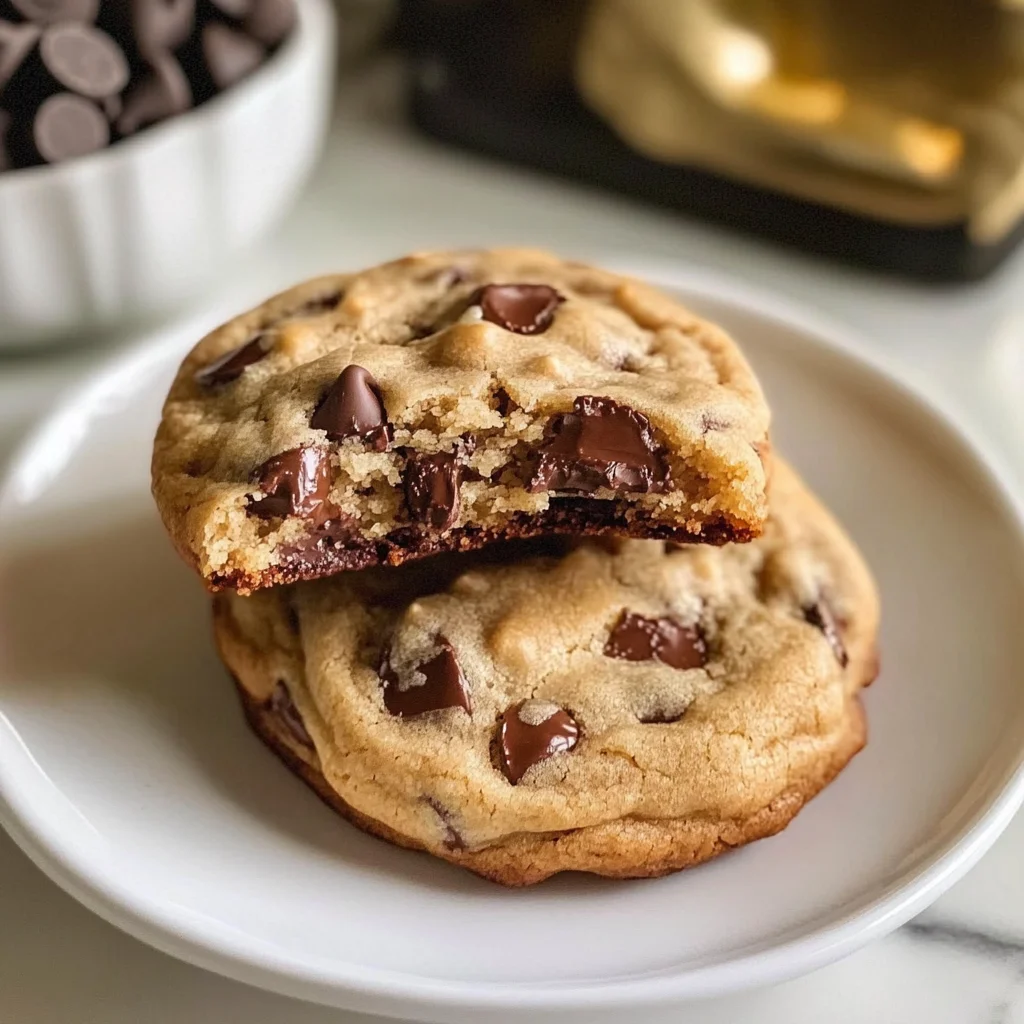
Levain-Style Two-Chip Chocolate Chip Cookies
There’s something truly magical about the smell of freshly baked cookies wafting through your home, isn’t there? It has this remarkable ability to evoke warmth and nostalgia, transporting you back to simpler times filled with laughter and love. Today, I’m beyond excited to share my cherished recipe for Levain-Style Two-Chip Chocolate Chip Cookies. These aren’t just any cookies; they are thick, gooey delights that are reminiscent of those iconic bakery-style treats you find at Levain Bakery. Imagine biting into a golden exterior that gives way to a soft, melting center loaded with two kinds of chocolate chips—semi-sweet and creamy milk or white chocolate. This is more than food; it’s an experience that brings joy and comfort, each bite a little reminder of what makes life sweet.
I’ve always been captivated by the allure of a perfect cookie—one that balances crunchy edges with a chewy heart. These Levain-Style Two-Chip Chocolate Chip Cookies embody that very essence. They’re designed for sharing, for cozy evenings spent around the table, or perhaps for indulging all on your own while curled up with a good book. Trust me when I say that once you take your first bite, you’ll understand why this recipe has become a beloved staple in my kitchen. So, gather your ingredients and let’s embark on this deliciously satisfying journey together!
Levain-Style Two-Chip Chocolate Chip Cookies: A Gooey Delight
Welcome to the world of baking bliss! Today we’ll create these incredible Levain-Style Two-Chip Chocolate Chip Cookies that promise to be the highlight of any gathering—or simply your weeknight treat after a long day. The combination of textures and flavors is nothing short of extraordinary, and I can’t wait for you to experience it.
Ingredients:
As we dive into our culinary adventure, let’s take a moment to appreciate each ingredient and its crucial role in crafting these delightful cookies. Each one contributes not just flavor but also texture and character to our final masterpiece.
- 1 cup (2 sticks or 226g) unsalted cold butter, cubed. Using cold butter is absolutely paramount in achieving that desired thick texture characteristic of Levain-style cookies. The coldness keeps the dough firm as it bakes, allowing the cookies to rise beautifully instead of spreading out too much. Opt for high-quality unsalted butter because it lets us control the saltiness in our recipe more precisely—something vital when balancing flavors.
- ¾ cup packed brown sugar. Brown sugar adds depth and moisture to our cookies thanks to its molasses content. This contributes not only sweetness but also a rich flavor profile that pairs perfectly with chocolate chips. When measuring brown sugar, packing it firmly into the cup helps ensure we have enough for optimal chewiness.
- ½ cup granulated sugar. This ingredient plays an equally important role by providing sweetness along with structure to our cookies as it caramelizes during baking. It creates those lovely golden edges while still allowing the centers to remain soft and chewy—just like we want them!
- 2 large eggs (cold). Cold eggs help keep our cookie dough at a lower temperature initially, which is essential for maintaining that thick texture while baking. Eggs contribute moisture as well as richness; they act as binders that hold everything together while helping achieve the perfect rise.
- 2 ¾ cups all-purpose flour. Flour is the backbone of our cookie dough—it provides structure and stability so that we don’t end up with flat puddles! For this recipe, using all-purpose flour allows us the right balance between tenderness and chewiness—absolutely non-negotiable if we want those thick results.
- 1 tbsp cornstarch. Now here’s where things get interesting! Cornstarch might seem like a minor player in this lineup, but trust me—this ingredient transforms ordinary cookies into something truly extraordinary by adding softness and tenderness without making them cakey.
- ¾ tsp baking powder & ¾ tsp baking soda (combined). Both leavening agents are essential in giving our cookies their desired lift while maintaining their gooey centers. Baking powder works immediately when mixed into wet ingredients, creating bubbles that expand during baking; whereas baking soda helps create those beautiful golden-brown edges by reacting with acidic components in our dough (like brown sugar).
- ¾ tsp salt. Salt may seem simple but don’t overlook its importance! Just like in savory dishes, salt enhances sweetness in baked goods and balances flavors beautifully—it’s what elevates these cookies from good to exceptional.
- 1 cup semi-sweet chocolate chips & 1 cup milk or white chocolate chips. This is where we really dial up the decadence! The semi-sweet chips offer rich cocoa notes while the milk or white ones add creaminess—creating an utterly intoxicating symphony of flavors within each bite.
- Optional: 1 cup chopped walnuts or pecans adds an extra crunch if you’re feeling adventurous! Nuts bring not just flavor but also texture contrast which can elevate your cookie game even further.
- Optional: ¼ tsp espresso powder enhances chocolate flavor without imparting coffee taste directly—an industry secret I swear by! It deepens richness subtly; you’ll wonder how you ever baked without it!
Now that we’ve gathered our magical ingredients let’s take stock of what tools will accompany us on this baking journey!
Equipment You’ll Need:
Having the right tools makes all the difference when bringing our culinary dreams to life! Here are some essential partners in creating these magnificent cookies:
- Mixing bowls – A set of various sizes ensures we can mix ingredients easily without overflow chaos happening on our countertops! Look for sturdy materials like glass or stainless steel—they resist heat well during mixing stages.
- Electric mixer – While hand-mixing is possible (and sometimes therapeutic), an electric mixer saves time and energy—especially when creaming butter with sugars until light and fluffy—a critical step for achieving perfect texture!
- Measuring cups & spoons – Accurate measurements lead directly to consistent results every time we bake! Investing in good-quality measuring tools will help ensure success—not just here but throughout all your cooking adventures!
- Baking sheets lined with parchment paper – These sheets prevent sticking while ensuring even heat distribution across cookie surfaces which leads us toward achieving those lovely golden exteriors—we want no burnt bottoms here!
- Cooling rack – Essential for letting cookies cool properly after they come out of the oven; it prevents sogginess caused by steam trapped underneath warm treats still resting on hot pans.
Now let’s dive into preparing these Levain-Style Two-Chip Chocolate Chip Cookies—it’s where all the magic happens!
Step 1: Creaming Together Butter and Sugars
To start off on the right foot, let’s begin by taking out that cold butter from the refrigerator (remember—the colder it stays early on helps later!) Cube it into chunks before placing them into your mixing bowl along with both sugars: brown sugar first followed by granulated sugar next. This process, known as creaming, involves beating these ingredients together until they become light and fluffy—a wonderful transformation occurs here as air gets incorporated creating tiny pockets within our dough which will help achieve height later on during baking! Don’t rush this step; give yourself about 3–5 minutes using medium speed—it should resemble pale-colored frosting when done correctly!
Step 2: Adding Eggs
Next up comes incorporating those two cold eggs into our luscious mixture—this step adds moisture while binding everything together nicely! Crack each egg directly into your bowl one at a time ensuring no shell pieces sneak their way in (trust me—they ruin everything!). Mix until fully incorporated before stopping briefly just to scrape down any bits clinging onto sides so every ounce gets mixed thoroughly—a few moments here ensures even flavor distribution throughout dough!
Step 3: Combining Dry Ingredients
In another bowl (yes—it feels endless doesn’t it?), whisk together flour, cornstarch,baking powder,baking soda,and salt until well blended—the goal being uniformity across each scoop later down road avoiding surprise lumps ruining otherwise flawless cookies ahead! Taking care at this junction enables proper rising action whilst preventing dense results from uneven dry mixes clumping together later; trust me—you’ll thank yourself later when enjoying perfectly baked beauties instead!
Step 4: Gradually Incorporating Dry Into Wet Mixture
Now comes an exciting moment where dry meets wet—we’re uniting forces here! Gently fold flour mixture into creamed butter/sugar/egg concoction gradually allowing everything time meld naturally over gentle motions rather than aggressive stirring which could develop gluten strands resulting slightly tougher textures overall—a delicate hand goes far here folks…about 2–3 minutes should suffice until just combined leaving no visible traces behind yet still ensuring some flour remains apparent—that means it’s time now for chip additions!
Let’s pause here before diving deeper into cookie shaping because trust me—the anticipation builds excitement exponentially!!
Step 5: The Creaming Process – A Dance of Butter and Sugars
Now, let’s dive into the heart of our cookie dough: the creaming process. This step is absolutely crucial because it creates that wonderful structure and texture we’re all craving in our Levain-Style Two-Chip Chocolate Chip Cookies. Begin by placing your cold, cubed butter into a large mixing bowl—trust me, using cold butter is key here as it helps achieve that rich, gooey center we love. Add in your brown sugar and granulated sugar, allowing them to mingle with the butter in a playful dance. Using a hand mixer or a stand mixer fitted with the paddle attachment (my favorite tool for this job), beat the mixture on medium speed for about 2-3 minutes until it becomes pale and fluffy.
Why is this step so important? As you cream the butter and sugars together, you’re incorporating air into the mixture. This air will expand during baking, giving your cookies that delightful rise and creating a tender crumb. You should be looking for a light and airy consistency—almost like whipped cream but with a bit more body. Don’t rush this step! Allow yourself to enjoy the process; think of it as nurturing your dough. If you notice any lumps of butter remaining after mixing, don’t fret—just keep beating until everything is well combined and smooth.
Step 6: Adding Eggs – Binding Magic
Next up, it’s time to introduce our cold eggs into the buttery mixture. Crack both of your large eggs directly into the bowl with your creamed butter and sugars. I suggest letting them sit at room temperature for about five minutes before adding them; however, since they’re already cold, they’ll still work just fine! Mix on low speed until everything is just combined—this should take no more than one minute. Remember, overmixing can lead to tough cookies as it develops gluten in the flour; we want soft and chewy treasures instead!
This addition serves multiple purposes: not only do eggs bind all these glorious ingredients together, but they also contribute moisture and richness to our cookies. As you mix, take a moment to appreciate how the color transforms from pale yellow to an inviting golden hue—a true testament to what’s to come! Trust me on this: taking care at this stage will pay off when you sink your teeth into that perfect cookie.
Step 7: Dry Ingredients Unite – The Flour Power
Once your eggs are fully incorporated, it’s time to bring in our dry ingredients—the flour blend that will transform our luscious batter into cookie dough! In a separate bowl, whisk together your all-purpose flour, cornstarch, baking powder, baking soda, salt (and optional espresso powder if you’re feeling adventurous), ensuring everything is evenly distributed. This whisking might seem simple but it’s non-negotiable! It guarantees that there are no pockets of baking powder or soda lurking in your dough that could cause uneven rising or flavor inconsistencies.
With your dry ingredients ready, gently add them to the wet mixture in two or three increments. Using a spatula or wooden spoon rather than an electric mixer here is crucial—overmixing can lead to dense cookies instead of those dreamy puffy bites we’re aiming for! Fold everything together with love until just combined; you’ll notice some streaks of flour remaining—that’s okay! We want to avoid overworking this dough at all costs because gluten development can turn soft cookies into hockey pucks. When you see those last bits of flour disappear and feel that thick consistency forming under your spatula, stop right there!
Step 8: The Chocolate Affair – Chips Galore!
Now comes one of my favorite parts—the chocolate chips! Pour both types of chocolate chips into your nearly-ready dough—remember we’re using semi-sweet for that classic richness and milk or white chocolate for a touch of sweetness that plays beautifully against the dark chocolate notes. Additionally, if you’ve decided to add chopped walnuts or pecans for that nutty crunch (which I highly recommend!), toss those in too at this stage.
Using a gentle yet thorough folding motion—think of cradling each chocolate chunk instead of crushing them—incorporate them evenly throughout the cookie dough. This step isn’t just about distributing chocolate; it’s about ensuring each bite delivers an utterly intoxicating blend of flavors. Once you see those beautiful morsels peeking out from every angle of your dough ball without any signs of flour remaining, you’ve done it right! Now cover your bowl with plastic wrap or transfer the dough onto parchment paper shaped into a log if you’re feeling fancy; then pop it into the fridge for at least 30 minutes (or even overnight if you’re planning ahead).
Why chill? Oh my friends, this is where magic happens! Chilling allows those flavors to meld beautifully while firming up the butter—a game-changer when it comes time for baking. You’ll end up with cookies that have perfectly defined edges while maintaining that gooey center we all adore.
Baking Your Perfect Levain-Style Two-Chip Chocolate Chip Cookies
Step 9: Preheat & Portion – Setting Up for Success
While your dough chills (and trust me—you’ll want to be patient here), preheat your oven to 410°F (210°C). Yes, you read that right! The higher temperature gives us those wonderfully domed tops while keeping the centers soft and chewy—an absolute must for bakery-style cookies! Line two baking sheets with parchment paper; this will prevent sticking and promote even browning—a small but essential detail often overlooked.
Once preheated, remove your chilled cookie dough from the fridge; now we get to shape our cookies! Using a generous scoop (about 1/4 cup) or two large tablespoons per cookie will yield those thick beauties reminiscent of what you’d find at Levain Bakery itself. Place them on the prepared sheets with enough space between each mound because they will spread slightly during baking (but not too much!). Try not to flatten them out too much; we want height here!
Step 10: Bake Away – The Aromatic Finale
Slide those trays into your preheated oven and bake for about 10-12 minutes until they’re beautifully golden around the edges while still remaining soft in the center—it’ll feel like heaven when you catch whiffs wafting through your kitchen! Keep an eye on them during those final moments; every oven behaves differently so know what works best for yours.
When they come out looking like golden clouds on earth—trust me when I say patience is key here—allow them to cool on the tray for about five minutes before transferring them onto wire racks to cool completely (if you can wait!). These little gems are best enjoyed warm when they’re gooey inside—what could be better?
Conclusion:
As we wrap up our journey through crafting these Levain-Style Two-Chip Chocolate Chip Cookies together, I hope you’re feeling as excited as I am about what you’ve just created! This recipe isn’t just about blending ingredients; it’s about invoking memories of cozy afternoons spent with loved ones and indulging in rich flavors that dance on your palate. The combination of semi-sweet and milk chocolate chips creates an utterly intoxicating experience that keeps you coming back for more. Each cookie offers that perfect balance between crunchy edges and soft centers—truly extraordinary!
Why should this recipe be on your must-try list? Well beyond its wonderfully indulgent taste lies the sheer joy of making them! The process itself is accessible and rewarding; from measuring out those golden sugars to watching dough transform into beautiful puffs of deliciousness in your oven — every step brings you closer to something special. Picture yourself pulling these cookies from the oven during a family gathering or enjoying one with friends over coffee on a lazy Sunday afternoon; these moments are what truly elevate this recipe beyond mere dessert.
And let’s talk pairings—imagine savoring one alongside a steaming cup of rich coffee or perhaps a tall glass of cold almond milk; both create harmonious symphonies of flavors that will leave your taste buds dancing with joy! For an afternoon pick-me-up, try enjoying one with a scoop of vanilla coconut ice cream nestled between two warm cookies for an indulgent sandwich experience you won’t forget anytime soon. Each bite becomes more than just dessert; it becomes an experience wrapped in warmth and nostalgia.
Feeling adventurous? This recipe is wonderfully adaptable! You could swap out chocolate chips for dried fruit like cranberries or cherries for a tart twist or add shredded coconut for an exotic flair. Want something nutty? Toss in some chopped almonds instead of walnuts or pecans! The possibilities are endless, each variation promising its own unique charm. So go ahead—experiment with what resonates with you personally because baking should always be fun and reflective of who you are! I invite you to try this recipe, share your experiences with me, and let’s connect through our love for baking together!
Levain-Style Two-Chip Chocolate Chip Cookies

Indulge in the joy of baking with these Levain-Style Two-Chip Chocolate Chip Cookies. Thick, gooey, and bursting with flavor, these cookies are reminiscent of those found in the best bakeries. Imagine biting into a warm cookie with a golden crust that yields to a soft, melting center filled with both semi-sweet and creamy milk chocolate chips. Perfect for sharing during cozy gatherings or enjoying as a sweet treat after a long day, this recipe promises to become a cherished favorite in your kitchen.
- Prep Time: 15 minutes
- Cook Time: 12 minutes
- Total Time: 27 minutes
- Yield: Makes approximately 24 cookies 1x
- Category: Dessert
- Method: Baking
- Cuisine: American
Ingredients
- 1 cup unsalted cold butter, cubed
- ¾ cup packed brown sugar
- ½ cup granulated sugar
- 2 large eggs (cold)
- 2 ¾ cups all-purpose flour
- 1 tbsp cornstarch
- ¾ tsp baking powder
- ¾ tsp baking soda
- ¾ tsp salt
- 1 cup semi-sweet chocolate chips
- 1 cup milk or white chocolate chips
Instructions
- Preheat the oven to 410°F (210°C) and line two baking sheets with parchment paper.
- In a mixing bowl, cream together cold, cubed butter, brown sugar, and granulated sugar until light and fluffy (about 3–5 minutes).
- Add cold eggs one at a time, mixing until just combined.
- In another bowl, whisk together flour, cornstarch, baking powder, baking soda, and salt.
- Gradually fold dry ingredients into the wet mixture until just combined.
- Gently fold in both types of chocolate chips.
- Use a large scoop to portion out dough onto prepared baking sheets, spacing them apart.
- Bake for about 10–12 minutes until edges are golden but centers remain soft.
- Allow cookies to cool on the tray for five minutes before transferring to wire racks.
Nutrition
- Serving Size: 1 cookie
- Calories: 210
- Sugar: 14g
- Sodium: 90mg
- Fat: 10g
- Saturated Fat: 6g
- Unsaturated Fat: 4g
- Trans Fat: 0g
- Carbohydrates: 28g
- Fiber: 1g
- Protein: 2g
- Cholesterol: 30mg