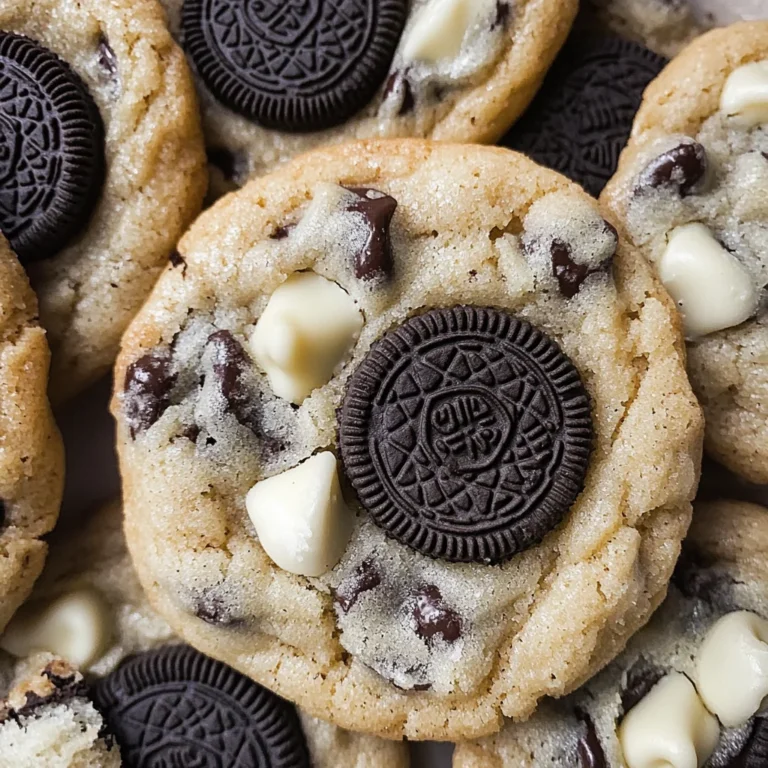
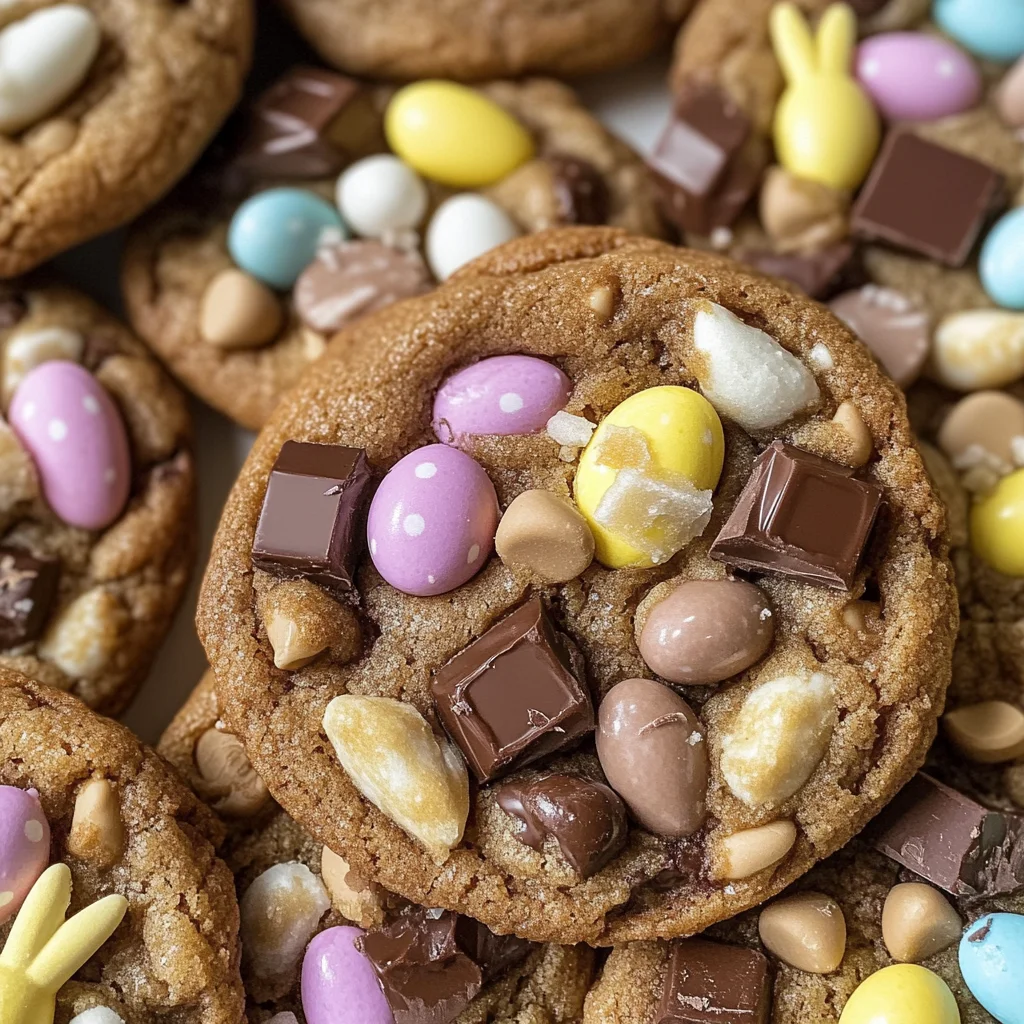
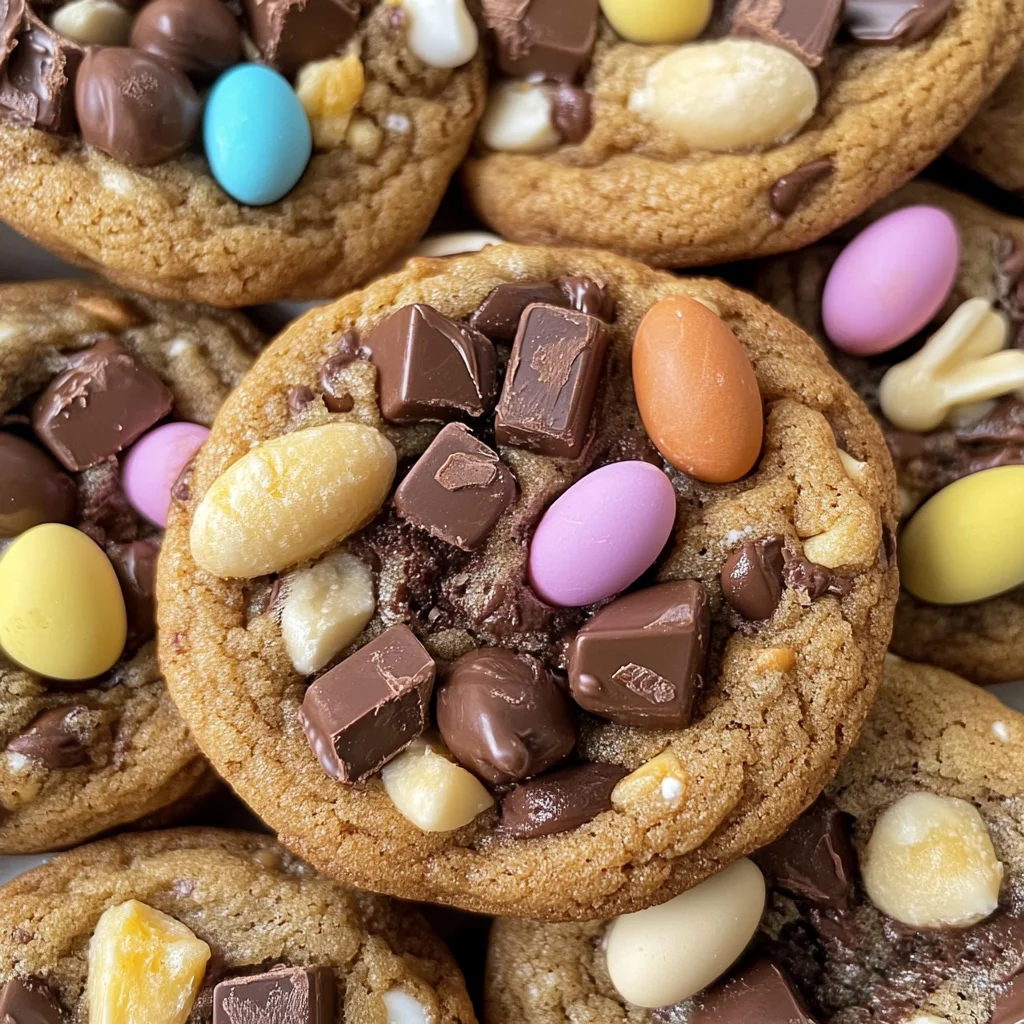
Easter Chocolate Cookies
There’s something truly magical about the smell of freshly baked cookies wafting through the kitchen, isn’t there? It feels like a warm hug, a reminder of shared moments and cherished memories. This Easter, I invite you to create that special atmosphere with a batch of my Easter Chocolate Cookies. These aren’t just any cookies; they’re soft, chewy delights filled with double chocolate chunks and topped with whimsical Malteser Bunnies and Mini Eggs. What makes these cookies so special is not only their rich flavor but also the joy they bring to every gathering, whether it’s an Easter brunch or a cozy afternoon treat with loved ones. The combination of textures—melting chocolate, crispy candy shells, and gooey centers—will transport you back to your childhood, where every bite feels like an adventure.
Baking has always been a form of love for me. It’s a way of taking ordinary ingredients and transforming them into something extraordinary—a delicious creation that can brighten anyone’s day. Each ingredient in these Easter Chocolate Cookies plays a vital role in crafting the perfect balance between sweetness and richness. As we embark on this delightful culinary journey together, I promise you’ll find that baking can be both simple and profoundly satisfying. So grab your apron, preheat that oven, and let’s dive into making these cookies that are destined to become a new family favorite!
Easter Chocolate Cookies: A Sweet Celebration for Your Taste Buds
Let’s talk about how to create these irresistible Easter Chocolate Cookies! This one-bowl recipe is not just easy, but it also minimizes cleanup—something we all appreciate after a fun day in the kitchen! The magic lies in combining delightful chocolate flavors with the playful charm of festive sweets that remind us of the joy this season brings. You’ll be surprised at how quickly you can whip up a batch that will have everyone swooning over their rich chocolatey goodness.
Ingredients:
As we prepare to gather our ingredients for these scrumptious Easter Chocolate Cookies, let’s take a moment to appreciate each element that contributes to this incredible treat. Remember, quality matters here; choosing the right ingredients will elevate your cookies from good to unforgettable.
- 160 g unsalted butter, softened to room temperature. This is absolutely paramount for achieving that dreamy texture we crave in our cookies. Room temperature butter creams beautifully with sugar to create air pockets that will help your cookies rise perfectly during baking. Look for high-quality butter—preferably European-style—with its higher fat content for an extra-rich flavor.
- 100 g white caster sugar adds sweetness while contributing to the cookie’s crisp edges when baked. The fine texture of caster sugar allows it to dissolve quickly into the butter, ensuring a smooth batter without any gritty bits. If you don’t have caster sugar on hand, you can pulse granulated sugar in a blender for a few seconds until finely ground.
- 150 g light brown sugar offers moisture and depth alongside its caramel notes, creating that delightful chewy texture we all adore. Brown sugar contains molasses which not only keeps our cookies soft but also enhances their flavor profile significantly. Trust me when I say the combination of white and brown sugars is what gives these cookies their irresistible appeal!
- 1 medium egg (at room temperature) serves as the binder in our cookie dough, ensuring all those lovely ingredients stick together nicely while adding richness and moisture. Using eggs at room temperature helps create an even batter that mixes more thoroughly—so don’t skip this step! If you forget to take your egg out ahead of time, simply place it in warm water for about five minutes.
- 1 medium egg yolk (also at room temperature) is non-negotiable; it adds richness without thinning out our cookie dough too much. This little gem helps contribute to the chewy texture we desire while making sure each bite melts deliciously in your mouth.
- 1 tsp vanilla extract infuses our cookies with warmth and complexity that elevates their flavor profile beyond just chocolatey goodness. Always opt for pure vanilla extract if possible—the difference in taste is astonishing compared to imitation vanilla!
- 280 g self-raising flour provides structure while allowing our cookies to rise beautifully during baking thanks to its built-in leavening agents. If you’re in a pinch without self-raising flour, you can substitute all-purpose flour mixed with 1 teaspoon of baking powder per cup; just remember this might slightly alter the texture.
- 0.5 tsp salt balances out the sweetness—it’s amazing how just a pinch can enhance flavors dramatically! Salt acts as a flavor enhancer while ensuring the chocolate shines through without tasting overly sweet.
- 200 g chocolate (either milk or white or even a mix) ensures each cookie is loaded with melty goodness! Choose high-quality chocolate bars over chips for better melting properties; chop them into chunks for those beautiful gooey pockets throughout each cookie.
- 12 Mini Malteser Bunnies, which are not just adorable but add delightful crunchiness along with creamy malt flavor that pairs beautifully with chocolate; they’re like tiny treasures waiting to surprise you in every bite!
- 12 Mini Eggs, typically found around Easter time—these colorful candies add fun pops of sweetness and crunchiness throughout our cookie dough! They also make decorating effortless; who wouldn’t love seeing those vibrant colors peeking through?
Equipment You’ll Need:
Before diving into mixing up our cookie dough, let’s ensure we have everything ready! Having the right tools on hand not only makes baking easier but also more enjoyable—you’ll feel like a true chef whipping up something wonderful!
- Mixing bowl – A large mixing bowl is essential for combining all of our ingredients effortlessly without worrying about spills or messes. Opt for glass or stainless steel as they retain heat well if using warm ingredients.
- Electric mixer – While you could blend everything by hand (and trust me—it’s great exercise!), using an electric mixer simplifies creaming butter and sugars together until fluffy—a key step for achieving those coveted light-textured cookies.
- Rubber spatula – Perfect for scraping down sides of bowls and folding in delicate ingredients like chocolate chunks or candies gently into your dough without deflating it too much.
- Baking sheets lined with parchment paper – Baking mats are another fantastic option if you have them! They prevent sticking while allowing even heat distribution—a must if you want perfectly baked cookies every time!
Now let’s get into preparing these heavenly Easter Chocolate Cookies!
Step 1: Creaming Butter and Sugars
Start by placing your softened unsalted butter along with both white caster sugar and light brown sugar into your mixing bowl. Using your electric mixer fitted with paddle attachments (or whisk if you’re feeling ambitious), mix on medium speed until light and fluffy—this usually takes about 2 minutes depending on your mixer power! This process known as creaming is crucial because it incorporates air into the mixture, giving rise to those tender yet chewy textures later on while simultaneously melting down any granules from sugars completely so smoothness abounds throughout every bite!
Step 2: Adding Eggs and Vanilla
Once you’ve achieved that fluffy consistency—which should look pale yellow—you’ll need to add both eggs followed by vanilla extract next! Make sure they’re at room temperature as mentioned earlier—this helps everything blend seamlessly together rather than forming clumps within your dough base! Mix again until fully incorporated; don’t rush this step because proper emulsification ensures no separation occurs when baked later!
Step 3: Incorporating Dry Ingredients
Now it’s time for our dry ingredients—the self-raising flour mixed gently alongside salt—to join this beautiful buttery mixture! Sift them directly over top before folding gently using your rubber spatula instead of blending vigorously; promoting ease here prevents overworking gluten which could result in toughened outcomes rather than delightfully soft treats desired here today!
Step 4: Chocolate Chunks & Candies Fold-In
Finally comes my favorite part—the indulgent addition of chopped chocolates plus mini Malteser bunnies alongside mini eggs folded carefully within already formed batter until evenly distributed throughout each corner—I promise they’ll melt wonderfully during baking producing pockets filled bursting flavors once cooled down afterwards post-bake too! Ensure everything looks beautifully swirled together before proceeding onto scooping out portions ready for oven action soon thereafter…
As we continue crafting these delectable delights further along this journey ahead—keep excitement brewing because soon enough you’ll be indulging yourself alongside friends & family alike sharing joyous moments made possible through simple acts such as sharing food prepared lovingly just like this recipe promises… Stay tuned as things heat up next round…
Step 5: Creaming the Butters – The Foundation of Flavor
Now that your butter is softened and ready, it’s time to embark on one of the most crucial steps in cookie-making: creaming the butter and sugars together. This technique is not just about mixing; it’s about creating a light and airy texture that will be the backbone of your Easter Chocolate Cookies. Start by adding both your white caster sugar and light brown sugar to the bowl with your butter. Use an electric mixer on medium speed, or if you’re feeling ambitious, a sturdy wooden spoon will do just fine—though it might take a bit more elbow grease! Cream them together for about 3-4 minutes until the mixture turns pale and fluffy. You want to see it change from a dense butter-sugar paste into something that resembles clouds—light, airy, and utterly intoxicating.
Why is this step so vital? Well, when you cream butter with sugar, you’re incorporating air into the batter, which helps create those delightful chewy cookies we all crave. If you skip this step or don’t mix long enough, your cookies may end up dense and overly compact—definitely not what we’re aiming for! Keep an eye on the color and texture; it should be significantly lighter than when you started. Trust me on this: investing a few extra moments here will yield cookies that are profoundly satisfying in every bite.
Step 6: Adding Eggs and Vanilla – The Heart of Your Cookies
Next up is introducing our eggs and that heavenly splash of vanilla extract into the creamed mixture. Crack your medium egg and egg yolk—both at room temperature—into the bowl, followed by a teaspoon of vanilla extract. The warmth from the eggs helps to emulsify everything beautifully, creating a smooth batter that’s rich in flavor. Using your mixer again (or your trusty wooden spoon), beat these ingredients together until they’re fully incorporated—about 1-2 minutes should do the trick.
Why do we add eggs at room temperature? Cold eggs can cause your batter to seize up or remain lumpy because they don’t blend as seamlessly with the fats in butter. The addition of vanilla is also non-negotiable; it brings depth and warmth to your cookies that pair perfectly with chocolate. As you mix, take a moment to inhale that intoxicating aroma—it’s like a warm hug from Grandma! Once you’ve achieved a smooth consistency with no visible streaks of egg or butter left behind, you’ll know you’re ready for the next step.
Step 7: Incorporating Dry Ingredients – The Magic Mix
Now comes one of my favorite parts—the moment when all those beautiful dry ingredients come together! In a separate bowl, whisk together your self-raising flour and salt until they’re well combined; this little act ensures even distribution throughout your dough. Slowly add this flour mixture into your wet ingredients in three parts using either a spatula or wooden spoon, folding gently but thoroughly after each addition. The goal here is to combine everything without overmixing; you’ll know it’s just right when there are no dry patches left but still some gentle lumps remain.
Why should we avoid overmixing? Overworking flour can activate gluten too much, leading to tougher cookies instead of those soft, chewy delights we’re after. As you fold in the dry ingredients, pay attention to how the dough transforms—it becomes thicker and richer with each addition! It’s like watching magic happen right before your eyes! Once everything is well combined, it’s time for the pièce de résistance—the chocolate!
Step 8: Chocolate Chunks Galore – A Decadent Add-In
Ahh, let’s talk chocolate! This is where things get really exciting as we introduce our 200 grams of luscious chocolate chunks—whether you choose milk chocolate for its sweet creaminess or dark chocolate for its bold intensity (or even a mix of both), I promise you won’t regret it! Chop your chocolate into generous chunks—think small but substantial pieces that will melt beautifully during baking. Fold these decadent morsels into your cookie dough using gentle motions; remember we’re aiming for an even distribution without overmixing!
At this point, you’ll notice how rich and luxurious your dough feels—this thick consistency is absolutely paramount for creating those satisfying bites filled with molten chocolate goodness. Take care not to rush through this step; letting those chocolate chunks mingle lovingly with the dough allows their flavors to infuse throughout each cookie as they bake. Once mixed well but still chunky (after all, we want surprises in every bite!), set aside about half of these delightful chunks for topping later because trust me—you’ll want that extra touch when they come out of the oven!
Conclusion:
As we bring our delightful journey through this recipe full circle, I can’t help but feel excited about how easy and rewarding it is to create these Easter Chocolate Cookies from scratch. With each ingredient carefully chosen—the rich chocolate chunks melting into the soft dough, complemented by the sweetness of Malteser Bunnies and Mini Eggs—you’ve crafted something truly extraordinary. The way they emerge from the oven, warm and inviting, is like unwrapping a gift filled with love and memories waiting to be made around family gatherings or festive celebrations.
Making these cookies isn’t just about satisfaction; it’s about creating moments of joy—whether it’s snuggling up on the couch with one after a long day or sharing them with friends during laughter-filled gatherings. The beauty lies not only in their taste but also in how accessible they are for bakers of all levels. Imagine pulling out a tray of freshly baked cookies; the aroma wafting through your home will have everyone gravitating toward the kitchen like bees to honey!
For an afternoon pick-me-up, savor one alongside your favorite cup of coffee or tea; the combination is simply heavenly! Or perhaps after dinner as dessert—imagine enjoying them warm with a scoop of vanilla ice cream melting on top; now that’s pure bliss! And if you’re feeling adventurous, consider pairing these cookies with fresh berries or drizzles of chocolate sauce for an added touch of decadence.
This recipe is wonderfully adaptable too! Feeling adventurous? You could swap out some chocolate chunks for peanut butter chips or even throw in some chopped nuts for extra crunch—each variation would bring its own unique flavor profile while still keeping that signature gooey texture intact. Imagine infusing orange zest into the batter for a zesty twist or even adjusting the sweetness level by using dark chocolate instead! The possibilities are endless! I invite you wholeheartedly to give these Easter Chocolate Cookies a try—share your experiences and creations with me because nothing brings me more joy than connecting over food made with love!
Easter Chocolate Cookies

Indulge in soft and chewy Easter Chocolate Cookies filled with double chocolate chunks! Bake this festive treat today and spread joy!
- Prep Time: 20 minutes
- Cook Time: 12 minutes
- Total Time: 32 minutes
- Yield: Approximately 24 cookies 1x
- Category: Dessert
- Method: Baking
- Cuisine: American
Ingredients
- 160 g unsalted butter (softened)
- 100 g white caster sugar
- 150 g light brown sugar
- 1 medium egg (room temperature)
- 1 medium egg yolk (room temperature)
- 1 tsp vanilla extract
- 280 g self-raising flour
- 0.5 tsp salt
- 200 g chocolate (chopped)
- 12 Mini Malteser Bunnies
- 12 Mini Eggs
Instructions
- Preheat your oven to 180°C (350°F).
- In a mixing bowl, cream together the softened butter, white caster sugar, and light brown sugar until light and fluffy.
- Add the egg, egg yolk, and vanilla extract; mix until well combined.
- In a separate bowl, whisk together the self-raising flour and salt. Gradually fold this mixture into the wet ingredients.
- Gently fold in the chopped chocolate, Mini Malteser Bunnies, and Mini Eggs until evenly distributed.
- Chill the cookie dough in the refrigerator for at least 30 minutes.
- Scoop the chilled dough onto a lined baking sheet, spacing about 2 inches apart.
- Bake for 10-12 minutes or until edges are set but centers remain soft.
- Allow cookies to cool slightly before transferring them to a wire rack.
Nutrition
- Serving Size: 1 serving
- Calories: 150
- Sugar: 12g
- Sodium: 45mg
- Fat: 7g
- Saturated Fat: 4g
- Unsaturated Fat: 3g
- Trans Fat: 0g
- Carbohydrates: 20g
- Fiber: 1g
- Protein: 2g
- Cholesterol: 25mg