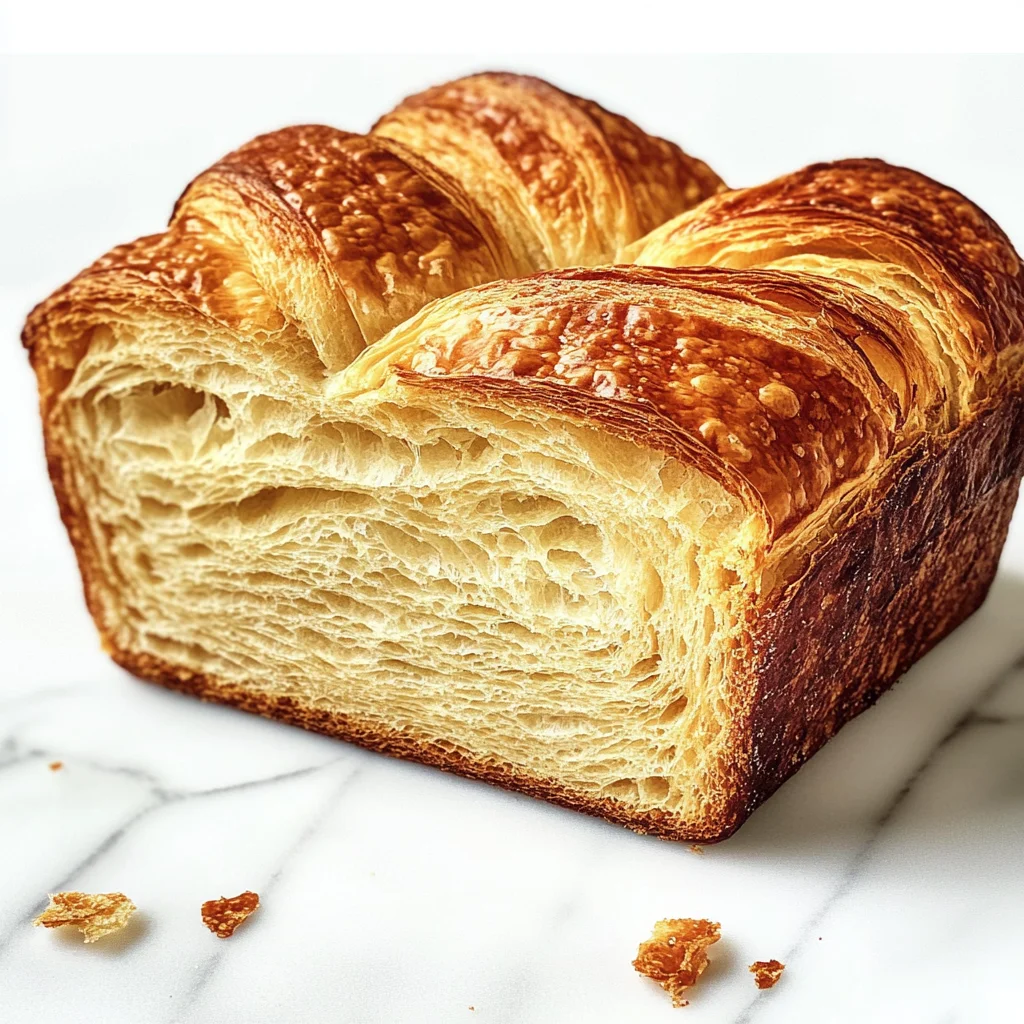
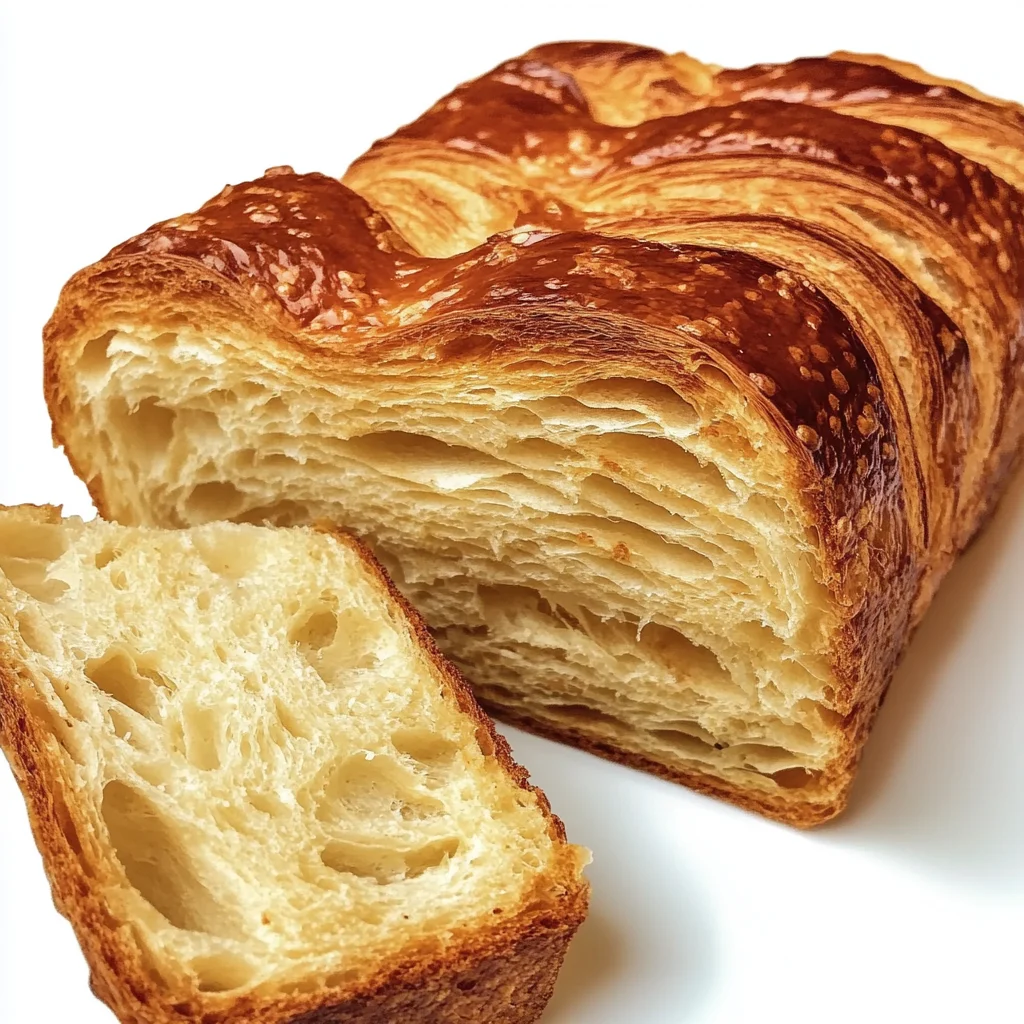
Croissant Bread Loaf
There’s something utterly enchanting about the aroma of freshly baked bread wafting through the kitchen, isn’t there? The heartwarming scent of toasty goodness envelops you like a cozy hug, and it’s truly one of life’s simple pleasures. But what if I told you that you could elevate that experience to something extraordinary? Enter the Croissant Bread Loaf—a delightful fusion that marries the flaky, buttery allure of croissants with the comforting embrace of a classic bread loaf. Imagine slicing into a warm loaf to reveal layers that shimmer with golden butter, each bite an intoxicating dance between rich flavor and airy texture. This recipe is not just about making bread; it’s about crafting a moment—a memory waiting to be shared over steaming cups of coffee or as a comforting afternoon snack.
Baking this Croissant Bread Loaf is more than following steps; it’s an adventure in your kitchen! Each fold and layer tells a story, weaving together tradition and innovation in a way that feels both familiar and refreshingly new. As you embark on this culinary journey, you’ll discover techniques that not only enhance your baking skills but also connect you deeply to the joy of cooking. Picture this: friends gathered around your table, eyes lighting up as they experience the unique combination of textures—flaky yet soft, buttery yet wholesome. Trust me when I say that this loaf will become a cherished favorite in your home.
Croissant Bread Loaf: A Flaky Delight for Any Occasion
This recipe embodies everything wonderful about baking—a blend of art and science that results in something truly special. Whether you’re serving it at brunch or savoring it quietly at home with a cup of tea, this Croissant Bread Loaf is bound to impress and satisfy. And let’s face it; who wouldn’t want to indulge in something that feels as indulgent as it sounds?
Ingredients:
As we embark on this delicious journey together, let’s take a moment to appreciate each ingredient’s role in creating our masterpiece. Each component plays its part in ensuring our Croissant Bread Loaf becomes an unforgettable experience.
- 1 cup whole milk, warmed to about 110°F. This warm liquid acts as a nurturing cradle for our yeast, encouraging it to bloom and activate. Milk adds richness and moisture to our dough, resulting in a soft crumb that beautifully complements the flaky layers we’re aiming for. Always check the temperature with your finger; too hot can kill the yeast while too cold will leave it sluggish—aim for that sweet spot!
- 2 and 1/4 teaspoons instant or active dry yeast. This little powerhouse is what brings our loaf to life! Yeast is essential for fermentation, producing carbon dioxide gas that makes our dough rise and gives it its airy structure. When using active dry yeast, remember to proof it first by dissolving it in warm milk with sugar—this ensures it’s alive and ready to work its magic.
- 3 tablespoons granulated sugar. Sugar isn’t just for sweetness; it provides fuel for our yeast during fermentation, helping create that lovely rise we desire. It also contributes to the browning process during baking, giving us a beautiful crust that’s simply irresistible!
- 1 and 1/4 teaspoons salt. Salt is crucial—not just for seasoning but also for controlling yeast activity. It strengthens gluten formation while enhancing all other flavors present in our dough. Just make sure it’s evenly distributed throughout!
- 3 tablespoons unsalted or salted butter, softened. Butter adds flavor and richness while contributing to the tender texture of our loaf. By softening it beforehand, we ensure it’s easily incorporated into the dough without creating lumps—trust me; these little details matter!
- 3 cups all-purpose flour, plus more as needed. Flour is the backbone of our dough; it’s what gives structure and strength through gluten development. All-purpose flour strikes a perfect balance between protein content—ensuring tenderness without being overly dense. If you’re feeling adventurous or need alternatives due to dietary restrictions, whole wheat flour can add depth but may require adjustments in hydration.
- 3/4 cup salted butter, slightly softened. This is where we start layering those delectable flaky textures! Using slightly softened butter allows us to incorporate it seamlessly during lamination—a technique vital for achieving those dreamy layers we all crave.
- 1 large egg. Eggs contribute moisture and richness while acting as an emulsifier for stability throughout our dough structure. Additionally, we’ll use this beauty later for an egg wash—the golden crown on top of our loaf!
- 1 tablespoon water. A small yet mighty ingredient! Adding water helps create an egg wash that’s easy to brush onto your rolls before baking, giving them that glossy finish we all admire in bakery loaves.
Equipment You’ll Need:
Before we dive into baking bliss, let’s gather some essential tools together! Having the right equipment makes everything smoother and ensures your experience is enjoyable from start to finish.
- Mixing bowl – A sturdy mixing bowl is essential for bringing together ingredients efficiently without making too much mess—look for one that’s large enough so you can knead comfortably later on.
- Whisk or stand mixer – For blending ingredients smoothly! If you’re using a stand mixer (which I highly recommend), you’ll find its strength invaluable during mixing and kneading phases—saving energy while ensuring excellent results.
- Rolling pin – This handy tool will help flatten out your dough perfectly during lamination—opt for one with comfortable grips if possible!
- Loaf pan (9×5 inches) – A good quality loaf pan ensures even cooking throughout your bread while providing structure during baking.
- Pastry brush – A simple yet critical tool used for applying egg wash—it gives your finished loaf that stunning sheen we all love.
Preparing the Croissant Bread Loaf
Step 1: Creating Our Dough
Let’s get started by preparing our dough—the heart of our Croissant Bread Loaf! Begin by whisking together warm milk with instant or active dry yeast along with sugar in your mixing bowl until combined—a ritual worth savoring! Allow this mixture to sit undisturbed for about five minutes until frothy—that bubbly surface indicates our yeast has awakened from dormancy and is ready to work its magic! Next comes adding salt along with softened butter followed by two cups of flour into this beautiful yeasty concoction; mix on medium speed until everything blends harmoniously into a smooth batter-like consistency—around two minutes should do nicely here!
Now here comes where things get hands-on: gradually incorporate additional flour while mixing on low speed until you observe soft dough forming around two minutes later—you want just enough tackiness without being overly sticky or dry! Once achieved, turn it out onto a floured surface where you’ll knead gently for about five minutes until smooth—it’s therapeutic work so don’t rush this step—it allows gluten strands time to develop which will ultimately give us elasticity during rising!
Step 2: Time To Rise!
Once kneaded into submission (but lovingly!), transfer your glorious dough into a greased bowl before covering tightly with plastic wrap or cloth—and now comes my favorite part: patience! Place this bowl somewhere warm (like near your oven) allowing it ample time (about 1.5 – 2 hours) until doubled in size—a beautiful transformation indeed! Trust me when I say watching your dough rise fills you with anticipation—it’s like witnessing magic unfold before your very eyes!
Step 3: Chill Out
After watching your dough grow plumply larger than life itself (and possibly taking selfies), it’s time for some cool-down action because we’re prepping for lamination now! Gently flatten out risen dough onto a lightly floured surface shaping into an approximate rectangle measuring around 10×14 inches before wrapping snugly in plastic wrap then chilling out together in refrigerator—for about twenty minutes—this crucial step helps firm up those lovely gluten strands making handling easier when incorporating buttery layers later on!
Step 4: The First Lamination
Once chilled adequately (don’t worry—you won’t forget!), slice softened butter into quarter-inch pieces placing them strategically atop chilled rectangle awaiting their moment—gently fold over half exposing those buttery slabs like closing curtains over an exquisite show awaiting its opening act! Rotate clockwise ninety degrees before rolling out again into another rectangular shape measuring roughly 9×12 inches—this marks step one toward achieving those heavenly flaky layers ahead! Next comes performing what bakers call “letter fold”—think folding paper like an envelope creating layers upon layers—we’re talking ultimate flakiness here folks! Tuck edges neatly before refrigerating again—for another twenty minutes—to relax after such hard work!
Stay tuned as we continue diving deeper into shaping our delicious Croissant Bread Loaf…
Step 5: Rolling and Shaping Your Croissant Bread Loaf
Now that your dough has been lovingly layered with that glorious softened butter, it’s time to roll and shape it into a loaf that will make your heart sing! Begin by rolling out your laminated dough into a rectangle about 9 inches wide and 12 inches long. This is the moment when patience truly pays off; you want to ensure that the layers of butter are evenly distributed throughout the dough. As you roll, take care to maintain an even thickness – this is crucial because it will affect how those buttery layers bake up into flaky perfection. Picture each layer as a delicate promise of flavor and texture waiting to be unveiled.
Once you have your rectangle perfectly shaped, it’s time to roll it up tightly like a jelly roll. Start at one of the shorter ends and gently but firmly roll towards the opposite end – think of tucking in those delightful layers of goodness. When you reach the end, pinch the seam to seal it securely; trust me, this step is non-negotiable! You want those layers to stay tucked in during baking. Now comes the cutting part, where you’ll slice your rolled dough into five even pieces, about 1.5 inches thick. These slices will become the individual rolls that create that beautiful loaf structure we’re aiming for. As you cut, let your knife glide through gently; this helps keep the layers intact, allowing for that stunning rise when they bake.
Step 6: The Second Rise – Patience Is Key
With your rolls cut and ready, it’s time for a second rise – a critical phase that allows your Croissant Bread Loaf to expand further and develop its airy structure. Place these beauties seam side down in a greased 9×5 inch loaf pan, ensuring they’re snug but not overcrowded; they need room to grow! Cover them with a clean kitchen towel or plastic wrap to create a warm environment while they rise. You’ll want them to sit undisturbed for about 45 to 60 minutes. And yes, I know waiting can be tough! But here’s why this step is essential: during this time, yeast continues its magic. It consumes sugar and produces carbon dioxide, which makes those rolls puff up beautifully.
As you wait, keep an eye on them – you should see noticeable growth! They’ll begin to fill out the pan and may even peak over the top slightly; this visual cue tells you they’re just about ready for baking. Remember, don’t rush this step; allowing sufficient time for rising ensures a light and fluffy loaf with those characteristic air pockets inside. If you’re unsure whether they’re ready after 45 minutes, give them another 15 minutes just to be safe; every kitchen has its own microclimate!
Step 7: Baking Your Croissant Bread Loaf
Ah, the moment we’ve all been waiting for: it’s finally time to bake our Croissant Bread Loaf! Preheat your oven to 350°F (175°C). This temperature is ideal; it will allow our layered dough to rise beautifully while also creating that golden-brown crust we all adore. As you prepare for baking, brush the tops of your rolls with an egg wash made from one large egg mixed with one tablespoon of water. This simple mixture is essential because it gives your loaf that gorgeous color and shine as it bakes – trust me when I say it transforms an ordinary loaf into something utterly intoxicating!
Carefully place your pan in the preheated oven and set a timer for one hour. However, after about 25 minutes of baking, be sure to tent your loaf with aluminum foil if it starts browning too quickly; we want golden perfection without burnt edges! During baking, watch how the kitchen fills with that heavenly aroma – it’s like a warm hug on a chilly day! But what’s truly magical happens when you check on your bread around the one-hour mark: use an instant-read thermometer inserted into the center of the loaf; you’re looking for an internal temperature of about 190°F (88°C) for perfect doneness.
Step 8: Cooling – The Final Touch
After an hour has passed (and believe me when I say time flies when you’re enveloped in delicious scents!), remove your Croissant Bread Loaf from the oven and let it cool in its pan for about 30 minutes before attempting to remove it. This cooling period is absolutely paramount because it allows steam within the bread to escape slowly rather than all at once; rushing this step could lead to a denser texture than desired.
Once cooled slightly in the pan, gently turn out your masterpiece onto a wire rack for an additional cool-down period of about 15 minutes more. This step allows air circulation around all sides of the loaf so that no moisture gets trapped underneath—nobody wants soggy bread! During this last stage of cooling, take a moment to admire your creation—the golden crust glinting softly under warm light and those flaky layers whispering promises of buttery bliss with every bite.
Conclusion:
As we wrap up our journey through crafting this beautiful Croissant Bread Loaf, I hope you’re feeling as inspired and excited as I am! Baking this unique blend of flaky croissant and comforting bread has been nothing short of magical—the way the layers meld together to create such an exquisite texture is truly extraordinary. Each bite delivers that perfect balance between buttery richness and airy fluffiness, while the subtle sweetness lingers on your palate like a cherished memory. It’s not just another bread recipe; it’s an experience steeped in warmth and creativity.
Why should this Croissant Bread Loaf be on your must-try list? Well, beyond its phenomenal taste lies the joy of making something so impressive yet accessible—it’s perfect for family breakfasts or cozy gatherings with friends. Picture this: pulling it from the oven with golden-brown tops glistening under soft lighting, then slicing into those airy layers while sharing stories around the table. The aroma will wrap around you like a warm hug; there’s nothing quite like it! Plus, its versatility allows you to serve it with creamy spreads or even sweet jams—each pairing elevates your moment into something profoundly satisfying.
Imagine savoring one warm slice spread with velvety almond butter or perhaps enjoying another piece drizzled with honey—oh my goodness! For an afternoon pick-me-up, pair it with freshly brewed coffee or tea; there’s simply no better way to enjoy those quiet moments of bliss. And if you’re feeling adventurous? Why not make a decadent French toast casserole using leftover slices? The possibilities are endless when you’re armed with such an incredible base recipe!
Feeling adventurous? This recipe is wonderfully adaptable! You could fold in chocolate chips before shaping or sprinkle some cinnamon sugar between those luscious layers for an enchanting twist—each variation adds a new layer to our beloved dish! Don’t hesitate to experiment; baking should be fun and expressive! I invite you to try this recipe, share your experiences with loved ones, and connect over our shared passion for homemade goodness. Let’s keep spreading joy through baking!
Croissant Bread Loaf

Indulge in the delightful experience of making Croissant Bread Loaf—an exquisite blend of flaky croissant and comforting bread that transforms your kitchen into a bakery. This recipe captures the essence of buttery layers and airy texture, perfect for breakfast or as an afternoon snack. Each slice reveals golden layers that promise a melt-in-your-mouth sensation, making it a wonderful centerpiece for gatherings or quiet moments with coffee. Get ready to impress family and friends with this easy-to-follow recipe that even novice bakers can master!
- Prep Time: 40 minutes
- Cook Time: 60 minutes
- Total Time: 1 hour 40 minutes
- Yield: Makes approximately 10 servings 1x
- Category: Breakfast
- Method: Baking
- Cuisine: French
Ingredients
- 1 cup whole milk, warmed to about 110°F
- 2 and 1/4 teaspoons instant or active dry yeast
- 3 tablespoons granulated sugar
- 1 and 1/4 teaspoons salt
- 3 tablespoons unsalted butter, softened
- 3 cups all-purpose flour, plus more as needed
- 3/4 cup salted butter, slightly softened (for lamination)
- 1 large egg (for egg wash)
- 1 tablespoon water (for egg wash)
Instructions
- In a mixing bowl, whisk together warm milk, yeast, and sugar. Let sit for about five minutes until frothy.
- Add salt, softened butter, and two cups of flour; mix on medium speed until smooth.
- Gradually add remaining flour while mixing on low until soft dough forms; knead gently on a floured surface for about five minutes.
- Place dough in a greased bowl and cover. Let rise in a warm place for 1.5 – 2 hours until doubled in size.
- Chill the risen dough for twenty minutes in the fridge.
- Roll out the chilled dough into a rectangle and place quarter-inch pieces of softened butter on half; fold over and roll again into a rectangle.
- Perform a letter fold and refrigerate for another twenty minutes.
- Roll out again into a rectangle, tightly roll it up from one end, pinch seams to seal, and cut into five equal pieces.
- Place rolls seam side down in a greased loaf pan; cover and let rise for another 45-60 minutes until puffy.
- Preheat oven to 350°F (175°C). Brush rolls with an egg wash made from beaten egg mixed with water.
- Bake for about one hour or until golden brown and internal temperature reaches 190°F (88°C).
- Cool in the pan for thirty minutes before transferring to a wire rack.
Nutrition
- Serving Size: 1 serving
- Calories: 170
- Sugar: 5g
- Sodium: 190mg
- Fat: 8g
- Saturated Fat: 5g
- Unsaturated Fat: 2g
- Trans Fat: 0g
- Carbohydrates: 21g
- Fiber: <1g
- Protein: 4g
- Cholesterol: 30mg