Amish Dinner Rolls Recipe (60 Minute Rolls)
When I think about the warmth of home, one of the first things that comes to mind is the soft, buttery aroma wafting through the air as a batch of freshly baked Amish dinner rolls emerges from the oven. It’s more than just a recipe; it’s an experience, a revelation that encapsulates comfort and connection. The moment you sink your teeth into these delightful rolls, you are met with a melt-in-your-mouth texture that transports you to simpler times where family gathered around the table to share stories and laughter. This Amish Dinner Rolls Recipe (60 Minute Rolls) is not just about filling your belly; it’s about filling your heart with joy and nostalgia.
What I adore most about these rolls is their incredible versatility. They serve as a perfect accompaniment to roasted meats or hearty stews, yet they can also stand alone as a lovely treat with a schmear of butter or jam. Imagine pulling apart one of these warm rolls, each fluffy layer revealing its tender crumb – it’s truly extraordinary. And, let me assure you, you don’t need hours in the kitchen to create this magic; in just 60 minutes, you’ll have beautiful, golden-brown rolls ready for your table. So grab your apron and let’s get started on this delightful journey toward baking perfection!
Amish Dinner Rolls Recipe (60 Minute Rolls): Soft Cloud-like Delights
Are you ready to embark on a culinary adventure that will fill your home with warmth and happiness? These Amish dinner rolls are incredibly easy to make, and they come together so quickly that you’ll find yourself baking them time and again!
Ingredients:
As we dive into this wonderful recipe, let’s take a moment to appreciate each ingredient’s role in crafting these delicious rolls. Every single one has its own story and significance, contributing to the overall harmony of flavors and textures.
- 1/2 cup warm water (approx. 110°): This liquid gold is essential for activating the yeast, which is the magic ingredient in our rolls. The warmth is crucial here; if it’s too hot, it could kill the yeast (and we definitely don’t want that!), while too cold won’t activate it adequately. Aim for that sweet spot at around 110°F—think comfortably warm like a cozy blanket on a chilly day.
- 2 tablespoons yeast: Yeast is our little miracle worker! It ferments and produces carbon dioxide gas when combined with sugar and warmth, causing our dough to rise beautifully. Use fresh yeast for optimum results—check expiration dates on packets because old yeast can lead to flat rolls. And trust me; no one wants flat rolls!
- 4 tablespoons butter: Oh, butter! The key player in making our dinner rolls rich and tender. When melted into our mixture, it adds moisture and flavor while creating that delightful softness we crave in every bite. Be sure to use unsalted butter for better control over seasoning since we’ll be adding salt later.
- 1 cup warm milk: Just like our water, we want this milk lukewarm so it integrates smoothly into our dough without shocking our yeast. The milk enriches our rolls with creaminess and contributes to their slightly sweet flavor profile—a little touch of indulgence goes a long way!
- 2 tablespoons brown sugar: This adds not only sweetness but also depth! Brown sugar contains molasses which brings a beautiful caramel note to our dinner rolls. Plus, sugar feeds the yeast during fermentation, helping those magical bubbles form.
- 1 large egg: Eggs play multiple roles—they add structure due to their proteins while also enriching our dough with fat which supports that lovely soft texture we’re after. Make sure it’s at room temperature before incorporating it; this helps everything blend more cohesively.
- 1 1/4 teaspoons salt: Salt might seem simple but it’s absolutely paramount for balancing flavors in any bread recipe! It enhances sweetness while controlling fermentation rates by slowing down yeast activity slightly—this balance ensures we get airy yet flavorful rolls.
- 4 – 4 1/4 cups bread flour: The backbone of our recipe! Bread flour has higher protein content than all-purpose flour which gives us that beautiful chewy texture we associate with good bread. Start with 4 cups but keep some extra flour nearby; depending on humidity levels or even how you measure flour may require slight adjustments for perfect consistency.
Equipment You’ll Need:
Now that we’ve gathered all these lovely ingredients, it’s time to talk tools! Having the right equipment makes all the difference in achieving success when baking—think of them as your trusty companions along this journey.
- Mixing bowl: A large mixing bowl is essential for combining all your ingredients without any mess spilling over the sides! Choose one that’s big enough so you can easily knead or mix without worry—it should feel like an open canvas ready for creation!
- Dough hook mixer (or hands): A stand mixer fitted with a dough hook makes kneading effortless while ensuring uniform incorporation of ingredients. If you prefer getting hands-on (which I sometimes do!), kneading by hand allows you to connect deeply with your dough—just remember it might take a bit longer!
- Tea towel or plastic wrap: Covering your dough during rising periods keeps it warm and prevents drying out—this step encourages those beautiful fluffy textures we’re after! A simple kitchen towel will do just fine!
- 9×13 pan (or round pans): Depending on how you wish to shape your dinner rolls, having either type of pan makes all the difference! The traditional rectangular pan works wonderfully if you’re aiming for classic shapes; round pans can create more pull-apart options which are fun too!
With all these wonderful tools at your disposal, you’re ready to create something truly special!
Preparing the Amish Dinner Rolls Recipe (60 Minute Rolls)
Step 1: Activate Your Yeast
First things first—let’s wake up that yeast! In a large mixing bowl, combine the warm water with those eager little yeast granules you’ve measured out. Allow them to sit undisturbed for about five minutes until they become frothy—this process is known as proofing. It’s crucial because it confirms whether your yeast is alive and kicking before we toss in all those other ingredients! You should see bubbles forming—that’s your cue that magic is happening!
Step 2: Create Your Flavor Base
While waiting patiently for those bubbles (trust me; it’s worth every second!), gently melt your butter over low heat—I recommend doing this on the stovetop rather than microwaving so you don’t risk overheating it—and warm up your milk until lukewarm as well. Once both are ready, mix them together along with brown sugar until dissolved completely before pouring this luscious mixture into your bubbly yeast concoction. Adding these fats creates richness while enhancing overall flavor—the result will be utterly intoxicating!
Step 3: Incorporate Wet Ingredients
Next up is adding in that room-temperature egg—yes! Mix everything together well until fully incorporated—it should look glossy and inviting now! At this point, sprinkle in salt followed by four cups of bread flour gradually while mixing continuously until you’ve formed dough that’s starting to come together nicely but still slightly tacky—don’t rush this step; allow yourself time to enjoy watching everything merge harmoniously!
Step 4: Kneading Time!
Now comes my favorite part—the kneading process! If using a stand mixer fitted with a dough hook set on medium speed (around speed two), let it work its magic for about two minutes until everything becomes cohesive like you’re molding something special from clay! If you’re kneading by hand instead? Dive right in—you’ll want roughly eight minutes of kneading action involving stretching & folding motions till smooth & elastic develops (you’ll feel proud!). Throughout this process add small dustings of additional flour only if necessary—you want just enough stickiness left behind so they rise beautifully later on without becoming dry!
As you complete these initial steps filled with anticipation & excitement—the next stages involve letting those little beauties rise & bake perfectly golden brown await us soon enough… stay tuned because trust me when I say every moment spent here will reward itself tenfold once served alongside dinner or enjoyed solo slathered generously with butter straight from oven blissfully warm goodness awaits ahead!!
Step 5: Kneading to Perfection – A Dance of Dough
Kneading is where the magic truly begins! As you add in your 4 cups of bread flour alongside the salt, you’re not just mixing ingredients; you’re developing the gluten structure that will give these rolls their delightful, airy texture. Gluten, a protein found in wheat, provides elasticity and strength to your dough, which is essential for achieving that pillowy softness we all crave when biting into a freshly baked roll. Using a stand mixer with a dough hook on speed 2, knead the mixture for about 3 to 5 minutes. You want to watch for that transformative moment when the dough begins to pull away from the sides of the bowl and forms a cohesive mass. If it feels overly sticky — like it’s clinging to your fingers and refusing to let go — don’t panic! Just sprinkle in a little more flour, one tablespoon at a time, until it reaches that perfect silky consistency.
But if you’re kneading by hand, allow yourself some patience — this can take about 8 to 10 minutes. It’s a gentle workout! Use the heel of your hand to push down and stretch the dough before folding it back over itself. This rhythmic motion isn’t just exercise; it’s vital for building that gluten network we discussed earlier. Trust me on this—taking your time with this step promises rolls that are not only soft but also have that incredible bite and fluffiness that will leave everyone asking if you’ve been baking for years!
Step 6: The First Rise – Letting Your Dough Rest
Once you’ve shaped your dough into a beautiful ball and placed it in a lightly greased bowl (don’t forget to cover it with a clean kitchen towel!), it’s time for the first rise, which lasts about 15 minutes. This resting period is crucial as it allows the yeast to work its magic. During this time, the yeast consumes the sugars in your mixture and produces carbon dioxide gas, causing those lovely bubbles that will make your rolls light and airy. While you’re waiting, I encourage you to take a moment to appreciate this transformative process; imagine how those tiny microorganisms are helping create something delicious right in front of you!
After about 15 minutes of patience (and perhaps some joyful daydreaming about how amazing your rolls will taste), peek under the towel. You should see that your dough has puffed up slightly! It may not look like much at first glance, but trust me — this is just the beginning of its journey toward becoming an extraordinary dinner roll.
Step 7: Shaping Those Little Clouds of Joy
Now comes one of my favorite parts: dividing and shaping! Gently punch down your risen dough (don’t worry; this is normal and actually necessary!), then turn it out onto a floured surface. This step releases that built-up carbon dioxide, redistributing it throughout the dough so each roll gets its fair share of airiness. Here’s where creativity can shine: divide your dough into roughly equal pieces — I aim for about 15-20 depending on how big I want my rolls. Each piece should weigh around 2 ounces; using a kitchen scale can be helpful here if you want uniformity.
To shape them into smooth balls, cup each piece with your palm against the countertop and gently rotate until they form a perfect orb. Remember to keep your hands lightly buttered — not only does this prevent sticking but adds an additional layer of flavor! When placing them into your greased pan (a classic 9×13 works beautifully), give them just enough space so they can rise further without crowding each other too much. If you prefer taller buns, cluster them closer together; for wider ones, space them out more generously. There’s something profoundly satisfying about creating beautiful little clouds of joy ready for baking!
Step 8: The Second Rise – Patience Pays Off
Cover those little beauties again with a tea towel and let them rise in their warm spot for another glorious 15 minutes. During this second rise, they’ll gain even more volume as they soak up warmth from their surroundings—this is absolutely paramount for achieving that fluffy texture we adore! You might notice they won’t double in size like during the first rise; instead, they’ll become puffy and soft—exactly what you’re aiming for.
While waiting, preheat your oven to 400°F (don’t skip this step!). A properly heated oven ensures even cooking from start to finish and helps develop that lovely golden crust on top as soon as those rolls hit the heat—so very important! After those magical fifteen minutes have passed and you’ve taken some moments to savor that yeasty aroma wafting through your kitchen, give one last check on those rolls before popping them in the oven; they should look plump but not overly expanded.
Baking Your Perfect Amish Dinner Rolls Recipe (60 Minute Rolls)
Step 9: The Grand Finale – Baking Brilliance
Now comes perhaps one of the most exhilarating moments in baking — sliding those beautifully risen rolls into the hot oven! Bake them for approximately 15-18 minutes until they’re gloriously golden brown on top—oh, just imagine how phenomenal they’ll smell filling your home! Keep an eye on them during those final moments because every oven is unique; what looks perfect in my kitchen might require an extra minute or two in yours.
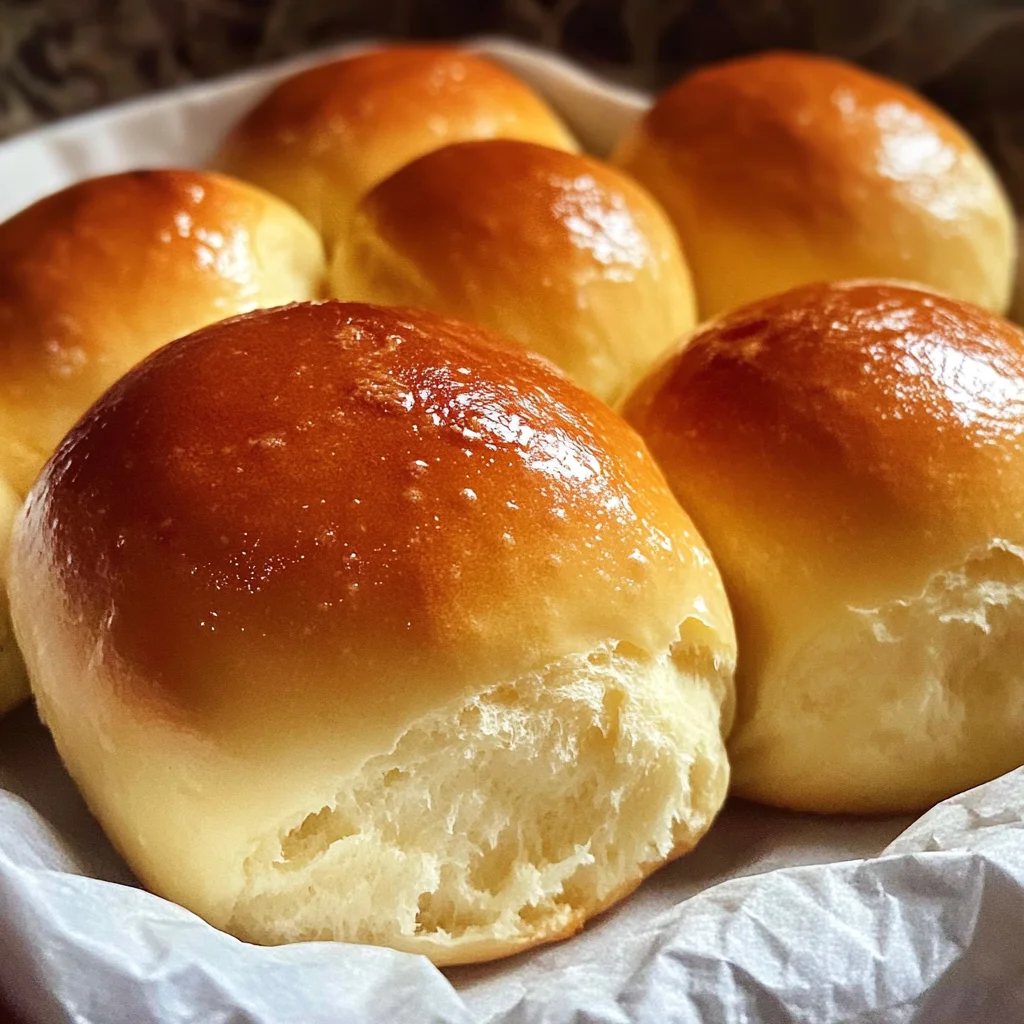
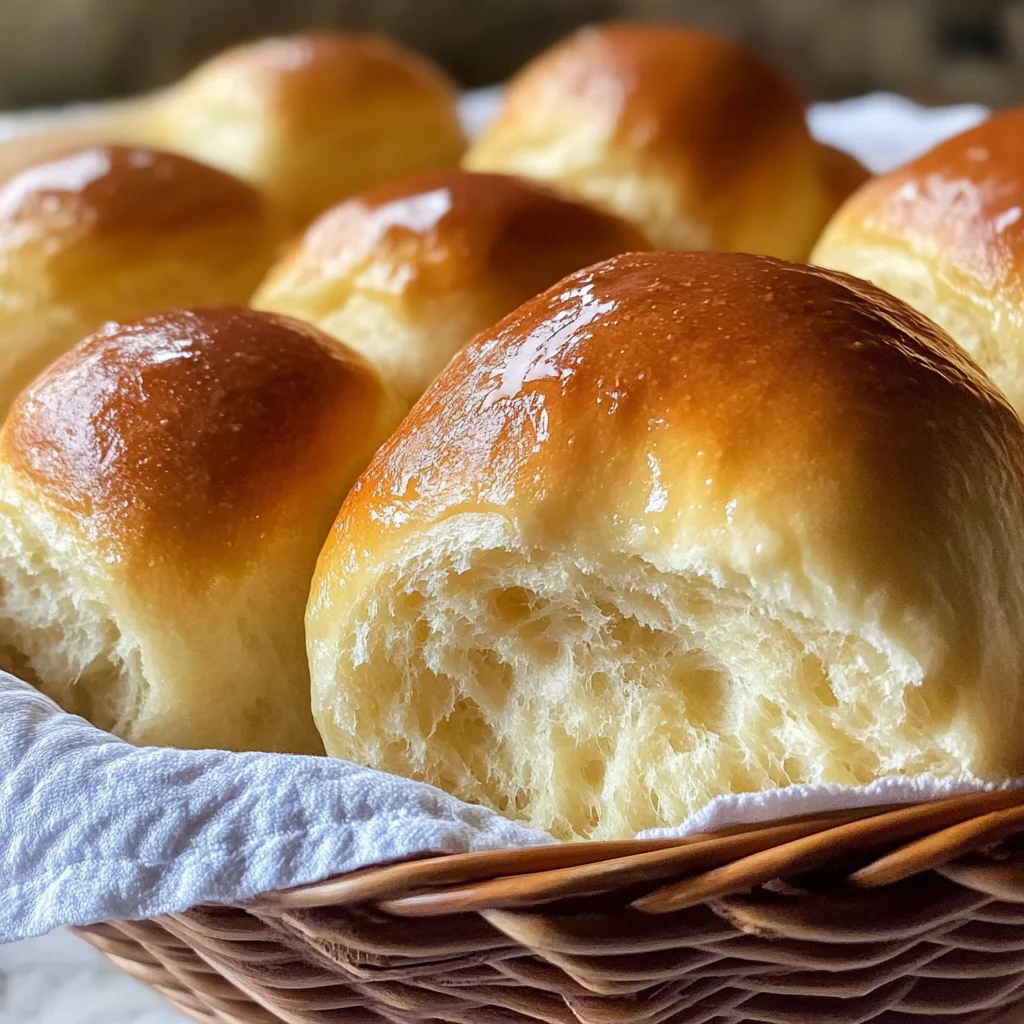
When they’re ready (you’ll know by their gorgeous color), take them out with care and immediately brush melted butter over their tops—this finishing touch serves multiple purposes: it enhances flavor with luscious richness while also giving them that shiny appearance we all love so much! Let them rest briefly before serving—this short pause allows steam inside each roll to settle just right so when you pull apart one tender piece from another, there’s no tearing or collapsing—just sheer perfection!
Once cooled slightly (if you can resist!), gather around your loved ones and enjoy these extraordinary creations together. There’s truly nothing like homemade bread fresh from the oven—it nourishes not just our bodies but our spirits too as we share stories around our tables filled with warmth and laughter.
And remember: these Amish dinner rolls are fantastic fresh but store beautifully in an airtight container or bag if you’d like leftovers—or freeze some for later enjoyment because who wouldn’t want freshly baked goodness ready at their fingertips? Now go forth and bake with joy — I promise you these rolls will become an unforgettable staple at every gathering!
Storage and Enjoyment Tips for Your Amish Dinner Rolls Recipe (60 Minute Rolls)
Ah, the moment has finally arrived! You’ve crafted these delightful Amish dinner rolls with your own hands, and now they’re ready to bring warmth and joy to your table. The aroma wafting through your kitchen is nothing short of intoxicating, and I can practically hear the soft whispers of satisfaction from friends and family as they pull apart those fluffy clouds of goodness. But what about the leftovers, you ask? Let’s dive into how to keep this deliciousness fresh and inviting for days to come!
Storing Leftover Amish Dinner Rolls Recipe (60 Minute Rolls)
To store your leftover Amish dinner rolls, I recommend using an airtight container; this will help retain their soft texture and buttery flavor. Place them in a cool, dry spot on your countertop—no need to refrigerate unless you live in an especially humid environment. When stored properly, these rolls can last for about 3-4 days, though I promise you, they’ll be devoured long before that! To maintain their quality, consider placing a slice of bread inside the container with the rolls; this little trick adds moisture and keeps everything beautifully soft. Even after a few days, you’ll find that they still taste divine—just slightly less pillowy than when they first came out of the oven. For reheating, pop them in a 350°F oven for about 5-10 minutes until warmed through; trust me, it brings back that freshly baked charm!
Freezing Amish Dinner Rolls Recipe (60 Minute Rolls) for Later
If you find yourself with more rolls than you can handle—or if you simply want to prepare ahead—freezing these beauties is a fantastic option! To freeze them properly, allow the rolls to cool completely after baking. Then wrap each one tightly in plastic wrap or aluminum foil before placing them in a freezer-safe bag or container. They can be stored frozen for up to three months without losing their delightful qualities. When you’re ready to enjoy them again, simply take out as many as you need and let them thaw at room temperature for about 30 minutes before reheating them in the oven. This is such a convenient way to have homemade goodness on hand whenever you desire it—perfect for unexpected guests or cozy family dinners!
Amish Dinner Rolls Recipe (60 Minute Rolls)

Experience the warmth and nostalgia of homemade bread with these delightful Amish dinner rolls. In just 60 minutes, you can enjoy soft, buttery rolls that are perfect for any meal or gathering. Their light, pillowy texture makes them an ideal accompaniment to roasted meats, hearty soups, or simply spread with your favorite jam or butter. This quick and easy recipe is designed for bakers of all skill levels, ensuring that anyone can create these tender rolls that will fill your home with irresistible aromas and bring joy to your table. Get ready to bake a batch that will leave everyone asking for seconds!
- Prep Time: 15 minutes
- Cook Time: 18 minutes
- Total Time: 33 minutes
- Yield: Approximately 15 rolls 1x
- Category: Bread
- Method: Baking
- Cuisine: American
Ingredients
- 1/2 cup warm water (approx. 110°)
- 2 tablespoons yeast
- 4 tablespoons unsalted butter
- 1 cup warm milk
- 2 tablespoons brown sugar
- 1 large egg
- 1 1/4 teaspoons salt
- 4 – 4 1/4 cups bread flour
Instructions
- Activate the yeast: In a large bowl, combine warm water and yeast. Let sit for about five minutes until frothy.
- Prepare the flavor base: Melt butter and warm milk until lukewarm. Mix into yeast mixture along with brown sugar.
- Incorporate wet ingredients: Add the room-temperature egg and mix well.
- Knead the dough: Gradually add salt and flour until a smooth, elastic dough forms (about 3-5 minutes in a stand mixer or 8-10 minutes by hand).
- First rise: Shape dough into a ball, place in a greased bowl, cover, and let rise for about 15 minutes.
- Shape rolls: Punch down the dough, divide into equal pieces (15-20), shape into balls, and place in a greased pan.
- Second rise: Cover shaped rolls and let rise for another 15 minutes while preheating the oven to 400°F.
- Bake: Bake in preheated oven for about 15-18 minutes until golden brown; brush with melted butter after baking.
Nutrition
- Serving Size: 1 roll
- Calories: 185
- Sugar: 2g
- Sodium: 150mg
- Fat: 6g
- Saturated Fat: 3g
- Unsaturated Fat: 3g
- Trans Fat: 0g
- Carbohydrates: 28g
- Fiber: 1g
- Protein: 5g
- Cholesterol: 20mg