Baked Lemon Pudding
There’s something utterly enchanting about the way a recipe can bridge generations, drawing us into a world filled with warmth, nostalgia, and a touch of culinary magic. Baked Lemon Pudding is one such treasure—a dessert that dances on the palate, igniting memories of sunlit afternoons and laughter shared over the dinner table. The bright, zesty notes of fresh lemon juice swirl together with the creamy texture to create a dessert that is more than just food; it’s an experience that wraps around you like a warm hug. Each spoonful is a revelation, offering not just sweetness but an uplifting brightness that feels like spring in every bite. Trust me when I say that this Baked Lemon Pudding will not only satisfy your sweet tooth but also create moments of joy and connection.
As you embark on the journey of making this delightful treat, you’ll discover how simple ingredients can transform into something truly extraordinary. This recipe serves six, making it perfect for sharing with loved ones or enjoying as a cozy indulgence all by yourself. With just 15 minutes of prep time and 35 minutes in the oven, you’ll have a beautifully golden pudding ready to impress at any gathering or quiet evening at home. The process itself is straightforward yet so rewarding—each step brings you closer to that moment when you pull your creation from the oven, its surface glistening with promise. So gather your ingredients, roll up your sleeves, and let’s dive into the world of Baked Lemon Pudding together!
Baked Lemon Pudding: A Zesty Delight
Get ready to indulge in the light and refreshing flavors of Baked Lemon Pudding! This delightful dessert is perfect for any occasion—be it brunch gatherings or an elegant dinner party. Its balance of sweetness and tartness is nothing short of spectacular, leaving your taste buds dancing with joy after each bite.
Ingredients:
As we embark on this delicious culinary adventure together, let’s take a moment to appreciate each ingredient that plays a vital role in creating our Baked Lemon Pudding. Each one adds its unique character to the dish, contributing not only flavor but also texture and overall experience.
- 1 cup granulated sugar. This is what brings sweetness to our dessert and balances the tartness of the lemons beautifully. Granulated sugar dissolves readily in liquids, which will help us achieve that smooth consistency we’re after. If you’re looking for alternatives, feel free to experiment with coconut sugar or even honey—just keep in mind that these will slightly alter both flavor and texture.
- 1/4 cup all-purpose flour. Flour acts as a structure builder in our pudding; it helps bind everything together while contributing to its lightness without being overly dense. Make sure to measure your flour correctly—spooning it into your measuring cup and leveling off ensures you won’t end up with too much flour, which could lead to a heavier pudding than intended.
- 1/4 teaspoon salt. This might seem minor, but salt is essential—it enhances flavors by contrasting sweetness and elevating the overall taste profile of our pudding. It’s like adding a secret ingredient that makes everything else shine brighter!
- 1 cup milk. Whole milk gives our pudding richness and creaminess; it’s also crucial for providing moisture during baking. If you’re looking for dairy-free options, unsweetened almond milk or oat milk can work wonderfully here; just keep an eye on how they affect the final texture.
- 1/2 cup fresh lemon juice. Freshly squeezed lemon juice is where we get that vibrant tangy flavor! Using fresh lemons rather than bottled juice makes all the difference; it introduces brightness and complexity that pre-packaged juices simply can’t replicate.
- Zest of 1 lemon. The zest amplifies that citrusy aroma and packs an extra punch of lemon flavor without adding acidity. When zesting your lemon, make sure not to include any bitter white pith beneath—the zest should be bright yellow for maximum flavor.
- 3 large eggs, separated. Eggs are our binding agents here: yolks enrich our pudding while whites provide airy lift when whipped into stiff peaks later on in the process. Remember to separate them carefully; even a hint of yolk in your whites can prevent them from whipping properly!
- 1/4 teaspoon cream of tartar. This ingredient stabilizes our egg whites as we whip them into those glorious peaks! It acts as an acid that helps achieve volume without deflating easily—a non-negotiable step if you want that airy texture we’re aiming for.
- Powdered sugar (for serving). A light dusting of powdered sugar on top before serving adds just enough sweetness while presenting beautifully—like icing on the cake! Plus, it contrasts nicely against the golden hue of your baked pudding.
Equipment You’ll Need:
Having the right tools at your disposal makes all the difference in ensuring your baking adventure goes smoothly! While these items aren’t “ingredients” per se, they are essential partners in creating something wonderful.
- Mixing bowls – A set of mixing bowls allows you flexibility while preparing different components simultaneously! Opt for glass or stainless steel bowls—they’re durable and won’t react with acidic ingredients like lemon juice.
- Whisk – A good whisk is vital for achieving smooth mixtures without lumps! Whether it’s handheld or electric doesn’t matter as much as having something reliable; whisking by hand gives you better control over textures throughout each step.
- Measuring cups & spoons – Accurate measurements ensure consistency in every batch! Invest in a set with clear markings—this is crucial because baking often relies heavily on precision for success.
- Baking dish (8×8 inches) – A square baking dish is perfect for this recipe since it provides even heat distribution while allowing enough space for rising during baking! Glass or ceramic works best as they hold heat well—but any oven-safe dish will suffice if needed!
Now that we’ve gathered our ingredients and equipment together like old friends ready for a reunion let’s delve into preparing this delightful Baked Lemon Pudding!
Step 1: Preheat Your Oven
To start off on the right foot, preheat your oven to 350°F (175°C). This step is absolutely paramount because starting with an adequately heated oven sets up optimal conditions for even baking right from the get-go—the last thing you want is uneven cooking halfway through! While that’s happening, take some time to prepare your baking dish by greasing it lightly; this will allow easy removal later on once everything has baked perfectly golden brown!
Step 2: Whisk Together Dry Ingredients
In one mixing bowl, combine 1 cup granulated sugar with 1/4 cup all-purpose flour and 1/4 teaspoon salt using your whisk until well incorporated—you want these dry elements evenly distributed before adding any liquids so they mix seamlessly later! Take note: Whisking creates tiny air pockets within these dry ingredients which helps lighten up our final batter too!
Step 3: Combine Wet Ingredients
Next up comes blending those beautiful wet ingredients together! Gradually add 1 cup milk along with 1/2 cup fresh lemon juice and zest into your dry mixture while continuing to whisk until everything forms a smooth batter without lumps—a visual cue here would be resembling pancake batter consistency but slightly thinner due to added liquid from milk! Don’t rush this step; taking care now pays off later when it’s time for baking!
Step 4: Prepare Egg Mixture
In another clean bowl (it’s crucial no grease remains!), beat those separated egg yolks until they’re pale yellow before gently folding them into our luscious lemon mixture—we want maximum incorporation without overworking either component at this stage since we’re building layers upon layers here!
Stay tuned because we’ll keep unfolding this delicious journey together as we whip those egg whites next…
Step 5: Whisking Up the Egg Yolks for Creamy Goodness
Now, we dive into the heart of our Baked Lemon Pudding, where the magic truly begins. In a separate mixing bowl, take those three large egg yolks and beat them until they are a luscious golden hue—think sunshine in a bowl! This step is crucial because egg yolks bring richness and depth to our pudding. They’re not just there for flavor; they help create that creamy texture that makes this dessert feel so indulgent. As you whisk, feel free to channel all your excitement about this dish into your technique. Use a fork or a hand mixer on medium speed, and gradually add in your lemon mixture—yes, that delightful concoction of milk, lemon juice, and zest we prepared earlier.
As you incorporate the liquid into the yolks, it’s essential to do it slowly to prevent any scrambling (nobody wants that!). Picture yourself gently introducing flavors rather than dumping everything in at once like an uninvited guest at a party. This method ensures the yolks blend seamlessly into the mixture, creating a harmonious base for our pudding. Once combined, set this aside as we move to one of my favorite parts of the recipe—whipping those egg whites!
Step 6: Whipping Egg Whites Into Fluffy Clouds
With your lemon-yolk mixture patiently waiting, it’s time to tackle the egg whites! Grab a clean mixing bowl—you want it impeccably clean because even the smallest trace of fat can hinder those whites from reaching their full potential. Add in your egg whites along with 1/4 teaspoon of cream of tartar; trust me on this ingredient—it acts as a stabilizer and helps achieve those stiff peaks we’re after. Using an electric mixer (or whisk if you’re feeling adventurous), start beating the egg whites on medium speed until they begin to froth and turn foamy.
The transformation is utterly intoxicating as you watch these humble ingredients morph into light, airy clouds. Continue whipping until you reach stiff peaks—a term you’ll hear often in baking that refers to when you lift your whisk, and the peaks stand tall without drooping over. This is absolutely paramount; it’s what gives our pudding its delightful lift and airy texture. If they start looking dry or clumpy, you’ve gone too far—so keep an eye on them! Once perfect, gently fold these whipped whites into your lemon-yolk mixture using a spatula. Be mindful here: folding is different from stirring; you want to maintain that airiness while combining everything together.
Step 7: The Art of Folding – Combining for Lightness
Ah, folding—a technique that requires patience but rewards with lightness in every bite! With your fluffy egg whites ready to go, scoop about a third of them into your lemon mixture first. This initial addition lightens up the batter, making it easier to incorporate the remaining egg whites without losing all that hard-earned airiness. Using wide strokes and gentle movements, fold them together until just combined—you want streaks of white still visible because they will merge completely once baked.
Don’t rush this step; I promise you that taking your time here makes all the difference in achieving that ethereal texture we’re after. As you fold, notice how each motion brings more life into your pudding; it’s like watching it wake up from a cozy nap! After everything is combined but not overmixed—remember we’re aiming for fluffy rather than dense—pour this heavenly mixture into your greased baking dish. Use a spatula to scrape every last bit out because every spoonful deserves its moment!
Step 8: Baking Your Perfect Baked Lemon Pudding
Now comes one of my favorite parts—the baking! With your oven preheated to 350°F (175°C), carefully place your filled baking dish inside. The aroma will begin wafting through your kitchen almost immediately—it’s like an olfactory hug from heaven! Bake for 30-35 minutes or until the top turns golden brown and has set nicely; it should jiggle slightly but not be liquidy when tapped gently.
As it bakes, keep an eye on those edges—they should puff up beautifully while forming a delicate crust on top that’s reminiscent of meringue yet still soft underneath. You’ll know it’s done when it’s golden and slightly springs back when lightly touched in the center; think of it as giving your pudding a little pat on the back for a job well done! Each oven behaves differently; some may run hotter or cooler than others, so don’t hesitate to adjust cooking times as needed—this is all part of becoming attuned to your kitchen’s quirks.
Next Major Phase – Cooling Down Before Serving
After removing your masterpiece from the oven (don’t burn yourself!), let it cool slightly before serving—this helps set everything beautifully and allows those flavors to deepen even further. While it’s tempting to dive right in with spoons at the ready—and trust me, I’ve been there—allowing it to rest for about 10-15 minutes will enhance its texture immensely.
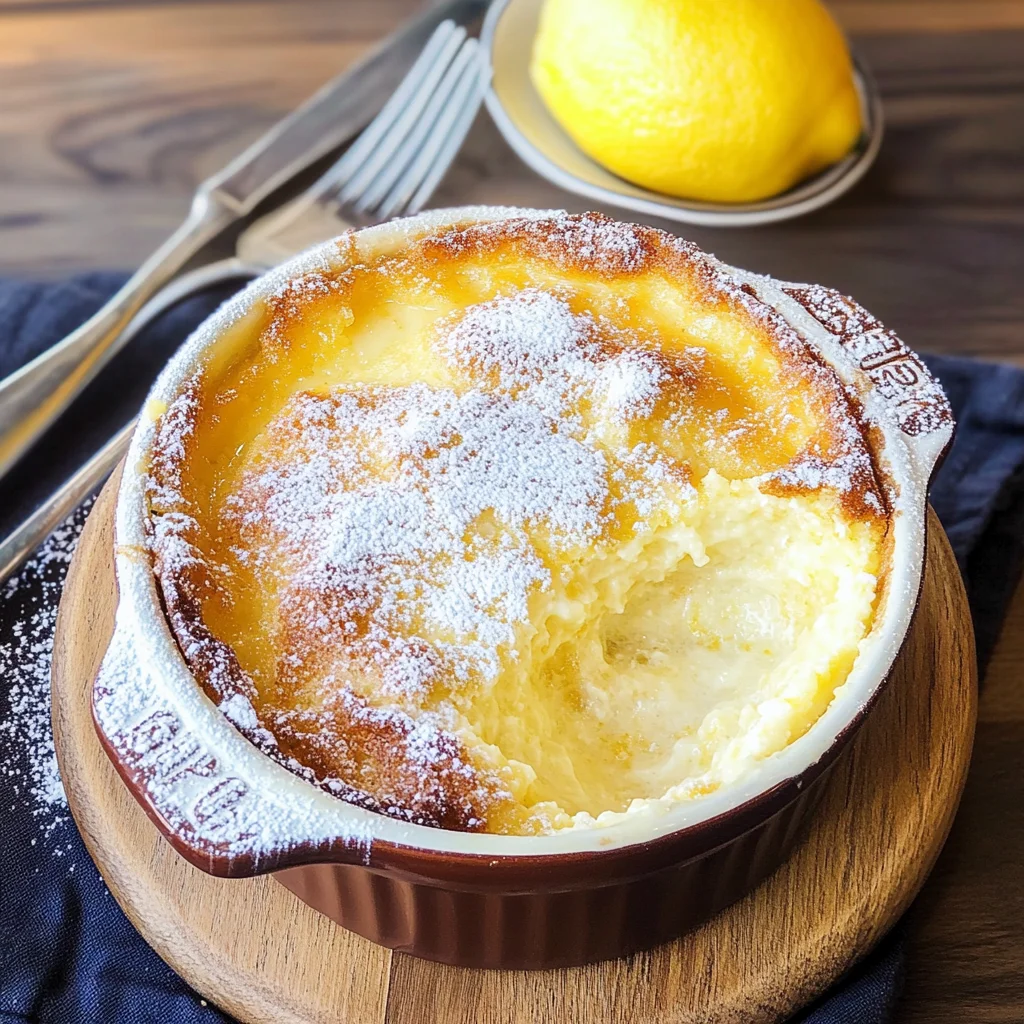
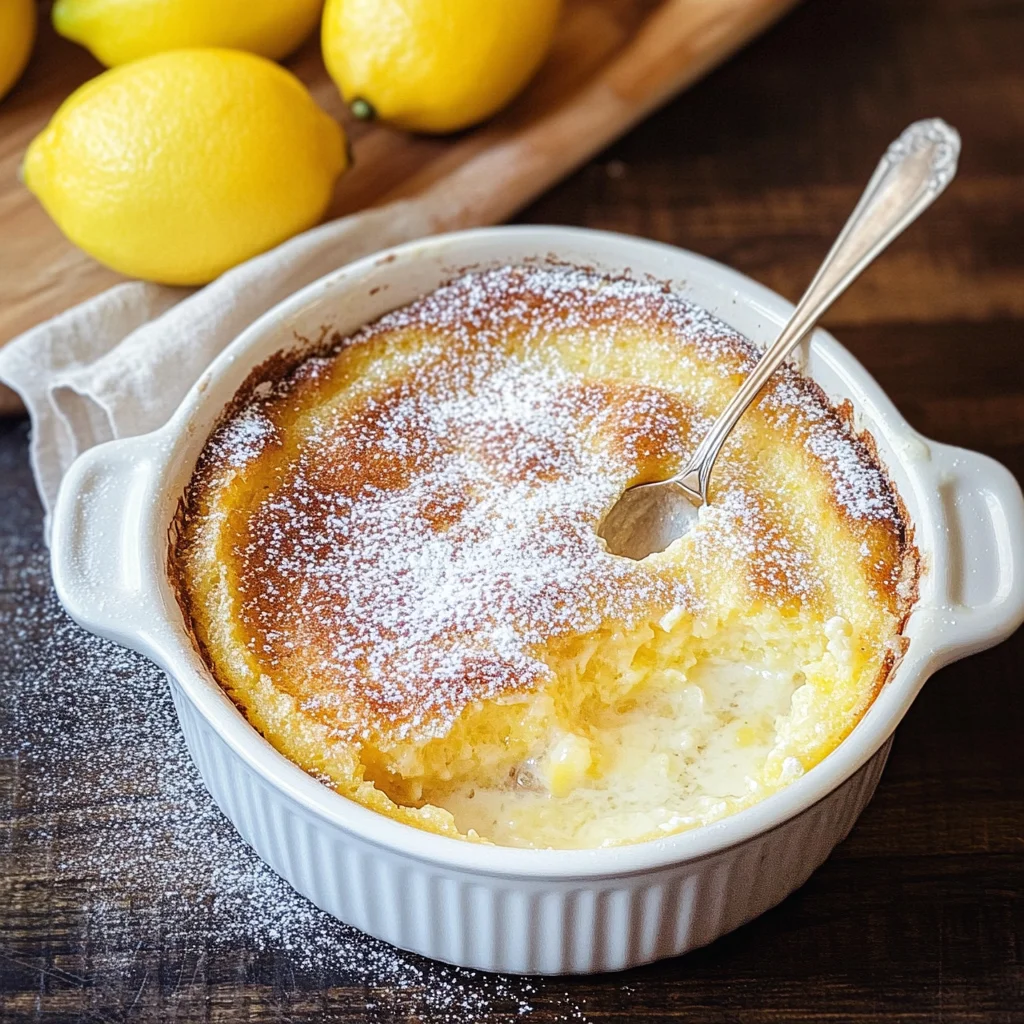
Once cooled slightly but still warm enough to wrap around your taste buds with zesty comfort, dust each serving with powdered sugar just before serving—it adds that finishing touch of sweetness and visual charm! Picture this: each slice revealing layers upon layers of soft lemony goodness topped with delicate snowflakes of sugar—a true feast for both eyes and palate.
And there you have it—a Baked Lemon Pudding that’s bursting with flavor and warmth! I promise you’ll find joy in each bite as you share this delightful dessert at celebrations or cozy weeknight dinners alike—it’s simply extraordinary!
Storage and Enjoyment Tips for Your Baked Lemon Pudding
Now that you’ve pulled your Baked Lemon Pudding from the oven, with its golden top and intoxicating aroma wafting through the kitchen, it’s time to revel in every luscious bite! This dessert is not just a fleeting moment of joy; it’s a treasure trove of flavor that can be savored again and again. However, if you happen to have leftovers—though I doubt it will last long—I’ve got some fantastic tips to ensure this delightful treat remains as scrumptious as when it first emerged from the oven.
Storing Leftover Baked Lemon Pudding
To keep your Baked Lemon Pudding fresh and delicious, transfer any leftovers into an airtight container. It’s important to store it in the refrigerator, where it’ll stay good for about 3 to 4 days. I always recommend placing a slice of bread in the container with the pudding; this little trick helps maintain moisture and keeps your dessert from drying out. Trust me on this—it makes a world of difference! When you’re ready to enjoy more of this zesty delight, you might notice that the flavors meld even more beautifully after a day or two in storage, creating a symphony of lemony goodness that dances on your palate. If you fancy warming it up, simply pop it in the microwave for about 20 seconds—just enough to take off the chill without losing its airy texture.
Freezing Baked Lemon Pudding for Later
If you want to extend the life of your delightful creation even further, freezing is an excellent option. To freeze your Baked Lemon Pudding properly, let it cool completely before wrapping individual portions tightly in plastic wrap or aluminum foil. Then place them in a freezer-safe container or bag for added protection against freezer burn. This method preserves its light texture and vibrant flavor for up to 2 months. When you’re ready to indulge once more, simply thaw it overnight in the refrigerator before gently reheating in the microwave or enjoying it cold—both options are delicious! The convenience of having this extraordinary dessert at your fingertips makes freezing worthwhile; imagine pulling out a piece on a busy weeknight or serving guests at a casual gathering—it’s like having sunshine stored away for those rainy days!
Baked Lemon Pudding

Indulge in the bright, zesty flavors of Baked Lemon Pudding—a delightful dessert that’s both light and satisfying. This easy recipe combines fresh lemon juice and zest with a creamy, fluffy texture to create a sweet treat that feels like sunshine in every bite. Perfect for any occasion, whether it’s a cozy dinner or an elegant gathering, this pudding is sure to impress your family and friends. With minimal prep time and simple ingredients, you’ll find joy in effortlessly crafting this comforting classic.
- Prep Time: 15 minutes
- Cook Time: 35 minutes
- Total Time: 50 minutes
- Yield: Serves 6
- Category: Dessert
- Method: Baking
- Cuisine: American
Ingredients
- 1 cup granulated sugar
- 1/4 cup all-purpose flour
- 1/4 teaspoon salt
- 1 cup milk (or dairy-free alternative)
- 1/2 cup fresh lemon juice
- Zest of 1 lemon
- 3 large eggs, separated
- 1/4 teaspoon cream of tartar
- Powdered sugar (for serving)
Instructions
- Preheat your oven to 350°F (175°C) and grease an 8×8-inch baking dish.
- In a mixing bowl, whisk together granulated sugar, flour, and salt until combined.
- Gradually mix in milk, lemon juice, and zest until smooth.
- In another bowl, beat egg yolks until pale; fold into the lemon mixture.
- In a clean bowl, whip egg whites with cream of tartar until stiff peaks form; gently fold into the lemon mixture.
- Pour the combined batter into the prepared baking dish and bake for 30-35 minutes until golden brown.
- Allow to cool slightly before dusting with powdered sugar and serving.
Nutrition
- Serving Size: 1 slice (100g)
- Calories: 200
- Sugar: 22g
- Sodium: 150mg
- Fat: 5g
- Saturated Fat: 2g
- Unsaturated Fat: 3g
- Trans Fat: 0g
- Carbohydrates: 34g
- Fiber: 0g
- Protein: 3g
- Cholesterol: 80mg