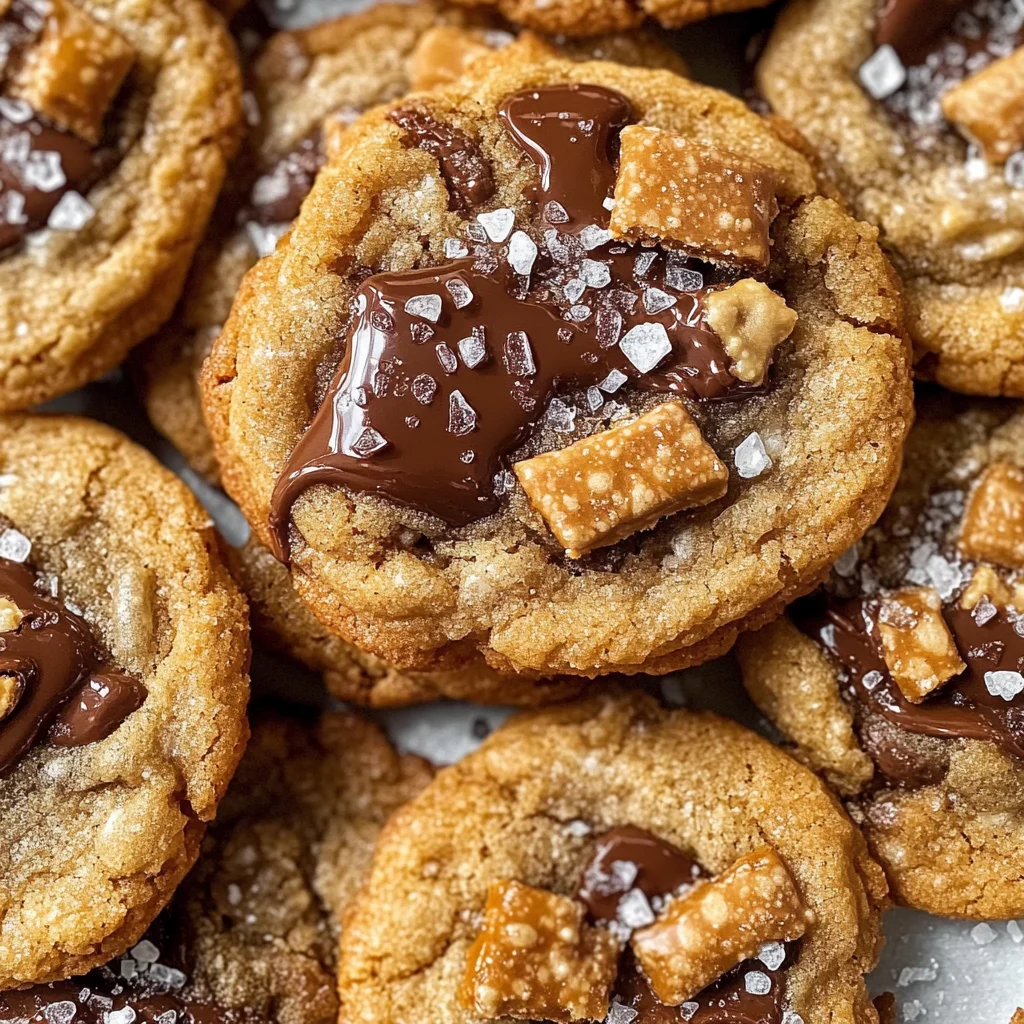
Brown Butter Toffee Cookies
There’s something truly magical about the process of baking, isn’t there? It’s more than just mixing flour, sugar, and butter; it’s a dance of flavors and aromas that fills your home with warmth and love. Today, we’re embarking on a delightful culinary journey to create Brown Butter Toffee Cookies—chewy, decadent bites that embody the perfect harmony of sweet and salty. These cookies are not just your average treat; they are an experience that marries the rich, nutty flavor of brown butter with the sublime crunch of homemade saltine cracker toffee. Imagine pulling a warm tray from the oven, each cookie a golden treasure waiting to be savored. Trust me when I say these will become your new favorite cookie, a delightful addition to any gathering or simply a cozy night in.
Baking is really about connecting with our ingredients and letting them shine. The foundation of these Brown Butter Toffee Cookies lies in two key components: the brown butter and the homemade toffee. Brown butter elevates ordinary cookies to extraordinary heights with its deep, caramelized notes that whisper tales of warmth and nostalgia. And then there’s the toffee—oh, the toffee! It’s like a sweet hug from your childhood, combining crunchy saltines with buttery caramel and rich chocolate. This is why I adore this recipe; it captures that perfect balance between indulgence and comfort, making it suitable for festive occasions or simply as a special treat for yourself after a long day.
Brown Butter Toffee Cookies: A Decadent Delight Awaits
Get ready for an unforgettable baking adventure! These Brown Butter Toffee Cookies are not only delicious but remarkably easy to make. They draw on simple ingredients that come together in remarkable ways to create something truly special. As we dive into this recipe together, remember that each step is an important part of crafting cookies that are chewy on the inside with a crisp edge—a texture you’ll find utterly mesmerizing. Let’s gather our ingredients and start this delightful process!
Ingredients:
Before we dive into the baking process, let’s take a moment to appreciate each ingredient that will harmonize beautifully in our Brown Butter Toffee Cookies. Each component serves a purpose that contributes to the symphony of flavors we’re creating here.
- 20 saltine crackers. These humble little squares may seem like an odd choice for cookies, but trust me—they’re magical! When transformed into toffee, they provide an unexpected crunch and a touch of saltiness that balances out all the sweetness in these cookies beautifully. Look for fresh ones; stale crackers won’t produce that satisfying snap or enhance the overall flavor.
- 1/2 cup unsalted butter (for toffee). Using unsalted butter allows you full control over the saltiness in your recipe—this is crucial when making caramel! The richness from this butter melds perfectly with brown sugar as it melts down into liquid gold during cooking.
- 1/2 cup light brown sugar (packed) (for toffee). This ingredient brings not only sweetness but also depth thanks to its molasses content. It helps create that wonderful caramel flavor in our toffee layer which complements both the saltines and chocolate perfectly.
- 6 ounces semisweet chocolate chips. A classic choice for cookies! The chocolate adds richness and creaminess against the crunchy texture of our toffee—a pairing made in heaven. Always opt for high-quality chocolate because it makes all the difference in both flavor and melting quality.
- Sea salt for topping (optional). Just a sprinkle can elevate these cookies from delicious to utterly extraordinary! The contrast between sweet and salty is one you won’t want to miss—it amplifies every bite!
- 1 cup unsalted butter (cubed) (for cookie dough). And now we transition into cookie territory! This butter will be browned first—a technique that imparts an incredible nutty aroma while enhancing the buttery flavor within our cookies.
- 2 1/2 cups all-purpose flour (spooned and leveled). Flour is foundational in any baking endeavor; it provides structure while allowing us to achieve those lovely chewy centers we’re aiming for here. Spoon-and-level ensures you’re using just the right amount without packing it down too tightly.
- 1 teaspoon baking soda. This leavening agent helps our cookies rise slightly while contributing texture; without it, we’d have dense bricks instead of delightful treats!
- 1 cup light brown sugar (packed) (for cookie dough). Just like in our toffee, this sugar adds sweetness along with moisture due to its molasses content—creating soft, chewy cookies every time.
- 1/3 cup granulated sugar. A touch of granulated sugar balances out the depth from brown sugar while helping achieve those crispy edges we all love so much!
- 2 large eggs (at room temperature). Eggs not only bind everything together but also contribute moisture and richness—room temperature eggs mix more easily into batters compared to cold ones straight from the fridge.
- 2 teaspoons pure vanilla extract. A non-negotiable ingredient if you want your cookies bursting with warm flavors! Pure vanilla extract offers complexity compared to imitation versions; look for high-quality brands for best results.
Now that we’ve gathered everything we’ll need for this scrumptious endeavor…
Equipment You’ll Need:
Before we roll up our sleeves and start mixing things up, let’s talk about some essential tools you’ll want by your side during our baking adventure. Having reliable equipment can make all the difference—not just in ease but also in achieving those perfect results we desire!
- 9×13-inch baking dish – This size is perfect for spreading out your saltines evenly when making your homemade toffee layer; you’ll want them snugly packed without overlapping too much so every bit gets coated well!
- Parchment paper – A must-have lining for effortless removal of baked goods from pans without any sticking or tearing—the ultimate kitchen multitasker!
- Medium saucepan – Ideal for melting down your butter smoothly while browning it without scorching—this vessel will see plenty of action as you create both your cookie dough and luscious caramel sauce!
- Rubber spatula – This tool is fantastic for scraping down bowls thoroughly so nothing goes wasted plus it’s gentle enough not harm nonstick surfaces during mixing.
- Mixing bowls – You’ll need at least two: one large bowl for combining dry ingredients and another medium-sized one specifically designed for wet mixtures before uniting them together.
As we prepare ourselves mentally—and physically—for creating these glorious Brown Butter Toffee Cookies…
Step 1: Crafting Irresistible Toffee
Let’s kick things off by making our delectable homemade saltine cracker toffee! Preheat your oven to 425°F (220°C) while lining a 9×13-inch baking dish with parchment paper—it prevents sticking like magic! Lay those saltines down flat across the bottom of your pan in even rows; it’s important they sit snugly next door since they’ll anchor everything else later on during baking.
Next up—the real magic begins! In a medium saucepan over medium-high heat, combine half a cup of unsalted butter with half a cup of packed light brown sugar—watch as they melt together slowly like old friends reuniting after years apart! Stir occasionally until this mixture bubbles away happily; once boiling starts happening consistently across its surface around 4–5 minutes later (without stirring!), reduce heat slightly but do NOT walk away—this step requires attention since burning could occur quickly if ignored!
Once you’ve reached that gorgeous bubbling stage where deep caramel tones emerge from within…remove from heat immediately before pouring over those waiting crackers below! Use either wooden spoons or rubber spatulas gently spreading evenly across their surface until completely covered—that way no cracker feels left behind during what comes next: popping into preheated oven just long enough until bubbly appears again after 4–5 minutes total time elapsed here—a true sign it’s working perfectly!
Step 2: Melting Chocolate Magic
When you pull out that bubbly masterpiece from above…get ready because now comes another exciting part—chocolate time! Immediately sprinkle on those semisweet chocolate chips across top gently; allow them sit undisturbed moments until softened sufficiently before using rubber spatula again gently spreading melted chocolate evenly atop warm caramel layer beneath—it should blend seamlessly creating luscious swirls throughout entire thing making each bite even more enticing than ever imagined possible beforehand!
Don’t forget about optional sea salt sprinkle at this stage…trust me on this one—it adds amazing contrast against sweetness balancing out overall flavor profile brilliantly leaving everyone wanting more once tasted!
Once complete…let’s transfer entire creation into freezer while preparing cookie dough next step ahead…keeping cool aids setting process needed later so keep handy until called upon again soon enough!
Step 3: Browning Butter Bliss
Now onto one my absolute favorite cooking techniques: browning butter! Yes, my friends…this step transforms ordinary melted butter into something truly special by coaxing out delicate nutty flavors through gentle heating method resulting heavenly aroma wafting through kitchen inviting everyone nearby join party happening right now…
Place cubed unsalted butter inside clean medium saucepan over medium heat allowing time melt slowly first before beginning swirl motion around pan ensuring even heat distribution occurs throughout entire batch being prepared here today…it takes approximately five minutes total until beautiful golden hue emerges alongside foamy bubbles appearing visibly atop surface below indicating readiness ahead!
This process known as browning creates unique depth character unlike anything else found regular cooking methods—it enhances final product beyond expectations entirely making sure everyone who tastes realizes how much effort put forth creating such delightful treat worth celebrating—so don’t rush this moment…enjoy watching transformation unfold before eyes eagerly anticipating next steps leading towards finished product arriving table soon enough afterwards…
Step 4: Mixing Together Dough Delights
Once browned goodness has cooled slightly—about ten minutes max—we’ll now whisk together flour alongside baking soda inside large mixing bowl beforehand prepping dry ingredients combo needed earlier mentioned…this creates foundation upon which rest builds proudly standing tall amidst future baked wonders awaiting discovery soon enough afterward too hopefully bringing smiles faces everywhere nearby upon consumption thereafter too always appreciated greatly each time shared joyously amongst family friends alike gathering close share experiences memorably forever cherished through food served lovingly made especially created uniquely crafted just like today’s offerings found herein respectively included here throughout entire journey taken earlier together too along way ahead still awaits unfolding now continuously moving forward onward ever upward towards victory achieved finally completed successfully reaching finish line victoriously feeling proud accomplished knowing hard work pays off exponentially rewarding everyone involved equally benefiting greatly altogether anytime shared collectively around table enjoying flavorful spoils gathered closely hand-in-hand sharing laughter cherished moments experienced deeply touched hearts forever lasting memories formed unexpectedly along way traveled together holding dear always keeping alive spirit brought forth wonderfully alive through simple act nourishing souls feeding hearts well fulfilled satisfied joyfully completely whole completing circle life wonderfully adding richness flavors cultivated shared lovingly celebrated cherished fondly remembered forevermore…
The Art of Creating Magical Brown Butter Toffee Cookies
Ah, the moment has arrived! After all that anticipation and careful preparation, we are nearing the grand finale of crafting our Brown Butter Toffee Cookies. If you’ve been following along, I know you can almost taste that intoxicating blend of chewy cookie goodness, crunchy toffee, and the rich aroma of brown butter wafting through your kitchen. Trust me when I say the experience is about to get even better. Let’s dive into the next steps with all the love and care these cookies deserve.
Step 5: Browning Butter – The Heart of Flavor
Now, let’s talk about the magic of browning butter. In a medium saucepan over medium heat, place your cubed unsalted butter. As it melts, keep swirling it gently—this isn’t just for show; it’s crucial for ensuring even cooking. You’ll want to stir constantly for about five minutes as the butter transforms from a pale yellow liquid into a bubbling golden elixir that smells utterly divine. It’s during this time that you will witness an amazing phenomenon: the milk solids in the butter begin to toast, creating a nutty aroma that envelops your senses and brings depth to your cookies like nothing else can.
This step is paramount because browning the butter adds layers of flavor that ordinary melted butter simply cannot achieve. You’re essentially caramelizing those milk solids, giving your cookies an earthy richness that will have everyone guessing your secret ingredient later on! Just keep an eye on it; when you see those lovely golden flecks forming at the bottom of your pan and smell that nutty scent—it’s time to remove it from heat. Allow it to cool slightly for about 10 minutes; this cooling period is important as adding hot butter directly into your dough can alter its texture.
Step 6: Blending Ingredients – Creating Cookie Alchemy
While your browned butter is cooling, take a large mixing bowl and whisk together 2 ½ cups of all-purpose flour and 1 teaspoon of baking soda until well combined. This step ensures that the leavening agent is evenly distributed throughout the flour, which is crucial for achieving those perfect cookie heights—neither too flat nor too puffy! Once your butter has cooled slightly, add both packed brown sugar and granulated sugar into the saucepan with it. Whisk vigorously until you have a silky mixture; this combines not only flavors but also starts to create structure in our cookies.
Next up, add in two large eggs at room temperature and 2 teaspoons of pure vanilla extract—this is where things get really exciting! Whisk until no yellow streaks remain; you want everything blended beautifully so every bite has that harmonious flavor profile we’re aiming for. Now comes a fun part: pour this luscious wet mixture into your flour blend. Using a rubber spatula, stir gently but deliberately until combined—you’ll notice at first it seems dry and crumbly; don’t worry! Just trust the process—it will soon come together into a beautiful dough.
Step 7: Preparing toffee – The Crunchy Surprise
Before we move on to baking our cookies, we need to tackle our glorious homemade saltine cracker toffee—the secret weapon behind these Brown Butter Toffee Cookies. Take your toffee out of the freezer (you’ve remembered it’s there, right?). Use a sharp knife to chop it into small pieces—this will allow for the perfect distribution of crunchy bits throughout each cookie without melting all the chocolate into a gooey mess! Be gentle here; using your hands might be tempting but could lead to melting some chocolate.
Once you’ve broken up that beautiful toffee (and perhaps snuck a piece or two—who could blame you?), return back to our cookie dough which should now be pleasantly chilled after spending some time in the freezer. Gently fold most of those crunchy pieces into your dough using a spatula—this step not only incorporates flavor but also adds delightful texture contrast in every bite. Remember to save some for topping after baking! Cover this precious dough with plastic wrap and give it at least two hours in the refrigerator—or if you’re feeling patient (which I highly encourage), allow it to chill overnight up to three days. This resting period allows flavors to deepen and meld together beautifully while also enhancing the overall texture.
Step 8: Shaping Your Dough Balls – Crafting Cookie Perfection
As we approach baking day (or night!), preheat your oven to 350°F (175°C) while preparing yourself for what’s about to unfold—it’s truly magical! Line a large baking sheet with parchment paper or a silicone baking mat; this is non-negotiable as it prevents sticking and promotes even cooking. Now take out your chilled dough from its repose in the fridge—it should feel firm yet pliable, like soft playdough ready for shaping!
Using a standard ice cream scoop or two tablespoons, scoop out portions of dough roughly equal in size (aim for about 2 tablespoons each). Space these out on your prepared cookie sheet with enough room between them—about two inches apart—to allow them room for expansion as they bake. This spacing ensures each cookie has its own space where they can spread just perfectly without merging into one giant cookie blob (although wouldn’t that be something?). You want them looking like delicious little mounds waiting for their moment in the oven!
The Grand Finale – Baking Your Perfect Brown Butter Toffee Cookies
Step 9: Baking Bliss – Golden Edges & Soft Centers
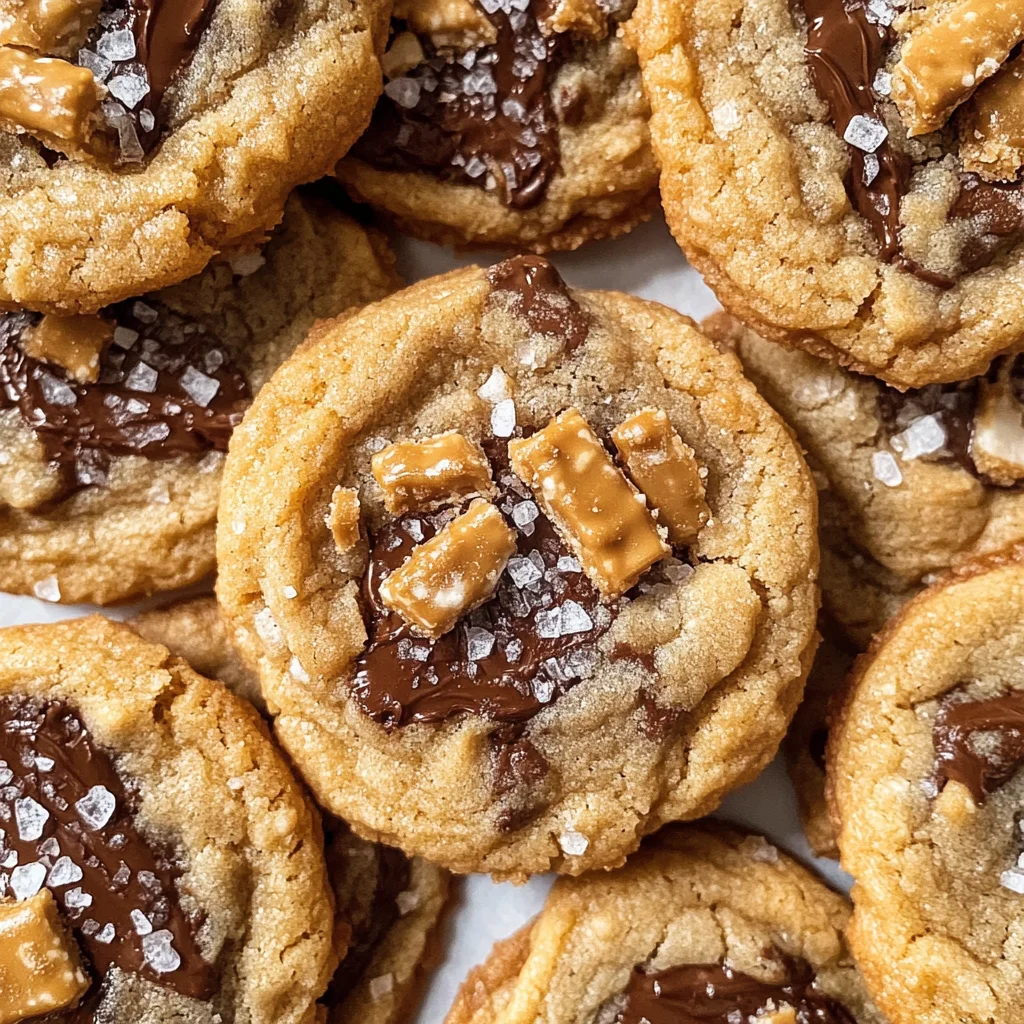
Finally, it’s time for our Brown Butter Toffee Cookies to shine! Slide those glorious trays into the preheated oven and set a timer for 8-10 minutes—the sweet spot where magic happens! Keep an eye on them during this critical time because every oven behaves differently; you want them just lightly golden around edges while still soft in centers—a sign they’re ready!
As they bake, you’ll be treated to an absolutely intoxicating aroma wafting through your kitchen—it will draw everyone near! When done, remove them from the oven and immediately sprinkle any reserved bits of salty sweet toffee on top while they’re still warm—this allows them to adhere wonderfully without melting away completely. Let them cool on the baking sheet for five minutes before carefully transferring them onto wire racks so they can cool fully.
And there you have it—the culmination of patience, technique, and love results in these irresistible Brown Butter Toffee Cookies! Each bite promises chewy goodness layered with crunchy bits of homemade saltine cracker candy—a combination so divine I’m sure they’ll become a household favorite faster than you can say “cookie!” Enjoy these little bites of joy with family or friends—they deserve every crumb just as much as you do!
Storage and Enjoyment Tips for Your Brown Butter Toffee Cookies
Oh, the moment has arrived! Your kitchen is filled with the intoxicating aroma of freshly baked Brown Butter Toffee Cookies, and you can hardly wait to take that first bite. But what if I told you that these cookies can bring joy long after you’ve pulled them from the oven? With a few simple storage tips, you can savor these delightful treats for days to come. So let’s dive into how to keep your cookies fresh and delicious!
Storing Leftover Brown Butter Toffee Cookies
To preserve the magic of your Brown Butter Toffee Cookies, it’s essential to store them properly. I recommend placing your cookies in an airtight container, which is crucial for keeping their chewy texture intact while warding off any unwanted moisture or air. If you want to go the extra mile—and trust me, you should—layer your cookies with parchment paper to prevent them from sticking together. When stored this way at room temperature, they will remain scrumptiously fresh for about a week. However, if you find yourself with extra cookies (which I promise will be hard!), you might want to try the bread slice trick: just tuck a slice of bread into the container; it’ll help maintain their soft and chewy integrity as it absorbs moisture. The flavors truly deepen over time; the caramel notes meld beautifully with the brown butter, creating a profoundly satisfying experience even days later. For those who prefer warm cookies straight from the oven, simply pop them in a microwave for about 10-15 seconds before indulging—it’s like they were just baked!
Freezing Brown Butter Toffee Cookies for Later
Now, if you’re anything like me and love having homemade goodies ready at a moment’s notice, freezing your Brown Butter Toffee Cookies is an absolute game-changer! To freeze them properly, allow your cookies to cool completely first—this step is vital because it prevents condensation from forming in your storage container. Then place them in a single layer on a baking sheet and freeze until solid, which usually takes about an hour. Once frozen, transfer them to an airtight freezer-safe bag or container where they will stay fresh for up to three months—perfect for when unexpected guests drop by or when those late-night cravings strike! Just pull out as many as you’d like and let them thaw at room temperature or reheat gently in the oven for that freshly baked taste again. There’s nothing quite like having these delectable treats on hand whenever the mood strikes!
Brown Butter Toffee Cookies

Brown Butter Toffee Cookies are a transformative treat that perfectly blend chewy cookie goodness with the rich, nutty flavors of brown butter and the delightful crunch of homemade saltine cracker toffee. Each bite offers a captivating contrast between sweet and salty, making them an unforgettable addition to any dessert table or cozy night in. The process of creating these cookies is as rewarding as the final product, inviting you into a world where simple ingredients come together to create pure bliss. Whether you’re hosting friends or treating yourself, these cookies promise to deliver joy with every delectable morsel.
- Prep Time: 30 minutes
- Cook Time: 15 minutes
- Total Time: 45 minutes
- Yield: About 24 cookies 1x
- Category: Dessert
- Method: Baking
- Cuisine: American
Ingredients
- 20 saltine crackers
- 1 cup unsalted butter (divided)
- 1 cup light brown sugar (packed) (divided)
- 6 ounces semisweet chocolate chips
- 2 ½ cups all-purpose flour
- 1 teaspoon baking soda
- 2 large eggs (room temperature)
- 2 teaspoons pure vanilla extract
- Sea salt for topping (optional)
Instructions
- Preheat oven to 425°F (220°C). Line a 9×13-inch baking dish with parchment paper and lay out saltines tightly in rows.
- In a medium saucepan over medium heat, melt ½ cup of unsalted butter with ½ cup packed light brown sugar, stirring until mixture bubbles. Pour over saltines and bake for about 5 minutes until bubbly.
- Remove from oven and sprinkle chocolate chips on top; let sit until softened, then spread evenly.
- Cool to set in freezer while preparing cookie dough.
- In another saucepan, brown the remaining cubed butter over medium heat until golden.
- In a large bowl, whisk together flour and baking soda. Combine browned butter with sugars, followed by eggs and vanilla until smooth, then mix into dry ingredients.
- Fold in most of the toffee pieces and scoop out rounded tablespoons onto lined baking sheets.
- Bake at 350°F (175°C) for about 8-10 minutes until edges are golden but centers remain soft. Sprinkle with additional toffee and sea salt if desired.
Nutrition
- Serving Size: 1 serving
- Calories: 160
- Sugar: 10g
- Sodium: 90mg
- Fat: 8g
- Saturated Fat: 5g
- Unsaturated Fat: 3g
- Trans Fat: 0g
- Carbohydrates: 20g
- Fiber: <1g
- Protein: 2g
- Cholesterol: 20mg