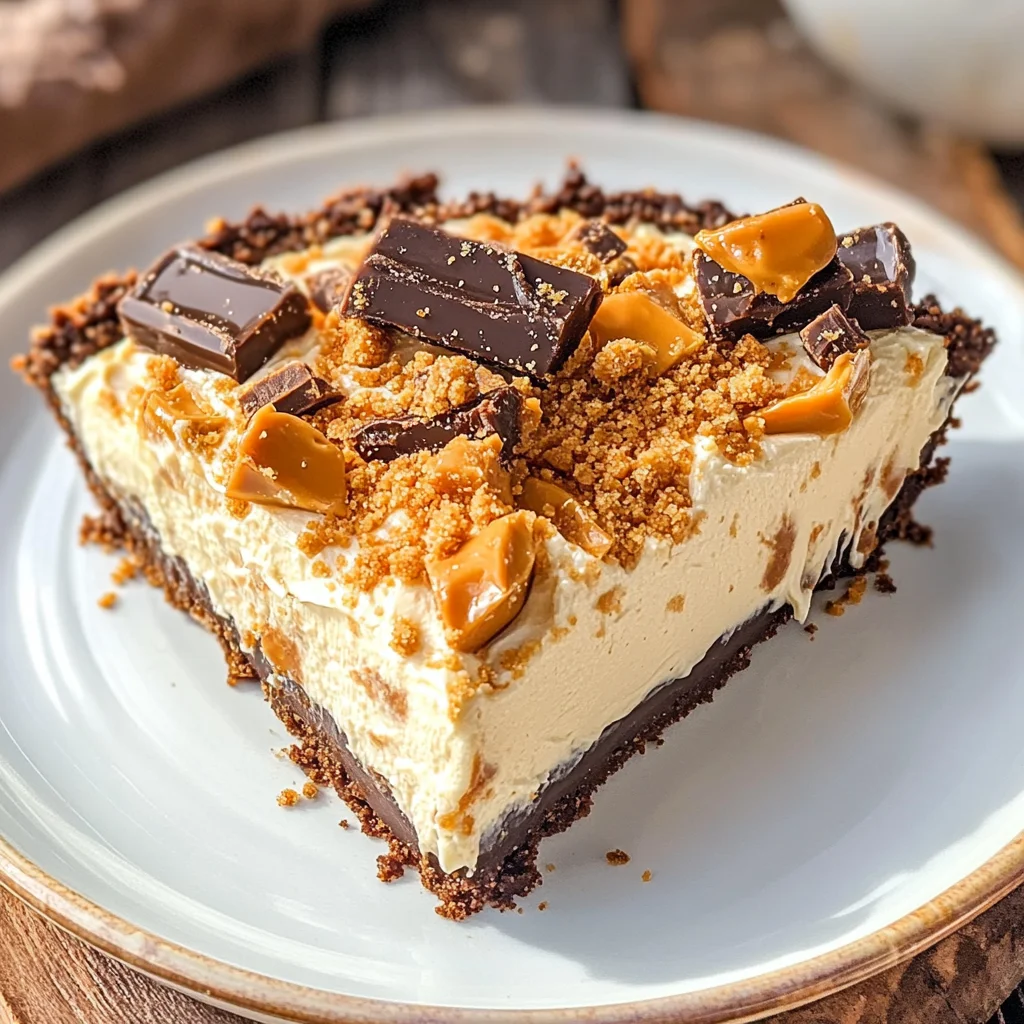
Butterfinger Pie
If you’re looking for a dessert that’s both incredibly easy to make and absolutely delicious, then you’ve come to the right place! This Butterfinger Pie is a family favorite in my home, and it’s perfect for any occasion—whether it’s a busy weeknight or a special gathering with loved ones. The cool, creamy texture combined with the crunch of Butterfinger bars makes this pie irresistible.
What I love most about this recipe is that it requires no baking at all! Just mix, fold, and chill. It’s truly a dessert that everyone will enjoy, especially the kids. Trust me; once you serve this Butterfinger Pie, your friends and family will be asking for seconds!
Why You’ll Love This Recipe
- Super Easy to Make: With just 15 minutes of prep time, you can whip up this dessert without breaking a sweat.
- Family-Friendly Delight: Kids and adults alike will love the combination of peanut butter and chocolatey goodness.
- Make-Ahead Convenience: Perfect for prepping in advance—just chill it in the fridge until you’re ready to serve!
- No-Bake Necessity: No oven required! Ideal for hot days when you want something sweet without heating up the kitchen.

Ingredients You’ll Need
Let’s gather some simple, wholesome ingredients that come together to create this delightful Butterfinger Pie. You probably already have many of these at home!
For the Filling
- 1 (8-ounce) package cream cheese (room temperature)
- 1/2 cup creamy peanut butter
- 2 teaspoons vanilla extract
- 1 1/2 cups powdered sugar
- 1 (12.5-ounce) bag fun-sized butterfinger bars (crushed – reserve 2 bars to sprinkle on top)
- 1 (8-ounce) container Cool Whip (thawed)
For the Crust
- 1 store-bought oreo or chocolate graham cracker crust
Variations
One of the best things about this Butterfinger Pie is how flexible it is! Here are some fun variations to try:
- Add Some Crunch: Mix in chopped nuts like peanuts or almonds for an extra crunchy texture.
- Change Up the Topping: Top with whipped cream or drizzle some chocolate sauce over it before serving.
- Go Dairy-Free: Use dairy-free cream cheese and whipped topping for a non-dairy version that everyone can enjoy.
- Switch Up the Candy: If you’re not a huge fan of Butterfingers, try substituting with crushed Reese’s Peanut Butter Cups or other favorite candy bars!
How to Make Butterfinger Pie
Step 1: Mix the Creamy Base
Start by placing your room-temperature cream cheese and creamy peanut butter in a large mixing bowl. Add in the vanilla extract. Using an electric mixer, beat these ingredients together until smooth. This step is crucial because it creates a creamy base that will make your pie luscious and delicious!
Step 2: Sweeten It Up
Next, gradually beat in the powdered sugar until everything is well combined and smooth. This adds sweetness and helps balance out the flavors from the peanut butter. Don’t rush this step; mixing well ensures a wonderful texture.
Step 3: Fold in Those Delicious Butterfingers
Now it’s time to fold in those crushed Butterfinger bars! Use a spatula to gently mix them into your filling. This will add delightful chunks of candy throughout your pie, giving each bite that signature flavor.
Step 4: Add the Cool Whip
Gently fold in the thawed Cool Whip into your mixture. This will give your pie its light and airy texture while still being rich and creamy. Be careful not to overmix; we want those fluffy clouds of Cool Whip to stay intact!
Step 5: Assemble Your Pie
Spread your filling evenly into the store-bought crust. Don’t forget to sprinkle those reserved crushed Butterfinger bars on top for an extra touch! This not only looks beautiful but also enhances that amazing texture.
Step 6: Chill Before Serving
Finally, refrigerate your pie for at least 4 hours before serving. Chilling allows all those flavors to meld together beautifully and gives the pie its perfect set texture. Once chilled, slice it up and watch everyone enjoy every last crumb!
Now you have a delightful Butterfinger Pie ready to impress! Enjoy every moment as you share this sweet treat with friends and family.
Pro Tips for Making Butterfinger Pie
Making this Butterfinger Pie is a breeze, but here are some pro tips to take your dessert to the next level!
- Use Room Temperature Ingredients: Ensuring your cream cheese is at room temperature will make it easier to blend smoothly with the peanut butter, resulting in a creamy filling that’s free of lumps.
- Crush Butterfingers Evenly: For the best texture, crush your Butterfinger bars into small but not overly fine pieces. This way, you’ll get delightful little chunks throughout the pie without losing that satisfying crunch.
- Chill Properly: Allowing the pie to chill for at least 4 hours (or even overnight) enhances the flavors and helps the filling set beautifully. This also makes slicing much easier when it’s time to serve!
- Experiment with Crusts: While an Oreo or chocolate graham cracker crust is traditional, feel free to try other options like a vanilla wafer crust or even a homemade cookie crust for a personalized touch.
- Add a Drizzle: For an extra special finish, consider drizzling chocolate sauce or melted peanut butter over the top just before serving. It not only looks beautiful but adds a delicious flavor boost!
How to Serve Butterfinger Pie
Presenting your Butterfinger Pie can be as fun as making it! Here are some ideas on how to elevate your serving experience:
Garnishes
- Whipped Cream: A dollop of whipped cream on each slice adds a light and fluffy contrast to the rich filling.
- Chocolate Shavings: Sprinkle some chocolate shavings on top for an elegant touch and an extra hit of chocolate flavor.
- Chopped Nuts: Toasted peanuts or pecans can add a nice crunch and enhance the nutty profile of the pie.
Side Dishes
- Fresh Fruit Salad: A refreshing fruit salad with berries, melons, and citrus balances out the richness of the pie and adds a burst of color.
- Vanilla Ice Cream: Serve slices alongside a scoop of vanilla ice cream for an indulgent treat that complements the flavors perfectly.
- Coffee or Tea: A warm cup of coffee or tea pairs wonderfully with dessert, offering a comforting contrast to the coolness of the pie.
- Chocolate-Covered Pretzels: The salty sweetness of chocolate-covered pretzels makes for a fun snack alongside your creamy dessert, adding another layer of texture and flavor.
With these tips and serving suggestions, your Butterfinger Pie will surely impress family and friends alike. Enjoy every creamy bite!
Make Ahead and Storage
This Butterfinger Pie is perfect for meal prep! You can make it ahead of time, allowing the flavors to meld beautifully while you focus on other tasks. Here’s how to keep your delicious dessert fresh:
Storing Leftovers
- Store any leftover pie in an airtight container in the refrigerator.
- Enjoy leftovers within 3 days for the best taste and texture.
Freezing
- If you want to make this pie even further in advance, you can freeze it!
- Wrap the pie tightly in plastic wrap and then place it in a freezer-safe container.
- Freeze for up to 2 months. Thaw in the refrigerator overnight before serving.
Reheating
- This pie is best enjoyed cold or at room temperature, so no reheating is necessary!
- Just slice and serve straight from the fridge for a refreshing treat.
FAQs
Here are some common questions about making Butterfinger Pie:
Can I use different candy bars in my Butterfinger Pie?
Absolutely! While Butterfinger adds a unique flavor, feel free to swap in your favorite chocolate or candy bars for a personalized touch.
How do I make my Butterfinger Pie firmer?
If you’d like a firmer pie, try adding a little more cream cheese or reducing the amount of Cool Whip. This will help maintain its shape when served.
Is Butterfinger Pie suitable for meal prep?
Yes! Butterfinger Pie is great for meal prep as it can be made ahead of time and stored in the fridge or freezer.
Can I use low-fat cream cheese?
Yes, low-fat cream cheese can be used as a lighter alternative without sacrificing too much flavor!
Final Thoughts
This Butterfinger Pie is not just a dessert; it’s an experience filled with creamy goodness and delightful crunch. Whether you’re hosting friends or enjoying a cozy night in, this recipe will bring smiles all around. I truly hope you enjoy making this sweet treat as much as I do! Don’t hesitate to share your creations and thoughts; I’d love to hear how it turns out for you!
Butterfinger Pie
Indulge in the creamy, crunchy decadence of this no-bake Butterfinger Pie, a delightful dessert that’s sure to impress at any gathering. With a luscious filling made from cream cheese and peanut butter, combined with crushed Butterfinger bars for that signature crunch, this pie is not only easy to make but also family-friendly. Perfect for warm days or busy weeknights, you can whip it up in just 15 minutes and chill it until ready to serve. Whether you’re hosting a party or enjoying a quiet night in, this dessert promises smiles all around!
- Prep Time: 15 minutes
- Cook Time: None
- Total Time: 0 hours
- Yield: About 10 servings 1x
- Category: Dessert
- Method: No-Bake
- Cuisine: American
Ingredients
- 1 (8-ounce) package cream cheese (room temperature)
- 1/2 cup creamy peanut butter
- 2 teaspoons vanilla extract
- 1 1/2 cups powdered sugar
- 1 (12.5-ounce) bag fun-sized Butterfinger bars (crushed – reserve 2 bars to sprinkle on top)
- 1 (8-ounce) container Cool Whip (thawed)
- 1 store-bought chocolate graham cracker crust
Instructions
- In a large bowl, blend room-temperature cream cheese and creamy peanut butter with vanilla extract until smooth.
- Gradually mix in powdered sugar until well combined.
- Gently fold in crushed Butterfinger bars using a spatula.
- Carefully incorporate thawed Cool Whip into the mixture.
- Pour the filling into the crust and sprinkle reserved crushed Butterfingers on top.
- Refrigerate for at least 4 hours before slicing and serving.
Nutrition
- Serving Size: 1 slice (85g)
- Calories: 305
- Sugar: 21g
- Sodium: 210mg
- Fat: 20g
- Saturated Fat: 10g
- Unsaturated Fat: 8g
- Trans Fat: 0g
- Carbohydrates: 30g
- Fiber: 1g
- Protein: 5g
- Cholesterol: 30mg