Earl Grey Tea Tiramisu
There’s something truly magical about creating desserts that dance between tradition and innovation, and my Earl Grey Tea Tiramisu is no exception. Imagine a sweet, creamy dessert that whispers tales of Italian heritage while embracing the fragrant notes of bergamot from Earl Grey tea. This isn’t just a recipe; it’s an experience that captivates your senses and invites you to savor every spoonful. The velvety mascarpone cream, infused with the delicate flavor of tea, layers beautifully with crisp ladyfinger biscuits, creating a symphony of textures and flavors that will leave you utterly enchanted. Every bite brings warmth and comfort, making it a perfect treat for cozy gatherings or quiet evenings at home. I promise you, once you try this delightful twist on a classic tiramisu, you’ll be transported to a realm where culinary traditions meet innovative flair.
As we embark on this culinary journey together, let’s take a moment to appreciate what makes this dessert so special. The Earl Grey Tea Tiramisu is not just a delectable indulgence; it holds the power to evoke memories of shared moments and laughter among friends and family. The fragrance of steeping tea fills your kitchen with an inviting aroma that beckons everyone to gather around the table, creating an atmosphere rich in warmth and connection. Perfect for celebratory occasions or simply as a comforting end to a busy day, this dessert is a testament to how food can bring us closer together in ways words sometimes cannot express.
Earl Grey Tea Tiramisu: A Cozy Twist on an Italian Classic
This Earl Grey Tea Tiramisu melds the beloved Italian dessert with the enchanting essence of tea—a combination that feels both familiar yet refreshingly unique. With each layer of creamy mascarpone mixed with airy egg whites and the soothing notes of Earl Grey, you’ll find an irresistible treat that sparks joy in every bite. Let’s dive into this delightful recipe together!
Ingredients:
As we gather our ingredients for this luscious dessert, I want you to think about how each component plays its own vital role in crafting this masterpiece. Each ingredient here is chosen not just for taste but for the texture and experience they bring to our Earl Grey Tea Tiramisu.
- 250 g mascarpone – This luxurious Italian cheese is absolutely paramount; it provides that rich creaminess we all crave in tiramisu. Mascarpone has a smooth texture that blends effortlessly into our mixture, giving it that signature velvety finish. When selecting mascarpone, look for high-quality brands without additives—trust me; the purity of flavor makes all the difference in your final dish.
- 2 eggs – Eggs are our key players here! They add structure and stability to our tiramisu while also enriching its flavor profile. We’ll be separating them into yolks and whites because each has its own important job: the yolks will create richness when combined with sugar and mascarpone, while the whipped whites will provide lightness and aeration—ensuring every bite feels ethereal.
- 50 g sugar (+2 tsp) – Sugar does more than just sweeten; it works wonders by enhancing flavors and contributing to texture. The initial addition of sugar helps dissolve quickly into our tea mix, while we’ll reserve some for whipping into our egg whites later on. This step creates those beautiful peaks that lend body to our cream mixture—don’t skip it!
- 100 g savoiardi (ladyfinger biscuits) – These delicate biscuits are indispensable for any tiramisu as they soak up flavors beautifully without turning mushy—if they’re fresh! Think of them as little sponges ready to absorb the fragrant sweetness of our Earl Grey tea infusion. If you can’t find savoiardi in stores, you can use homemade versions or even sponge cake cut into strips.
- 2 tsp loose leaf Earl Grey tea – Here lies the heart of our recipe! Loose leaf tea infuses a captivating fragrance throughout our dessert that’s simply irresistible—a blend of black tea and bergamot oil gives us those aromatic notes we adore in Earl Grey. Don’t hesitate to splurge on quality leaves; they elevate your tiramisu from good to extraordinary!
- 160 ml water – Water acts as the medium in which we steep our wonderful tea leaves along with sugar until everything melds together harmoniously. Using freshly boiled water ensures maximum extraction from your tea leaves—a step that’s crucial if you want those deep flavors shining through in your dessert!
Equipment You’ll Need:
Before we dive into making this gorgeous tiramisu, let’s gather some essential kitchen tools that’ll make your baking experience smoother and more enjoyable. Having the right equipment is like having reliable friends by your side—they help ensure everything goes off without a hitch!
- Mixing bowls – A set of mixing bowls comes in handy throughout this process, especially when separating eggs or mixing different components together. Opt for glass or stainless steel bowls as they’re easy to clean and won’t react with any ingredients.
- Electric mixer or whisk – Whether you choose an electric mixer for speed or a traditional whisk for a workout (I commend your dedication!), both are essential for whipping egg whites to stiff peaks—a key step that transforms your mascarpone mixture from heavy to light.
- Casserole dish or serving dish – Select a medium-sized casserole dish where all those lovely layers can shine through! Glass dishes work beautifully as they allow you to see those enticing layers form within.
- Strainer – A fine mesh strainer is crucial for removing those loose tea leaves after steeping—no one wants little bits ruining their creamy finish! It ensures we’re left only with smooth liquid gold ready to infuse our dessert.
Now that we’ve gathered everything we need, let’s get started on creating this sensational Earl Grey Tea Tiramisu!
Step 1: Infusing Liquid Gold
To kick things off, start by boiling 160 ml of water until it’s bubbling away like a gentle cauldron! Once boiled, add 2 teaspoons of loose leaf Earl Grey tea along with 50 g sugar directly into the pot—this is where magic begins as you’ll stir until sugar dissolves completely before allowing it all to steep for about 20 minutes. Trust me when I say that patience is key here; letting those leaves steep properly extracts every ounce of flavor from them! After steeping time has passed (and your kitchen smells divine), pour through a fine mesh strainer into another bowl to catch any stray bits—what you’re left with should be an aromatic liquid that’s both comforting and slightly sweet.
Step 2: The Egg Separation Dance
While waiting for those flavors to meld beautifully together, it’s time for another essential step—separating two eggs into two different mixing bowls. This may seem simple but trust me when I say it’s non-negotiable! Add half (25 g) of your measured sugar into the bowl containing egg whites—you’ll want these babies whipped until they reach hard peaks resembling fluffy clouds! Use either an electric mixer or whisk vigorously by hand—it’s quite therapeutic after all—and watch as they transform before your eyes into glossy peaks!
In another bowl, beat together egg yolks with the remaining sugar until they’re pale yellow and fluffy—this process adds air which contributes immensely toward creating lightness later on when combined with mascarpone cream!
Step 3: Marrying Flavors
Once you’ve achieved fluffy egg yolk glory alongside glorious stiff egg whites awaiting their turn—the next step involves uniting these mixtures harmoniously! Gently fold in 250 g mascarpone cheese into your yolk mixture using either spatula or wooden spoon until fully incorporated without losing airiness—we want silky smoothness here! Once combined well (a few lumps are okay), it’s time gently fold those whipped egg whites into this luscious base too—doing so carefully ensures you’re keeping all those lovely air bubbles intact which guarantees lightness throughout every layer later on!
Step 4: Layering Bliss
Now comes perhaps one of my favorite parts—the assembly! Start by spreading just enough cream over bottom of casserole dish so there’s no sticking involved once filled with layers upon layers (it also creates an amazing foundation). Next comes dipping those ladyfinger biscuits swiftly—but don’t linger too long! Just imagine these little gems soaking up sweetness from our brewed Earl Grey concoction—quickly dip each side before placing directly onto cream layer beneath—that texture contrast between soft soaked biscuit against rich creamy goodness? Absolutely heavenly!
Repeat layering process: First dipping then layering dipped biscuits followed by generous dollops creamy heaven atop until reaching desired height—or at least two complete biscuit layers followed finally by remainder mascarpone mix spread evenly across top surface like icing on cake—this final flourish seals everything within nicely while creating visual appeal too!
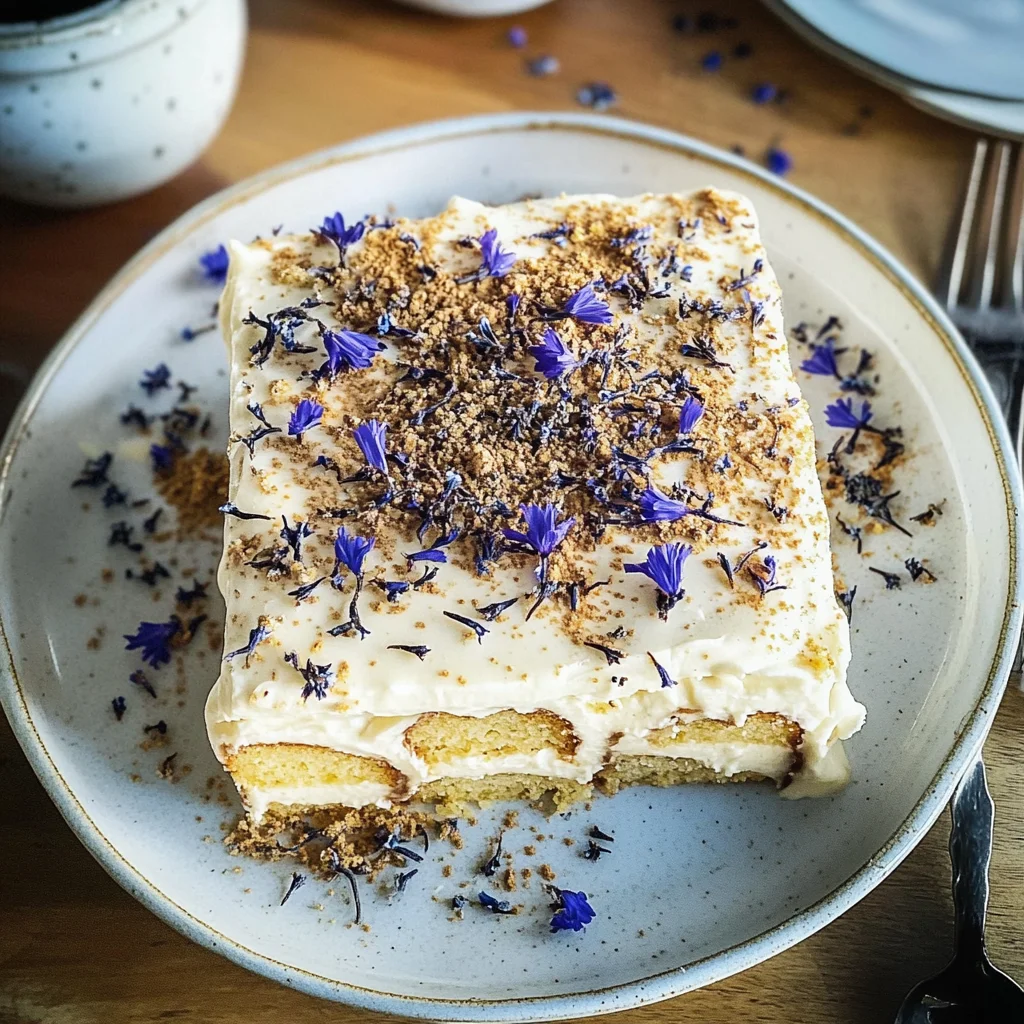
With everything layered beautifully inside dish now covered lovingly with cling film—we’ll place it away safely inside fridge letting chill/rest preferably overnight—but minimum duration should be around two hours so flavors meld perfectly across layers leaving behind pure bliss once served chilled garnished delicately dusted atop powdered tea perhaps cornflower petals if available!
And there you have it—the incredible journey toward crafting an indulgent Earl Grey Tea Tiramisu awaits! Each step brings us closer towards creating something extraordinary together; trust me when I say you’ll cherish every bite just as much as I do!
Step 5: Layering the Dreamy Cream and Ladyfingers
Now, we embark on the truly delightful part of creating our Earl Grey Tea Tiramisu—the layering! First, take that luscious mascarpone cream we whipped up so carefully and spread a thin layer over the bottom of your casserole dish. This step is crucial because it not only creates a base for our ladyfinger biscuits but also ensures that the first layer has a creamy foundation to rest upon, preventing any sogginess that could occur later. I like to think of this layer as a gentle hug for the ladyfingers, welcoming them into their creamy embrace.
Next, we take our savoiardi—those charming little ladyfinger biscuits—and prepare to dip them in the sweetened Earl Grey tea. It’s essential to act quickly here; you want to soak each biscuit just enough so it absorbs the aromatic flavors without becoming overly mushy. Picture this: as you dip each side into the fragrant tea for just a second or two, they transform from dry and hard into soft, pillowy delights infused with that quintessential Earl Grey essence. Building this base layer requires patience and precision, so don’t rush! After dipping, lay them side by side atop the mascarpone cream like little soldiers ready for action. Repeat this process until you’ve created a satisfying first layer of tea-dipped biscuits followed by another generous layer of that luxurious cream. The contrast between the soft cream and the delicate crunch of the ladyfingers is what makes every bite utterly intoxicating.
Step 6: The Art of Building Layers
With one glorious layer behind us, it’s time to repeat this enchanting dance of flavors. Grab your remaining mascarpone cream and generously spread it over the first layer of dipped ladyfingers. This is where things get really exciting because each subsequent layer adds depth to our dessert’s flavor profile—a true symphony of textures and tastes awaits! As you spread this second layer, go slow; you want it to be even and smooth, enveloping those ladyfingers in creamy goodness. Remember that patience is key here; rushing through can lead to uneven layers which might affect how beautifully it sets later.
After spreading out this second layer of mascarpone cream, we dive back into dipping more savoiardi in our sweet Earl Grey concoction. Just like before, immerse each biscuit quickly—this time with slightly more confidence! With each dip, feel free to savor the aromatic hints wafting through your kitchen; trust me when I say it’s an experience worth relishing! Place these dipped biscuits carefully on top of your new cream layer, ensuring they are snugly fit together but not overcrowded. Repeat until you achieve another perfect layer of soaked biscuits nestled within creamy perfection. Trust me on this—it’s all about striking that balance between crunch and creaminess; it’s what will make every bite feel like a warm hug!
Step 7: The Final Creamy Crown
Now comes my favorite part—the crowning glory! With your layers complete, it’s time to finish off your creation with one final thick blanket of mascarpone cream on top. This step may seem simple, but oh my goodness does it hold significance! This last layer not only provides visual appeal but also acts as a protective barrier while chilling in the fridge—the main event that’s about to unfold! Spread it evenly across the surface using a spatula or even just a spoon if you prefer—it doesn’t have to be perfect; rustic charm goes a long way in desserts like these.
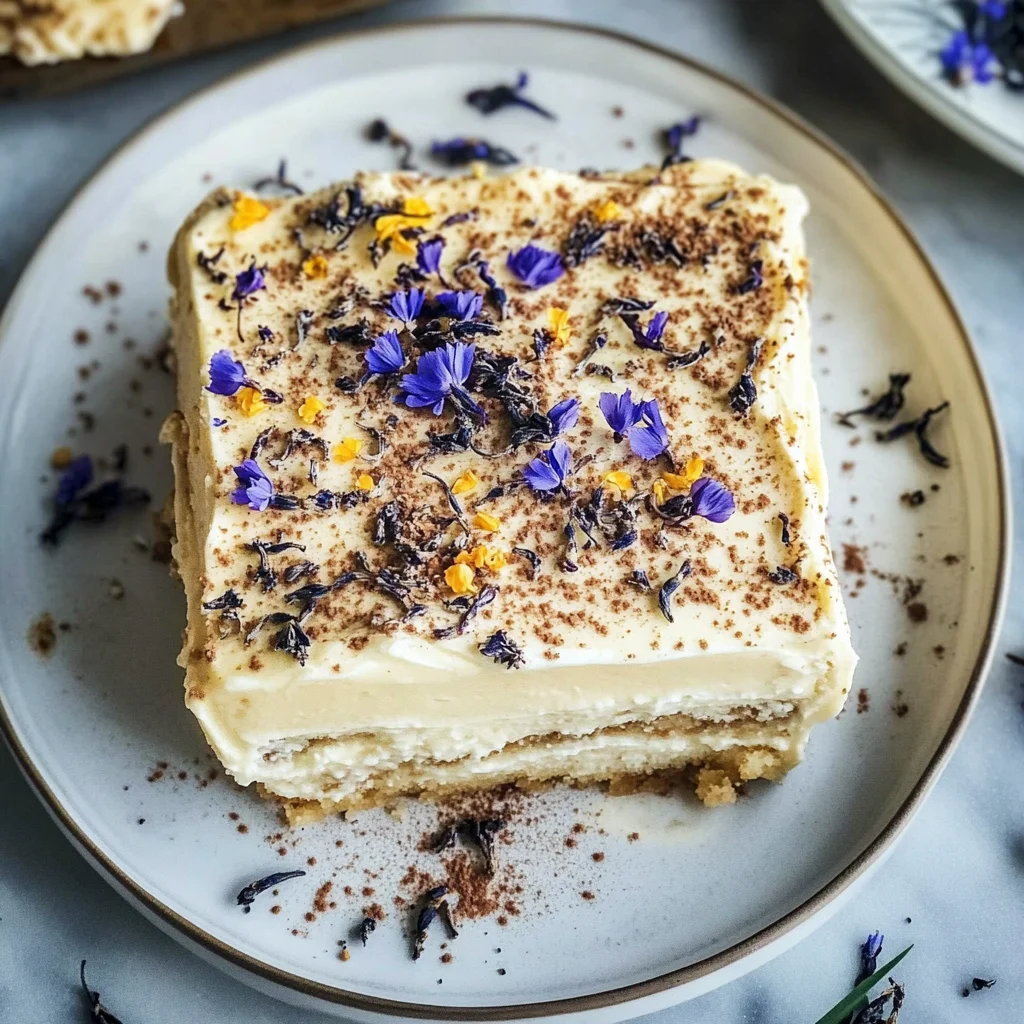
As you smooth out this final layer, consider adding some love by sprinkling additional powdered Earl Grey tea or dried cornflower petals atop for an extra flourish that speaks elegance and whimsy! These toppings not only add visual interest but also provide delightful flavor nuances—the floral notes from cornflowers paired with the citrus undertones from Earl Grey create an enchanting aroma that will greet everyone when they dive into their servings! It’s essential to allow yourself a moment here; pause and appreciate your handiwork before moving on.
Step 8: Chilling Out for Flavor Fusion
The moment has arrived for our tiramisu to chill out in the refrigerator—a necessary step that cannot be overstated! Cover your casserole dish tightly with cling film (or foil if you prefer), sealing all that deliciousness inside while keeping unwanted odors at bay. Now comes the hard part—waiting! Allow your tiramisu to rest in its cool haven for at least 2 hours, though overnight is truly where magic happens. During these hours, all those beautiful layers meld together harmoniously; flavors deepen as they intermingle like old friends sharing stories over tea.
Why is chilling so vital? Well, during this resting phase, moisture from those lovely soaked ladyfingers seeps into the mascarpone cream while allowing everything to firm up beautifully—creating an utterly sublime texture where each component works together seamlessly. If you’re tempted to dig in too soon (believe me, I understand!), resist that urge because I promise you; letting it rest longer results in something profoundly satisfying—one bite will transport you straight into flavor heaven! Once you’ve exercised all your patience and it’s finally time to serve up slices of this dreamy dessert, sprinkle some more powdered tea or cornflowers atop right before serving for that extra touch of elegance—trust me when I say it’ll be worth every second spent waiting!
Conclusion:
As we wrap up our journey through creating this exquisite Earl Grey Tea Tiramisu, I hope my excitement has bubbled over into your kitchen! This recipe isn’t just about combining ingredients; it’s about crafting memories and sharing joy through flavors. The unique twist of using Earl Grey tea instead of coffee elevates this classic Italian dessert into something utterly intoxicating. The delicate notes of bergamot paired with creamy mascarpone create a symphony of flavors that dance on your palate; it’s truly special!
You absolutely must try making this dessert not just for its taste but for the sheer joy of bringing such elegance into your home. Picture inviting friends over for an afternoon tea party and pulling out this stunning tiramisu from the fridge—how impressed they will be! It shines at gatherings but is equally perfect for quiet evenings when you want something sweet yet sophisticated. Each layer invites anticipation as guests dive into their plates; trust me, you’ll relish every smile shared over these bites.
For serving suggestions, imagine savoring one alongside a steaming cup of herbal tea—perhaps something floral like chamomile or another blend that complements those lovely bergamot notes beautifully. For an afternoon pick-me-up that dazzles, consider pairing it with fresh berries—the tartness will create such a wonderful contrast with the creamy richness of the tiramisu! And if you’re feeling adventurous? A light drizzle of honey or an infusion of citrus zest could elevate each piece into another realm altogether—a delightful journey worth exploring!
Feeling adventurous? This recipe is wonderfully adaptable! You could infuse different teas—think chai spices or matcha—for a vibrant twist that keeps things exciting. Perhaps add layers of fruit compote between mascarpone layers for added texture and flavor depth; every variation tells its own delicious story. I invite you to embrace creativity in your kitchen; share your experiences and adaptations with me—I’d love to hear all about them! Let’s continue spreading warmth through food together!
Earl Grey Tea Tiramisu
Earl Grey Tea Tiramisu is a delightful twist on the classic Italian dessert that combines traditional elegance with the aromatic notes of bergamot-infused tea. This no-coffee version features rich, creamy mascarpone layered with delicate ladyfinger biscuits, all enveloped in a fragrant Earl Grey infusion. The result is a light and refreshing treat that is perfect for any occasion—from cozy evenings at home to festive gatherings with friends. With its luxurious texture and enchanting flavors, this dessert is sure to impress your guests and create memorable moments around the table. Dive into this culinary adventure and savor every spoonful of bliss!
- Prep Time: 30 minutes
- Cook Time: None
- Total Time: 0 hours
- Yield: Serves 8
- Category: Dessert
- Method: No-bake
- Cuisine: Italian
Ingredients
- 250 g mascarpone
- 2 eggs
- 50 g sugar (+2 tsp)
- 100 g savoiardi (ladyfinger biscuits)
- 2 tsp loose leaf Earl Grey tea
- 160 ml water
Instructions
- Boil 160 ml of water and add 50 g sugar along with the loose leaf Earl Grey tea. Steep for 20 minutes, then strain.
- Separate the eggs into two bowls. Whip egg whites with half of the sugar until stiff peaks form; set aside.
- In another bowl, beat egg yolks with remaining sugar until pale and fluffy. Gently fold in mascarpone until smooth.
- Fold whipped egg whites into the mascarpone mixture until fully incorporated.
- Dip each ladyfinger briefly in the Earl Grey infusion, then layer them at the bottom of a casserole dish.
- Spread a layer of mascarpone cream over the dipped ladyfingers, then repeat with another layer of dipped ladyfingers followed by more cream.
- Finish with a final layer of mascarpone cream on top and chill for at least 2 hours or overnight.
Nutrition
- Serving Size: 1 slice (100g)
- Calories: 320
- Sugar: 18g
- Sodium: 50mg
- Fat: 22g
- Saturated Fat: 13g
- Unsaturated Fat: 9g
- Trans Fat: 0g
- Carbohydrates: 26g
- Fiber: 0g
- Protein: 6g
- Cholesterol: 80mg