Easy Lemon Mousse
There’s something truly magical about dessert, isn’t there? It’s more than just a sweet ending to a meal; it’s a chance to indulge in flavors that dance on our taste buds and bring smiles to our faces. I’ve always been captivated by the way a simple dessert can evoke memories of family gatherings, sunny afternoons, and laughter shared among friends. Today, I’m excited to share with you my beloved recipe for Easy Lemon Mousse, a treat that’s not just delightful but also refreshingly bright and tangy. This mousse is like sunshine in a glass—creamy, airy, and utterly intoxicating—perfect for any occasion or just because you deserve a little sweetness in your life.
Imagine standing in your kitchen, the aroma of fresh lemons filling the air as you whip up this luscious dessert. The process is quick and straightforward, yet each step feels special, leading to an end result that feels like a celebration. With just a handful of ingredients—heavy cream, lemon curd, and zest—you’ll be creating a dish that will leave your guests asking for seconds. Trust me when I say this Easy Lemon Mousse will become a cherished recipe in your home; it’s adaptable for gatherings or simply as an everyday indulgence when you need that little moment of joy.
Easy Lemon Mousse: A Refreshing Citrus Delight
I can’t wait to guide you through making this delightful lemon mousse! With its light texture and zesty flavor, it’s sure to impress everyone at your table. Whether you’re hosting a summer barbecue or enjoying an intimate dinner with loved ones, this mousse is bound to steal the show.

Ingredients:
As we embark on this culinary adventure together, let’s talk about the ingredients that will help us create our Easy Lemon Mousse. Each component plays a vital role in crafting this creamy delight, so let’s explore what makes them special.
- 2 cups heavy cream. This rich ingredient is absolutely paramount for achieving that luxurious texture we adore in mousses. Heavy cream has a high-fat content (around 36% or more), which means it whips beautifully into soft peaks, providing the airy base for our mousse. Look for fresh cream without additives; if possible, opt for organic varieties that often have richer flavor profiles. Remember not to skimp on quality here; it truly makes all the difference!
- 2 tablespoons confectioner’s sugar. This finely powdered sugar dissolves quickly and easily into the cream while adding just the right amount of sweetness without any grittiness. It helps balance the tartness of the lemon curd beautifully! You can use regular granulated sugar if that’s what you have on hand; just make sure it’s well blended into the mixture before whipping so there are no undissolved granules left behind.
- Pinch of salt. It might seem small and insignificant compared to other ingredients, but trust me—this pinch of salt elevates all the flavors. Salt enhances sweetness and balances acidity; it brings out the best in both the cream and lemon curd, creating an exquisite symphony of flavors in every bite.
- 1 cup lemon curd. Ahh, lemon curd—the star of our show! This tangy treasure brings brightness and depth to our mousse with its bold citrus flavor. If you’re feeling adventurous or wish to control the sweetness level yourself, homemade lemon curd is surprisingly easy to whip up! However, store-bought options work wonderfully as well; just be sure to choose one without artificial ingredients for that genuine taste experience.
- 1 tablespoon lemon zest. The zest is where much of the essential oils reside—it’s like capturing sunshine itself! By incorporating freshly grated zest into our mousse, we add an intense burst of lemon flavor that complements the smoothness of the curd perfectly. When selecting lemons for zesting, look for bright yellow ones with shiny skin; they tend to be fresher and juicier!
Equipment You’ll Need:
Before we dive into making this delightful dessert, let’s ensure we have all the right tools at hand! Having proper equipment can make your cooking journey smoother and more enjoyable—like having trusty companions by your side as you create something wonderful.
- Mixing bowl – A large mixing bowl is crucial here since we’ll be whipping cream until it reaches fluffy perfection. Glass or stainless steel bowls are ideal because they retain cold temperatures well—essential for keeping the cream chilled while whipping.
- Electric mixer (handheld or stand) – This gadget will save you time and energy when whipping cream! A handheld mixer works perfectly fine if you don’t have a stand mixer handy; make sure it has enough power to whip heavy cream efficiently until those lovely peaks form.
- Spatula – A flexible spatula is indispensable for gently folding in our luscious lemon curd without deflating that beautiful whipped cream we’ve created. Opting for silicone spatulas can be great since they’re heat-resistant and easy on non-stick surfaces.
- Dessert glasses or small bowls – Presentation matters! Choosing charming little glasses not only makes serving easier but also adds an inviting touch as everyone anticipates their own creamy portion of deliciousness.
Preparing the Easy Lemon Mousse
Step 1: Chill Your Tools
Let’s kick things off by preparing our mixing bowl and beaters! Place these essential tools in your refrigerator for about 15-30 minutes prior to starting—this step is absolutely paramount! Chilling your bowl helps keep the heavy cream cold while whipping; warmer temperatures can cause it to struggle forming those perfect peaks we want so dearly. Once chilled (you might even notice condensation forming), take them out with anticipation—it’s time to create magic!
Step 2: Whipping Up That Cream
Now comes one of my favorite parts—the actual whipping! Pour those two cups of heavy cream into your chilled mixing bowl along with two tablespoons of confectioner’s sugar and just a pinch of salt. Using your electric mixer set at medium speed (don’t rush!), start blending these ingredients together until they begin transforming into something fluffy—a process that should take around 2-3 minutes. Keep an eye on it; we’re aiming for medium peaks here—not too soft but definitely not overbeaten either! Overmixing can lead us down an unfortunate path where our lovely cream turns grainy—so stop once those peaks hold their shape nicely!
Step 3: Folding in Flavor
Once you’ve achieved those glorious whipped peaks, it’s time to add in our star players—the lemon curd and zest! Using your spatula gently fold these delicious additions into the whipped cream with care; we want to preserve all that airy goodness we’ve created during whipping! Start by adding half of the lemon curd first then fold until fully combined before adding more—this method ensures everything mixes evenly while maintaining lightness instead of deflating our mixture completely.
Step 4: Spoon Into Glasses
With everything combined beautifully now comes perhaps one of my most satisfying steps: spooning this dreamy mixture into individual dessert glasses! Take care as you fill each glass halfway full; remember there’s still some setting ahead where it’ll expand slightly while chilling out in the fridge later on—so leave room at top! You might find yourself wanting larger servings (who doesn’t love more dessert?), but trust me—it’ll feel indulgent enough even at half-full portions!
Now go ahead and place these filled beauties into your refrigerator—they need at least one hour (or up to twenty-four hours) chill time before they’re ready to dazzle palates everywhere with their refreshing allure!
Stay tuned as we complete this delightful journey together by garnishing them right before serving…
Indulging in the Creamy Delight of Easy Lemon Mousse
Ah, friends, we’ve reached a delightful juncture in our culinary adventure! The moment when we transform simple ingredients into a creamy, dreamy dessert that’s not just easy to make but also profoundly satisfying. This Easy Lemon Mousse is something I promise will leave your taste buds dancing and your heart full. Imagine the luscious creaminess paired with that fresh, zesty lemon flavor—it’s like a sunbeam on your tongue! Now, let’s continue crafting this beautiful dessert together.
Step 5: Gently Folding in the Lemon Curds and Zest
Now comes one of my favorite parts—combining that fluffy whipped cream with the tangy lemon curd and zest. This step is crucial because it’s where we marry the airy texture of the whipped cream with the rich, tart flavor of the lemon. Using a spatula, gently introduce the lemon curd into your whipped cream. Trust me on this: you want to fold rather than stir! Folding helps maintain the volume we’ve worked so hard to achieve; it keeps our mousse light and airy instead of turning it into a dense mixture.
As you fold, you’ll want to see those gleaming streaks of lemon curd swirling through the whipped cream—a beautiful sight indeed! Take your time here; don’t rush this step. You’ll know you’ve done it right when everything is well incorporated but still fluffy and inviting. The addition of lemon zest not only amplifies that citrus fragrance but also adds tiny bursts of flavor that are utterly intoxicating. This delicate folding technique is non-negotiable if you want that perfect mousse consistency!
Step 6: Spoon Your Creation into Dessert Glasses
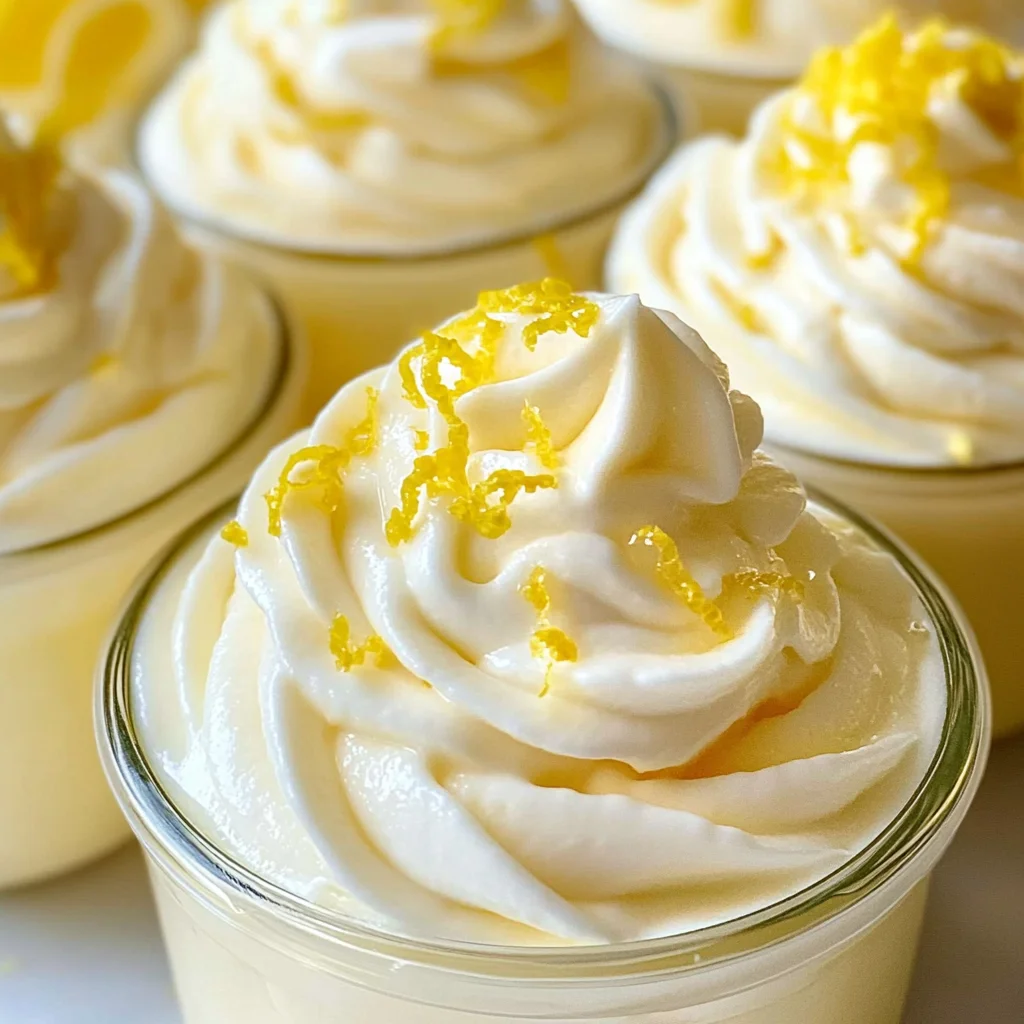
Once your mixture is beautifully combined and you can practically taste the sunshine in every swirl, it’s time to spoon this luscious mousse into small dessert glasses. I love using clear glasses for this because they showcase the vibrant yellow hue of our mousse so beautifully—it’s like a little work of art! Fill each glass about halfway; this allows room for the mousse to expand slightly as it sets in the refrigerator.
This step may seem simple, but it’s actually quite important. By filling them only halfway, you’re ensuring each serving gets that airy texture we aimed for while avoiding an overflow situation later on—nobody wants a messy fridge, right? As you spoon in the mousse, take a moment to appreciate its silken texture; it should glide off your spoon with ease! Each dollop feels like pure luxury going into those glasses.
Step 7: The Magic of Chilling
Now we enter one of my absolute favorite phases—the chilling process! Once all eight glasses are filled with that glorious Easy Lemon Mousse, it’s time to place them carefully in the refrigerator. Here’s where patience really pays off—chill these beauties for at least one hour or up to 24 hours if you’re planning ahead for a gathering. Why chill? Well, my friends, cooling allows all those flavors to meld together beautifully and helps set up that dreamy texture we’re after.
As they chill, imagine how those zesty notes mingle with the creamy goodness; think of it as a delicious dance party happening inside those glasses! You’ll notice that after an hour, each spoonful will be perfectly light yet solid enough to hold its shape when served—this is what makes our Easy Lemon Mousse truly extraordinary. If you can resist diving in too soon (I know it’s hard!), I encourage you to wait until they’ve had their full chill time for optimal flavor development.
Step 8: Final Touches Before Serving
Just before serving, let’s add some final touches that will elevate this dessert from lovely to unforgettable! Remove your beautifully chilled lemon mousse from the refrigerator and take a moment to admire them—they should look like little sunny clouds waiting for someone special to dig in! Here’s where you can get creative: consider garnishing each glass with a dollop of freshly whipped cream or an extra sprinkle of lemon zest for visual flair and a burst of citrus aroma.
When adding your garnishes, remember that presentation matters; it’s part of what makes food so magical! A little zest on top not only enhances flavor but adds a pop of color that invites everyone in. If you’re feeling adventurous (and I always encourage culinary exploration!), consider adding fresh mint leaves or even edible flowers for a stunning touch—because why not? The beauty is part of the enjoyment!
Embracing Your Culinary Triumph
Now that you’ve crafted this delightful Easy Lemon Mousse from scratch—and trust me when I say there’s nothing quite as rewarding as knowing you made this divine treat—you’re ready to serve it up at dinner parties or enjoy as an everyday indulgence. Each bite is sure to bring smiles and compliments alike because who doesn’t love something sweet yet refreshing? Remember to savor not just the flavors but also the joy of sharing this labor of love with friends and family—you’ve truly created something magical today!
And there you have it—your very own Easy Lemon Mousse recipe complete from start to finish! I can’t wait for you to experience how utterly intoxicating this dessert can be. Happy cooking, my dear friend!
Storage and Enjoyment Tips for Your Easy Lemon Mousse
Now that you’ve whipped up this delightful Easy Lemon Mousse, it’s time to dive into the joys of savoring it! Whether you’re treating yourself to a special dessert or sharing it with loved ones, let’s talk about how to keep this creamy goodness fresh and ready for your next indulgence. You’ll want every spoonful to be as luxurious and refreshing as the first, so understanding storage is key. With just a few tips, you can ensure that your mousse remains a showstopper at every gathering or a comforting treat on those cozy nights in.
Storing Leftover Easy Lemon Mousse
If you find yourself with any leftover Easy Lemon Mousse—though I must admit, that’s often a rare occurrence!—you’ll want to store it properly to maintain its glorious texture and flavor. The best way to do this is by transferring your mousse into airtight containers; glass jars or plastic storage containers work wonderfully. Make sure to pop them in the refrigerator where they can stay fresh for up to four days. This is crucial because the creamy layers can start to separate if left out too long. If you’re really keen on keeping that fluffy texture intact, consider placing a slice of bread on top of the mousse before sealing the container; it helps with moisture control. Trust me when I say that even after a few days in the fridge, each spoonful will still taste like sunshine in a cup, bursting with that vibrant lemony tang!
Freezing Easy Lemon Mousse for Later
Now, if you’re looking for a way to make this delightful dessert last even longer, freezing it is a fantastic option! To freeze your Easy Lemon Mousse, simply spoon it into freezer-safe containers, leaving some space at the top since it may expand as it freezes. It will keep beautifully frozen for up to two months—just imagine having an elegant dessert ready at your beck and call! When you’re ready to enjoy it again, simply transfer it back to the refrigerator and allow it to thaw overnight. I promise you—it’s like having a little piece of summer waiting for you whenever you need a pick-me-up! The convenience of pulling out an already-prepared dessert makes entertaining guests so much simpler and adds an element of surprise when they take their first bite of that creamy goodness!
Easy Lemon Mousse

Experience the delight of a luscious dessert with this Easy Lemon Mousse. Bursting with tangy citrus flavor and airy creaminess, this mousse is the perfect sweet ending to any meal or a refreshing treat on its own. With minimal ingredients and straightforward steps, you can whip up this delightful dessert in no time. Ideal for summer gatherings or cozy evenings at home, this Easy Lemon Mousse will impress your guests and satisfy your cravings. Serve it in charming glasses and watch as everyone savors each creamy spoonful.
- Prep Time: 15 minutes
- Cook Time: 0 minutes
- Total Time: 15 minutes
- Yield: Serves 4
- Category: Dessert
- Method: No-bake
- Cuisine: American
Ingredients
- 2 cups heavy cream
- 2 tablespoons confectioner’s sugar
- Pinch of salt
- 1 cup lemon curd
- 1 tablespoon lemon zest
Instructions
- Chill your mixing bowl and beaters in the refrigerator for 15-30 minutes.
- In the chilled bowl, combine heavy cream, confectioner’s sugar, and salt. Use an electric mixer to whip until medium peaks form (about 2-3 minutes).
- Gently fold in lemon curd and lemon zest using a spatula, ensuring to maintain the light texture.
- Spoon the mixture into dessert glasses, filling them halfway.
- Refrigerate for at least one hour before serving.
Nutrition
- Serving Size: 1 serving
- Calories: 320
- Sugar: 20g
- Sodium: 50mg
- Fat: 28g
- Saturated Fat: 17g
- Unsaturated Fat: 10g
- Trans Fat: 0g
- Carbohydrates: 24g
- Fiber: 0g
- Protein: 3g
- Cholesterol: 100mg