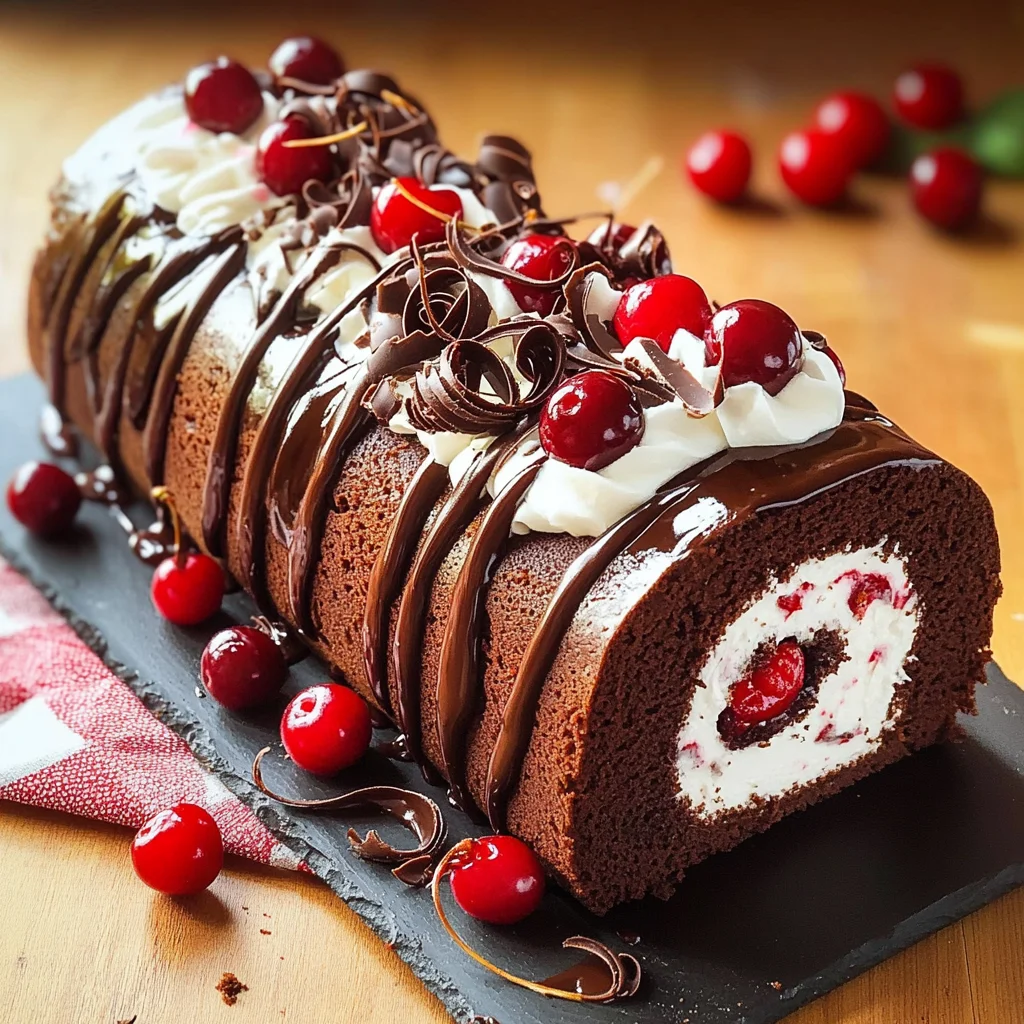
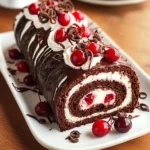
Elegant Black Forest Cake Roll
The Elegant Black Forest Cake Roll is not just a dessert; it’s an experience that transports you to a charming coffee shop in the heart of Europe, where the air is filled with the intoxicating aroma of chocolate and cherries. Imagine slicing into this beautiful creation, revealing a delicate swirl of rich chocolate sponge enveloped around a luscious filling of sweetened whipped cream and plump cherries. Each bite offers a delightful dance of flavors and textures—the lightness of the cake, the creamy filling, and the burst of juicy fruit—all harmonizing to create something that’s truly unforgettable. This recipe has been my little secret for special occasions—a show-stopping treat that leaves everyone asking for seconds. Trust me when I say, this Elegant Black Forest Cake Roll will become a cherished favorite in your home as well.
Every time I prepare this cake roll, I am reminded of how food has this incredible power to evoke memories and create connections. It’s like wrapping up love and joy within layers of cake and cream, making it perfect for birthdays, holidays, or even just an afternoon indulgence. The contrast between the bittersweet chocolate and the tartness of cherries is nothing short of magical. And let’s not forget about the velvety chocolate ganache drizzled over the top—it’s liquid gold that brings everything together in one spectacular presentation. Whether you’re celebrating a milestone or simply treating yourself on a quiet evening at home, this recipe promises to deliver satisfaction in every bite.
Elegant Black Forest Cake Roll: A Decadent Delight
Get ready to embark on a culinary journey that will elevate your dessert game! This Elegant Black Forest Cake Roll combines classic flavors in an innovative way that will impress anyone lucky enough to enjoy it. The preparation may seem intricate at first glance, but I assure you, with each step taken mindfully, you’ll find joy in creating this beautiful masterpiece. The balance of airy chocolate sponge with rich cream and cherries is worth every moment spent in your kitchen!

Ingredients:
As we dive into crafting this stunning dessert together, let’s take a closer look at each ingredient that plays a pivotal role in creating our Elegant Black Forest Cake Roll.
- 4 large eggs. Eggs are essential in baking as they provide structure and stability to our cake roll while also adding moisture. When beaten, they trap air which leads to that fluffy texture we crave. Fresh eggs are always best; if you can get them from a local farm or market, their flavor will elevate your cake significantly.
- 3/4 cup granulated sugar. Sugar isn’t just for sweetness; it also contributes to the cake’s structure by helping it rise as it bakes. It caramelizes slightly during baking, enhancing the overall flavor profile with subtle notes of complexity. Always use fine granulated sugar for smooth incorporation into your batter.
- 1 teaspoon vanilla extract. This aromatic ingredient adds depth and warmth to our chocolate sponge. Choose high-quality pure vanilla extract over imitation varieties—it makes all the difference! The natural essence brings out the richness of the cocoa powder beautifully.
- 1/2 cup all-purpose flour. Flour is what gives our cake its body without making it dense; it’s crucial for holding everything together while allowing it to remain light and airy. Look for unbleached all-purpose flour if possible—its natural color often indicates better quality.
- 1/4 cup unsweetened cocoa powder. Cocoa powder is what transforms our sponge into a delightful chocolate experience! Using high-quality cocoa powder will yield richer flavor; Dutch-processed cocoa is particularly superb if you want deeper tones in your cake.
- 1 teaspoon baking powder. This leavening agent is absolutely paramount for achieving that lovely rise we want in our sponge cake roll. It reacts with moisture and heat during baking to create those delightful air pockets—don’t skip this!
- 1/4 teaspoon salt. Salt might seem insignificant compared to other ingredients, but it’s crucial! It enhances sweetness and balances flavors within desserts by bringing out their inherent qualities.
- 2 tablespoons powdered sugar (for dusting the towel). We dust our towel with powdered sugar to prevent any sticking as we roll our warm cake after baking; it adds an extra touch of sweetness too!
- 1 cup heavy whipping cream. This luscious cream creates our dreamy filling! The fat content allows it to whip up beautifully into soft peaks that hold their shape perfectly when folded with cherries later on.
- 2 tablespoons powdered sugar (for sweetening whipped cream). Adding powdered sugar here ensures our whipped cream remains stable while providing just enough sweetness without overpowering other flavors.
- 1 teaspoon vanilla extract (for whipped cream). Just like before, this adds aroma and enhances taste—don’t underestimate its power!
- 1/2 cup chopped cherries (fresh or jarred). Juicy cherries are what make this roll truly sing! Their tartness cuts through the richness of chocolate and cream so perfectly; fresh is best when in season but jarred works wonderfully too—just be sure they’re pitted!
- 2 tablespoons cherry juice (optional): While using kirsch (cherry brandy) is traditional in many recipes, cherry juice provides similar fruity notes without any alcohol—a delightful alternative that still elevates flavor!
- 1/2 cup heavy cream (for ganache): This will melt down beautifully with chocolate to create our rich ganache topping—the silky smooth finish every elegant dessert deserves!
- 4 ounces dark or semi-sweet chocolate, chopped: Good quality chocolate matters here! Opt for something you love eating straight from the bar—it should melt beautifully into your ganache.
- 1 tablespoon butter: A touch of butter adds glossiness and richness to our ganache—absurdly delicious!
- Whipped cream (optional, for piping): If you’re feeling fancy or want to add decorative flair on top of your finished roll—this optional step can elevate presentation tremendously!
- Whole cherries: These provide stunning decoration on top—plus who doesn’t love fresh fruit atop their desserts?
- Chocolate curls or shavings: These are visually appealing finishes that add elegance; they’re easy enough to do at home using a vegetable peeler on chocolate bars too!
Equipment You’ll Need:
Before we dive into creating magic with these ingredients, let’s gather some essential tools that will help make this experience enjoyable and successful! Having the right equipment ensures smoother processes throughout each step—trust me; it’s worth investing in good tools where possible.
- 10×15-inch jelly roll pan – Essential for achieving that perfect sponge size! A larger pan lets us spread our batter thinly so it bakes evenly—be sure it’s lined properly with parchment paper for easy release post-baking.
- Parchment paper – Not just any paper but specifically parchment allows baked goods to slide off easily without sticking—a baker’s best friend!
- Mixing bowls (varying sizes) – You’ll need these for combining ingredients separately before bringing them together; having multiple sizes helps keep things organized while baking.
- Whisk or electric mixer – An electric mixer can save time when beating eggs into fluffy peaks but don’t shy away from whisking by hand if that’s more your style—it creates intimacy between you & your batter!
- Rubber spatula – A must-have tool for folding delicately so as not disturb those precious air bubbles we’ve worked so hard for while mixing ingredients together gently yet thoroughly.
- Kitchen towel – This acts as both protection during rolling-up process & prevents sticking thanks dusting powdered sugar prior—make sure it’s clean & dry before use!
Now that we’ve gathered our ingredients along with needed tools let’s jump into making this showstopper dessert come alive!
Preparing the Elegant Black Forest Cake Roll
Step 1: Prepping Your Oven & Pan
First things first—we need to set ourselves up for success by preheating your oven to 350°F (175°C). This ensures that when we put our batter inside later on, it’s greeted with immediate heat which helps everything bake evenly right from start! While that’s warming up nicely, grab your jelly roll pan (the one measuring 10×15 inches) and line it with parchment paper before lightly greasing it—that way nothing sticks when it’s time to flip out onto cooling towel later on! Trust me; taking these steps prevents heartbreak down-the-line when things don’t release smoothly from pan surfaces—it’s non-negotiable if you want perfection here!
Step 2: Mixing Eggs & Sugar
In a large mixing bowl—grab those four large eggs along with three-fourths cup granulated sugar—and beat them together until light and fluffy using either an electric mixer or whisk by hand if you’re feeling adventurous today! We’re aiming here for volume—this process introduces air bubbles which lead us towards achieving that coveted light texture once baked off later on! Once you’ve reached nice pale yellow hue combined well alongside fluffy consistency—which generally takes around 5 minutes depending upon speed utilized—you can mix-in one teaspoon vanilla extract now too—it’ll enhance overall flavor beautifully as well adding aromatic note throughout entire batter later when tasted!
Step 3: Sifting Dry Ingredients Together
Next comes one vital step not everyone realizes how crucial truly—is sifting dry ingredients together beforehand ensures there aren’t lumps lurking anywhere causing unevenness during baking times ahead! In separate bowl combine half-cup all-purpose flour alongside quarter-cup unsweetened cocoa powder plus one teaspoon baking powder mixed-in lastly alongside pinch salt—we want balance here so each element shines through once baked off perfectly afterwards! After sifting through ensure everything appears uniform before moving forward because trust me—you don’t want surprise lumps ruining final product after all hard work put forth until now…
Step 4: Folding Mixtures Together
Once dry mixture has been prepared carefully fold-in those previously beaten egg/sugar mixtures gently using rubber spatula—we aim here not disrupt air bubbles formed during initial beating stage earlier since preserving volume matters greatly upon final outcome achieved afterward! Be patient throughout process taking care ensuring no streaks remain visible either from egg mixture hiding underneath—that would indicate uneven blending leading potential issues down road later once baked off entirely—you really wouldn’t like experiencing flat sponge instead light airy delight resulting instead…
Feel free to reach out as we continue through this mesmerizing process—I’m here cheering you on every step along way towards creating something quite extraordinary today!
Elegant Black Forest Cake Roll: A Labor of Love
Oh, my dear friends, if there’s one dessert that truly captures the essence of celebration and indulgence, it’s this Elegant Black Forest Cake Roll! I’m so thrilled to share this with you because each bite is a delightful journey through layers of rich chocolate sponge, luscious whipped cream, and the sweet-tart burst of cherries. It’s a recipe that dances on your palate and fills your heart with joy—and isn’t that what we’re all after in our kitchen adventures? So let’s roll up our sleeves and dive into the next steps of creating this show-stopping treat!
Step 5: Spreading the Magic of Chocolate
Now comes one of the most crucial moments in our baking journey—spreading the batter onto the prepared pan. You’ve just created a light and airy chocolate sponge that deserves to be treated with care. Using a spatula, gently spread the batter evenly onto your prepared jelly roll pan, ensuring it reaches all corners. This is where magic happens! The thin layer will bake quickly and create that perfect texture we’re aiming for: soft yet sturdy enough to roll without cracking. As you smooth out the top, take a moment to appreciate the velvety chocolate aroma wafting through your kitchen—it’s absolutely intoxicating!
The evenness of your batter distribution is absolutely paramount because any thick spots could lead to uneven baking; we want our cake to be uniformly fluffy. Bake it in your preheated oven for about 10 minutes but keep an eye on it—every oven behaves differently! You’ll know it’s ready when you gently press the center and it springs back without leaving an indentation. This step is essential as it ensures that your cake has the right texture to hold its shape when we roll it up later. Trust me on this: a little patience here goes a long way.
Step 6: The Art of Rolling
Once you remove the cake from the oven, allow its irresistible aroma to fill your space for just a moment longer before we embark on another beautiful step—the rolling! While still warm (and oh-so-fragile), carefully invert the cake onto a clean kitchen towel dusted with powdered sugar. This step is crucial because it helps prevent sticking while adding just a hint of sweetness to complement our dessert. Gently peel away the parchment paper; if you notice any stubborn bits clinging on, don’t force it—just coax them away delicately.
Now here comes one of my favorite parts: rolling! Starting from one edge, tightly roll up the cake along with the towel inside. Picture this as wrapping a precious gift—the tighter you roll now, the more beautifully swirled your final cake will be! This technique not only helps create those gorgeous spirals but also sets up the structure for our filling later on. Let this delightful log cool completely in its cozy towel embrace; this resting period allows its shape to set perfectly, making unrolling and filling a breeze later on.
Step 7: Whipping Up Sweetness
While our fantastic creation cools down, let’s turn our attention to crafting that luxurious whipped cream filling—this is where things get incredibly dreamy! In a large mixing bowl, pour in one cup of heavy whipping cream along with two tablespoons of powdered sugar and one teaspoon of vanilla extract. Now comes the fun part: using an electric mixer or whisking vigorously by hand (if you’re feeling adventurous!), beat these ingredients until stiff peaks form. This process transforms liquid cream into billowy clouds—oh, what joy!
Why do we need stiff peaks? Well, they give our filling structure so that every slice holds together beautifully when served; no one wants their masterpiece falling apart at first cut! As you whip away, keep an eye on texture; you want glossy peaks that stand tall without collapsing back into themselves. Once you’ve achieved perfection, gently fold in those gorgeous chopped cherries (both fresh or jarred work wonderfully) for bursts of fruity flavor throughout your creamy filling. If you’re opting for cherry juice as well—go ahead and add it now—it enhances that exquisite cherry flavor while keeping everything moist and delightful.
Step 8: The Grand Unroll
Now that we have our fluffy filling ready to go, let’s return to our cooled chocolate sponge cake for its grand unrolling! Carefully unwrap your rolled-up creation from its towel cocoon; take extra care here as it can be delicate yet forgiving if handled gently. Lay it seam-side down on a clean surface or serving platter—you want this beauty displayed proudly!
With an offset spatula or large knife, spread that luscious whipped cream mixture evenly over the entire surface of your cake. Be generous here; this is where dreams come true! Make sure every inch gets covered in rich cherry-laden goodness because every bite needs to sing with flavor harmony. Once you’ve spread out all that creamy goodness like frosting on a canvas, it’s time for another gentle roll—this time without any towels involved! Starting from one edge again, slowly roll up your cake once more until it’s back into its cylindrical shape; think about how happy it’ll make everyone who gets to enjoy it!
After rolling, place your elegant creation seam-side down once again and pause for just a moment to admire what you’ve accomplished—it truly is extraordinary! But wait…we’re not done yet; there are still some finishing touches that will elevate this dessert into something utterly divine!
Final Touches: A Drizzle of Decadence
Step 9: Ganache Glory
What makes desserts so special is often found in their finishing touches—the final flourish that turns something beautiful into something breathtakingly divine! Let’s make some rich chocolate ganache that’ll drape over our elegant black forest cake roll like liquid gold—a truly stunning presentation awaits us! To begin this process, heat half a cup of heavy cream in a small saucepan over medium heat until just simmering; look for those tiny bubbles forming around the edges—that’s your cue!
Once simmering, remove from heat and pour over four ounces of chopped dark or semi-sweet chocolate along with one tablespoon of butter in another bowl. Now here comes an important technique called emulsification—using a whisk or spatula, stir these ingredients together until smooth and glossy. The heat from the cream melts the chocolate beautifully while incorporating air through whisking gives us that luxuriously silky finish we love in ganache. Allow it to cool slightly before drizzling generously over your cake roll—it’ll create an inviting sheen that’s simply irresistible!
As you pour over this heavenly mixture cascading down like waterfalls against dark chocolate sponge goodness beneath, don’t forget about garnishing—it adds both beauty and texture! Top off each slice generously with piped whipped cream dollops (if desired), whole cherries perched atop like crowns fit for royalty—and finish off with cascading chocolate curls or shavings for that extra wow factor!
Step 10: Slicing & Serving Your Masterpiece
After all these delicious transformations have taken place—from mixing batters to crafting fillings—the moment has finally arrived: slicing into your Elegant Black Forest Cake Roll is nothing short of magical! But before you dive right in (as tempting as it may be), allow your creation some time to chill briefly in the fridge for about 30 minutes if possible; this helps set everything nicely together while enhancing those decadent flavors even further.
When ready to serve (and believe me—it’ll be worth every second!), use a sharp serrated knife for clean cuts; applying gentle pressure rather than sawing will help maintain that beautiful spiral effect within each slice. As guests take their first bites filled with creamy layers intermingling harmoniously against rich chocolate sponge intertwined perfectly throughout—watch their faces light up with delight!
This Elegant Black Forest Cake Roll isn’t just dessert; it’s an experience brimming with love—and trust me when I say birthdays, anniversaries, or simply ‘just because’ occasions deserve such joyful indulgence too! So gather around with family and friends alike as laughter mingles alongside shared delights—we’ve turned simple ingredients into something utterly extraordinary today!
Enjoy every single morsel—you’ve earned it!
Storage and Enjoyment Tips for Your Elegant Black Forest Cake Roll
Now that your Elegant Black Forest Cake Roll is beautifully assembled and ready to dazzle, let’s chat about how to store it so you can enjoy this delightful treat long after you’ve made it. Trust me, having a slice of this luscious cake roll on hand will turn any ordinary day into something special! Whether you’re planning to share with friends, save for a special occasion, or simply indulge yourself over the days to come, understanding how to preserve its magic is key.
Storing Leftover Elegant Black Forest Cake Roll
To keep your Elegant Black Forest Cake Roll fresh and delicious, gently wrap it in plastic wrap or place it in an airtight container. If you can find one that’s just the right size to avoid squishing those beautiful layers—fantastic! Store it in the refrigerator, where it will stay scrumptious for up to 3 days. I can’t emphasize enough how important it is to keep air out; this prevents the cake from drying out or absorbing any unwanted odors from your fridge. And while we’re on the topic of maintaining quality, here’s a pro tip: if you want to preserve that dreamy texture even longer, place a slice of bread in the container with your cake roll. This simple trick helps retain moisture without any fuss! When you finally take a bite after storing, you’ll be delighted—while the flavors mellow just a tad and blend beautifully together, rest assured it still tastes utterly divine. Just slice it cold and serve it straight from the fridge for an invigorating treat!
Freezing Your Elegant Black Forest Cake Roll for Later
If you’re looking ahead and want to prepare your Elegant Black Forest Cake Roll well in advance, freezing is absolutely fantastic! To freeze this beauty properly, wrap it tightly in plastic wrap—two layers will do wonders—then pop it into a freezer-safe container or bag to prevent freezer burn. It can stay frozen for up to 2 months without losing its charm! When you’re ready to enjoy a slice (or two), simply transfer it to the fridge overnight to thaw slowly; this gentle approach allows the flavors to develop further while keeping everything moist. Imagine pulling out this decadent dessert on a whim and sharing slices with loved ones during surprise gatherings; there’s something incredibly joyful about serving a homemade treat that you’ve prepared earlier. The convenience of having such an indulgent cake roll at your fingertips makes all the difference!
Elegant Black Forest Cake Roll
Indulge in the delightful experience of crafting an Elegant Black Forest Cake Roll, a remarkable dessert that combines rich chocolate sponge with luscious whipped cream and juicy cherries. This stunning cake roll is perfect for any occasion, from birthdays to festive gatherings. With its soft, airy texture and the harmonious balance of flavors, each slice promises to transport you to a charming café filled with mouthwatering aromas. Impress your guests with this show-stopping treat that’s as beautiful as it is delicious!
- Prep Time: 30 minutes
- Cook Time: 10 minutes
- Total Time: 40 minutes
- Yield: Serves approximately 12 slices 1x
- Category: Dessert
- Method: Baking
- Cuisine: European
Ingredients
- 4 large eggs
- 3/4 cup granulated sugar
- 1 teaspoon vanilla extract
- 1/2 cup all-purpose flour
- 1/4 cup unsweetened cocoa powder
- 1 teaspoon baking powder
- 1/4 teaspoon salt
- 1 cup heavy whipping cream
- 2 tablespoons powdered sugar (for cream)
- 1 teaspoon vanilla extract (for cream)
- 1/2 cup chopped cherries (fresh or jarred)
- Optional: 2 tablespoons cherry juice
- For ganache: 1/2 cup heavy cream
- 4 ounces dark chocolate (chopped)
- 1 tablespoon butter
Instructions
- Preheat your oven to 350°F (175°C) and line a jelly roll pan (10×15 inches) with parchment paper.
- In a large bowl, beat eggs and granulated sugar until light and fluffy. Mix in vanilla extract.
- Sift together flour, cocoa powder, baking powder, and salt; gently fold into the egg mixture.
- Spread batter evenly in the prepared pan and bake for about 10 minutes until springy.
- Invert the cake onto a clean kitchen towel dusted with powdered sugar; carefully peel off parchment.
- Roll the cake tightly with the towel; let cool completely.
- Whip heavy cream with powdered sugar and vanilla until stiff peaks form; fold in cherries.
- Unroll the cake, spread whipped cream mixture over it, then roll again without the towel.
- For ganache, heat cream until simmering; pour over chopped chocolate and butter; stir until smooth.
- Drizzle ganache over the rolled cake; garnish as desired.
Nutrition
- Serving Size: 1 slice (100g)
- Calories: 290
- Sugar: 19g
- Sodium: 45mg
- Fat: 18g
- Saturated Fat: 10g
- Unsaturated Fat: 8g
- Trans Fat: 0g
- Carbohydrates: 29g
- Fiber: 2g
- Protein: 5g
- Cholesterol: 95mg