Guava Cheesecake
There’s something incredibly magical about baking a Guava Cheesecake that transcends the mere act of cooking; it’s an experience, a celebration of flavors and memories wrapped in a creamy embrace. Imagine the fragrant aroma wafting through your kitchen as you mix together the ingredients, each one adding its own unique character to this dessert symphony. The vibrant guavas, their sweetness almost intoxicating, mingle with rich cream cheese and a hint of vanilla, creating a luscious filling that dances on your palate. This isn’t just dessert; it’s a bridge between tradition and innovation, where every slice tells a story of sun-soaked tropics and warm gatherings with loved ones. I promise you, this Guava Cheesecake will become not only a beloved recipe but also a cherished memory to share.
What truly sets this dessert apart is its ability to evoke feelings of nostalgia while still feeling fresh and exciting. Guavas have always held a special place in my heart; their unique flavor profile is both sweet and slightly tangy, reminiscent of summers spent under shady trees with family. This cheesecake captures that essence perfectly, providing not just a treat for the senses but also an opportunity to connect over something truly extraordinary. Whether you’re hosting a summer dinner party or simply indulging yourself after a long day, this baked vanilla cheesecake topped with homemade guava compote is sure to elevate any occasion into something memorable.
Guava Cheesecake: A Tropical Delight for All Occasions
I can hardly contain my excitement as I share this Guava Cheesecake recipe with you! It’s perfect for those sunny days when you want something refreshing yet indulgent. The creamy cheesecake acts as a wonderful canvas for the vibrant guava compote we’ll create together, making it not just visually stunning but also an explosion of flavor in every bite. Trust me; your friends and family will be raving about this dessert long after the last slice has vanished.
Ingredients:
As we embark on this culinary journey together, let’s take our time to appreciate each ingredient that makes this Guava Cheesecake so special. Each item plays its own significant role in crafting the perfect dessert!
- 500 g guavas (chopped and peeled). These tropical gems are the star of our show! Fresh guavas bring an extraordinary sweetness combined with an aromatic quality that’s second to none. When selecting guavas, look for ones that are slightly soft to the touch and fragrant—this indicates ripeness. If fresh ones are hard to find, don’t hesitate to use frozen guavas; just make sure they’re thawed before using them in our compote.
- 80 g granulated white sugar. This sugar is essential for balancing out the natural tartness of the guavas while enhancing their sweetness during cooking. It helps create that luscious syrupy texture in our compote that clings beautifully to each slice of cheesecake. Opt for fine granulated sugar for quick dissolving which allows us to achieve that smooth consistency we desire.
- 1 tbsp lime juice. A splash of lime juice adds brightness and acidity that cuts through the richness of the cheesecake. It’s absolutely paramount because it enhances all those lovely flavors we’ve been working so hard to build while preventing any one element from overwhelming the others.
- 300 g Tennis biscuits. These delightful cookies form the foundation of our cheesecake crust! Their coconut flavor adds an unexpected twist that pairs beautifully with guava’s tropical notes. If you’re unable to find Tennis biscuits, feel free to substitute them with digestive biscuits or Graham crackers—just keep in mind they may alter the flavor slightly.
- 150 g unsalted butter (melted). Butter brings rich flavor and binds our crust together nicely; it’s crucial for achieving that perfect crunch while still being soft enough to slice easily through once baked. Always melt your butter gently—microwaving it too quickly can cause it to separate or burn!
- 700 g cream cheese. This is where we get our creamy texture—the basis for any great cheesecake! Room temperature cream cheese is essential for smooth blending without lumps; cold cream cheese will resist mixing properly, leading to an undesirable texture in your final product.
- 250 g castor sugar. Castor sugar is finer than regular granulated sugar and dissolves more readily into our cream cheese mixture, ensuring we eliminate any graininess before baking begins. This subtle differentiation makes a world of difference in achieving that silky-smooth filling we crave.
- 4 extra-large eggs. Eggs are responsible for binding everything together while providing structure as they bake—think of them as little miracle workers! Make sure they’re at room temperature too; adding cold eggs can shock your batter leading to cracks later on.
- 1 tsp vanilla extract. Vanilla elevates every component by adding depth—a comforting warmth envelops each bite when it melds with other flavors during baking! Always go for pure vanilla extract over synthetic versions; trust me on this—it makes all the difference.
- 200 ml whipping cream. Adding whipping cream lends an airy lightness to our cheesecake filling—you’ll love how it creates that irresistible melt-in-your-mouth sensation! Whip until soft peaks form before incorporating into your mixture gently; over-whipping can lead us down an unwanted path of graininess instead.
- 200 g guavas (for decorating). Finally, these beautiful slices will adorn our cake like jewels atop a crown! Selecting ripe guavas ensures they not only look stunning but taste deliciously fresh—perfect for tempting guests at your next gathering!
Equipment You’ll Need:
Having the right tools makes all the difference when bringing your culinary visions to life! While these items aren’t ingredients per se, they’re essential partners in creating something wonderful—and trust me; investing time into understanding them will make your baking experience smoother and more enjoyable.
- Springform pan – This type of pan allows easy release from sides thanks to its removable base, ensuring you won’t have any mishaps during serving time! It’s crucial for achieving clean edges on our beautiful cake without damaging its structure as you remove it from its mold.
- Mixing bowls – A set of various sizes helps tremendously throughout different stages—from beating egg whites stiffly to combining crust ingredients without spilling everywhere! Choose glass or stainless steel varieties as they are durable and won’t retain odors or stains like plastic sometimes does.
- Electric mixer – While mixing by hand can be therapeutic, electric mixers save precious time when creaming together butter & sugars or incorporating heavy ingredients like cream cheese—all key steps! If possible opt for one with paddle attachments since these excel at breaking down tough mixtures quickly without introducing too much air early on in mixing stage.
- Rubber spatula – A must-have tool that allows you gently fold delicate mixtures (like whipped cream) into heavier batters without deflating them unnecessarily; ensure you choose one that’s heat-resistant if planning on using near hot surfaces!
Now armed with ingredients and equipment ready at hand let’s dive into preparing this heavenly Guava Cheesecake!
Step 1: Prepare Your Crust
To begin this delightful journey towards creating your Guava Cheesecake masterpiece, start by preheating your oven to 180°C (350°F). This step ensures even baking throughout once we pop our creation inside later on! Meanwhile, place those Tennis biscuits into a food processor until finely crushed—think sand-like consistency here—as it’ll help bind beautifully once mixed with melted butter! If you don’t have access to one, no worries—simply place them inside zip-lock bags before crushing using a rolling pin instead—fun therapy included!
Once pulverized into crumbs add them directly into large mixing bowl along melted unsalted butter while stirring until evenly coated—a sign it’s ready when mixture starts clumping together like wet sand would do at beach playtime fun! Now press this lovely crumb blend firmly into bottom (and slightly up sides) springform pan ensuring compactness; don’t rush this step because having sturdy base is crucial once cake firms up post-baking!
Step 2: Create Your Filling
Now let’s turn our attention towards crafting that decadent filling which truly defines what makes this Guava Cheesecake so special! In another large bowl combine room temperature cream cheese along castor sugar before beating until completely smooth—this process known as creaming helps incorporate air giving us fluffiness later on after baking takes place—a non-negotiable aspect if aiming high above expectations here!
As soon as those two forms one harmonious blend add eggs one at time allowing each fully integrate before next addition occurs—this gradual approach allows control over consistency preventing unwanted lumps forming within mixture down road ahead—nobody wants surprises ruining their masterpiece after all right?
Step 3: Add Flavor & Texture
Once smooth like velvet flowing rivers finish off filling by folding vanilla extract along whipping cream gently using rubber spatula—you want everything well combined but remember avoiding over-mixing now since lightness will dissipate resulting dense texture instead—a true tragedy indeed!
At this point if desired sprinkle some zest from fresh lime right over blending action adding bright hints complementing fruity notes beautifully enhancing overall complexity within cake while lifting spirits skyward just thinking about future bites ahead!
Step 4: Bake It Up!
With crust ready and filling perfectly crafted pour luscious mixture directly onto prepared biscuit base smoothing top lightly using spatula ensuring even distribution across entire surface area—it’s important because uneven layers could lead uneven baking resulting cracks forming during cooling process afterwards which nobody appreciates seeing gracing their creation post-effortful labor put forth!
Place springform pan delicately inside preheated oven allowing magic unfold between heat transformation occurring within environment surrounding cake—it should take roughly 50 minutes till center remains slightly jiggly yet edges firm enough holding shape well—that’s how you’ll know readiness has arrived where patience pays off immensely rewarding everyone involved during feast moments approaching fast ahead!
As tempting aromas fill space around kitchen inviting thoughts swirling dreams about upcoming indulgences believe me—it’ll be wholly worth waiting patiently afterwards chilling patiently post-bake before finally unveiling grand reveal showcasing golden perfection achieved amidst celebrations enjoyed wholeheartedly amongst family & friends gathered round sharing laughter over slices served up happily devoured leaving smiles lingering far beyond last bites taken away…
I can’t wait for you all enjoy making this delightful treat yourself—you’ve got this my friend!
Step 5: Crafting the Crust of Your Dreams
Now that your Tennis biscuits are finely crushed and mixed with that lovely melted butter, it’s time to create a crust that will serve as the sturdy yet delicious foundation for your Guava Cheesecake. Begin by preheating your oven to 180°C (350°F). This is absolutely paramount because we want to ensure that our crust bakes evenly, providing a perfect base for the creamy filling. In a 9-inch springform pan, pour in your buttery biscuit mixture and press it down firmly using the back of a measuring cup or your fingers. You want this crust to be compact but not overly dense; think of it as a gentle hug for your cheesecake.
The baking time for this crust is around 10 minutes, just enough to allow the butter to soak into the crumbs and bind them together beautifully. While it’s in the oven, you’ll notice an intoxicating aroma wafting through your kitchen—this is a sign that those biscuits are marrying beautifully with the butter, and trust me, it’s going to elevate your cheesecake experience immensely. Once baked, let it cool completely on a wire rack before adding the filling. Cooling is crucial here; a hot crust can compromise the texture of your cheesecake by melting the cream cheese mixture when poured in later. So, take a moment to savor this step; it’s all about building layers of flavor!
Step 6: Blending the Creamy Filling
Now we dive into one of my favorite parts—creating that luscious cream cheese filling! In a large mixing bowl, combine 700 g of cream cheese and 250 g of castor sugar. Using an electric mixer on medium speed, beat these two ingredients together until they become smooth and creamy—about 2-3 minutes. Why is this step so important? Well, incorporating air into this mixture creates lightness in your cheesecake, preventing it from becoming dense or heavy while baking. You’re looking for a silky texture here; feel free to scrape down the sides of your bowl with a spatula as you go along to ensure every bit gets blended perfectly.
Next up are those eggs! Crack in four extra-large eggs one at a time and continue mixing on low speed. This method allows each egg to be fully incorporated before adding another, creating an even structure throughout your filling. After all eggs are added, mix in 1 teaspoon of vanilla extract—this will add an exceptional depth of flavor. Finally, pour in 200 ml of whipping cream and blend until just combined; this will give your cheesecake that luxurious mouthfeel we all adore! Remember not to overmix at this stage; you want everything combined without introducing too much air which could lead to cracks later on.
Step 7: The Transformation Begins
With our creamy filling ready to go, it’s time to pour it onto our cooled crust. Carefully spoon the luscious mixture over the biscuit base and use a spatula to spread it evenly from edge to edge. Don’t rush this step; we want every bite of our Guava Cheesecake to have that rich filling against the buttery crust—a delightful contrast in textures! As you pour, take a moment to admire how beautiful it looks already; you’re creating something truly extraordinary here!
Before popping it into the oven, gently tap the pan on your countertop a couple of times. This simple action releases any trapped air bubbles that could disrupt your smooth surface while baking—trust me on this one! Bake at 180°C (350°F) for about 50 minutes or until the edges are set but the center still has a slight jiggle when nudged gently—this will ensure it remains creamy after cooling. As you bake, resist opening that oven door too soon; maintaining consistent temperature is vital for even cooking.
Step 8: The Patience Game – Cooling Time
Once baked to perfection, remove your cheesecake from the oven and allow it to cool at room temperature for about an hour before transferring it to the refrigerator. I know waiting can feel excruciating when you’re so eager for that first slice—but patience here pays off dearly! Cooling gradually helps prevent cracks from forming on top by allowing steam and heat to escape gently rather than abruptly.
After letting it rest outside for an hour, cover with plastic wrap or foil and chill in the fridge for at least four hours—or overnight if you can manage! This chilling phase transforms your Guava Cheesecake into something truly remarkable; not only does it firm up nicely but flavors meld together beautifully during this time as well! When you finally cut into it after patiently waiting, you’ll feel like you’ve accomplished something really special.
And there you have it—a step-by-step journey towards creating an incredible Guava Cheesecake that’s bound to leave everyone asking for seconds (or thirds)! Each layer is infused with love and intention because cooking isn’t just about feeding people; it’s about sharing moments together around the table filled with laughter and joy. Enjoy every bite—you’ve earned it!
Storage and Enjoyment Tips for Your Guava Cheesecake
Now that your magnificent Guava Cheesecake has emerged from the oven, a golden-brown delight with a lush, creamy filling, it’s time to bask in its glory! But before you dive into the first slice, let’s talk about how to savor this beauty for days to come. You might find the flavor of guava dancing on your taste buds long after the last crumb is gone; trust me, preserving this luscious dessert is just as important as making it. The journey doesn’t end here—it only gets better when you know how to store it properly.
Storing Leftover Guava Cheesecake
To keep your Guava Cheesecake fresh and delicious, I recommend using an airtight container, which will protect it from drying out and absorbing any unwanted odors from your fridge. Seal it up tight and place it in the refrigerator where it can sit comfortably for up to five days. If you’re like me and want to maintain that perfect texture, consider placing a slice of bread inside the container; it works wonders at keeping everything moist! After storage, the cheesecake still boasts its velvety richness with that gorgeous guava compote on top, creating a delightful contrast between creamy and fruity flavors. When you’re ready to enjoy another slice, simply remove it from the fridge and allow it to come to room temperature for about 30 minutes—this step is crucial because it enhances those luscious flavors and brings out that creamy texture you’ve worked so hard for!
Freezing Guava Cheesecake for Later
If you find yourself with more cheesecake than you can eat right away (though, I dare say that’s a rare occurrence!), freezing is a fantastic option! To freeze your Guava Cheesecake, gently wrap individual slices in plastic wrap or aluminum foil—this step is essential to prevent freezer burn from stealing away its delightful essence. Once wrapped securely, place them in a freezer-safe container or zip-top bag. You can keep these treats frozen for up to three months! When you’re ready to indulge again, simply transfer a slice to the fridge overnight or leave it out at room temperature for about an hour before serving. It’s like unearthing a little treasure each time—a sweet reminder of sunny days spent baking. The convenience of having this delectable dessert on hand makes any day feel special!
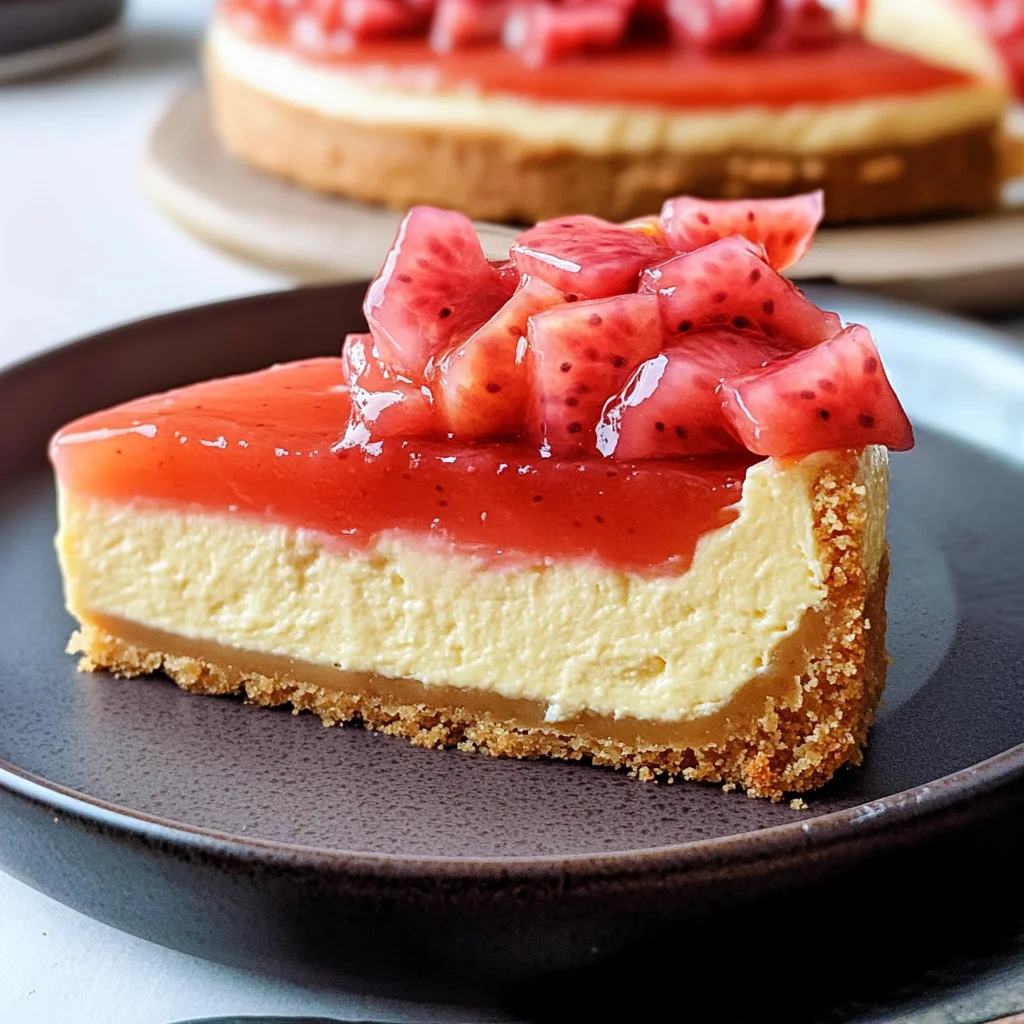
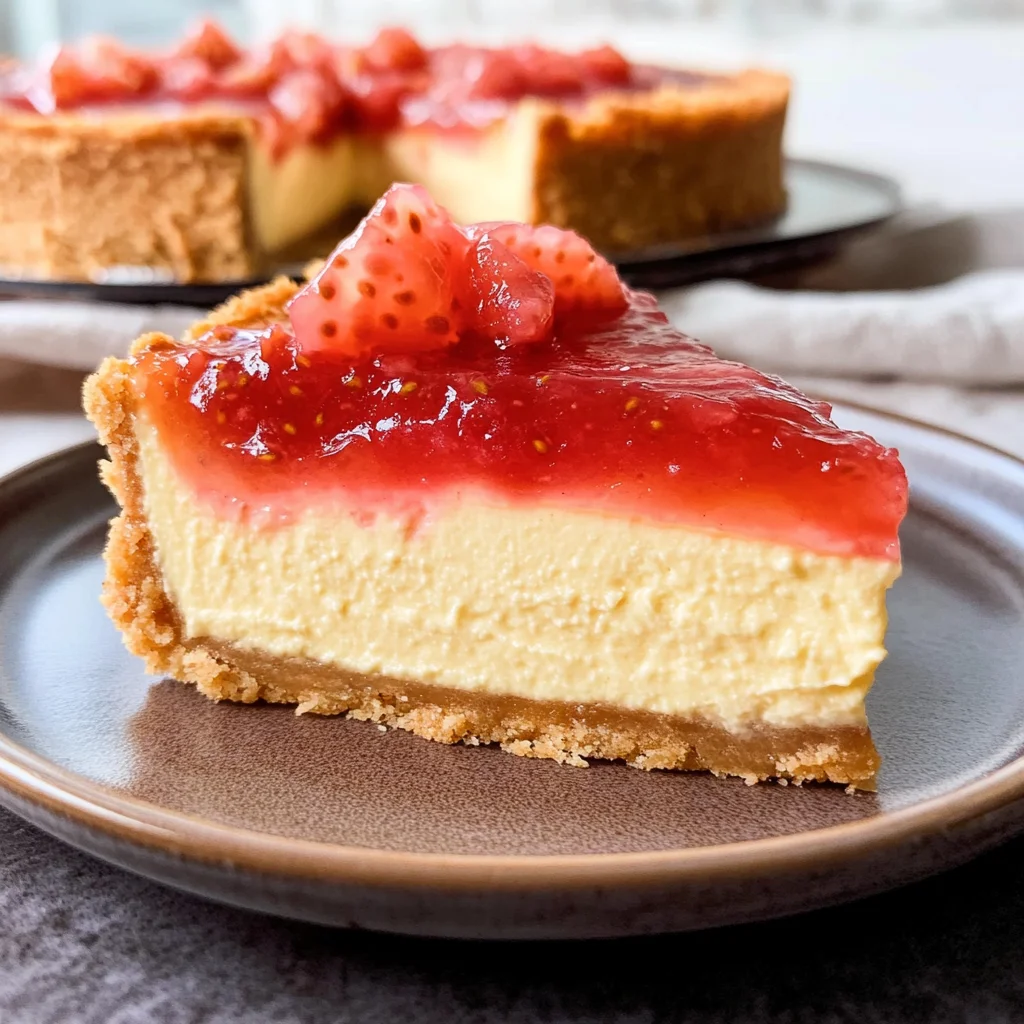
Guava Cheesecake
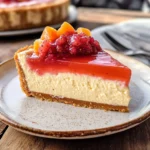
Experience the tropical bliss of our creamy Guava Cheesecake, a delightful dessert that promises to elevate any occasion. This luscious cheesecake features a dreamy filling of cream cheese, whipped to perfection and infused with the vibrant essence of guavas. Topped with a homemade guava compote, each slice delivers a burst of sweet and tangy flavor that transports you straight to sun-soaked shores. Ideal for summer gatherings or cozy nights in, this dessert is not only visually stunning but also incredibly satisfying. Gather your loved ones and indulge in this unforgettable treat—every bite is sure to spark joy and create cherished memories.
- Prep Time: 30 minutes
- Cook Time: 60 minutes
- Total Time: 1 hour 30 minutes
- Yield: About 12 servings 1x
- Category: Dessert
- Method: Baking
- Cuisine: Tropical
Ingredients
- 500 g guavas (chopped and peeled)
- 80 g granulated white sugar
- 1 tbsp lime juice
- 300 g Tennis biscuits (or digestive biscuits)
- 150 g unsalted butter (melted)
- 700 g cream cheese
- 250 g castor sugar
- 4 extra-large eggs
- 1 tsp vanilla extract
- 200 ml whipping cream
- 200 g guavas (for decoration)
Instructions
- Preheat the oven to 180°C (350°F). In a food processor, crush the Tennis biscuits until fine. Combine with melted butter and mix well.
- Press the biscuit mixture into the base of a springform pan, creating an even layer. Bake for 10 minutes and let cool.
- In a bowl, beat together cream cheese and castor sugar until smooth. Add eggs one at a time, mixing well after each addition. Incorporate vanilla extract and whipping cream gently.
- Pour the filling over the cooled crust and bake for approximately 50 minutes, until edges are set but center jiggles slightly.
- Allow cooling at room temperature before chilling in the refrigerator for at least four hours or overnight.
- While chilling, prepare guava compote by simmering chopped guavas, sugar, and lime juice until thickened.
- Serve slices topped with guava compote and enjoy!
Nutrition
- Serving Size: 1 slice (125g)
- Calories: 380
- Sugar: 30g
- Sodium: 180mg
- Fat: 25g
- Saturated Fat: 15g
- Unsaturated Fat: 8g
- Trans Fat: 0g
- Carbohydrates: 32g
- Fiber: 1g
- Protein: 6g
- Cholesterol: 85mg