Hawaiian Sunset Cake Recipe
There are few things in life that can match the sheer joy of baking a cake, especially when it’s one as vibrant and delicious as the Hawaiian Sunset Cake. This isn’t just any dessert; it’s a celebration of flavors that takes you on a tropical getaway with every bite. Picture this: a luscious cake layered with sweet, juicy pineapple and fluffy coconut, all beautifully enveloped in a creamy frosting that captures the essence of summer. I’ve always been captivated by how food can evoke such strong memories and emotions, and this cake is no exception. It’s a glorious blend of nostalgia and innovation, mingling the comforting familiarity of cake mix with the whimsical delight of tropical ingredients. Trust me when I say that making this Hawaiian Sunset Cake Recipe will not only fill your kitchen with enchanting aromas but also create unforgettable moments around the table.
This delightful cake is perfect for any occasion—be it a festive gathering or simply an afternoon treat to brighten your day. The layers represent more than just cake; they symbolize warmth, connection, and indulgence shared among friends and family. I promise you, once you slice into this tropical wonder, your loved ones will be asking for seconds (and thirds!). The way the sweet juice from the crushed pineapple seeps into the layers creates an utterly intoxicating experience that leaves everyone craving more. You might even find yourself dreaming about this cake long after it’s been devoured!
Hawaiian Sunset Cake Recipe: A Slice of Tropical Paradise
Let’s embark on this delightful culinary journey together! This Hawaiian Sunset Cake Recipe is not only easy to follow but also incredibly rewarding. With layers upon layers of flavor, every step is infused with love and care that transforms simple ingredients into something truly extraordinary. So roll up your sleeves, gather your ingredients, and prepare to create something magnificent!
Ingredients:
As we dive into our ingredient list for this enchanting Hawaiian Sunset Cake Recipe, remember that each component plays a crucial role in crafting that perfect bite of paradise. Let’s explore what makes each ingredient special.
- 1 15.25 ounce boxed white cake mix: Using a boxed cake mix allows us to achieve that light texture without spending hours measuring out flour and sugar. It serves as a brilliant base for our Hawaiian Sunset Cake—providing consistency and ease while allowing us to add our unique twist with tropical flavors.
- 1 ½ cups milk: Milk is essential here as it hydrates the dry ingredients in the cake mix while adding richness to the batter. Whole milk is fantastic for giving depth to flavor; if you’re looking for a lighter option, feel free to use almond or coconut milk for an extra hint of tropical bliss.
- ½ cup vegetable or canola oil: This liquid gold is non-negotiable! Oil contributes moisture to our cake, ensuring each slice remains tender and fluffy rather than dry and crumbly. While butter adds flavor, oil helps us achieve that melt-in-your-mouth texture.
- 4 eggs: Eggs act as binders in our batter but also add structure and stability to our layers. They help create those lovely air pockets during mixing which will lead to a beautifully risen cake! Be sure to use room-temperature eggs—this helps them emulsify better with other ingredients.
- 1 3.4 ounce package instant vanilla pudding mix: This unexpected addition enhances both flavor and texture, creating an incredibly moist crumb that’s almost addictive! It thickens the batter slightly while adding richness; trust me on this—it’s absolutely crucial for achieving that signature fluffiness.
- 1 3 ounce package orange vegan gelatin mix: Here’s where we really start to shine! The vegan gelatin mix not only contributes vibrant color but also infuses subtle citrus notes throughout our cake. This zest brings out the sweetness in other ingredients, creating an undeniably refreshing taste.
- 1 20 ounce can crushed pineapple, well drained: Pineapple is not just a topping; it’s one of the stars of this recipe! Its natural sweetness pairs perfectly with coconut while keeping our cake moist without making it heavy. Make sure to drain the pineapple thoroughly—too much juice could make our layers soggy instead of fluffy!
- 2 cups sugar: Sugar doesn’t just sweeten; it also affects texture and moisture content in baked goods. In this recipe, we use granulated sugar which helps create that beautiful golden crust during baking while balancing out tartness from fruits.
- 3 ½ cups sweetened shredded coconut: Coconut adds both texture and flavor—a true tropical delight! It’s essential for achieving that classic “Hawaiian” vibe we’re going for here. Look for high-quality shredded coconut without preservatives or additives for best results.
- 1 cup sour cream: Sour cream introduces tanginess along with moisture—important factors for elevating our layers beyond basic vanilla! Plus, it helps maintain tenderness even after refrigeration—a must-have secret weapon!
- 1 8 ounce container frozen whipped topping, thawed: This fluffy topping makes frosting easy-peasy while adding lightness to our overall dessert experience! If you prefer whipping your own cream from scratch (which I totally admire!), feel free—just aim for soft peaks before mixing it into your reserved filling.
- Orange slices & Pineapple tidbits (for garnish): A beautiful presentation can elevate any dish—even dessert! These fruity garnishes not only add visual appeal but also enhance flavor profiles when served alongside each slice.
Equipment You’ll Need:
Before we get started whipping up this gorgeous cake, let’s talk tools—having the right equipment makes all the difference in creating something magical! While these aren’t technically ingredients, think of them as vital partners in your baking adventure.
- Three 9-inch round baking pans: Using three pans ensures even layering without needing to slice through baked cakes later on—a huge timesaver! Opt for nonstick ones or line them with parchment paper to guarantee easy release after cooling.
- Mixing bowls (various sizes): A sturdy set of mixing bowls will help keep everything organized as we move through different steps—from mixing batter to combining filling components.
- Electric mixer (handheld or stand): While you could whisk by hand (which I commend!), an electric mixer will save time and energy when beating together those fluffy egg mixtures or blending thick batters smoothly.
- Rubber spatula: Essential for scraping down sides while mixing—this tool ensures that no ingredient gets left behind!
Now we’re all set up with our delicious ingredients and trusty tools at hand; let’s dive into preparing this gorgeous Hawaiian Sunset Cake Recipe!
Step 1: Preheat Your Oven & Prepare Pans
Preheating your oven may seem like a small detail but trust me—it’s absolutely paramount! An adequately heated oven ensures proper rising during baking time so don’t skip this step! Set it to 350°F (175°C) before moving forward because once those cakes go in there should be no delay in heat exposure which leads us directly into glory land—the delicious aroma wafting through your kitchen will be irresistible! While waiting on preheating magic, grab those three prepared round pans—we want them ready too! Spraying them generously with nonstick cooking spray prevents sticking later on; nobody wants their hard work stuck inside stubborn pans—I mean yikes!
Step 2: Combine Your Batter
In a large mixing bowl (you know—an appropriate size!), grab your electric mixer because it’s time to combine those essential elements together carefully yet confidently! Beat together the boxed white cake mix first along with milk until smooth—that creamy concoction sets us up perfectly ahead of adding oil next followed closely by eggs one at a time ensuring thorough incorporation between each addition before continuing onward towards vanilla pudding mixture + orange vegan gelatin powder swirling harmoniously until fully blended together—we are talking about two minutes max folks here—and voilà!
Step 3: Bake & Cool Layers
Once everything’s combined beautifully (cue happy dance), divide mixture equally across all three prepared pans ensuring each layer receives ample love equally—and off they go into preheated oven awaiting their momentary transformation into fluffy cakes within approximately twenty-five minutes max! Here’s where patience comes in handy—let them bake undisturbed until toothpick inserted comes out clean—that’s how we know they are done right—so resist peeking too soon lest they sink at mid-way point…not fun at all!! After removing from ovens allow cooling inside respective pans resting atop wire racks about ten minutes before gently coaxing them out onto racks themselves where they’ll continue cooling completely devoid from pan confines altogether—a vital step preventing sogginess later down line!
Step 4: Prepare Filling
While cakes cool blissfully away allowing anticipation build up further still—we turn toward crafting luxurious filling bursting forth brimming over flavors ready entice taste buds galore!! In another large bowl combine crushed pineapple sugar coconut sour cream mixture folding carefully until fully mixed throughout–taking care not overwork since gentle folding preserves texture integrity needed here perfectly—what emerges oh so wondrously smells divine already!!! Now set aside one cup reserved specifically towards frosting means don’t forget!! This will become key piece transforming entire dessert later on so keep safe stash somewhere nearby whilst continuing progress forward now…
And just like that we’re off on our way towards creating this stunning Hawaiian Sunset Cake Recipe together—you’re doing wonderfully my friend!! Keep following along—it only gets better from here as we assemble those glorious layers next…
Step 5: Cooling the Layers to Perfection
Once your cakes are baked to golden-brown perfection—about 25 minutes—it’s time for a crucial step that can make or break the texture of your Hawaiian Sunset Cake. Carefully remove the pans from the oven and place them on a wire rack, allowing them to cool for about 10 minutes. This short span is vital because it gives the cake time to slightly firm up, making it easier to release from the pans without any crumbling or tearing. Trust me on this; if you skip this resting period, you might find yourself in a sticky situation with broken layers come assembly time!
After those precious ten minutes, gently turn each pan upside down and let the cakes slide onto the wire rack. The cakes should come out easily if you’ve followed the nonstick prep correctly. If they seem reluctant, give them a gentle shake or a light tap on the counter—just enough to coax them out without damaging their delicate structure. Now, let them cool completely before moving on; I know, waiting is hard, but it’s absolutely paramount! Cooling allows the flavors to settle and enhances that moist texture we all crave. You’ll want to ensure they’re completely cool so that when you layer them with that luscious filling, everything melds together beautifully without turning into a melty mess.
Step 6: Creating the Tropical Filling Bliss
While your cakes are in their cooling phase—a perfect moment for you to sip some iced tea and savor the anticipation—let’s dive into preparing that utterly intoxicating pineapple-coconut filling. In a large mixing bowl, combine your well-drained crushed pineapple, sugar, sweetened shredded coconut, and sour cream. Mix gently but thoroughly; you want every inch of that fruity goodness coated in creamy delight! Each ingredient here plays a role: the pineapple brings juiciness and tang, while the coconut adds that lovely tropical flavor and texture. The sour cream not only enriches this mixture but also balances sweetness with its slight tartness.
Once everything is combined into this glorious filling, take one cup of it out and set it aside for later use as frosting. This small but essential step ensures you have a delicious topping that mirrors all those tropical flavors we’re building into this cake. Don’t skimp on this part; it’s like capturing sunshine in a bowl! What makes this filling special is how it transforms as it melds over time; letting it sit for even just a few minutes allows those flavors to deepen and develop further, creating an extraordinary harmony that will elevate each bite of your cake.
Step 7: Layering Your Dream Cake
Now comes one of my favorite parts: assembling your Hawaiian Sunset Cake! It’s where all your hard work pays off as you begin layering those beautiful cake rounds with that dreamy filling. Grab your first layer of cake and place it flat side up on your serving plate or stand—you want it stable and ready to support all that lusciousness above it! Spread half of the remaining pineapple-coconut filling evenly over this layer using an offset spatula or simply a spoon; the goal here is to create a nice even blanket of flavor that will seep into every crumb below.
As you lay down your second layer of cake—again flat side up—you’re building height and anticipation! Repeat with the rest of that glorious filling until it’s fully encased between layers like treasures hidden underwater in a stunning lagoon. Once you’ve added your final layer of cake, take a moment to admire what you’ve created thus far; you’re already halfway there! The layers should stack beautifully high, like mini cliffs ready to be crowned with icing glory.
Step 8: Frosting with Whipped Heaven
Before we crown our creation with frosting—the pièce de résistance—it’s essential we prepare our whipped topping mixture for maximum flavor infusion. Stir together your reserved one cup of pineapple-coconut mixture with thawed whipped topping until well blended. This creates an incredibly fluffy frosting that’s light yet packed with flavor—a perfect partner for our moist cake layers! Trust me when I say this step is non-negotiable; using whipped topping not only adds luxurious creaminess but also helps maintain stability so our cake stays intact as we slice into it later.
With your fluffy frosting ready, it’s time for some tender loving care as you spread it over the top and sides of your layered masterpiece. Use long sweeping motions, starting from the center and moving outward; think of yourself as an artist painting a vibrant sunset across an idyllic Hawaiian beach! There’s no right or wrong way here—just let creativity flow! You want an even coating that captures all those tropical flavors while enticing anyone who walks by with its beauty alone.
Final Touches: A Tropical Garnish
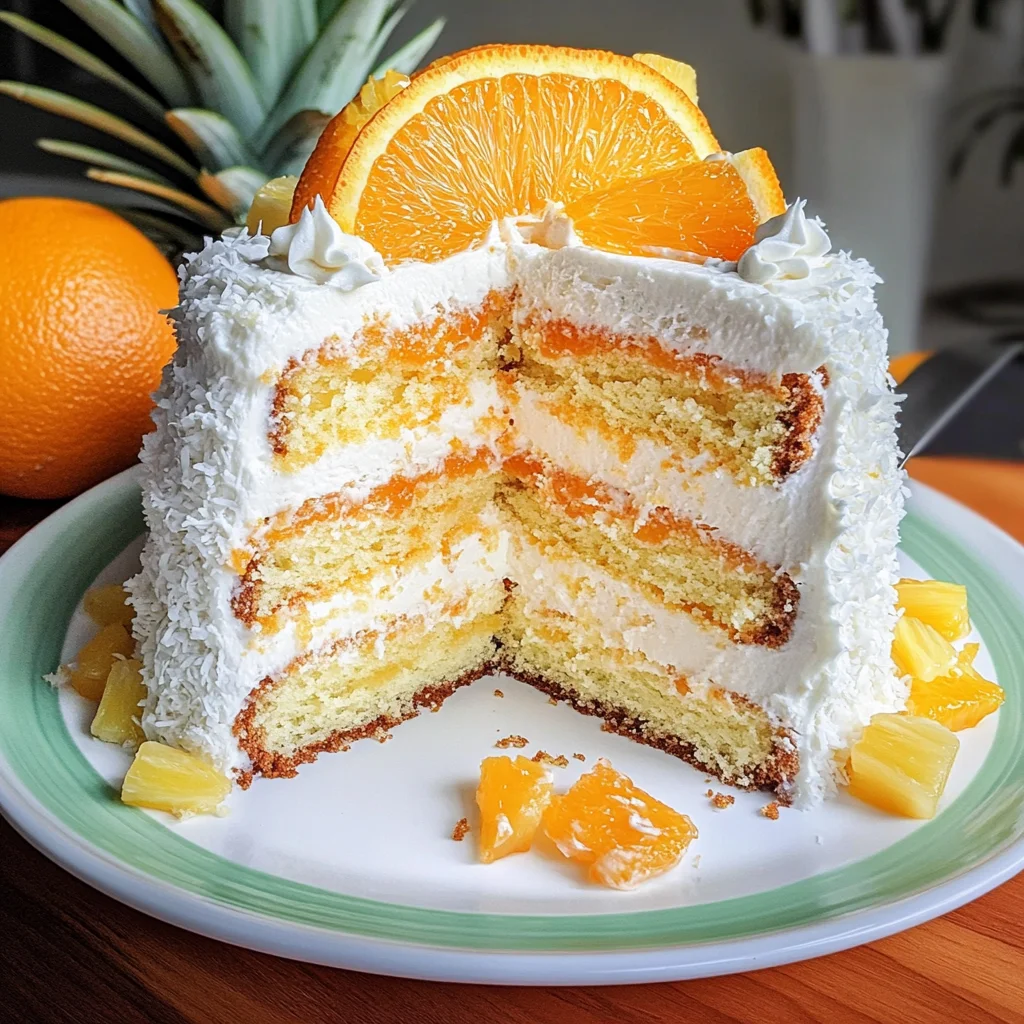
Once frosted to perfection—and oh my goodness does this look beautiful—it’s time for our final flourish before serving: garnishing! Decorate generously with bright orange slices and juicy pineapple tidbits atop your cake like radiant sun rays peeking through palm trees at sunset—how delightful does that sound? Not only does this add visual appeal but also brings fresh bursts of flavor when served alongside each slice.
After garnishing, pop your Hawaiian Sunset Cake into the refrigerator until you’re ready to serve; I recommend chilling it for at least an hour if possible (or longer if time allows!). Why chill? It allows all those flavors to meld together beautifully while setting up that lovely whipped topping so it holds its shape better during slicing—a win-win in my book! When you’re finally ready to share this spectacular creation with friends or family—or perhaps just treat yourself—you’ll find each slice reveals perfectly layered colors reminiscent of an actual sunset in Hawaii.
Conclusion
And there you have it—the ultimate Hawaiian Sunset Cake Recipe brought straight from my kitchen to yours! Each bite promises a symphony of tropical flavors dancing on your palate—a truly extraordinary dessert experience worthy of any celebration or just because you deserve something special today. I hope you’ll cherish making this recipe as much as I have over the years; remember, cooking is about love and sharing joy through food. Enjoy every moment spent crafting this delightful treat; I promise you won’t regret any bite of sunshine-infused happiness coming from this cake!
Storage and Enjoyment Tips for Your Hawaiian Sunset Cake Recipe
Oh, the delightful moment when you finally unveil your Hawaiian Sunset Cake! It’s not just a dessert; it’s a celebration of vibrant flavors and tropical flair that will have everyone swooning. Once you’ve savored that first slice, you’ll want to make sure the remaining cake stays as delicious as the moment it was first served. Trust me, there’s no need to rush through this step—taking care of your precious creation will only enhance your enjoyment later on!
Storing Leftover Hawaiian Sunset Cake Recipe
To keep your Hawaiian Sunset Cake fresh and luscious, store it in an airtight container at room temperature if you’re planning to enjoy it within two days. If you think you’ll take a little longer to finish it off (and who could blame you?), then pop it in the refrigerator where it can last up to a week without losing its charm. Just remember, this is crucial: before sealing it up, ensure it’s completely cooled down so you don’t trap any moisture that could lead to sogginess. For an extra touch of love, place a slice of bread in the container; this simple trick helps maintain moisture and keeps every bite tender and delightful. Even after a day or two in storage, the cake remains a tropical treat—each layer still bursting with sunshine and sweetness.
Freezing Components for Later
Now, if you’re thinking ahead (which I wholeheartedly encourage!), freezing parts of your Hawaiian Sunset Cake is an excellent option. You can freeze individual layers or the entire assembled cake with ease! Just wrap each layer tightly in plastic wrap and then in aluminum foil to prevent freezer burn—this method keeps them fresh for up to three months. When you’re ready to indulge again, simply remove the layers from the freezer and let them thaw overnight in the fridge; they’ll taste just as divine as they did when freshly baked! This approach isn’t just convenient; it allows you to savor those tropical flavors whenever a craving strikes—a hidden gem waiting to come out at your leisure!
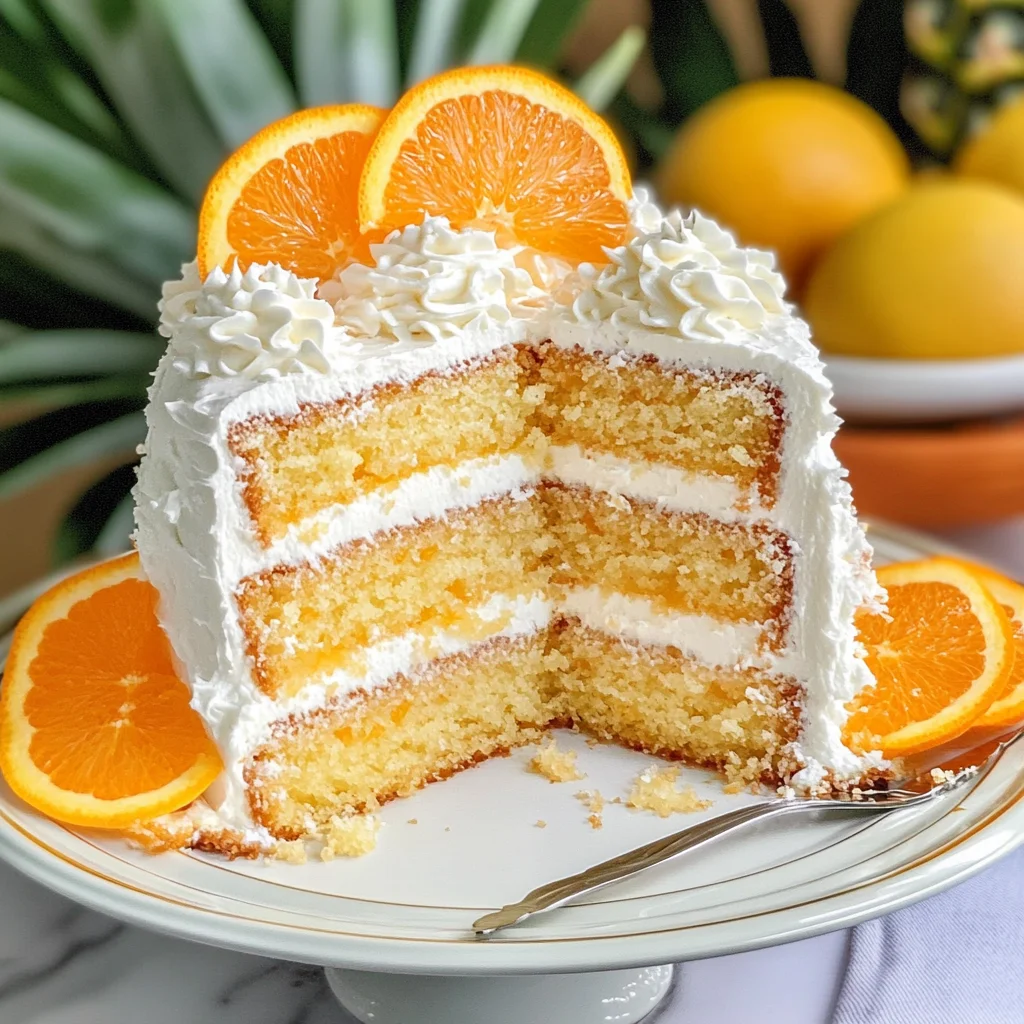
Hawaiian Sunset Cake

Indulge in the tropical allure of our Hawaiian Sunset Cake, a delightful dessert that transports your taste buds to a sun-kissed paradise. Each slice showcases layers of moist white cake infused with sweet crushed pineapple and velvety coconut, all enveloped in a light and fluffy whipped topping. This easy-to-make cake is perfect for any occasion, whether it’s a festive gathering or simply a treat to brighten your day.
- Prep Time: 30 minutes
- Cook Time: 25 minutes
- Total Time: 55 minutes
- Yield: Approximately 12 servings 1x
- Category: Dessert
- Method: Baking
- Cuisine: Tropical
Ingredients
- 1 boxed white cake mix (15.25 oz)
- 1 ½ cups milk
- ½ cup vegetable oil
- 4 eggs
- 1 package instant vanilla pudding mix (3.4 oz)
- 1 package orange vegan gelatin mix (3 oz)
- 1 can crushed pineapple (20 oz), well drained
- 2 cups granulated sugar
- 3 ½ cups sweetened shredded coconut
- 1 cup sour cream
- 1 container frozen whipped topping (8 oz), thawed
- Orange slices and pineapple tidbits for garnish
Instructions
- Preheat oven to 350°F (175°C). Grease three 9-inch round baking pans.
- In a large bowl, mix the white cake mix, milk, vegetable oil, and eggs until smooth. Add pudding mix and vegan gelatin; blend until combined.
- Divide the batter evenly among prepared pans and bake for about 25 minutes or until a toothpick comes out clean.
- Let cakes cool in pans for about 10 minutes before gently removing them to wire racks to cool completely.
- While cooling, combine drained crushed pineapple, sugar, shredded coconut, and sour cream in a bowl to create the filling; set aside one cup for frosting.
- Layer cooled cakes with half of the filling between each layer and frost the top and sides with the reserved filling mixed with whipped topping.
- Garnish with orange slices and pineapple tidbits before chilling in the refrigerator.
Nutrition
- Serving Size: 1 slice (120g)
- Calories: 306
- Sugar: 29g
- Sodium: 215mg
- Fat: 13g
- Saturated Fat: 10g
- Unsaturated Fat: 2g
- Trans Fat: 0g
- Carbohydrates: 43g
- Fiber: 1g
- Protein: 4g
- Cholesterol: 58mg