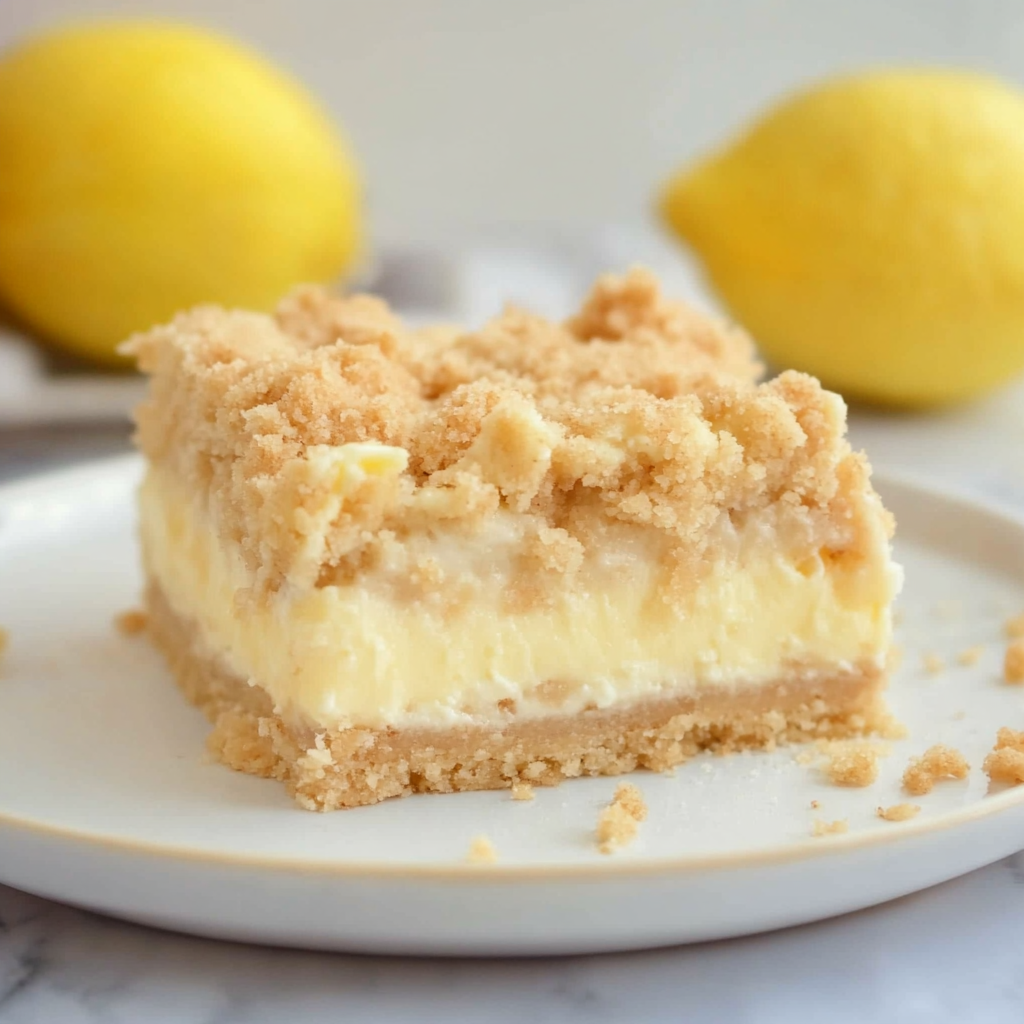
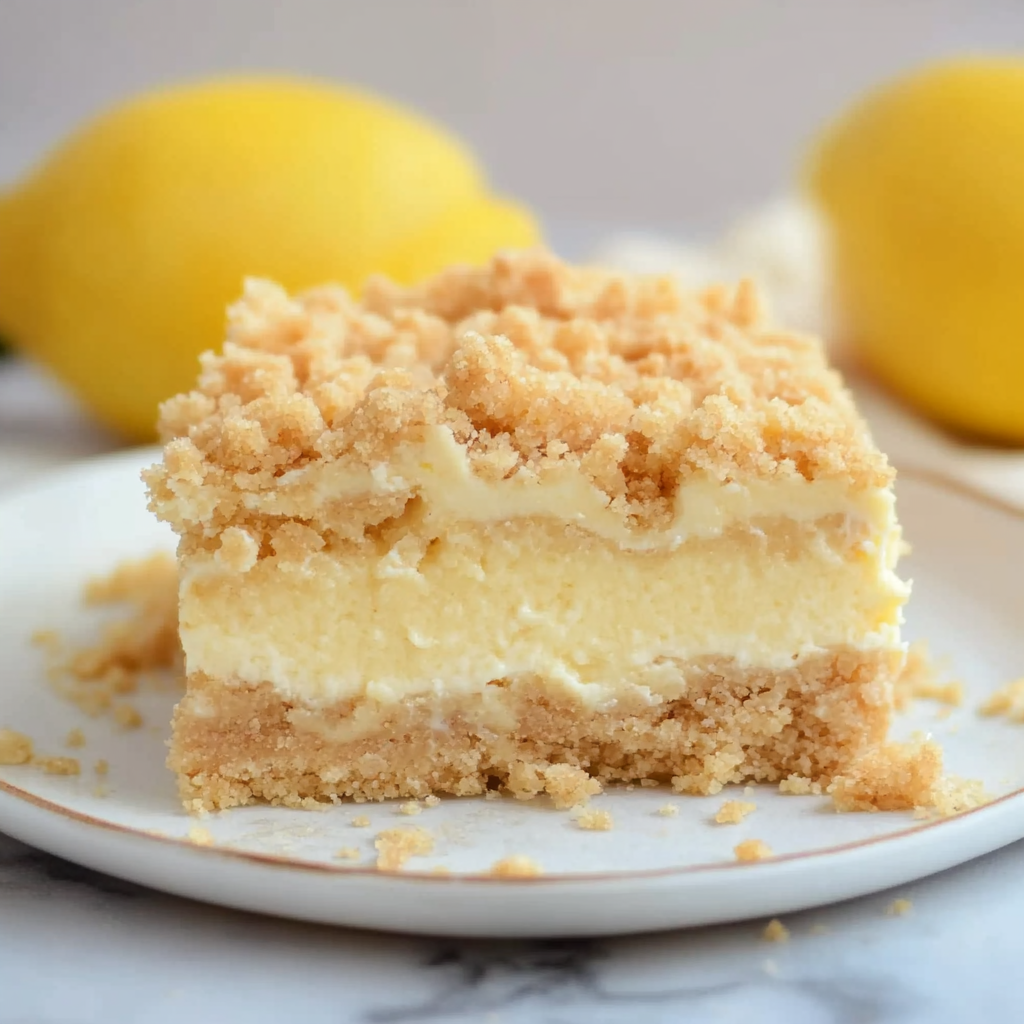
Lemon Cheesecake Crumb Bars
There’s something profoundly enchanting about the way a simple recipe can transport us, isn’t there? Lemon Cheesecake Crumb Bars aren’t just another dessert; they are a delightful symphony of flavors that dances on your taste buds, bringing with them a sense of nostalgia and warmth that wraps around you like a cozy blanket. Imagine slicing into these golden bars, revealing the creamy lemon filling nestled between layers of crumbly oat goodness. The bright citrus notes intermingle with the rich, sweet cream cheese, creating a refreshing experience that feels both indulgent and invigorating. Whether it’s a sunlit afternoon or an evening gathering with friends, these bars remind us that food is not just sustenance; it’s a celebration of life, love, and shared moments.
As we embark on this culinary journey together, I want to share my heart with you. There’s an unmistakable joy in preparing something from scratch—each ingredient chosen with care, each step taken with love. This recipe combines traditional cheesecake elements with a crumbly oat crust that adds texture and depth. The sweetened condensed milk brings an extraordinary creaminess that makes every bite utterly intoxicating. Trust me when I say: once you taste these Lemon Cheesecake Crumb Bars, you’ll find yourself reaching for seconds (and maybe thirds)! They’re perfect for summer gatherings or simply as a treat for yourself when you need a little sunshine on your plate.
Lemon Cheesecake Crumb Bars: A Refreshing Treat for Every Occasion
These Lemon Cheesecake Crumb Bars are not just delicious; they’re also incredibly easy to whip up! Packed with zesty lemon flavor and enveloped in a delightful oat crust, they make for an unforgettable dessert that everyone will adore. Perfect for any occasion—from backyard barbecues to holiday feasts—these bars are versatile enough to shine year-round while refreshing enough to be your go-to summer treat!
Ingredients:
Let’s gather our ingredients and get ready to create something extraordinary! Each component plays a vital role in crafting these luscious bars, so let’s explore why they matter.
- 2 1/3 cups all-purpose flour or whole wheat pastry flour. Flour serves as the backbone of our crumb crust—providing structure while allowing the bars to hold their shape beautifully. When choosing flour, think about what you want out of your dessert: all-purpose flour delivers a lighter texture, while whole wheat pastry flour offers a nuttier flavor and slightly denser bite. Both options will yield delicious results, so pick what speaks to you!
- 2 1/3 cups old-fashioned oats. These aren’t just any oats; they contribute heartiness to our crumb crust while also adding incredible texture! Old-fashioned oats give those lovely chewy bits that contrast beautifully with the creamy filling. Make sure to choose rolled oats rather than quick oats; quick oats can become mushy and won’t provide the same satisfying crunch.
- 1 teaspoon salt. Salt is like the magical whisper in this recipe—it enhances all the flavors without overwhelming them. It’s absolutely crucial to balance sweetness with just the right amount of saltiness; it allows the bright lemon notes to really shine through in each bite.
- 2 teaspoons baking powder. This little leavening agent is key! It helps our crumb mixture rise slightly during baking, giving it that lightness we crave while ensuring it doesn’t become dense or heavy. The baking powder acts as a tiny magician in our kitchen!
- 1 cup brown sugar. Brown sugar adds not only sweetness but also moisture and depth of flavor thanks to its molasses content. This richness complements the tangy lemon perfectly—creating an irresistible harmony in every bar.
- 1 cup granulated sugar. Here comes our classic sweetener! Granulated sugar contributes clean sweetness which balances beautifully with the caramel notes from brown sugar. Together, they create a truly balanced crumb topping.
- 1 cup cold cubed butter. Butter is one of those non-negotiables when it comes to achieving that rich buttery flavor and flaky texture we adore in desserts! Using cold cubed butter ensures we create little pockets of fat within our crumb mixture which leads to that coveted crumbly consistency.
- 8 ounces cream cheese at room temperature. Cream cheese is what makes this cheesecake filling so luscious and decadent! When softened properly, it blends seamlessly into our batter—creating that velvety smooth texture we crave in cheesecakes.
- 3 whole egg yolks. Egg yolks add richness and help bind everything together—giving structure without making it dry or dense. They also contribute beautiful color and enhance the overall flavor profile!
- 1 teaspoon lemon zest. Zest contains aromatic oils from the lemon peel which elevate this dessert beyond ordinary by infusing it with bright citrus notes! Make sure not to skip this step; fresh lemon zest is where much of the flavor magic happens!
- 1 teaspoon vanilla extract. Vanilla is like the warm hug of desserts—it rounds out flavors beautifully while complementing both sweet and tart notes harmoniously.
- 28 ounces sweetened condensed milk. This liquid gold is truly extraordinary! It adds incredible creaminess and sweetness without needing extra sugar or dairy products; plus, it lends itself perfectly to creating that luscious cheesecake filling we desire.
- 1 cup fresh squeezed lemon juice. Freshly squeezed juice brings vibrancy and acidity needed for balance against all the rich elements at play here—ensuring every bite bursts with refreshing tanginess!
Equipment You’ll Need:
Before diving into preparation mode, let’s take stock of our essential tools because having the right equipment makes all the difference! These tools will ensure your experience is smooth sailing as you create your delectable Lemon Cheesecake Crumb Bars.
- 9×13 baking pan: This size is perfect for yielding just the right portion size for gatherings (or sneaking bites when no one’s looking!). Using glass or metal pans will work well; just remember metal pans may yield slightly crispier edges due to better heat conduction.
- Parchment paper: A game changer in terms of easy removal after baking! Lining your pan ensures there are no sticky situations when serving up these beauties later on—trust me; it’s worth taking this small extra step!
- Mixer (stand mixer or handheld): A stand mixer fitted with paddle attachments works wonders for mixing dry ingredients thoroughly before adding wet ones; however, if you’re using hand mixers instead – don’t fret—you’ll achieve great results too!
- Whisk attachment (if using stand mixer): This attachment provides airiness crucial for beating eggs and cream cheese together until light and fluffy—a step essential in creating that dreamy cheesecake layer!
Now that we have everything lined up beautifully let’s dive into preparing those scrumptious Lemon Cheesecake Crumb Bars!
Step 1: Preheat Your Oven
First things first—we need to preheat our oven to 350 degrees Fahrenheit (175 degrees Celsius). Preheating ensures even cooking throughout once we place our delicious creation inside! If you skip this important step, you risk uneven baking which could lead either to undercooked centers or burnt edges—neither option sounds appealing now does it?
Step 2: Prep Your Pan Like A Pro
Next up is buttering up our trusty 9×13 pan generously before lining it with parchment paper (also buttered!). This double layer acts like insurance against any potential sticking disasters later on—that means easier removal post-baking! Gently press down on parchment ensuring there are no air bubbles trapped beneath—it’ll help maintain even shapes throughout baking too!
Step 3: Mix Dry Ingredients
This step involves bringing together all those wonderful dry ingredients into one bowl—the flour(s), oats,salt,baking powder,brown sugar,and granulated sugar should be combined well using either your mixer fitted paddle attachment—or simply grab a whisk if mixing by hand here! Mixing thoroughly ensures uniformity across flavors which leads ultimately toward satisfying bites later on without any surprises hiding within those layers…
Step 4: Create The Crumble Mixture
Now comes my favorite part—the addition of cold cubed butter into our dry mixture! Using medium-low speed on your mixer (or working quickly if mixing manually), combine until everything resembles coarse crumbs—it’ll take approximately two minutes max! Don’t rush this process—those little chunks created are what give us flaky goodness once baked…
And there we go—the foundation has been laid beautifully for these stunning Lemon Cheesecake Crumb Bars already beginning their journey towards creation blissful moments ahead… Stay tuned because next we’ll dive right into creating that luscious cheesecake layer which everyone will be talking about long after dessert time ends!
Step 5: Pressing Down the Crust – Building the Foundation of Flavor
Now that your crumb mixture is ready, it’s time to create the solid foundation for our Lemon Cheesecake Crumb Bars. You’ll want to take half of that delectable crumb mixture you set aside and gently press it into the bottom of your prepared 9×13 pan. Use your fingers or a flat measuring cup to ensure an even layer, about a quarter-inch thick. Pressing firmly but gently is key here – we don’t want to compact it too much; just enough so it holds together while baking. This step is crucial because it creates a sturdy base that will support the luscious cheesecake filling above. If you skip this part or don’t press firmly enough, you might end up with a crumbly mess rather than those delightful bars we’re after.
As you work, take a moment to appreciate the aroma wafting from the mixture; it’s a beautiful mix of sweetness and nutty oats that hints at the deliciousness to come. Make sure to spread it evenly across the pan, getting into every corner, as this will ensure uniform baking. Once you have pressed down the crust, set it aside while we prepare our creamy filling—this step is essential for allowing those tantalizing flavors to meld together beautifully when baked.
Step 6: Whipping Up the Creamy Filling – The Heartbeat of Our Bars
Now comes one of my favorite parts: making that creamy lemon cheesecake filling! Grab your mixer (a stand mixer with a whisk attachment works wonders here). Begin by beating your room-temperature cream cheese on medium-high speed until it’s light and fluffy—think clouds swirling in a bright blue sky! This step should take about two to three minutes. Why do we want it fluffy? Well, incorporating air into the cream cheese creates a lighter texture and ensures that your bars are not dense but rather an indulgent delight.
Once your cream cheese resembles soft peaks, it’s time to introduce the egg yolks—one at a time—into the bowl. This method allows each yolk to fully incorporate before adding the next, ensuring an even consistency throughout your filling. Scrape down the sides of your bowl as needed; this simple action keeps everything well-mixed and prevents any stubborn lumps from forming in your heavenly mixture. After all yolks are added and combined smoothly, toss in that zesty lemon zest and vanilla extract, stirring until everything dances together harmoniously. The brightness of lemon zest ties back into our theme perfectly—why would we settle for anything less than extraordinary?
Step 7: Sweetening the Deal – Incorporating Condensed Milk
Here comes where things get really exciting—drizzling in that sweetened condensed milk! With your mixer still running on medium speed, slowly pour in this liquid gold. Trust me on this; taking your time with this step allows for better incorporation and ensures that every last drop transforms our mixture into something truly divine. After pouring in all that lusciousness, let it whip away for about three minutes at medium-high speed until everything is wonderfully combined and velvety smooth.
The reason we beat this for so long is simple: creating that airy texture makes all the difference between ordinary bars and extraordinary ones! You want it silky and smooth without any lumps—a beautiful canvas ready for our zesty lemon juice! It’s like magic seeing how those ingredients come together into one cohesive batter; I promise you’ll be tempted to sneak a taste—it’s perfectly okay if you do! Just be sure to scrape down those bowl sides again before moving on; every bit of goodness counts!
Step 8: Adding That Zesty Kick – Lemon Juice Infusion
Now it’s time for what makes these Lemon Cheesecake Crumb Bars shine—the fresh lemon juice! With your mixer set to low speed (this helps prevent splattering), gradually add in that freshly squeezed juice while mixing until everything is well combined. It’s important not to rush this step; allowing each ingredient its moment ensures maximum flavor infusion throughout your creamy filling. You’ll notice how bright and vibrant everything looks as you fold in those sunny yellow drops—the anticipation is palpable!
Be sure to keep an eye on consistency as you mix—it should be thick yet pourable, almost like a custard just before setting. If you’ve ever made custard or pudding before, think of how satisfying it feels when everything comes together perfectly—that same joy awaits you here! Once you’ve achieved that perfect blend of creamy goodness with no lumps remaining, stop mixing and breathe in deeply; can you smell how intoxicatingly good this will be?
Next Major Phase: Baking Your Perfect Lemon Cheesecake Crumb Bars
With our crust pressed down and our creamy filling ready to go, it’s time for the grand finale—baking these beauties!
Step 9: Pouring and Topping – The Grand Assembly
Carefully pour that luscious lemon cheesecake filling over your pressed-down crumb crust in the pan; allow yourself a moment of excitement as you watch it spread effortlessly across its base like sunshine breaking through clouds on a warm morning. Then take those remaining crumbs you set aside earlier and sprinkle them generously over top of this creamy filling—it adds texture and contrast while keeping things visually appealing! You’re creating layers here—a symphony of flavors waiting to sing together beautifully in the oven.
Now slide that masterpiece into your preheated oven at 350°F (175°C) for about 30 minutes. As they bake, keep an eye out for signs they’re done—the edges should lightly brown while still maintaining their soft center; they may jiggle slightly but shouldn’t be overly wobbly like jello either. This delicate balance is absolutely paramount because once out of the oven, they will continue firming up as they cool off.
As tempting as it may be to dive right into these bars after baking, patience is key here my friend. Allow them to cool completely at room temperature first—this could take around an hour or so—and then pop them into the fridge for at least four hours (or overnight!) before slicing them up into gorgeous squares. Chilling them not only enhances their flavor profile but also gives them structure for clean cuts later—a transformative effect indeed!
I know waiting can feel torturous when you’re excited about dessert (trust me!), but I promise that chilling achieves an ethereal quality worthy of any celebration or quiet evening treat alike! When finally ready to serve up these Lemon Cheesecake Crumb Bars—whether enjoyed alone or shared with loved ones—you’ll experience pure bliss with each bite filled with zesty tanginess complemented by just-right sweetness nestled within crisp oat crumbs! Enjoy every moment—it’s truly extraordinary what happens when love meets kitchen magic!
Storage and Enjoyment Tips for Your Lemon Cheesecake Crumb Bars
Now that your kitchen is filled with the tantalizing aroma of freshly baked Lemon Cheesecake Crumb Bars, it’s time to revel in the joy of sharing—or enjoying them all yourself! I can already envision you cutting into those golden squares, revealing their creamy, luscious filling nestled between that delightful oat crumb crust. But before you dive in headfirst (trust me, I get it!), let’s talk about how to best store these little treasures to keep them tasting divine for days to come.
Storing Leftover Lemon Cheesecake Crumb Bars
To ensure your Lemon Cheesecake Crumb Bars remain as delectable as the day they were baked, I recommend using an airtight container—this keeps them fresh while preventing any unwanted moisture from sneaking in. You can store them right at room temperature if you’re planning to enjoy them within a day or two; however, for longer preservation, pop them in the refrigerator where they will stay delicious for up to a week. If you’re anything like me and want to savor every bite, here’s a pro tip: place a slice of bread in the container alongside your bars. This little trick helps maintain their moist texture without compromising flavor! After a few days in the fridge, you’ll find that the flavors meld beautifully—almost making each bite even more profoundly satisfying than the last. When it comes time to serve, simply cut a square and enjoy it chilled right out of the fridge, or let it sit at room temperature for just a few minutes to allow those sumptuous flavors to shine through.
Freezing Lemon Cheesecake Crumb Bars for Later
If you’ve made a bigger batch or simply want to save some for later indulgence (which I totally support!), freezing these bars is an excellent option. Just slice them into individual portions and wrap each piece tightly in plastic wrap before placing them in a freezer-safe container or resealable bag. This helps preserve their delightful texture and flavor for up to three months! Whenever you crave that refreshing lemon bliss—perhaps on a hot summer day—you can pull out a frozen bar, let it thaw for about 30 minutes at room temperature or pop it in the fridge overnight. The convenience factor of having these creamy delights on standby makes my heart flutter! Trust me when I say that pulling out one of these frozen treasures feels like unearthing a little piece of sunshine on any day.
Lemon Cheesecake Crumb Bars

Lemon Cheesecake Crumb Bars are a delightful balance of creamy, tangy lemon filling and a buttery oat crust, making them the perfect dessert for any occasion. Each bite offers a refreshing burst of citrus flavor paired with the richness of sweetened condensed milk and cream cheese, all enveloped in a crumbly topping that’s both satisfying and indulgent. These bars are not only easy to prepare but also versatile enough to shine at summer gatherings or cozy family dinners. Whether enjoyed chilled or at room temperature, they promise a sweet escape that will leave everyone craving more.
- Prep Time: 25 minutes
- Cook Time: 30 minutes
- Total Time: 55 minutes
- Yield: Approximately 12 servings 1x
- Category: Dessert
- Method: Baking
- Cuisine: American
Ingredients
- 2 1/3 cups all-purpose flour or whole wheat pastry flour
- 2 1/3 cups old-fashioned oats
- 1 teaspoon salt
- 2 teaspoons baking powder
- 1 cup brown sugar
- 1 cup granulated sugar
- 1 cup cold cubed butter
- 8 ounces cream cheese (room temperature)
- 3 egg yolks
- 1 teaspoon lemon zest
- 1 teaspoon vanilla extract
- 28 ounces sweetened condensed milk
- 1 cup fresh squeezed lemon juice
Instructions
- Preheat your oven to 350°F (175°C). Grease a 9″x13″ baking pan and line it with parchment paper.
- In a large bowl, mix together flour, oats, salt, baking powder, brown sugar, and granulated sugar.
- Add the cold cubed butter and blend until the mixture resembles coarse crumbs.
- Press half of the crumb mixture into the prepared pan to form the crust.
- In another bowl, beat the cream cheese until fluffy; add egg yolks one at a time, mixing well after each addition.
- Stir in lemon zest, vanilla extract, sweetened condensed milk, and lemon juice until smooth.
- Pour the filling over the crust and sprinkle remaining crumbs on top.
- Bake for about 30 minutes or until golden around the edges. Allow to cool before refrigerating for at least four hours before slicing.
Nutrition
- Serving Size: 1 serving
- Calories: 290
- Sugar: 20g
- Sodium: 150mg
- Fat: 18g
- Saturated Fat: 10g
- Unsaturated Fat: 6g
- Trans Fat: 0g
- Carbohydrates: 33g
- Fiber: 2g
- Protein: 4g
- Cholesterol: 60mg