Lime Crinkle Cookies
A Taste of Joy: Lime Crinkle Cookies
There’s something undeniably magical about the vibrant zing of lime, isn’t there? It dances on your taste buds, weaving a tapestry of bright, refreshing notes that can uplift even the dullest of days. When I first stumbled upon the recipe for Lime Crinkle Cookies, it felt like a revelation—a delightful blend of tradition and innovation that transforms simple ingredients into a truly extraordinary treat. These cookies are not just baked goods; they are an experience! Imagine biting into a soft, chewy cookie with a crackled powdered sugar exterior that reveals a tangy explosion of lime flavor within. Each cookie is like a little burst of sunshine, making them perfect for sharing with friends and family or simply indulging during those quiet moments when you need a sweet escape.
As I embarked on this culinary journey to create these Lime Crinkle Cookies, I was struck by how they embody the essence of baking—transforming raw ingredients into something beautiful and comforting. The process becomes an act of love, where the scents of zesty lime and buttery sweetness envelop your kitchen, inviting everyone to gather around. I promise you, once you make these cookies, they will find a special place in your heart and your recipe collection. So let’s roll up our sleeves together and dive into this delightful adventure!
Ingredients:
Gathering the right ingredients is like assembling the cast for a magnificent play—each one plays a critical role in creating the final masterpiece. As we prepare to make our Lime Crinkle Cookies, let’s take a moment to appreciate what each ingredient brings to the table.
- 2 ⅓ cups all-purpose flour. This is our foundational ingredient, providing structure and stability to our cookies. When measuring flour, be sure to stir it in its container before spooning it into your measuring cup; this prevents packing and ensures you don’t end up with overly dense cookies. All-purpose flour strikes a perfect balance between being too heavy and too light—ideal for achieving that soft-baked texture we’re aiming for.
- 1 teaspoon baking powder. Think of baking powder as the magic wand in our cookie-making process! It acts as a leavening agent, creating tiny bubbles that expand in the oven to give our cookies that wonderful rise. It’s essential for achieving the puffy appearance we adore in crinkle cookies. Make sure it’s fresh; old baking powder can yield lackluster results.
- ½ teaspoon salt. While salt may seem like a small player here, it’s absolutely paramount for enhancing flavors! It balances out the sweetness of our sugar and elevates the overall taste profile of our cookies. Just like in life, balance is key!
- ½ cup unsalted butter (1 stick), room temperature. This ingredient is crucial for creaming properly and creating that light, airy texture we’re aiming for in our Lime Crinkle Cookies. If your butter is too cold, it won’t cream effectively; if it’s melted, your cookies will spread too much during baking. I recommend using high-quality butter; European-style butters with higher fat content will yield even richer results—because why settle for anything less?
- 1 ¼ cups granulated sugar. Here lies our primary sweetener! Granulated sugar not only adds sweetness but also contributes to that lovely crisp exterior we associate with crinkle cookies. When creamed with butter, it creates air pockets that help give structure as they bake.
- 1 Tablespoon lime zest (about 2 limes). Zest is where the magic begins—this vibrant green outer layer packs an intense flavor punch! As you grate the limes’ zest, inhale deeply; you’ll notice how it instantly lifts your spirits! Use fresh limes whenever possible; their zest has an unparalleled brightness compared to pre-packaged options.
- 2 large eggs (room temperature). Eggs serve as binding agents in our cookie dough while adding moisture and richness. Using eggs at room temperature helps them incorporate better into the batter—creating smoother doughs that rise beautifully without any clumps.
- ¼ cup lime juice (about 2 limes). Freshly squeezed lime juice infuses each cookie with its distinct tartness! This liquid gold not only adds flavor but also helps balance out sweetness from the sugar and butter—all while keeping things moist.
- Neon green food coloring (optional). For those who want an extra pop of color reminiscent of summer days under blue skies! While not essential to flavor or texture, vibrant hues can make these cookies visually stunning—perfect for celebrations or simply brightening up your dessert table!
- ¼ cup granulated sugar (for coating) & ½ cup powdered sugar (for coating). These two types of sugar are essential for creating that signature crinkled look on our cookies’ surface! The granulated sugar provides grip while rolling out dough balls before coating them generously with powdered sugar—a step that contributes both texture and visual appeal!

Equipment You’ll Need:
Now that we have all our ingredients ready to go, let’s talk about equipment—the unsung heroes behind every successful baking endeavor! Having the right tools makes everything smoother and more enjoyable when you’re whipping up something delicious in the kitchen.
- Stand mixer with paddle attachment – A stand mixer is invaluable here because it does most of the heavy lifting when creaming butter and sugar together until light and fluffy—this step is crucial for achieving optimal texture in our final product!
- Mixing bowls – Having multiple mixing bowls lets us keep things organized while preparing different components like dry ingredients versus wet ones—it saves time later on when combining everything together.
- Cookie scoop (#40 scoop; about 1.5 Tablespoons) – This nifty tool ensures uniformity among cookie sizes which means consistent baking times across batches! Plus, using it prevents messier hands since sticky dough can be tricky otherwise.
- Baking sheets – Choose heavy-duty baking sheets lined with silicone mats or parchment paper—they provide non-stick surfaces ensuring easy removal without risk of tearing apart those lovingly formed cookies when they come out from their warm oven bath!
With all our tools prepped alongside those enticing ingredients ready at hand—we’re poised for success! Let’s step into action as we prepare these delightful Lime Crinkle Cookies together…
Step 1: Preheat Your Oven
First things first: let’s get that oven preheated to 350 degrees Fahrenheit! Preheating sets up an ideal environment so that as soon as those cookies hit its warm embrace, they begin rising perfectly right from the start—achieving their signature puffy shape quickly without spreading excessively or becoming flat disks instead!
Step 2: Combine Dry Ingredients
While waiting patiently for warmth enveloping every corner inside your oven—take this time wisely by whisking together flour along with baking powder plus salt inside one bowl until evenly blended throughout—that way each bite holds both flavor richness without overwhelming any single element present here today…
Step 3: Cream Butter & Sugar Together
Now comes my favorite part—the creaming process! In another bowl fitted onto your stand mixer attach paddle attachment then add softened butter along side granulated sugars plus zesty lime peel before turning mixer speed on medium-high until mixture becomes light-colored fluffy cloud-like consistency—it usually takes about three minutes so don’t rush this step because trust me when I say patience yields absolute perfection here!
Step 4: Incorporate Eggs & Lime Juice
Once you’ve achieved that dreamy whipped texture—it’s time now introduce eggs one by one mixing well after each addition allowing them fully blend into buttery sweetness followed closely behind by fresh-squeezed tangy-lime juice too which adds moisture alongside vibrant flavor bursts enhancing overall experience waiting ahead…
As we continue through this enchanting journey towards crafting these delightful treats—I encourage you to savor every moment spent together enjoying each step along way towards realizing ultimate goal: Our irresistible batch of Lime Crinkle Cookies awaits magnificently ahead just around corner…
Step 5: Embracing the Dough’s Character
Now, we’re arriving at a pivotal moment in our Lime Crinkle Cookies journey! With your flour mixture patiently resting and your butter-sugar-lime zest concoction transformed into a light and fluffy cloud of deliciousness, it’s time to bring these elements together. Gradually introduce the dry ingredients into the bowl with your sugar mixture while keeping the mixer on low speed. This is crucial; you want to prevent flour clouds that send you into a sneezing fit! Mix just until everything is combined—this means you’ll see no white streaks of flour anymore, but don’t overdo it either. The dough should be thick and slightly sticky, embodying a texture that is both comforting and inviting.
Now, if you find that your dough seems like it’s been caught in a rainstorm—especially if it feels too wet or sticky—don’t panic! This can happen if your butter was too soft (it happens to the best of us!). The good news is that all you need to do is show some patience and let the dough chill in the fridge for about 30 minutes. This step will not only help firm up the dough, making it easier to handle, but it also allows the flavors to meld beautifully. Trust me when I say this waiting period transforms an already fantastic cookie into something truly extraordinary.
Step 6: Crafting Delightful Cookie Balls
Once your dough has chilled and is ready for action, it’s time to shape those adorable little spheres of joy! Set up two small bowls: one filled with granulated sugar and the other with powdered sugar. Using a medium cookie scoop (I highly recommend a trigger scoop for this task because of the stickiness), portion out about 1.5 tablespoons of dough for each cookie ball. As you scoop, feel that delightful stickiness; it’s a sign of all the moisture and flavor packed inside!
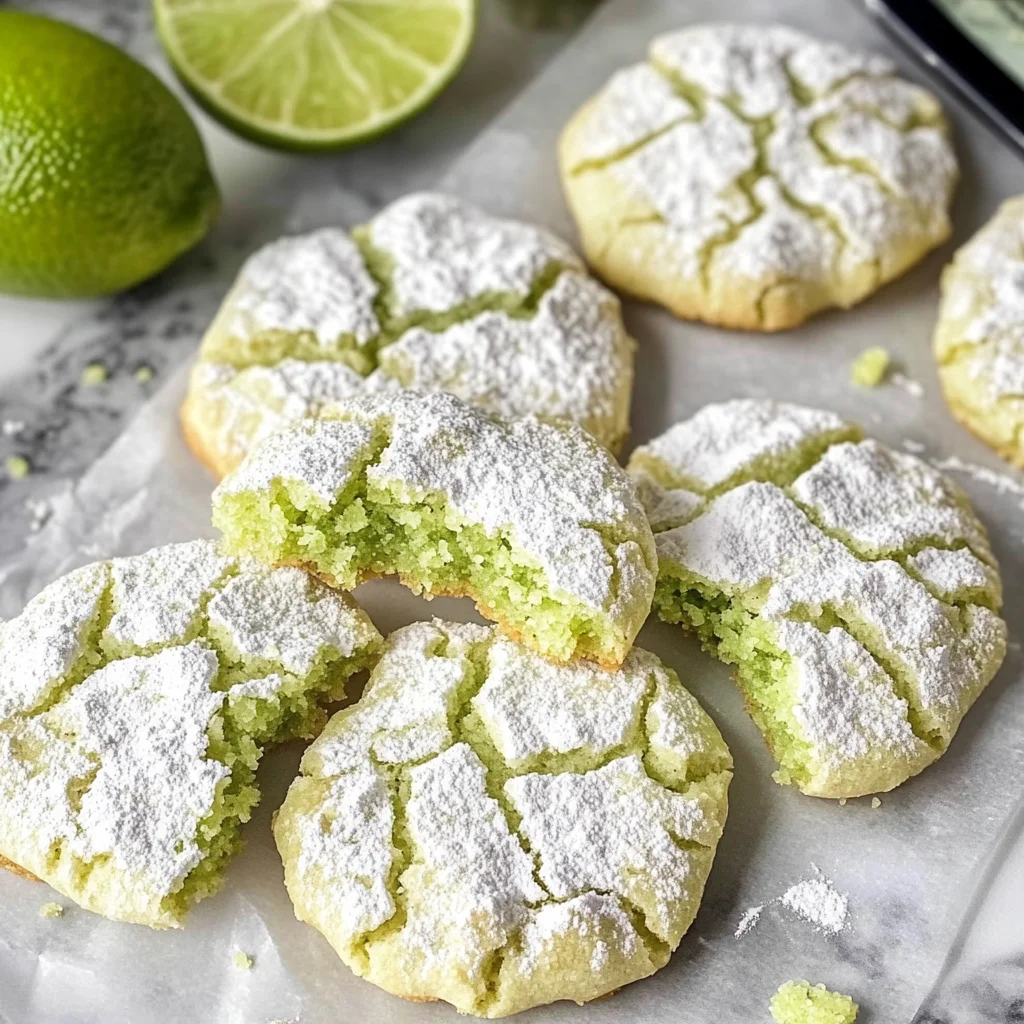
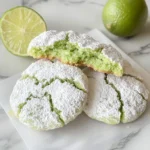
This rolling process is where the magic really begins. First, drop each dough ball in the granulated sugar, rolling it around gently before shaking off any excess. This step not only makes it easier to handle but provides a lovely texture contrast once baked. Next comes the fun part: generously coating the dough ball in powdered sugar! This non-negotiable step is what gives our cookies that signature crinkle effect—when they bake, they puff up, cracking beautifully as they do so. Place them on prepared baking sheets with enough space in between because trust me, they want room to grow!
Step 7: Baking with Love
Now that our cookie balls are ready to hit the oven stage, let’s talk about timing and temperature! Preheat your oven to 350 degrees Fahrenheit—the sweet spot for achieving that perfect balance of soft insides and slightly crisp edges. Place your baking sheets in the oven and set a timer for 9-11 minutes. You’ll know they’re ready when they’ve puffed up nicely and their edges feel firm when you give them a gentle poke—but resist opening that oven door too soon! Each moment spent inside contributes to their magical transformation.
As they bake, take a moment to savor that intoxicating aroma wafting through your kitchen; it’s pure bliss! Keep an eye on them during those final minutes—you want them set yet still slightly shiny in the center where those cracks form. If they look too dry or overly matte at this point, they might need just a minute or two more, but remember: don’t overbake them! That soft center is what makes them utterly delightful. Once they reach that perfect state where they’re puffy yet slightly soft in the middle, pull them from the oven and let them cool on the pan for several minutes before transferring them onto a wire rack.
Step 8: Cooling – The Hardest Part!
After pulling those glorious cookies from the oven, you’ll be tempted to dive right in—I get it; I’ve been there too! But here’s where patience plays its final role: allow those cookies to cool on their baking sheet for about five minutes before moving them onto a wire rack. Why? This cooling period allows them to firm up just enough so that they hold their shape without falling apart when transferred.
When you finally do transfer them onto that rack, give yourself a well-deserved pat on the back; you’re almost there! As they cool completely (which may feel like an eternity!), their flavors deepen and become even more harmonious—a true testament to patience rewarding us with deliciousness. Store any leftovers (if there are any!) in an airtight container at room temperature for up to one week—though I promise you they’ll be long gone before then!
Final Touches – Enjoying Your Heavenly Creation
Now comes one of my favorite parts—the moment we get to relish these Lime Crinkle Cookies together! As you take your first bite, close your eyes and let that burst of zesty lime invigorate your senses; it’s like sunshine captured in cookie form. Perfectly soft yet somehow chewy, each crinkle reveals moist tender interiors while providing delightful bursts of sweetness balanced by tangy lime—a true symphony of flavors.
Feel free to share these cookies with friends or family—nothing brings people together quite like fresh-baked treats—and watch how quickly smiles spread across faces as everyone experiences this delightful creation together. Whether enjoyed alongside afternoon tea or as an after-dinner treat while reminiscing about cherished memories or creating new ones; these Lime Crinkle Cookies are destined to become a beloved staple in your home just as they’ve warmed mine.
So go ahead—bake up these beauties with love and watch as every bite brings joy not only to those who indulge but also fills your heart with pride knowing you created something truly special! Happy baking!
Storage and Enjoyment Tips for Your Lime Crinkle Cookies
Now that you’ve whipped up a batch of these delightful Lime Crinkle Cookies, it’s time to savor the fruits of your labor! Seriously, there’s nothing quite like the joy of pulling those puffy, crackled cookies from the oven, their sweet citrus aroma wrapping around you like a warm hug. But what about those leftovers? Well, my friends, I have some delightful tips to ensure your cookies stay fresh and scrumptious for days to come!
Storing Leftover Lime Crinkle Cookies
To keep your Lime Crinkle Cookies as fresh as the moment they came out of the oven, I recommend storing them in an airtight container. This method is crucial because it prevents moisture from sneaking in and ruining that tender texture we all love. You can keep them at room temperature for up to a week—though I doubt they’ll last that long in most households! If you’re concerned about maintaining their softness, you can also place a slice of bread in the container; it works wonders by helping to keep the cookies moist while absorbing any excess air. Trust me on this one! After a few days, they still taste heavenly—just slightly chewier, which some might even prefer. If you’re feeling adventurous, a quick 5-10 seconds in the microwave will revive that freshly baked feel and warmth.
Freezing Lime Crinkle Cookies for Later
If you find yourself with an abundance of these limey delights—or if you simply want to prepare ahead—freezing is an excellent option. To freeze your cookies properly, allow them to cool completely before placing them in a single layer on a baking sheet until they’re firm. Then transfer them into a freezer-safe bag or container, layering them with parchment paper if you’re stacking them; this step is essential to prevent sticking. They can be stored in the freezer for up to three months! When you’re ready for a treat, simply take out as many as you’d like and let them thaw at room temperature for about 15 minutes—or enjoy them straight from the freezer for that cold burst of flavor! It’s such a convenient way to always have sweetness at your fingertips.
Lime Crinkle Cookies
Indulge in these vibrant Lime Crinkle Cookies that bring zesty flavor and fluffy texture together—perfect for sharing or enjoying solo!
- Prep Time: 20 minutes
- Cook Time: 10 minutes
- Total Time: 30 minutes
- Yield: Approximately 24 cookies 1x
- Category: Dessert
- Method: Baking
- Cuisine: American
Ingredients
- 2 ⅓ cups all-purpose flour
- 1 teaspoon baking powder
- ½ teaspoon salt
- ½ cup unsalted butter, room temperature
- 1 ¼ cups granulated sugar
- 1 Tablespoon lime zest (about 2 limes)
- 2 large eggs, room temperature
- ¼ cup lime juice (about 2 limes)
- Neon green food coloring (optional)
- ¼ cup granulated sugar (for coating)
- ½ cup powdered sugar (for coating)
Instructions
- Preheat your oven to 350°F.
- In one bowl, whisk together flour, baking powder, and salt.
- In another bowl, cream together butter and granulated sugar until light and fluffy.
- Mix in lime zest and eggs one at a time, followed by lime juice.
- Gradually add dry ingredients to the wet mixture until combined; chill dough for about 30 minutes if too sticky.
- Scoop dough into balls using a cookie scoop; roll first in granulated sugar then coat in powdered sugar.
- Place on prepared baking sheets with space between each cookie.
- Bake for 9-11 minutes or until puffed and edges are set but centers remain slightly shiny; cool before transferring to wire racks.
Nutrition
- Serving Size: 1 cookie
- Calories: 120
- Sugar: 10g
- Sodium: 60mg
- Fat: 5g
- Saturated Fat: 3g
- Unsaturated Fat: 2g
- Trans Fat: 0g
- Carbohydrates: 18g
- Fiber: <1g
- Protein: <1g
- Cholesterol: 15mg