No Bake Pistachio Cream Pie
There’s something truly enchanting about a dessert that whispers of nostalgia while inviting creativity. The No Bake Pistachio Cream Pie is not just a recipe; it’s an experience, a delightful journey that transports you to sunny afternoons filled with laughter and the gentle rustle of leaves. Imagine slicing through a chilled pie, revealing layers of creamy pistachio goodness nestled within a buttery, crumbly crust. The moment you take your first bite, the coolness envelops your senses like a soft embrace, while the subtle nuttiness of the pistachios dances on your palate. This pie is more than just food; it’s a bridge between cherished memories and new traditions, perfect for any gathering or simply as a mid-week indulgence.
What makes this No Bake Pistachio Cream Pie so special? It’s wonderfully simple yet profoundly satisfying—ideal for those warm spring and summer days when you crave something light but decadent. The vibrant green hue of the filling evokes the freshness of nature, making it not only delicious but stunning to behold on any table. As we dive into this recipe together, I promise you’ll find yourself enchanted by the ease with which it comes together and how it can turn an ordinary day into something extraordinary.
No Bake Pistachio Cream Pie: A Cool and Creamy Delight
Let’s embark on this culinary adventure together! This No Bake Pistachio Cream Pie captures everything we love about desserts—the joy of creating something beautiful and delicious without ever having to turn on the oven. It’s incredibly straightforward, requiring only a handful of ingredients that come together in mere minutes. Trust me when I say that once you taste this pie, you’ll be eager to share it with friends and family, ushering in smiles and compliments all around.

Ingredients:
As we gather our ingredients for this delightful creation, think of each component as part of a symphony that harmonizes perfectly together to create an unforgettable treat. Here’s what you need:
- 1 prepared graham cracker crust. This crust is the foundation upon which our luscious filling rests—it’s sweet, crunchy, and utterly comforting. If you’re short on time (or just want to skip a step), store-bought crusts work beautifully here, but if you’re feeling adventurous, making your own from crushed graham crackers mixed with melted butter is an option too! You’ll find that a homemade crust offers an extra layer of flavor and texture that elevates the entire pie experience.
- 1 (3.4-oz) package pistachio instant pudding mix. This magical powder is like liquid gold in dessert form! Not only does it impart that gorgeous pale green color we adore, but it also brings an intoxicating pistachio flavor that’s nutty and sweet without being overwhelming. Instant pudding mix also allows us to skip the cooking step entirely—perfect for those hot days when no one wants to stand over a stove!
- 1 cup cold milk. This ingredient is paramount because it activates our pudding mix! Cold milk helps thicken the mixture quickly and achieves that creamy consistency we’re after in our filling. Whole milk works best for richness, but if you prefer a lighter version or dairy-free option, almond milk can be substituted seamlessly while still delivering great flavor.
- 3 oz cream cheese, softened. Think of cream cheese as the secret weapon in our pie—it adds richness and depth while balancing out the sweetness from the pudding mix and powdered sugar. Make sure it’s softened before mixing; otherwise, you’ll end up with lumps instead of smooth decadence! If you’re looking for alternatives due to dietary preferences, whipped coconut cream could offer a delightful twist.
- 1/4 cup butter, softened. This ingredient contributes to that silky texture we’re aiming for in our pie filling; butter adds richness and helps emulsify everything together beautifully. Always use unsalted butter so you can control the sweetness in your pie! Remember to leave it out at room temperature ahead of time so it creams easily with other ingredients.
- 1/2 cup powdered sugar. This sweet addition not only enhances the overall flavor but also contributes to achieving that luxurious mouthfeel we crave in desserts like this one! Powdered sugar dissolves quickly into our mixture without leaving any graininess behind—just ensure you sift it if it’s clumpy.
- 8-oz whipped topping (such as Cool Whip). We’re using whipped topping here for its airy texture; it lightens up our filling tremendously while adding volume without needing any whipping skills! If you’d rather go homemade or are seeking dairy-free options, feel free to whip some coconut cream until soft peaks form—it will add its unique flavor profile while keeping things light and fluffy.
Equipment You’ll Need:
Having the right tools at your disposal can make all the difference in your culinary journey—it turns what could be a chore into pure joy! Each piece of equipment plays its role like trusted companions guiding us along this path toward dessert perfection.
- Large mixing bowl – A spacious bowl is essential for combining our pudding mix with milk efficiently without risking splatters everywhere (and trust me; nobody wants cleaning duty!). It provides ample space when we start incorporating our additional ingredients too!
- Electric mixer – While some might consider whisking by hand as an option here (and kudos if you do!), an electric mixer saves time and effort while ensuring everything blends smoothly—especially important when creaming together butter and cream cheese!
- Measuring cups and spoons – Precision is key in baking (and desserts too!), so having reliable measuring tools ensures every ingredient contributes accurately to our final product’s flavor profile.
- Rubber spatula – This handy tool aids us in scraping down sides during mixing sessions—that way nothing gets left behind! It’s perfect for gently folding in our whipped topping too so we maintain that airy texture throughout.
Now that we’re equipped with both ingredients and tools let’s dive into preparing this luscious No Bake Pistachio Cream Pie!
Preparing the No Bake Pistachio Cream Pie
Step 1: Mixing Magic Begins
Start by grabbing your large mixing bowl—this is where all the magic begins! Pour in your package of pistachio instant pudding mix along with one cup of cold milk. Using your electric mixer on low speed initially will prevent splatters while blending these two together seamlessly; we want them combined well but don’t rush into high speed just yet! Mix for about two minutes until you notice it begins thickening slightly—a hint of what’s coming next already fills the air with its wonderful aroma.
Step 2: Create Your Creamy Base
In another smaller bowl, let’s tackle our cream cheese mixture now because this step is absolutely paramount—it creates richness! Start by adding softened cream cheese along with softened butter into this bowl; again using an electric mixer will help achieve maximum fluffiness here as they blend into what’s akin to thick frosting consistency within moments! Once mixed thoroughly, introduce powdered sugar gradually—you want everything nicely incorporated without clumps stealing away from smoothness later on.
Step 3: Marrying Flavors Together
This part feels like bringing two worlds together—gently add your creamy cream cheese mixture into the thickened pudding base from earlier using your rubber spatula or mixer set at medium-high speed until completely smooth—you’ll know you’ve succeeded when there’s no trace left behind from either mixture!
Step 4: The Final Fluff
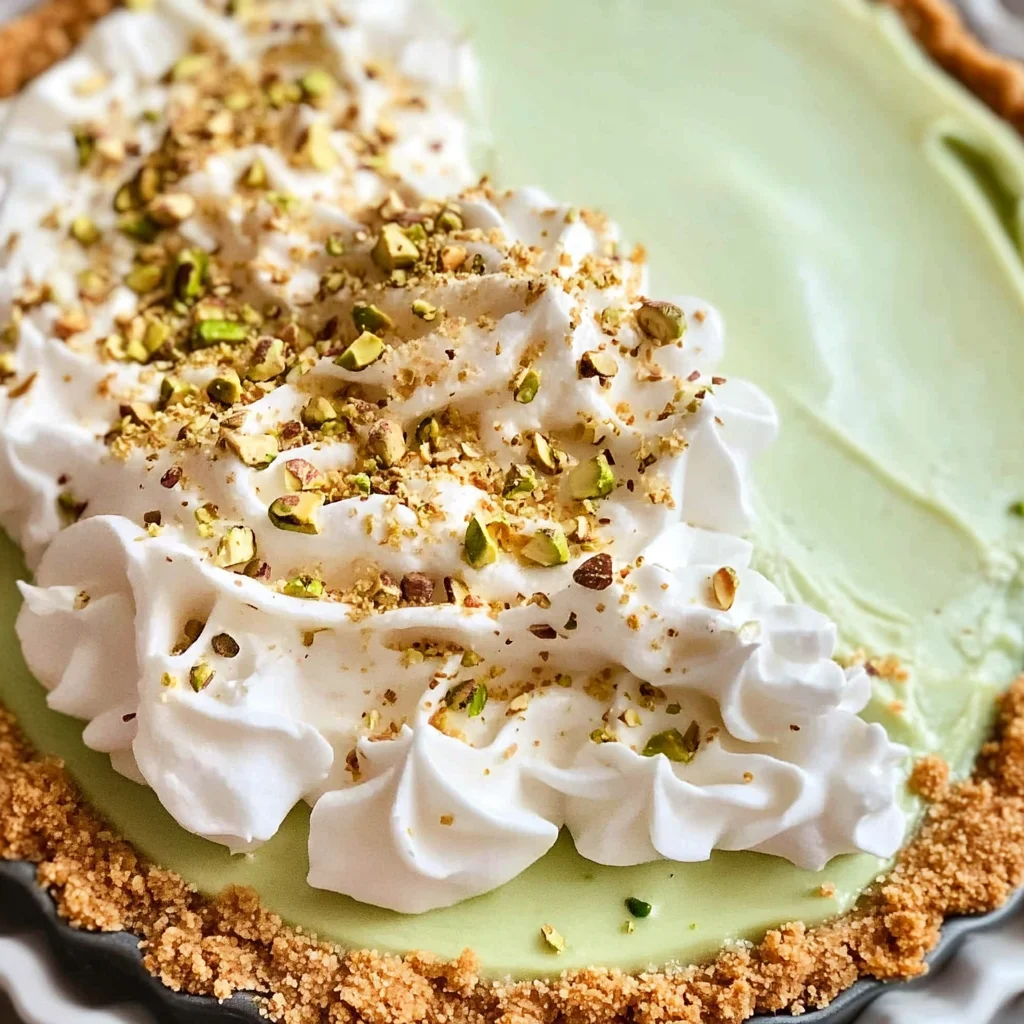
Now comes one of my favorite parts: folding in that glorious whipped topping! Be gentle here; we want air retained within this beautiful concoction—we’re not trying to deflate anything after all! Fold slowly until uniform pale green color emerges without visible white streaks lingering around—it’s crucial for presentation later on too since we eat first with our eyes!
And there you have it—the beginnings of something truly extraordinary await as we pour this luscious filling into its prepared graham cracker crust next…
Step 5: Pouring in the Creamy Filling
Now comes one of the most exciting parts of our No Bake Pistachio Cream Pie! Gently pour that luscious, pale green mixture into your prepared graham cracker crust. As you do this, take a moment to appreciate the velvety texture of the filling; it should flow smoothly and effortlessly into the crust, like a gentle stream cascading over pebbles. This step is crucial because it ensures that every bite will be infused with that delightful pistachio flavor. The combination of pudding and cream cheese creates a rich, creamy filling that’s not only satisfying but also has an intoxicating aroma that beckons you to take a taste right then and there. Trust me when I say that letting this filling settle into its home is essential for achieving that perfect pie structure.
After pouring in the filling, use a spatula to smooth the top gently, ensuring it’s evenly distributed. This step not only makes your pie look beautiful but also allows for even chilling, which is absolutely paramount to achieving the right consistency later on. Next, cover your pie with plastic wrap or aluminum foil—be careful not to let it touch the surface of the filling to avoid any unsightly marks. Now, it’s time for some patience. This is where magic happens! Place your pie in the refrigerator and allow it to chill for at least two hours. During this time, the flavors will meld together beautifully, and the filling will firm up just enough to slice cleanly without falling apart. So resist that urge to dig in right away; I promise you, waiting will be worth every second!
Step 6: The Art of Garnishing
Once those two hours have passed—and oh my goodness, what a glorious two hours they will be!—it’s time for some fun with garnishing! While it’s entirely optional, I highly recommend dressing up your No Bake Pistachio Cream Pie with some delightful toppings because presentation can truly elevate your dessert from delicious to extraordinary. Start by whipping up some fresh whipped cream if you’re feeling adventurous—just combine heavy cream (or a non-dairy alternative) with a bit of powdered sugar until soft peaks form. This can create an ethereal cloud atop your pie that adds both visual appeal and an extra layer of sweetness.
Now, if you’re opting for garnish, grab your piping bag (or just a zip-top bag with a corner snipped off), and pipe dollops of whipped cream around the edges of your pie in whatever design feels right—swirls, rosettes, or simply little mounds work beautifully here! And don’t forget about those chopped pistachios! Sprinkle them generously over the whipped cream or directly onto the filling for that added crunch and visual contrast. The vibrant green against the creamy backdrop is not only eye-catching but also signals to everyone what flavor profile awaits them in each slice—a veritable celebration on a plate!
Step 7: Slicing Into Happiness
Finally! The moment we’ve all been waiting for has arrived—the first slice! Carefully remove the pie from the fridge and bring it out into the light so everyone can admire its beauty before diving in. Using a sharp knife (a wet knife can help prevent sticking), cut through that creamy layer and graham cracker crust; you should feel it glide smoothly as you slice through each layer. Pay attention to how satisfying it feels as you lift out each piece—this is where all your hard work pays off! Each slice should hold its shape beautifully while revealing that gorgeous green filling within.
As you serve each piece onto plates, take a moment to breathe in those delightful aromas wafting up from your creation—trust me, it’s utterly intoxicating! If there are any leftover crumbs on your serving platter (which might just happen), don’t hesitate to scoop them up with your fingers; they are little bites of happiness waiting to be enjoyed! Remember to encourage everyone at your table to savor each bite slowly; this dessert deserves appreciation for its flavors and textures as much as its stunning appearance.
Step 8: Enjoying Your Creation Together
Now comes perhaps one of the most rewarding moments in any cooking journey: sharing what you’ve created with others. As everyone takes their first bite of this No Bake Pistachio Cream Pie, watch their eyes widen with delight—that’s when you’ll know you’ve succeeded! The coolness of the pie against their palate paired with that nutty pistachio flavor creates an experience that’s profoundly satisfying. It’s more than just dessert; it’s a moment shared among friends and family filled with laughter and conversation.
While enjoying this sweet treat, don’t forget to share stories or memories related to pistachios or even about other family recipes that have brought joy over the years; after all, food has an incredible power to connect us all deeply. If you’re feeling particularly generous (and I hope you are!), encourage others at your table to take seconds—or thirds! This No Bake Pistachio Cream Pie is perfect for gatherings or celebrations during spring and summer months when something light yet indulgent is just what we need.
Conclusion:
What an incredible journey we’ve shared through this recipe for No Bake Pistachio Cream Pie! I hope my enthusiasm has inspired you as much as my love for this dessert inspires me every time I make it. There’s something truly extraordinary about those layers of creamy pistachio filling nestled inside that crunchy graham cracker crust—the marriage of textures creates a symphony of flavors that will linger lovingly on your taste buds long after the last bite.
This recipe is not just about satisfying your sweet tooth; it’s about creating joyful moments with loved ones. Whether it’s during spring gatherings, summer barbecues, or simply treating yourself on a quiet evening at home, this No Bake Pistachio Cream Pie shines brightly in any setting. Imagine pulling it from the fridge, garnished with fluffy whipped cream and sprinkled pistachios, as delighted gasps fill the room—this is what cooking is all about!
As you savor each slice, think about pairing your pie with a cup of freshly brewed coffee or perhaps some herbal tea for those cozy afternoons together. For an afternoon pick-me-up, serve alongside fresh berries—they add a vibrant contrast both visually and taste-wise! And if you’re feeling particularly indulgent, drizzle some chocolate sauce over top right before serving; trust me when I say this elevates the experience from delightful to utterly intoxicating.
Feeling adventurous? This recipe is wonderfully adaptable! You could swap out the pistachios for other nuts like almonds or walnuts if you’d prefer, or even experiment with adding different flavors like coconut or almond extract into the filling for a twist that’s uniquely yours! Each variation opens up new avenues for creativity in your kitchen and adds personal touches that make every bite feel special. So go ahead—try it out, share your experiences with friends and family, and connect over this beautiful dessert that brings warmth and joy to every gathering!
No Bake Pistachio Cream Pie

Experience the joy of our No Bake Pistachio Cream Pie, a delightful dessert that combines creamy pistachio flavors with a buttery graham cracker crust. This easy-to-make treat is perfect for warm afternoons and gatherings, offering a refreshing sweetness without the need for an oven. With its vibrant green hue and smooth texture, this pie not only satisfies your sweet tooth but also serves as a beautiful centerpiece for any occasion. From family dinners to casual get-togethers, indulge in this nostalgic dessert that brings smiles and compliments with every slice.
- Prep Time: 20 minutes
- Cook Time: Chill for at least 2 hours
- Total Time: 0 hours
- Yield: Serves approximately 8 slices 1x
- Category: Dessert
- Method: No Bake
- Cuisine: American
Ingredients
- 1 prepared graham cracker crust
- 1 (3.4 oz) package pistachio instant pudding mix
- 1 cup cold milk (whole or almond)
- 3 oz cream cheese, softened (or whipped coconut cream)
- 1/4 cup butter, softened
- 1/2 cup powdered sugar
- 8 oz whipped topping (such as Cool Whip or whipped coconut cream)
Instructions
- In a large mixing bowl, combine the pistachio instant pudding mix and cold milk. Mix with an electric mixer on low speed for about two minutes until thickened.
- In another bowl, beat together the softened cream cheese and butter until fluffy. Gradually add powdered sugar and mix until smooth.
- Gently fold the cream cheese mixture into the pudding mixture until fully combined.
- Carefully fold in the whipped topping until no white streaks remain.
- Pour the filling into the prepared graham cracker crust, smoothing the top with a spatula.
- Cover with plastic wrap and refrigerate for at least two hours to set.
- Garnish with additional whipped topping and chopped pistachios before serving.
Nutrition
- Serving Size: 1 slice (approximately 110g)
- Calories: 290
- Sugar: 24g
- Sodium: 150mg
- Fat: 16g
- Saturated Fat: 8g
- Unsaturated Fat: 8g
- Trans Fat: 0g
- Carbohydrates: 32g
- Fiber: 1g
- Protein: 3g
- Cholesterol: 30mg