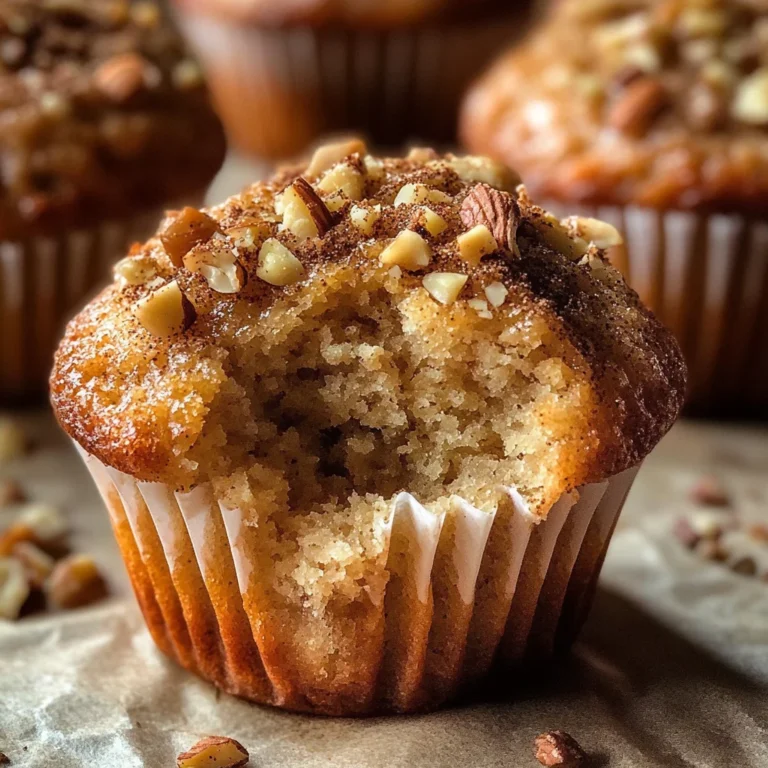
Pumpkin Cinnamon Roll Muffins: A Cozy Fall Breakfast Delight
As the leaves begin to turn and that crisp autumn air sweeps in, there’s nothing quite like the warmth of fresh-baked goods wafting through your home. You know those moments when you just want to cozy up with something comforting? Well, my dear friend, let me introduce you to a revelation in the world of breakfast treats: Pumpkin Cinnamon Roll Muffins. These little delights are not merely a recipe; they are an experience that brings together the essence of fall with every bite—a delightful blend of spiced pumpkin goodness and the sweet, gooey aroma of cinnamon. Can you picture it? The moment you pull them from the oven, dusted with a light glaze, your kitchen will be filled with an utterly intoxicating scent that beckons everyone to gather around the table.
I’ve always been captivated by how certain foods evoke memories and emotions, connecting us to cherished moments and loved ones. With these Pumpkin Cinnamon Roll Muffins, I promise you will feel that connection. They embody the spirit of sharing—whether it’s a cozy weekend breakfast with family or a gathering of friends on a chilly evening. Imagine enjoying one of these muffins while wrapped in your favorite blanket, sipping on warm apple cider or coffee as rain dances against your windowpane. It’s not just about satisfying hunger; it’s about creating memories around food that nurture our souls.
Pumpkin Cinnamon Roll Muffins: A Cozy Fall Breakfast Delight
Let’s embark on this scrumptious culinary journey together! These muffins are incredibly simple to make and will leave your kitchen smelling like a slice of autumn paradise. They perfectly bridge the gap between traditional cinnamon rolls and muffin ease, making them ideal for busy mornings or leisurely brunches alike. So grab your apron and let’s dive into these delightful creations!
Ingredients:
Before we start mixing and baking, let me guide you through our ingredient lineup. Each component plays a vital role in crafting these muffins into something truly special.
- 1 cup canned pumpkin puree (use plain pumpkin puree, not pie filling). This is the star ingredient that brings both moisture and rich flavor to our muffins. It’s essential to use pure pumpkin puree rather than pie filling because pie filling often contains added sugars and spices that can throw off our delicate balance of flavors. Look for brands that only list pumpkin as the ingredient—it should be thick and vibrant orange for optimal results.
- 1/2 cup melted butter (or vegetable oil as a substitute). Using melted butter gives our muffins that luscious richness and enhances their tenderness. If you’re looking for a plant-based option, vegetable oil works beautifully as well—it keeps things moist without altering the flavor significantly. Whatever you choose, make sure it’s at least room temperature before adding it into our batter; this helps everything blend harmoniously.
- 3/4 cup granulated sugar. This sugar adds sweetness but also contributes to the structure of our muffins. When mixed with butter, it creates air pockets during creaming (which we’ll get to soon), leading to fluffy muffins. You could substitute with coconut sugar for a more caramel-like flavor if you’re feeling adventurous!
- 1 large egg (or flax egg for vegan option). Eggs help bind our ingredients together while providing richness and moisture—crucial for achieving that perfect texture. If you prefer a vegan alternative, mix 1 tablespoon ground flaxseed with 2.5 tablespoons water; let it sit for about five minutes until it becomes gelatinous—this mimics the binding properties of an egg beautifully!
- 1 teaspoon vanilla extract (use pure vanilla for best results). Vanilla is one of those magical ingredients that elevates flavors without overpowering them. The warmth it brings complements both the pumpkin and cinnamon effortlessly, creating what I like to call a symphony of flavors in every bite.
- 2 cups all-purpose flour (can substitute with a gluten-free blend). Flour is crucial as it provides structure to our muffins. For those needing gluten-free options, using a blend designed for baking will yield fantastic results—you want something that mimics traditional flour’s properties closely.
- 1 teaspoon baking soda (ensure freshness). This ingredient acts as a leavening agent which makes our muffins rise beautifully! Always check your baking soda’s expiration date before using—it should fizz when mixed with acid for optimal effectiveness.
- 1 teaspoon baking powder (check for gluten-free if needed). Similar to baking soda but works differently; this combination ensures our muffins have just the right amount of lift so they are light yet still satisfyingly dense.
- 1/2 teaspoon salt. A pinch of salt is non-negotiable! It balances sweetness and enhances all other flavors present in our muffins—trust me on this one.
- 1 teaspoon ground cinnamon (adjust for stronger flavor). Ahh, cinnamon—the aromatic spice that truly embodies fall! Feel free to increase this if you’re like me and adore its warm notes; it’s what makes each muffin feel like a hug from within.
- 1/4 cup melted butter (for filling). This additional touch not only enriches our cinnamon swirl but also helps it adhere beautifully inside each muffin—a crucial step in achieving those irresistible cinnamon rolls vibes!
- 1/2 cup brown sugar (or white sugar as substitute). Brown sugar adds depth due to its molasses content—it will create lovely caramelized swirls inside each muffin when baked. If you don’t have brown sugar handy, white sugar works fine too!
- 1 cup powdered sugar (for glaze). This sweet snow-like topping is what finishes off our muffins splendidly! It adds an extra layer of sweetness while giving visual appeal—we eat first with our eyes after all!
- 2 tablespoons milk (adjust for desired thickness or use non-dairy milk). Milk combines with powdered sugar to create that dreamy glaze; adjust according to how thick or thin you’d like your drizzle!
Equipment You’ll Need:
Having the right tools can make this journey smoother and more enjoyable! While they might not be “ingredients,” these essentials are vital partners in creating something wonderful.
- Mixing Bowls: A set of mixing bowls in various sizes will help keep everything organized as we combine dry ingredients separately from wet ones before bringing them together into one beautiful batter.
- Whisk: A good whisk is indispensable here! It helps incorporate air into your batter while ensuring even mixing—don’t underestimate this little tool’s power!
- Rubber Spatula: Perfectly designed for scraping down sides & folding ingredients without deflating air pockets—we want all that fluffiness intact!
- Muffin Tin: A standard 12-cup muffin tin is essential; ideally non-stick or lined with paper liners so removal post-baking is seamless—nobody wants crumbled muffins!
- Cooling Rack: Once out from their hot oven bath, transferring these beauties onto cooling racks allows air circulation so they don’t become soggy bottoms—a must if you want perfect presentation!
Now that we’ve gathered all our ingredients and equipment together, let’s get started on preparing these delightful Pumpkin Cinnamon Roll Muffins! I can’t wait for you to experience every delicious moment!
Step 1: Preheat Your Oven
The first step in any great baking adventure begins long before mixing ingredients—you need to preheat your oven! Set it at 350°F (175°C) so it’s nice and hot by the time we’re ready to pop those lovely muffins inside. Preheating is absolutely paramount because it ensures even cooking throughout—the last thing we want is unevenly baked treats lurking in there after all this effort!
Step 2: Combine Wet Ingredients
Begin by whisking together your melted butter—yes, liquid gold—alongside granulated sugar until well-combined; then add your egg or flax egg along with vanilla extract & canned pumpkin puree into this mix too! This process known as creaming helps incorporate air into the mixture which means fluffier final product later on; so take some extra time here—don’t rush this step! Keep whisking until fully combined—you’ll see everything transform into creamy perfection in no time!
Step 3: Mix Dry Ingredients
In another bowl now bring together flour, baking soda powder, salt & cinnamon—this mixture needs proper attention because these dry components need uniform distribution throughout upcoming batter creation phase ahead! Using whisk again here allows each ingredient blends seamlessly without clumping which would lead textural inconsistencies once baked—a disaster no one wants at breakfast tables everywhere!
Step 4: Bring It All Together
This part is where magic truly happens! Gradually fold dry mixture into wet until just combined—remember over-mixing could cause tough gummy textures instead fluffy bites we crave so gently does it here friends! Watch carefully as batter comes together—it’ll still look slightly lumpy but trust me that’s normal—that’s what keeps them soft & tender once baked up golden brown delightfully fragrant treats awaiting us soon enough…
Stay tuned—we’re getting closer by minute! Next up we’ll dive deeper into shaping & filling these delicious muffins before they hit their final destination—the oven where transformation takes place… 🍂✨
Step 5: Whisking Those Cozy Flavors Together
Now that we have all our ingredients prepped and ready to go, it’s time to bring them together in a way that creates a symphony of flavors. Start by taking a large mixing bowl and adding your 1 cup of canned pumpkin puree. This is the heart and soul of our muffins, providing not just flavor but also moisture and a beautiful, vibrant color. Next, pour in your 1/2 cup of melted butter—you can also use vegetable oil if you prefer a lighter touch. The melted butter is crucial here; it adds richness and ensures that every bite melts in your mouth.
Using a whisk, incorporate these two ingredients until they’re beautifully combined. The goal here is to create an inviting mixture that feels smooth and velvety; the pumpkin should blend seamlessly with the butter, creating what I like to call liquid gold! Once you’ve achieved this luscious texture, it’s time to add 3/4 cup of granulated sugar, followed by 1 large egg (or flax egg for those opting for a vegan twist), and 1 teaspoon of vanilla extract. Vanilla is non-negotiable; it elevates the entire profile of the muffins, enhancing the warmth of the spices we’ll be adding soon. Whisk again until everything is perfectly mixed—don’t rush this step! Take your time, as this meticulous blending is where the magic begins.
Step 6: The Dry Ingredients Dance
Next up, let’s shift gears and focus on our dry ingredients. In another bowl (yes, I know we’re dirtying dishes here, but trust me—it’s worth it!), combine 2 cups of all-purpose flour, 1 teaspoon of baking soda, 1 teaspoon of baking powder, 1/2 teaspoon salt, and 1 teaspoon ground cinnamon. Ahh, the cinnamon—its intoxicating aroma fills the air as you mix! Baking soda and baking powder are both vital players in this recipe; they work together to create that beautiful rise while ensuring your muffins aren’t dense or heavy. Remember that fresh ingredients are key for optimal results; check those expiration dates!
Once combined, slowly add this dry mixture into the wet ingredients bowl. Using a spatula or wooden spoon (let’s keep it rustic!), fold the dry ingredients into the wet ones gently. You want to combine them just enough so there are no visible streaks of flour—overmixing can lead to tough muffins due to gluten formation, which nobody wants! You’ll know you’re done when everything looks nicely blended but still has some lumps; this is completely normal and absolutely okay.
Step 7: Infusing Sweet Swirls
Now comes one of my favorite parts—the filling! Grab another small bowl and melt 1/4 cup of butter for our delicious swirl. Once melted, mix in 1/2 cup brown sugar and an extra sprinkle of cinnamon if you really want to amp up that cozy fall flavor. This sweet concoction is more than just a filling; it’s an experience waiting to happen inside each muffin!
With your muffin batter ready and your sweet filling made, it’s time to layer these two elements together in a way that ensures every bite will be filled with delightful sweetness. Take about two-thirds of your muffin batter and scoop it evenly into your greased muffin tin—filling each cavity about halfway full will do just fine! Next, drizzle about a teaspoon of your cinnamon-sugar mixture over each dollop of batter before topping with the remaining batter until each cavity is about three-quarters full. This layering process is what makes these Pumpkin Cinnamon Roll Muffins so special; it allows for that glorious swirl effect once baked!
Step 8: Baking Your Perfect Muffins
It’s finally time for these beauties to meet their final destination—the oven! Preheat yours to 350°F (175°C), ensuring it’s nice and hot before placing your muffin tin inside. Baking is truly an art form—this specific temperature allows the muffins to rise beautifully while developing those golden-brown tops we all adore. Bake them for about 25 minutes, but keep an eye on them during those final moments because ovens can vary quite dramatically.
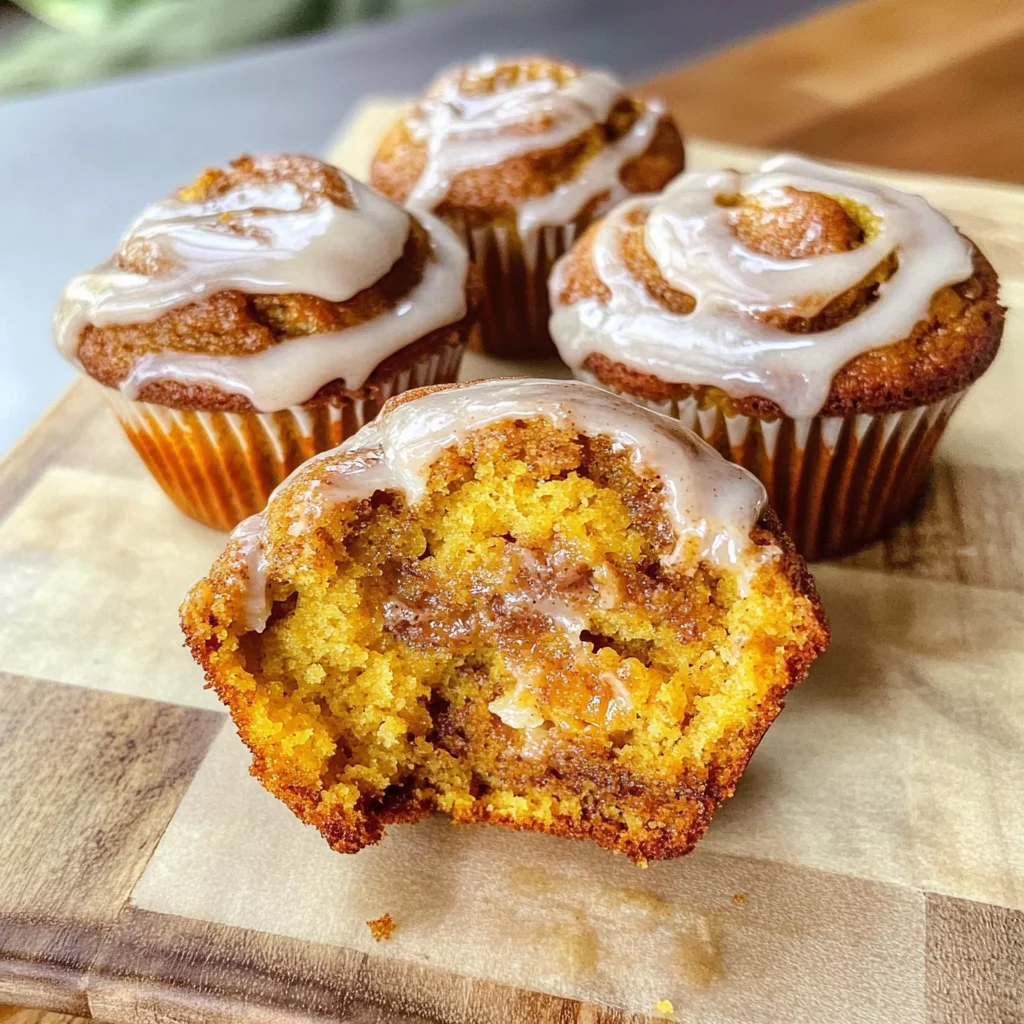
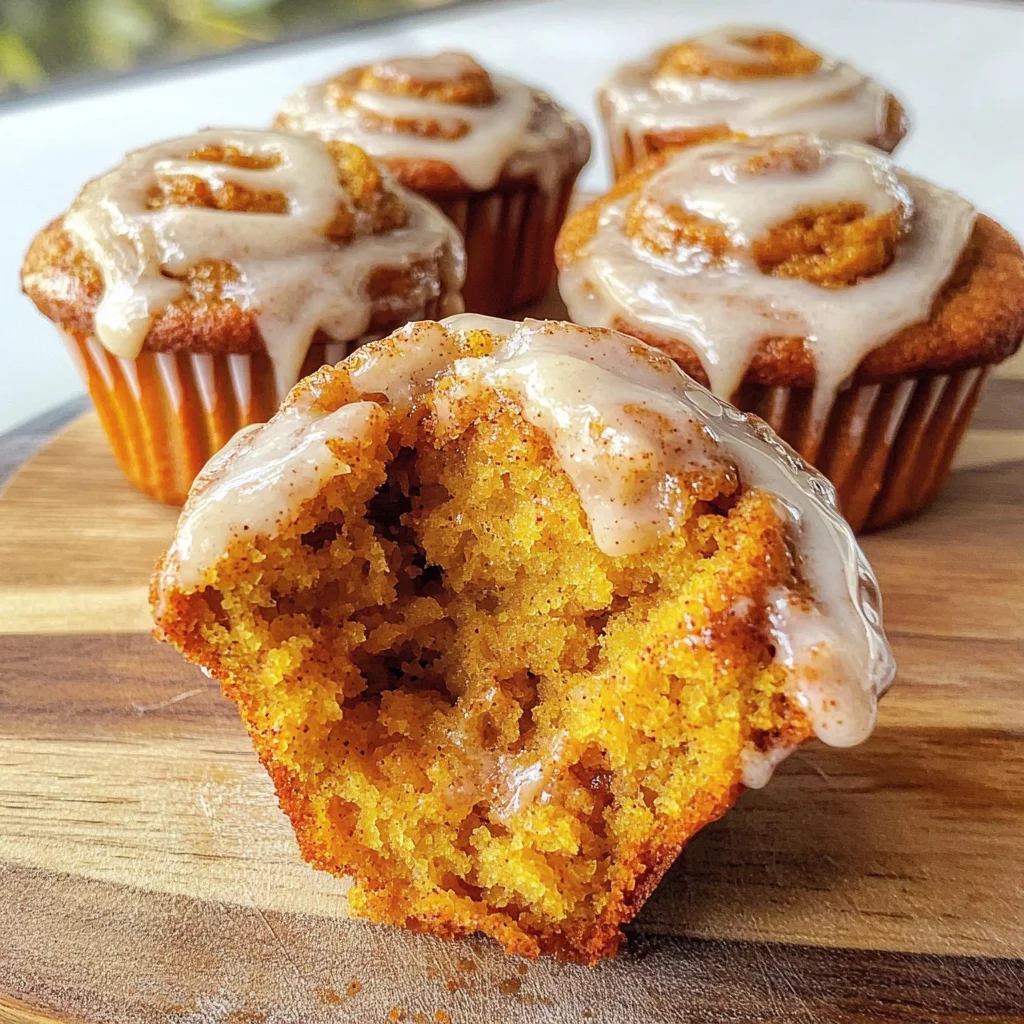
You’ll know they’re ready when you see golden edges peeking out from their little cups and when you insert a toothpick into the center—it should come out clean or with just a few moist crumbs attached (but not wet batter!). The scent wafting through your kitchen at this point will be utterly intoxicating—a warm embrace from autumn itself! Once baked, let them cool in the pan for about five minutes before transferring them to wire racks; this step helps maintain their tender texture while preventing sogginess on the bottom.
Finishing Touches: Frosting Your Fall Delight
Step 9: Drizzling with Sweetness
Ahh, we’ve arrived at perhaps my favorite part—the frosting! While your muffins cool down slightly, let’s whip up an easy glaze that adds just the right touch of sweetness without overwhelming those wonderful pumpkin flavors we’ve worked so hard on creating. In a medium bowl, combine 1 cup powdered sugar with 2 tablespoons milk (or non-dairy milk if you prefer). Mix until smooth; adjust with more milk if necessary until you achieve a lovely drizzling consistency that’s neither too thick nor too runny.
Now comes the fun part—once your muffins have cooled for about ten minutes on those wire racks (patience is key here!), take each one and drizzle this delectable glaze over them generously! You want every muffin adorned with that shiny finish as it glistens under the light—and trust me when I say it not only looks beautiful but tastes like pure bliss too! Just imagine biting into one warm muffin where gooey swirls meet creamy frosting—it’s simply divine!
As you serve these Pumpkin Cinnamon Roll Muffins—whether at brunch gatherings or cozy Sunday mornings—I promise they will become an instant family favorite. So grab a warm mug of coffee or tea, sit back, and savor every bite—you’ve earned it! Enjoy creating memories around these treats because cooking isn’t just about food; it’s about love shared through flavors that linger long after the last crumb has disappeared.
Happy baking everyone! 🍂✨
Storage and Enjoyment Tips for Your Pumpkin Cinnamon Roll Muffins: A Cozy Fall Breakfast Delight
Now that you’ve given your Pumpkin Cinnamon Roll Muffins a glorious bake, it’s time to revel in the delights of enjoying them! The tantalizing aroma wafting through your kitchen is just the beginning; these muffins are not only a feast for the senses fresh out of the oven, but they also have a wonderful ability to hold their charm even after some time has passed. But let’s be real — who wouldn’t want to enjoy these cozy morsels more than once? So grab your favorite storage container, and let’s talk about how to make sure those sweet flavors linger!
Storing Leftover Pumpkin Cinnamon Roll Muffins: A Cozy Fall Breakfast Delight
To keep those delightful muffins tasting their best, I recommend storing them in an airtight container. This little trick is absolutely paramount for preserving their moisture and preventing them from becoming too dry. If you don’t have an airtight container handy, simply wrap them tightly in plastic wrap or foil. Stored this way, they’ll stay fresh for about 3 to 4 days at room temperature. If you want to keep them even longer, you could pop them into the fridge, where they can last up to a week. Pro tip: placing a slice of bread inside the container can work wonders—this ingenious method helps maintain that soft texture by absorbing any excess moisture! When you take one out after a day or two, you’ll be pleasantly surprised at how rich and flavorful they still are. For a warm treat that feels like a hug from the inside out, simply reheat them in the microwave for about 10-15 seconds or pop them in a preheated oven at 350°F (175°C) for just a few minutes. Trust me, there’s nothing quite like that first bite!
Freezing Pumpkin Cinnamon Roll Muffins for Later
If you find yourself with more muffins than you can enjoy in the short term (which is a lovely problem to have), let me share my secret weapon: freezing! To freeze these beauties properly, allow them to cool completely first—this step is crucial to avoid sogginess. Wrap each muffin individually in plastic wrap and then place them into a freezer-safe zip-top bag or container; this double layer keeps freezer burn at bay. They can happily reside in your freezer for up to three months without losing their delicious essence! When you’re ready for a cozy breakfast treat on a busy morning or an impromptu gathering, simply remove however many muffins you need and allow them to thaw at room temperature or warm them directly from frozen in the oven or microwave. Can you feel that excitement? The convenience of having delicious homemade muffins ready at your fingertips makes this option absolutely irresistible!
Pumpkin Cinnamon Roll Muffins
Pumpkin Cinnamon Roll Muffins are the ultimate fall breakfast treat that perfectly combine the comforting flavors of pumpkin and cinnamon. These muffins are easy to make and offer a delightful twist on traditional cinnamon rolls, making them ideal for busy mornings or cozy weekend brunches. Imagine pulling these warm muffins from the oven, their sweet aroma enveloping your kitchen, and indulging in each tender bite topped with a luscious glaze. Whether you’re enjoying them with family or sharing them at gatherings, these muffins are sure to create lasting memories.
- Prep Time: 15 minutes
- Cook Time: 25 minutes
- Total Time: 40 minutes
- Yield: Makes about 12 muffins 1x
- Category: Dessert
- Method: Baking
- Cuisine: American
Ingredients
- 1 cup canned pumpkin puree
- 1/2 cup melted butter (or vegetable oil)
- 3/4 cup granulated sugar
- 1 large egg (or flax egg for vegan option)
- 2 cups all-purpose flour (or gluten-free blend)
- 1 teaspoon baking soda
- 1 teaspoon baking powder
- 1 teaspoon ground cinnamon
- 1/2 teaspoon salt
- 1/2 cup brown sugar (for filling)
- 1 cup powdered sugar (for glaze)
- 2 tablespoons milk (or non-dairy milk)
Instructions
- Preheat your oven to 350°F (175°C). Prepare a standard muffin tin by greasing it or lining it with paper liners.
- In a large mixing bowl, whisk together the melted butter and granulated sugar until smooth. Add the pumpkin puree, egg (or flax egg), and vanilla extract; mix well.
- In another bowl, combine the flour, baking soda, baking powder, salt, and cinnamon. Gradually fold the dry ingredients into the wet mixture until just combined.
- For the filling, mix together melted butter, brown sugar, and additional cinnamon in a small bowl.
- Fill each muffin cup halfway with batter, add about a teaspoon of the filling mixture in the center of each cup, then top with more batter until three-quarters full.
- Bake for about 25 minutes or until a toothpick inserted comes out clean. Allow cooling for five minutes before transferring to a wire rack.
- For the glaze, whisk together powdered sugar and milk until smooth; drizzle over cooled muffins.
Nutrition
- Serving Size: 1 serving
- Calories: 250
- Sugar: 15g
- Sodium: 180mg
- Fat: 10g
- Saturated Fat: 5g
- Unsaturated Fat: 4g
- Trans Fat: 0g
- Carbohydrates: 38g
- Fiber: 1g
- Protein: 3g
- Cholesterol: 20mg