Pumpkin Muffins with Maple Cream Cheese Filling
There’s something undeniably magical about the arrival of autumn, isn’t there? The crisp air, the vibrant leaves turning shades of amber and gold, and the comforting aroma of spices wafting through our kitchens. It’s a season that invites us to gather around tables, share stories, and indulge in flavors that warm both body and soul. That’s why I’m absolutely thrilled to share my treasured recipe for Pumpkin Muffins with Maple Cream Cheese Filling with you. These muffins are not just a delightful treat; they’re an experience, a celebration of fall’s bounty wrapped in a soft, fluffy embrace that will leave your taste buds singing.
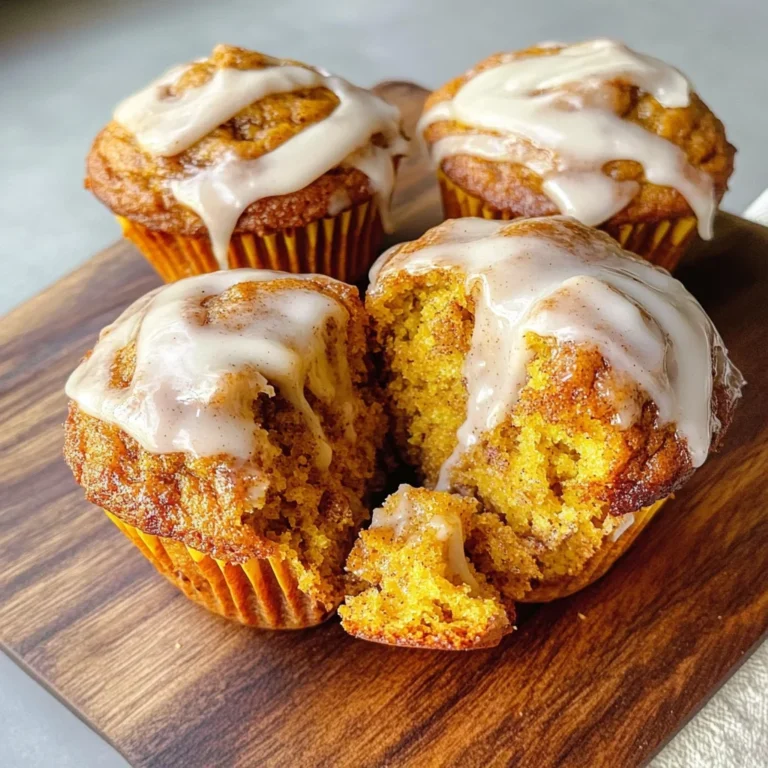
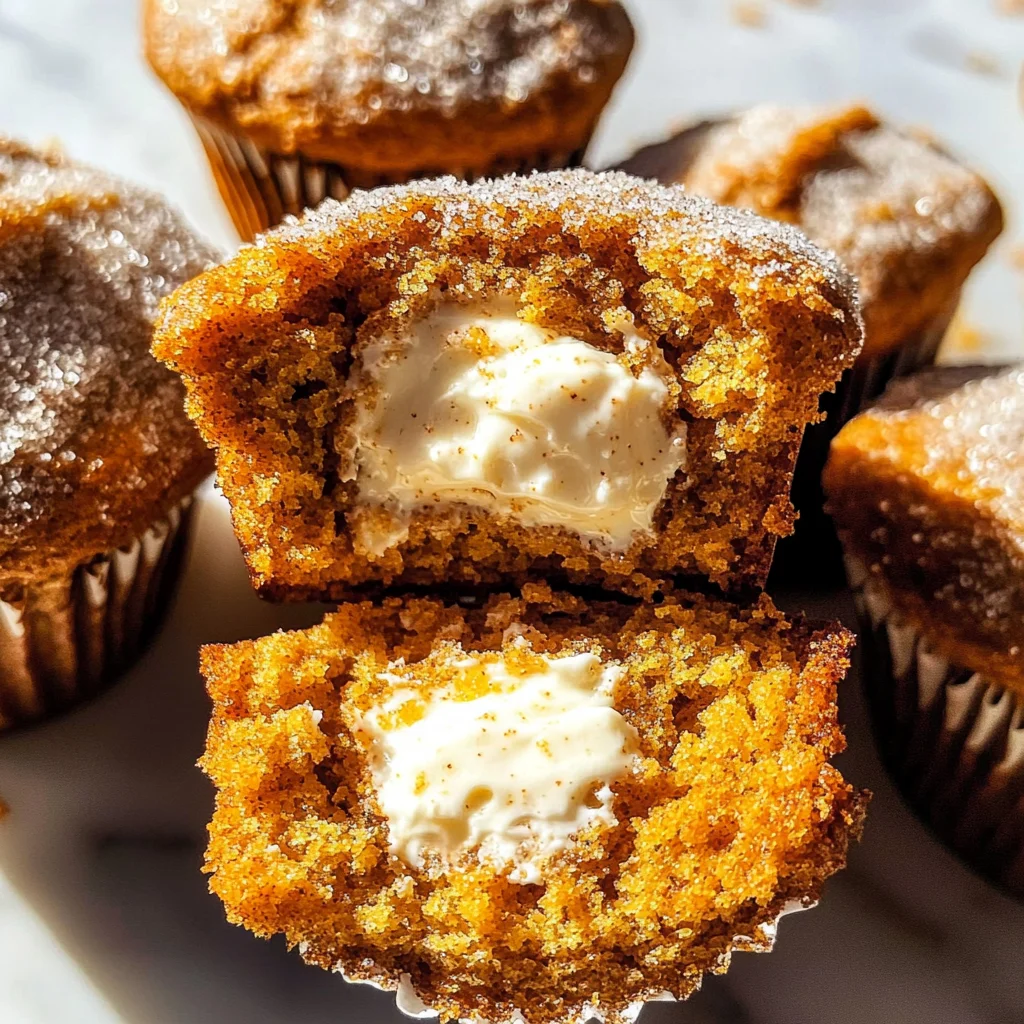
Imagine sinking your teeth into a perfectly baked pumpkin muffin topped with a lightly crunchy, sparkly cinnamon sugar coating. As you bite in, you’re greeted by a heavenly surprise: a creamy filling that combines the rich taste of cream cheese with the sweet notes of maple syrup. Each muffin is like a small hug from nature itself—comforting, nurturing, and utterly delightful. Trust me when I say these muffins are perfect for cozy mornings with coffee or as a charming dessert at your next gathering. They capture the essence of what makes this season so special—the warmth of home and the joy of sharing delicious food with those we love.
Pumpkin Muffins with Maple Cream Cheese Filling: A Cozy Autumn Delight
Baking has always been my way of expressing love, and these Pumpkin Muffins are no exception. They remind me of family gatherings where laughter echoes through the kitchen while we whip up treats together. Whether you’re celebrating an occasion or simply enjoying a quiet moment at home, these muffins are here to elevate your day. Let’s embark on this culinary adventure together; I promise you’ll savor every moment.

Ingredients:
As we prepare to dive into this delightful recipe for Pumpkin Muffins with Maple Cream Cheese Filling, let’s take a moment to appreciate each ingredient’s role in creating something truly special. Each component brings its own unique charm and flavor profile to this dish.
- 1/2 cup vegetable oil. Using vegetable oil keeps our muffins moist and tender—an essential quality in any baked good! Unlike butter, which can toughen if overmixed, vegetable oil helps create that delicate crumb we all crave in muffins. When selecting your oil, look for neutral options so they don’t overpower the subtle pumpkin flavor; canola or sunflower oils are excellent choices as they blend seamlessly into the batter.
- 1/2 cup granulated sugar. This sugar is crucial for sweetness and contributes to the lovely golden color of our muffins as they bake. Granulated sugar also aids in creating that beautiful rise we want by providing structure during baking. If you want to reduce refined sugars slightly without sacrificing flavor, consider using coconut sugar as a substitute—it adds depth while still keeping things sweet!
- 1/2 cup packed light brown sugar. Brown sugar brings not only sweetness but also moisture due to its molasses content. This results in an irresistibly chewy texture that contrasts beautifully with the pumpkin’s natural softness. Be sure to pack it tightly into your measuring cup for accurate measurements; this step ensures you get all that rich flavor!
- 1 1/2 cups pumpkin puree. The star of our show! Pumpkin puree provides moisture and a vibrant color while infusing each muffin with that beloved autumnal flavor we cherish so much. Ensure you use pure pumpkin puree rather than pumpkin pie filling to avoid added sugars and spices—trust me; it makes all the difference!
- 1 teaspoon vanilla. This is where things get aromatic! Vanilla adds warmth and depth to our muffins—a little touch goes a long way in enhancing flavors without overpowering them. Always opt for pure vanilla extract instead of imitation for an authentic taste profile; it truly elevates your baking game.
- 2 eggs. Eggs serve as binders in our recipe, giving structure while also adding richness and moisture. They help provide lift when combined with other ingredients like baking soda—so don’t skip this step! For those avoiding eggs, flaxseed meal mixed with water can be an effective substitute—just remember it will slightly change the final texture.
- 1/4 cup milk. Milk adds moisture but also helps activate the baking soda during mixing—this is crucial for achieving those fluffy tops we all desire! You can use any type of milk here; whole milk offers creaminess while almond or oat milk keeps things dairy-free without sacrificing too much on texture.
- 1 3/4 cups all-purpose flour. Flour forms the backbone of our muffins! It provides structure but should be handled gently to avoid making them dense—think tender hugs rather than tight grips! When measuring flour, spoon it into your measuring cup and level off gently; packing it down can lead to dry muffins.
- 1 teaspoon baking soda. This leavening agent is absolutely paramount! Baking soda reacts with our acidic ingredients (like pumpkin) during baking, creating carbon dioxide bubbles that help our muffins rise beautifully while maintaining their soft texture.
- 1 1/2 teaspoons ground cinnamon & 1/4 teaspoon ground cloves: Ahh—the spices! Ground cinnamon offers warmth reminiscent of cozy fall days while cloves add an intricate layer—almost like whispering secrets from grandma’s kitchen! Together they create an intoxicating aroma that fills your home as they bake.
- 3/4 teaspoon salt: Salt may seem small and unassuming but trust me—it balances sweetness beautifully and enhances flavors across every ingredient involved in our recipe!
- 1/2 cup granulated sugar (for topping) & 1 teaspoon cinnamon (for topping): This sparkly topping creates a light crunch on each muffin’s surface—absolutely irresistible when paired against soft interiors! Mixing these two will give us crunchy bites filled with flavor contrast!
- 1 tablespoon unsalted butter, melted: Butter not only contributes flavor but also helps adhere our cinnamon-sugar topping atop each muffin perfectly!
- 3/4 cup heavy cream & 8 ounces cream cheese (softened): These two come together magically to create the luscious filling inside each muffin—a silky blend that’s rich yet not overly sweet! Ensure both ingredients are at room temperature before starting; this allows them to combine smoothly without lumps ruining their creamy essence.
- 1/4 cup maple syrup (to taste): Pure maple syrup adds sweetness but also lends its signature woodsy notes—we want just enough sweetness without overpowering other flavors present within lovely pumpkin muffins!
Equipment You’ll Need:
Before we dive into creating these delightful treats together, let’s make sure we have all our tools ready at hand for seamless baking bliss! Having the right equipment makes everything easier—and trust me; you’ll appreciate how efficient it is when preparing these delicious Pumpkin Muffins.
- Muffin tin (12-cup): A nonstick muffin tin ensures easy removal after baking while promoting even heat distribution throughout each cavity—as a result; you’ll end up with perfectly shaped muffins every time! If you don’t have one available though? Silicone molds work great too—they provide flexibility during removal!
- Mixing bowls (various sizes): You’ll need mixing bowls both large enough for batter creation but also smaller ones dedicated solely towards preparing toppings/fillings separately! Glass or stainless steel options allow visual confirmation during mixing—which helps monitor consistency closely!
- Whisk & spatula: A good whisk helps combine dry ingredients effortlessly while folding wet mixtures together yields fluffy results without overworking batter—no one likes tough muffins after all!
- Electric mixer (optional): While I prefer using my trusty arm muscles when beating cream cheese until smooth…it doesn’t hurt having an electric mixer handy if you prefer quicker results versus manual labor involved!
Preparing the Pumpkin Muffins with Maple Cream Cheese Filling
Step 1: Preheat Your Oven & Whisk It All Together
First things first—let’s preheat that oven to 350 degrees Fahrenheit because we want no time wasted once everything’s mixed up nicely! In your largest mixing bowl pour in half-cup vegetable oil followed by both granulated sugar AND brown sugar—the combination creates incredible moisture levels ensuring tenderness throughout each bite later on down road ahead…then grab your whisk again continuing combining those oils/sugars until fully blended! Now add 1 ½ cups pure pumpkin puree along with one teaspoon vanilla extract followed by two eggs beaten beforehand & quarter cup milk before whisking until just combined—this process known as “mixing” integrates flavors evenly without overworking gluten found within flour used later on down line causing tougher textures than intended…so trust me here do NOT rush past this step!
Step 2: Incorporate Dry Ingredients
Once everything’s mixed well let’s move onto dry ingredients next beginning by sifting together flour measured out carefully along side one teaspoon baking soda plus ground spices cinnamon/cloves alongside three quarters teaspoon salt added afterwards too—all help create balance amongst sweetness found within batter preventing cloying effects seen sometimes elsewhere if avoided completely…Take care stirring gently now until just combined leaving some lumps visible since overmixing leads dire consequences when dealing fragile batters like ours here today!
Step 3: Fill Those Muffin Tins
Now comes my favorite part—the filling action begins!! Grab yourself either oiled/nonskid muffin tin & spoon generous amounts batter directly into each cavity filling roughly three quarters full ensuring tops rise beautifully during bake time ahead just wait till they spring back upon touch… Don’t worry too much about perfection here every muffin has unique personality anyway right? And who doesn’t love variety?! But remember avoid overfilling otherwise expect messy spills across oven floor below leading cleanup duty later on—not ideal scenario trust me…
Step 4: Prepare Cinnamon Sugar Topping
While those lovely muffins bake away let’s shift gear prepping delicious cinnamon-sugar topping next which gives added crunch + flavor boost everyone craves especially fall season now approaching fast!! In small bowl mix half-cup granulated sugar combined one teaspoon ground cinnamon then drizzle melted butter atop mixture tossing gently until fully coated—it’ll resemble sandy texture ready sprinkle generously atop cooled baked goods once removed hot from oven allowing aromas fill space around us inviting guests over immediately wanting sample what smells so good…
With each step taken thus far we inch closer towards delectable outcome awaiting us shortly—I hope you’re feeling excited because I’m positively vibrating here thinking about how scrumptious they’ll be warm fresh out oven topped off decadent creamy filling waiting patiently inside just yearning release soon afterwards…
Step 5: Whip Up That Heavenly Cream Cheese Filling
Once your muffins have made their aromatic debut in the oven, it’s time to turn our attention to the truly luxurious maple cream cheese filling. This step is not just a matter of combining ingredients; it’s about creating an ethereal, fluffy cloud that will elevate your pumpkin muffins from delightful to utterly divine. Begin by pouring the heavy cream into a medium-sized bowl. Using a hand mixer or a stand mixer, whip the cream on medium speed until it begins to thicken and soft peaks form, usually around 3-5 minutes. You want to see those beautiful peaks standing tall but still soft enough that they gently fold back into themselves—this is where patience comes in! Don’t rush this step; the airy texture you’re cultivating is crucial for achieving that lightness in your filling.
In a separate bowl, beat your softened cream cheese until it’s gloriously smooth and creamy—this is where we create that rich foundation for our filling. If the cream cheese is too cold or not softened adequately, you risk ending up with lumps, which are less than desirable when you want a silky finish. Once it’s perfectly smooth, gently fold in the whipped cream using a spatula. This folding technique is non-negotiable because it helps maintain that precious air we’ve whipped into the cream. The goal here is to combine them without deflating all that gorgeous volume. Finally, drizzle in your maple syrup—just enough to infuse that warm, sweet flavor—and mix until everything is beautifully blended together. Trust me on this: each spoonful will be like a taste of autumn wrapped in pure bliss!
Step 6: Carving Out Muffin Perfection
Now that your muffins have baked to golden perfection—those tops should spring back lightly when touched—it’s time for some creative sculpting! Allow them to cool in the muffin tin for about 10 minutes before transferring them to a wire rack. This resting period lets the steam escape and prevents sogginess as they cool down completely—a crucial detail if you want muffins with a nice crumb structure. Once they’ve cooled enough to handle without burning your fingers (but still warm), take a small paring knife and carefully carve out a cone shape from the center of each muffin.
As you do this, picture it as creating little treasure troves waiting to be filled with that luscious cream cheese mixture we just prepared! Try to keep the sides thick enough so they don’t collapse under the weight of all that deliciousness you’re about to add. The reason we’re removing this cone shape isn’t just for aesthetics; it creates space for our heavenly filling and ensures every bite delivers an explosion of flavor rather than just muffin dough alone. Plus, who doesn’t love seeing a delightful filling peeking out at them? It adds an element of surprise and charm!
Step 7: Fill Those Muffins with Love
With those charming little cones cut out, it’s time for my favorite part—the filling! Grab your piping bag (or plastic bag with one corner snipped off) and fill it with that dreamy maple cream cheese mixture we whipped up earlier. Now, taking each muffin in hand, gently insert the tip of your piping bag into the hollow center and fill generously until you can see the filling peeking out over the edges—this visual cue is essential! Don’t worry if some spills over; it only adds character and makes them look even more inviting.
This step is absolutely paramount because it allows each bite of your pumpkin muffin to be infused with that velvety richness while perfectly complementing its spiced pumpkin goodness. The combination creates a symphony of flavors—sweet yet tangy from the cream cheese and maple syrup against the warm spices of cinnamon and cloves in the muffin itself. I promise you; this will make every bite feel like an embrace from fall itself! If any extra filling remains after you’ve filled all your muffins (no judgment here!), consider serving it alongside as a dip or drizzle for an extra treat.
Step 8: The Grand Finale – Enjoying Your Masterpiece
And now comes perhaps one of the most rewarding moments—you get to taste what you’ve created! These pumpkin muffins with maple cream cheese filling can be enjoyed immediately or stored for later indulgence; if you’re making them ahead of time, simply place them in an airtight container in the fridge. They can be savored at room temperature or chilled straight from the fridge; both options are utterly delectable depending on what mood you’re in!
Just imagine yourself taking that first bite—the slightly crunchy sparkly cinnamon sugar topping gives way to moist pumpkin goodness hiding an unexpectedly creamy center that bursts with flavor! It’s like capturing fall in every mouthful while also ensuring comfort during those crisp days ahead. I can’t stress enough how satisfying this recipe is—not just because it’s delicious, but because it brings people together around something so heartwarming and genuine as homemade treats crafted with love.
Final Touches on Your Pumpkin Muffins Adventure
As we wrap up this delightful journey through baking these Pumpkin Muffins with Maple Cream Cheese Filling, remember there are no hard rules when enjoying them! You might even find inspiration along the way—consider adding some chopped pecans or walnuts into your batter for added crunch or experimenting by drizzling extra maple syrup on top before serving for those sweet moments when life calls for indulgence.
Baking should always feel joyful—a celebration of flavors intertwined with memories made around shared tables or cozy gatherings with loved ones. So go ahead—share these muffins with friends or family, relish their reactions as they dive into each delightfully filled bite, and know that you’ve created something truly extraordinary together! Happy baking!
Storage and Enjoyment Tips for Your Pumpkin Muffins with Maple Cream Cheese Filling
Now that you’ve whipped up these delightful Pumpkin Muffins with Maple Cream Cheese Filling, it’s time to share in the joy of tasting them! But before you dive in, let’s chat about how to store those scrumptious muffins so they remain as indulgent as the moment they emerged from the oven. With their soft, pumpkin-spiced interiors and that luscious maple cream cheese filling, I promise you’ll want to savor every last bite. Whether you’re enjoying them warm or chilled, storing them properly will ensure they maintain their moistness and flavor for days to come.
Storing Leftover Pumpkin Muffins with Maple Cream Cheese Filling
To keep your muffins fresh and fabulous, place them in an airtight container—this is absolutely paramount! A glass or plastic container works beautifully; just make sure it seals tightly to lock in moisture. These muffins will keep well at room temperature for about two days, but if you want to extend their life—and trust me, you’ll want to—refrigerate them for up to a week. If you happen to have leftover muffins (though I doubt it!), consider placing a slice of bread in the container with them; this little trick helps maintain moisture and prevents them from drying out. The flavors only deepen over time, creating a taste that’s profoundly satisfying even after storage. When you’re ready to enjoy one again, simply let it come to room temperature or pop it in the microwave for a few seconds—nothing beats that warm, gooey cream cheese filling!
Freezing Your Pumpkin Muffins with Maple Cream Cheese Filling for Later
If you find yourself fortunate enough to have some muffins left over (or if you’re just planning ahead), freezing these gems is an excellent option! To freeze your muffins properly, wrap each one individually in plastic wrap before placing them into a freezer-safe bag or container. This method keeps them from getting freezer burn while maintaining that lovely texture we all adore. They can be stored in the freezer for up to three months, so feel free to make a double batch! When you’re ready to indulge again, simply take one out and let it thaw in the fridge overnight or on the counter for a couple of hours. The convenience of having homemade muffins waiting for you is utterly intoxicating—a sweet little surprise that makes any day feel special.
Pumpkin Muffins with Maple Cream Cheese Filling
Indulge in the essence of fall with these delightful Pumpkin Muffins filled with Maple Cream Cheese. Each muffin is a warm hug on a chilly day, boasting a fluffy texture and a luscious filling that melts in your mouth. The sweet notes of maple syrup paired with spiced pumpkin create an irresistible combination, while the crunchy cinnamon sugar topping adds just the right amount of sweetness. Perfect for cozy mornings or gatherings, these muffins will become your go-to autumn treat!
- Prep Time: 15 minutes
- Cook Time: 25 minutes
- Total Time: 40 minutes
- Yield: Approximately 12 muffins 1x
- Category: Dessert
- Method: Baking
- Cuisine: American
Ingredients
- 1/2 cup vegetable oil
- 1/2 cup granulated sugar
- 1/2 cup packed light brown sugar
- 1 1/2 cups pumpkin puree
- 2 eggs
- 1 teaspoon vanilla extract
- 1/4 cup milk
- 1 3/4 cups all-purpose flour
- 1 teaspoon baking soda
- 1 teaspoon ground cinnamon
- 1/4 teaspoon ground cloves
- 3/4 teaspoon salt
- For the filling: 8 ounces cream cheese, softened
- 3/4 cup heavy cream
- 1/4 cup maple syrup
- 1/2 cup granulated sugar (for topping)
- 1 teaspoon cinnamon (for topping)
- 1 tablespoon unsalted butter, melted
Instructions
- Preheat oven to 350°F (175°C). Grease a muffin tin.
- In a large bowl, whisk together vegetable oil, granulated sugar, brown sugar, pumpkin puree, eggs, vanilla extract, and milk until well combined.
- In another bowl, sift together flour, baking soda, cinnamon, cloves, and salt. Gradually mix dry ingredients into wet ingredients until just combined.
- Fill each muffin cup three-quarters full with batter.
- Mix granulated sugar and cinnamon for topping and sprinkle over batter before baking.
- Bake for about 20-25 minutes or until a toothpick comes out clean.
- While cooling, whip heavy cream until soft peaks form; mix in softened cream cheese and maple syrup until smooth.
- Once cooled slightly, carve out centers of muffins and fill with cream cheese mixture.
Nutrition
- Serving Size: 1 muffin (75g)
- Calories: 198
- Sugar: 12g
- Sodium: 150mg
- Fat: 9g
- Saturated Fat: 2g
- Unsaturated Fat: 6g
- Trans Fat: 0g
- Carbohydrates: 27g
- Fiber: 1g
- Protein: 3g
- Cholesterol: 28mg