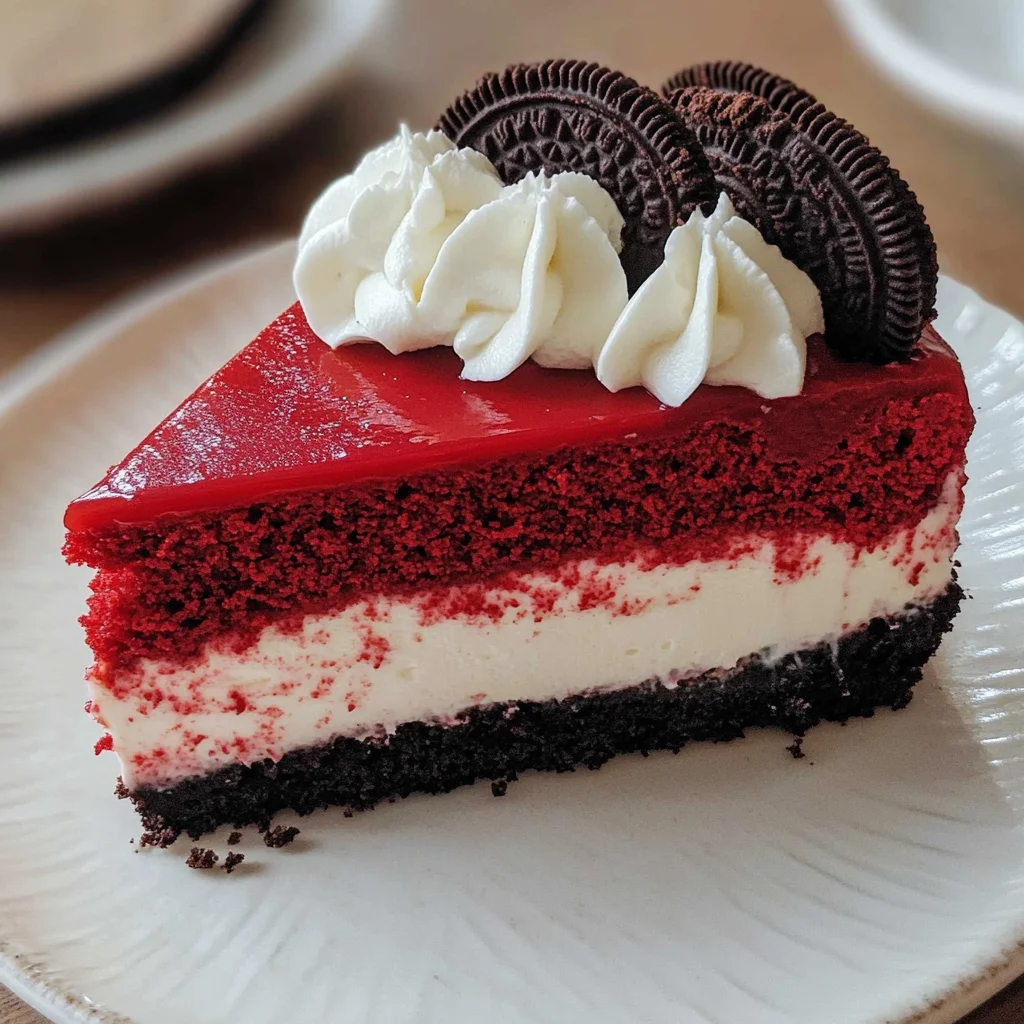
Red Velvet Oreo Cheesecake
The experience of creating a dessert is so much more than just following a recipe; it’s about weaving together memories, flavors, and love. I’ve always been captivated by the way food brings people together, how a single slice of cake can spark conversations and laughter around the table. This Red Velvet Oreo Cheesecake is not just another dessert; it’s an invitation to indulge in a luxurious blend of rich cheesecake and the iconic red velvet flavor we adore. Imagine sinking your fork into layers of creamy, decadent cheesecake that melts in your mouth while the crunch of Oreo cookies provides that perfect contrast. Each bite is a symphony of flavors and textures that will leave you utterly enchanted.
This cheesecake’s vibrant red hue evokes feelings of celebration and joy, making it the ideal centerpiece for special occasions or even a delightful treat on an ordinary Tuesday—because why not? The combination of classic flavors, with the twist of an Oreo crust and a silky chocolate ganache on top, creates something truly extraordinary. It’s not merely about satisfying a sweet tooth; it’s about embracing life’s moments and making them sweeter. Trust me when I say that every step in this recipe is designed to create something magical—something you will want to share with your friends and family.
Red Velvet Oreo Cheesecake: A Decadent Delight
Let’s embark on this culinary journey together as we create the ultimate crowd-pleaser! You’re going to fall in love with this dessert as much as I have, so let’s gather our ingredients and get started!
Ingredients:
As we dive into this cheesecake adventure, let’s take a moment to appreciate each ingredient that will bring our creation to life. Each one plays a crucial role in achieving that perfect balance of flavor and texture.
- 2 ½ cups Oreo cookie crumbs (about 25-30 cookies, crushed). The foundation of our cheesecake begins with these beloved cookies. Their rich chocolatey flavor paired with just the right amount of sweetness creates a delectable crust that perfectly complements the creamy filling above. When selecting Oreos, opt for classic varieties—this gives us that nostalgic flavor we all know and love. You could also use gluten-free Oreos if you need a gluten-free option; just ensure they’re properly crushed for an even layer.
- 5 tbsp unsalted butter, melted. This is crucial for binding our Oreo crumbs together into a solid crust that holds its shape when sliced. Using unsalted butter allows us to control the overall saltiness of our dessert—perfect for ensuring the sweet flavors shine through without being overwhelmed. Be sure to melt it gently; too hot can lead to greasy crumbs instead of a lovely mixture.
- 16 oz (2 blocks) cream cheese, softened. Cream cheese is at the heart of any great cheesecake! It lends that signature creamy texture and tangy taste we adore. Make sure it’s softened—this helps achieve that smooth consistency when mixing; otherwise, you might end up with lumps instead of silkiness in your batter. If you’re feeling adventurous, look for flavored cream cheeses like vanilla for an extra twist!
- ¾ cup granulated sugar. Sugar not only sweetens our cheesecake but also contributes to its structure by interacting with proteins during baking. This process helps create that velvety smooth texture we crave! When measuring sugar, be sure to level off your measuring cup for accuracy—too much can make your cheesecake overly sweet.
- ¼ cup sour cream. Sour cream adds moisture while enhancing richness and providing slight acidity—a perfect counterpart to the sweetness! If you don’t have sour cream on hand, Greek yogurt can work as an excellent substitute without sacrificing creaminess or flavor.
- 2 large eggs. Eggs are key players here as they help bind everything together while also contributing to our cheesecake’s stability during baking. At room temperature, eggs incorporate better into batters; thus, if possible, take them out ahead of time so they can warm up before mixing.
- 1 ½ tbsp cocoa powder. Cocoa powder deepens our red velvet flavor profile while adding subtle chocolate notes without overwhelming sweetness—a non-negotiable element for balancing flavors in this dessert! Choose high-quality unsweetened cocoa powder for optimal results—the darker the color, typically the richer the taste.
- 1 ½ tsp vanilla extract. Ahh—the magic elixir! Vanilla extract enhances all those delicious flavors working harmoniously in our cheesecake—it truly brings everything together beautifully! Opt for pure vanilla extract over imitation varieties whenever possible; trust me—it makes all the difference!
- 1 tbsp red food coloring. The stunning hue associated with red velvet cakes comes from food coloring—this gives us that gorgeous deep red color which not only looks appealing but also adds depth to the visual presentation! While gel food coloring works well for intense color without adding excess liquid to recipes, feel free to adjust based on how vibrant you’d like your final product!
- ½ cup heavy cream. Heavy cream serves two purposes in this recipe: first, it forms part of our luscious ganache topping later on; second—and most importantly—it enriches our cheesecake filling itself! The higher fat content leads us toward utter decadence—a truly satisfying choice!
- ¾ cup semi-sweet chocolate chips. These little gems are essential for creating our silky chocolate ganache which will crown our masterpiece at the end! Semi-sweet chips are versatile enough—they provide sweetness without being overly sugary or detracting from other flavors present throughout this dish.
- Whipped cream – Whipped cream adds an airy lightness when dolloped atop slices—it transforms every piece into something ethereal! Plus who can resist freshly whipped cream? It’s simple yet profoundly satisfying!
- Oreo cookie crumbs – More than just decoration—these crumbs sprinkled around edges add both visual appeal and delightful crunch; elevating presentation as well as texture contrast against creamy layers below.
- Whole Oreos – For garnishing purposes—whole Oreos make for stunning decorative touches while inviting guests into indulging further! They serve dual purpose: adding charm visually & reinforcing nostalgic flavors found throughout every bite!
Equipment You’ll Need:
Before jumping into mixing those beautiful ingredients together, let’s talk about some essential tools you’ll want by your side during this baking adventure—they’re like trusty companions guiding us through each step!
- 9-inch springform pan – This pan is indispensable when preparing cheesecakes since its removable bottom allows easy release after baking without compromising shape or presentation integrity! Ensure yours is well-greased prior even if using parchment paper lining underneath—this guarantees effortless removal post-baking!
- Mixing bowls (various sizes) – A good set allows flexibility when tackling multiple components simultaneously (like separate batters). Investing in different sizes ensures ease whether whipping egg whites or combining heavier batters ensuring thorough mixing throughout processes involved here!
- Electric mixer or whisk – An electric mixer simplifies blending tasks significantly saving time & effort especially needed during creaming phases where air incorporation matters most leading towards fluffy textures achieved effortlessly compared manual methods alone would require otherwise! However if you enjoy traditional techniques & have upper body strength—a whisk serves perfectly acceptable too!
- Rubber spatula – Essential tool used frequently throughout various stages—from scraping down sides while beating batters ensuring no remnants left behind—to folding delicate mixtures showcasing versatility within kitchen arsenal making them invaluable indeed!
Now that we’ve gathered everything necessary let’s dive right into preparing this delightful Red Velvet Oreo Cheesecake together!
Step 1: Preheat and Prepare Your Springform Pan
First things first: preheating your oven ensures consistent baking temperatures throughout which helps achieve optimal results as we embark on creating this beautiful masterpiece! Set your oven temperature at 325°F (163°C)—this moderate heat allows gentle cooking ensuring neither dryness nor excessive browning occurs prematurely during bake time while allowing flavors meld beautifully too! Next up—grab that trusty springform pan & grease it liberally with butter (or non-stick spray!) before lining its bottom with parchment paper; doing so provides extra insurance against sticking once cooled down later allowing clean removal without chaos ensuing upon slicing those luscious servings ahead… We want perfection here after all don’t we?
Step 2: Create Your Crunchy Oreo Crust
Now comes one of my favorite parts: crafting our crumbly crust from those delightful Oreos! In a medium bowl combine those already crushed cookie crumbs along with melted butter until fully incorporated forming cohesive mixture resembling wet sand—a tactile experience indeed reminiscent childhood memories spent playing beach games wouldn’t you agree? Once evenly mixed press firmly into greased bottom pan using either fingers or flat-bottomed glass pressing down evenly across surface until compacted enough allowing solid base adheres nicely preventing any seepage occurring later during baking process… Bake this heavenly crust layer alone at preheated temperature between 8–10 minutes golden brown appearance indicating readiness signaling next stage approaching quickly thereafter…
Step 3: Mixing Up That Luscious Red Velvet Batter
With crust cooling set aside briefly let’s focus on creating exquisite creamy filling now starting off beating softened blocks cream cheese along granulated sugar until smooth velvety consistency emerges before introducing tang from sour cream combined eggs cocoa powder followed closely by tantalizing hint vanilla extract plus splash vibrant red food coloring—all these elements combine harmoniously transforming mixture becoming rich colored batter awaiting transformation inside oven shortly ahead… Don’t rush here—take time thoroughly mixing ensuring no lumps remain because trust me—it makes significant difference come tasting time later on where silken texture shines through every bite enjoyed leaving guests raving endlessly about heavenly results achieved thanks diligence applied upfront right here today…
Step 4: Layering It All Together
Once prepared pour that decadent red velvet mixture directly over cooled oreo crust spreading evenly across surface using spatula working gently making sure edges reach corners snugly keeping everything contained perfectly within confines established earlier while maintaining aesthetic appeal desired throughout entire presentation forthcoming ahead once baked then cooled finally served later… Afterward turn attention toward crafting white vanilla layer following similar method previously used simply mixing remaining blocks cream cheese alongside sugar incorporating eggs alongside splash vanilla extract until smooth creamy consistency achieved once again ready topping previous layer awaiting placement patiently inside oven soon thereafter…
And there you have it—the initial steps laid out meticulously guiding us closer towards unveiling show-stopping dessert awaiting indulgence shortly ahead… Keep going strong—you’re doing amazing thus far!
Stay tuned as we continue through preparation stages ultimately leading towards glorious finish complete with luscious chocolate ganache crowning glory waiting eagerly atop finished creation inspiring awe among all who lay eyes upon masterpiece unveiled shortly thereafter… Remember: baking takes patience but rewards are undeniably worthwhile every bit along way shared fondly amongst loved ones gathered near savoring delightfully crafted experiences shared together around table grown warmer brighter through simple joy found within desserts made from heart shared openly freely among friends family alike transforming mundane routine into cherished traditions lasting forever etched memories created alongside delectable dishes prepared lovingly together… Enjoy!
The Art of Layering Flavors: Crafting Your Red Velvet Oreo Cheesecake
Step 5: Whipping Up the Creamy Red Velvet Base
Now that we have our crust ready and cooling, it’s time to create that stunning red velvet cheesecake layer, which is truly the heart and soul of this dessert. Grab a large mixing bowl and your trusty electric mixer; we’re about to make some magic happen! Begin by adding the softened cream cheese into the bowl—this should be at room temperature, allowing it to whip up creamy and smooth without any lumps. I always say that achieving the right texture here is absolutely paramount because it sets the foundation for a luxurious cheesecake. Add in ¾ cup of granulated sugar; this sweetness balances beautifully with the richness of the cream cheese. Beat these together on medium speed until you achieve a silky-smooth consistency—this usually takes about 2-3 minutes.
Next, introduce the sour cream into your mixture. It adds just the right amount of tanginess, creating that delightful contrast against the sweetness. After that, crack in two large eggs, one at a time, ensuring each egg is fully incorporated before adding the next; this helps maintain a light and airy texture throughout your cheesecake. Don’t rush this step—trust me on this—as it allows air to blend in beautifully. Now, sift in 1½ tablespoons of cocoa powder along with 1½ teaspoons of vanilla extract, followed by 1 tablespoon of vibrant red food coloring. The cocoa powder deepens the flavor while enhancing that classic red velvet hue we all adore! Mix everything until well combined; you want a luscious batter with no streaks or lumps.
Step 6: Pouring Perfection Over Your Crust
With our rich red velvet mixture prepared, it’s time for the magic moment when we transform our crust into something extraordinary! Carefully pour this vibrant red batter over your cooled Oreo crust, tilting your pan slightly to help spread it evenly across the surface. This is where you’ll want to take a moment to admire how beautiful that contrasting color looks against the dark crust—it’s like a work of art! Using a spatula, gently spread the batter all the way to the edges without disturbing the crust too much; this ensures every slice will have that perfect layer combo we’re aiming for.
Why is spreading evenly so important? Well, an uneven layer can lead to uneven baking, which might result in cracks as it cools. We want our cheesecake to be as smooth as silk on top! Once you have smoothed out your red velvet layer nicely, it’s crucial not to tap or shake your pan too forcefully; doing so might cause air bubbles to rise and burst during baking—nobody wants those unsightly air pockets ruining their masterpiece!
Step 7: The Divine Vanilla Layer
Now comes my favorite part—the addition of another layer of pure bliss! In another mixing bowl (yes, we’re making a bit more mess but it’s so worth it), beat together another two blocks (16 ounces) of softened cream cheese with ¾ cup of granulated sugar until incredibly smooth—think velvety clouds! Just like before, ensure everything is well combined before moving on. Add in another ¼ cup of sour cream for that lovely tang and richness we crave in cheesecake recipes. Follow up with two large eggs and 1½ teaspoons of vanilla extract—this is where those delicate undertones come into play.
Mix this vanilla layer until it’s perfectly smooth and creamy; you might notice it becoming thicker than your red velvet batter—that’s completely normal! Remember to scrape down the sides of your bowl often; this ensures every bit gets mixed in equally (and prevents any surprises later!). This step is crucial because we want every bite to be bursting with flavor and texture. Once everything looks divine—a consistent pale hue without lumps—it’s time for some careful pouring!
Step 8: Baking Your Masterpiece
With both layers ready and looking fabulous in their respective bowls, it’s now time for our cheesecake to take its first journey into heat—the oven! Preheat your oven once again if needed and set it to 325°F (163°C). Gently pour this luscious vanilla mixture over your already poured red velvet layer. As you pour slowly from one side, allow gravity to do its magic so that it glides over smoothly without mixing too much with the underlying layer; remember we want those distinct layers visible when sliced!
Once you’ve added all that lovely vanilla goodness on top, place your springform pan carefully onto a baking tray—this helps catch any drips just in case things get messy during baking (because who wants burnt sugar at the bottom of their oven?). Bake for about 50-60 minutes; you’ll know when it’s done when the edges are set but there’s still a slight jiggle in the center—it should resemble jiggly custard rather than liquidy soup!
During baking, resist opening that oven door prematurely; peeking can cause drastic temperature changes leading to cracks forming on top—that’s not what we want for our gorgeous creation! When time’s up, turn off your oven but leave your cheesecake inside with the door slightly ajar for an hour. This gradual cooling step is immensely important as it helps prevent sudden temperature drops which can lead to cracks forming as well—patience really pays off here!
Conclusion:
As we wrap up our delightful journey through creating this stunning Red Velvet Oreo Cheesecake, I hope you feel as inspired as I do! This isn’t just any dessert; it’s an extraordinary experience crafted from layers of passion and love. The interplay of flavors—the slight bitterness of cocoa against the sweet creaminess of cheesecake—is nothing short of magical. Each bite is a symphony of textures: the crunch from the Oreo crust gives way to the smoothness of the red velvet layer followed by the subtle vanilla notes from the top layer. It’s truly a celebration on your taste buds!
What makes this recipe such a must-try isn’t merely its taste but also the joy woven into its creation. It’s accessible enough for novice bakers yet impressive enough to wow even seasoned culinary enthusiasts. Picture pulling this gorgeous cheesecake from the oven—the aroma filling your kitchen like a warm embrace—and hearing gasps of delight as friends and family gather around, eager to dig in! Whether it’s a birthday bash, holiday gathering, or just because you deserve something special today, this cheesecake shines in every scenario.
For serving suggestions that elevate your experience even further: imagine savoring a slice alongside a steaming cup of coffee or perhaps pairing it with fresh berries drizzled with honey for that extra touch of sweetness. If you’re feeling adventurous, why not add a scoop of vanilla bean ice cream on top? For an afternoon pick-me-up during those languid weekend moments, serve it alongside herbal tea—a perfect balance between indulgence and refreshment.
Feeling adventurous? This recipe is wonderfully adaptable! You could swap out classic Oreos for mint-flavored ones for an invigorating twist or even incorporate swirls of raspberry puree into the cream cheese layer for an exciting burst of fruity flavor. Each variation lends itself beautifully to personal flair while still maintaining that signature richness we adore in this cheesecake. So grab your apron and get baking; I can’t wait for you to try this recipe and share your experiences with me! Let’s spread some joy together through baking!
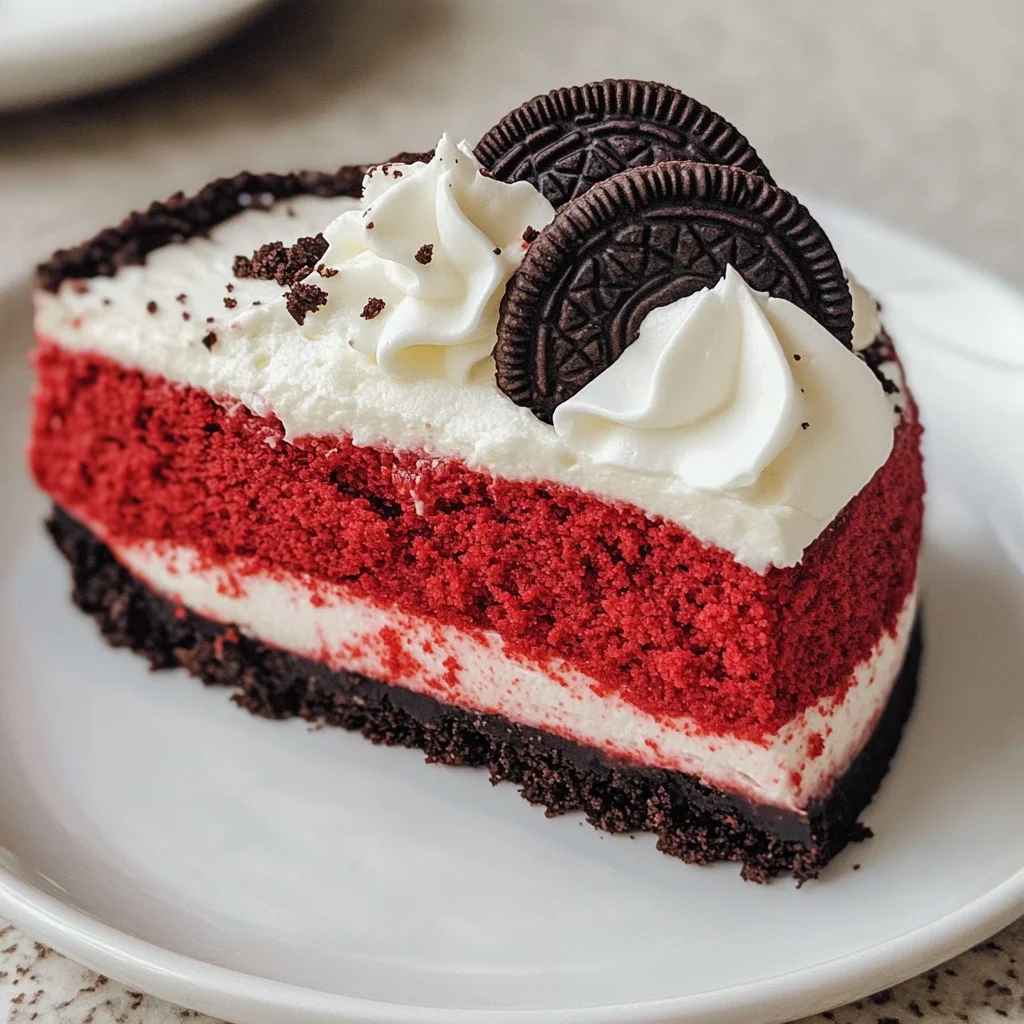
Red Velvet Oreo Cheesecake

Indulge in the utterly delightful Red Velvet Oreo Cheesecake, a luxurious dessert that combines the classic flavors of red velvet cake with a creamy cheesecake twist. This stunning treat features a crunchy Oreo crust, rich cream cheese filling, and a silky chocolate ganache topping, making it perfect for any celebration or sweet craving. Each mouthful offers a harmonious blend of textures and flavors, from the velvety cheesecake to the satisfying crunch of Oreos. Whether you serve it at a party or enjoy it at home, this cheesecake is sure to impress everyone who gets a taste!
- Prep Time: 30 minutes
- Cook Time: 60 minutes
- Total Time: 1 hour 30 minutes
- Yield: Approximately 12 servings 1x
- Category: Dessert
- Method: Baking
- Cuisine: American
Ingredients
- 2 ½ cups Oreo cookie crumbs
- 5 tbsp unsalted butter, melted
- 16 oz cream cheese, softened
- ¾ cup granulated sugar
- ¼ cup sour cream
- 2 large eggs
- 1 ½ tbsp cocoa powder
- 1 ½ tsp vanilla extract
- 1 tbsp red food coloring
- ½ cup heavy cream
- ¾ cup semi-sweet chocolate chips
Instructions
- Preheat oven to 325°F (163°C). Grease a 9-inch springform pan and line the bottom with parchment paper.
- In a bowl, mix Oreo cookie crumbs and melted butter until combined. Press into the bottom of the prepared pan and bake for 8–10 minutes.
- In another bowl, beat softened cream cheese and sugar until smooth. Add sour cream, eggs (one at a time), cocoa powder, vanilla extract, and red food coloring; mix until well combined.
- Pour the red velvet mixture onto the cooled crust and spread evenly.
- In a separate bowl, mix another batch of cream cheese with sugar, sour cream, eggs, and vanilla until smooth. Pour over the red velvet layer.
- Bake for 50–60 minutes until edges are set but center jiggles slightly. Let cool in oven with door ajar for one hour.
- Chill in refrigerator for at least six hours before preparing ganache.
- Heat heavy cream until hot; pour over chocolate chips and stir until smooth. Once cooled slightly, pour ganache over chilled cheesecake.
Nutrition
- Serving Size: 1 slice (120g)
- Calories: 320
- Sugar: 22g
- Sodium: 300mg
- Fat: 22g
- Saturated Fat: 12g
- Unsaturated Fat: 9g
- Trans Fat: 0g
- Carbohydrates: 30g
- Fiber: 2g
- Protein: 5g
- Cholesterol: 85mg