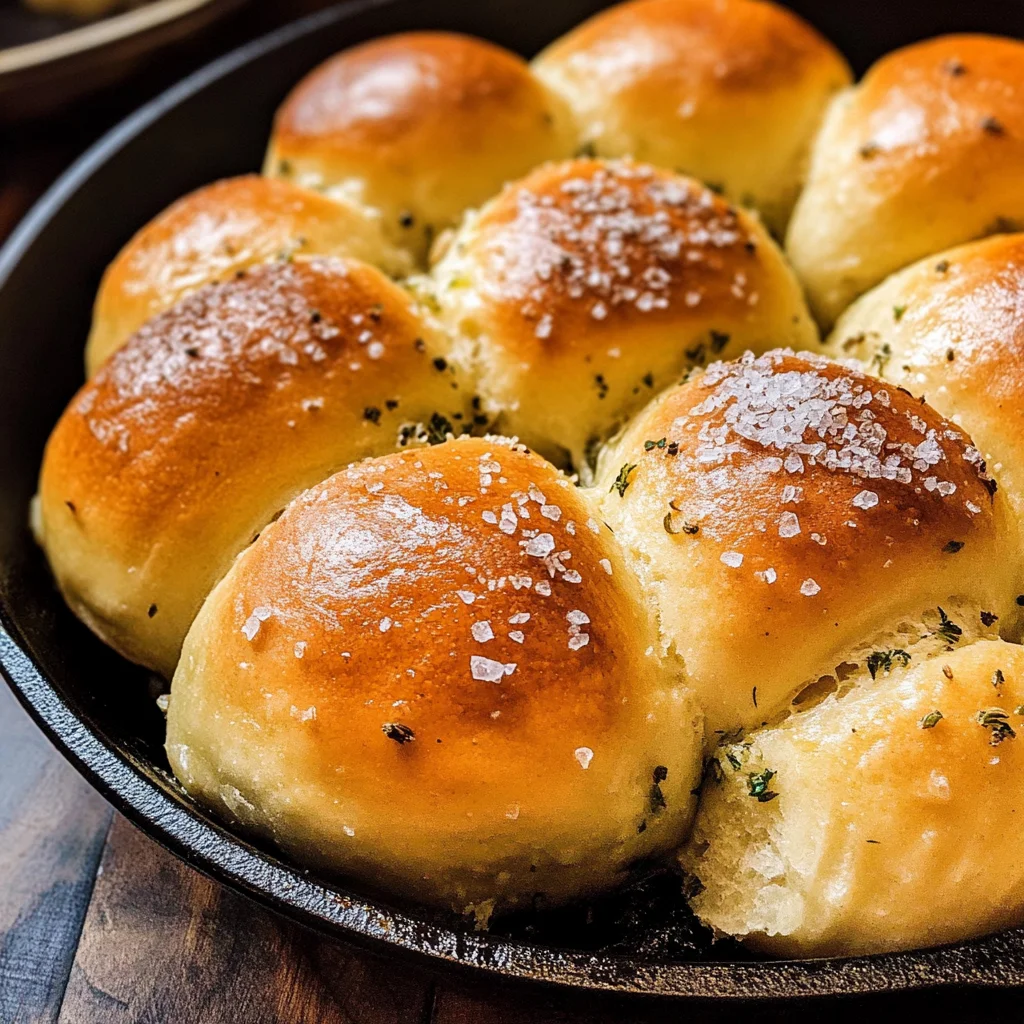
Sea Salt & Herb Skillet Rolls
There’s something truly magical about the act of baking, isn’t there? The way the kitchen fills with the warmth of rising dough, the intoxicating aroma of herbs and garlic wafting through the air—it’s more than just making food; it’s creating a moment that envelops you in comfort and nostalgia. These Sea Salt & Herb Skillet Rolls are not merely a side dish; they are an experience waiting to happen at your dinner table. Imagine pulling apart a soft, fluffy roll, still warm from the oven, and slathering it with a pat of butter that melts into a golden pool. Each bite is a symphony of flavors—savory herbs mingling with that delightful hint of sea salt—making them utterly irresistible. I promise you, once you try these rolls, they’ll become a staple in your home.
Now, let me take you on this culinary journey where we blend tradition with a touch of creativity. The beauty of these rolls lies not only in their flavor but also in their versatility. Perfect for family gatherings, casual dinners, or even just as an indulgent treat for yourself on a cozy evening at home, they evoke warmth and belonging. What makes them special is how approachable they are; even if you’re new to baking bread, I assure you that following this recipe will lead to success. So, grab your apron and let’s dive into these Sea Salt & Herb Skillet Rolls!
Sea Salt & Herb Skillet Rolls: Softness Meets Flavor
These rolls are like little pillows of joy! Fluffy and soft on the inside with a slightly crisp exterior that beckons you to take just one more bite. They’re infused with aromatic dried herbs and finished off with flaky sea salt for that perfect balance of savory goodness. You’ll find that they pair beautifully with soups, salads, or even as a simple snack all on their own. Trust me when I say this recipe will elevate any meal.

Ingredients:
As we embark on this culinary adventure together, let’s discuss the ingredients that will bring our Sea Salt & Herb Skillet Rolls to life! Each component plays a vital role in crafting the perfect texture and flavor, so let’s explore why they’re essential.
- 1 cup (240ml) whole milk, warmed to about 110°F (43°C): Whole milk is rich and creamy, which adds moisture and tenderness to our rolls. Warming it slightly before mixing is crucial because it activates our yeast—think of it as giving our yeast a gentle nudge to wake up and start working its magic! If you don’t have whole milk on hand, you can substitute it with 2% milk or even non-dairy alternatives like almond or oat milk; just ensure they’re warmed properly.
- 2 and 1/4 teaspoons active dry yeast (1 standard packet): This little powerhouse is what gives our rolls their airy lift! Yeast is a living organism that ferments sugars in the dough, producing carbon dioxide bubbles that create those delightful pockets of air we love in bread. Always check the expiration date on your yeast; fresh yeast ensures better results. And remember—if your milk isn’t warm enough (but not hot!), it won’t activate properly!
- 2 Tablespoons granulated sugar, divided: Sugar here serves two primary purposes: it sweetens our dough just enough to balance the flavors while also feeding our yeast during fermentation. The first tablespoon goes into the warm milk mixture to kickstart yeast activity, while the second helps enhance the overall flavor profile of our rolls.
- 1 large egg, at room temperature: Eggs contribute richness and moisture to bread recipes while also acting as an emulsifier that brings together fats and liquids for a cohesive dough. It’s essential for your egg to be at room temperature because cold eggs can slow down the activation process of your yeast.
- 1/4 cup (4 Tablespoons; 56g) unsalted butter, melted + slightly cooled and divided: Butter brings flavor and creates tenderness within each roll—a true hero ingredient! Using unsalted butter allows us to control the salt content more effectively. When melting your butter, let it cool slightly before adding it to prevent cooking the egg when combined.
- 1 teaspoon salt: Salt is critical in balancing flavors while also strengthening gluten structure in bread dough. It enhances all other flavors without overpowering them; think of it as an essential seasoning that ties everything together harmoniously.
- 2 teaspoons each: dried rosemary, dried basil, & dried parsley: These aromatic herbs add layers of flavor that elevate our rolls from basic to extraordinary! Dried herbs work well here because they infuse their essence throughout the dough during mixing without excess moisture from fresh herbs.
- 1 teaspoon garlic powder (or 2 teaspoons minced garlic): Garlic adds depth and warmth to our rolls—a classic pairing with herb flavors that no one can resist! If using fresh garlic instead of powder, sauté it lightly beforehand for mellower tones; raw garlic can have an overwhelming bite when baked directly into bread.
- 3 cups (390g) bread flour (spooned & leveled), plus more for work surface: Bread flour has a higher protein content than all-purpose flour which results in better gluten development—essential for achieving those fluffy rolls we’re after! Spoon your flour into measuring cups rather than scooping directly from the bag ensures accuracy without packing too much flour into your measurement.
- Flaky sea salt or coarse sea salt, for topping: This final flourish adds texture and bursts of salty flavor right at the finish line! As they bake up golden brown in color, sprinkling some flaky salt atop each roll will accentuate their beauty—and trust me when I say it’s worth every crumb!
Equipment You’ll Need:
Before we dive into making these marvelous rolls come alive in your kitchen, let’s gather our trusty tools! Having the right equipment makes your baking experience smoother and far more enjoyable. Here’s what you’ll need:
- Stand mixer or large mixing bowl: A stand mixer equipped with a dough hook can make kneading easier but isn’t absolutely necessary! If you’re going old school with manual mixing using a large bowl and wooden spoon or silicone spatula works perfectly fine too—just be ready for some arm workout!
- Measuring cups & spoons: Precision matters when baking breads; having proper measuring tools ensures consistency every single time you whip up these rolls!
- Clean kitchen towel or plastic wrap: We’ll need these for covering bowls during rise times—this keeps moisture locked in while preventing crust formation on our dough surfaces.
- Oven-safe skillet or baking pan: A cast iron skillet can give beautiful browning due to its heat retention properties but any oven-safe skillet or rectangular baking dish will work wonderfully too!
Now that we have everything ready—let’s get rolling!
Preparing the Sea Salt & Herb Skillet Rolls
Step 1: Activate Your Yeast
Start by whisking together warm milk (110°F/43°C), active dry yeast from one standard packet along with 1 tablespoon sugar in your stand mixer bowl—a delightful combination that signals “let’s get bubbling!” Cover this mixture gently so it remains cozy while waiting about five minutes until frothy bubbles form atop—a clear sign that your yeast is alive and kicking! Activating yeast correctly is absolutely paramount; if nothing happens after five minutes? Well then my friend—it might be time to check those expiration dates because no one wants flat rolls!
Step 2: Mix It All Together
Once those bubbles appear like magic foam atop your warm concoction—you’ll now add remaining sugar (the second tablespoon), egg (room temp!), melted butter (cooled), salt along with dried herbs plus garlic powder—and finally pour in one cup flour gently over top before switching on low speed mix until everything combines beautifully—it should take about thirty seconds! Scrape down sides carefully using silicone spatula ensuring no ingredient left behind before adding remaining flour gradually till dough comes together nicely away from sides—mixing away medium speed should take roughly two minutes max depending upon how vigorous you’re feeling today!
Step 3: Knead That Dough
Here comes another crucial moment—the kneading phase either utilizing dough hook attachment still attached onto mixer—or my preferred method kneading by hand upon lightly floured countertop works wonders too since it allows you feel textures change under fingertips as dough transforms from sticky mess towards softer pliable beauty over next five minutes’ time frame! If things become overly tacky sprinkle small amounts flour sparingly avoiding dry results entirely—it’s about finding balance as silky smoothness emerges under touch instead transforming tough rubbery ball fighting back against hands trying mold shape desired!
Step 4: Let It Rise
After kneading successfully done? Fantastic job—you’ve made progress already towards those fluffy masterpieces! Now lightly grease large bowl using oil/nonstick spray before placing formed ball inside turning around once coating all sides thoroughly followed by covering tightly either foil/plastic wrap/towel allowing rise peacefully somewhere warm undisturbed around one-two hours ideally double size achieved—trust me don’t rush this step patience pays off exponentially later when biting into freshly baked pieces bursting aroma fills room inviting everyone near smell divine anticipation growing ever stronger within hearts awaiting next delicious chapter unfolding ahead…
With these initial steps laid out beautifully—you’ll soon find yourself surrounded by comforting scents filled kitchen captivating senses reminding everyone home-cooked love thrives best whenever hands join forces creating delicious memories together… Stay tuned as we continue transforming simple ingredients into pure heavenly delights worth every crumb shared around joyous tables everywhere celebrating life itself through food connections made deeper than anything else imaginable…
Step 5: Preparing the Pan for Perfection
Now that your dough has risen beautifully, it’s time to prepare the vessel that will cradle these fluffy rolls as they bake. Grab a 10-12 inch oven-safe skillet or a trusty 9×13-inch baking pan—whichever you choose, it should be well-loved and seasoned if you’re using cast iron. If you opt for a non-stick version or a glass dish, just give it a light greasing with oil or non-stick spray. This is crucial because it ensures that your rolls don’t stick stubbornly to the sides, allowing them to release effortlessly and emerge golden brown and glorious.
Why is this step so important? Well, think of it like preparing a stage for a performance. The skillet or pan is where your rolls will rise and ultimately perform their final act in the oven, so we want them to have the best conditions possible. It’s all about creating the right environment for those rolls to expand and cook evenly. If using cast iron that’s already seasoned, you can skip this greasing step; just make sure it’s clean and ready to go! Trust me on this—your rolls will thank you later.
Step 6: Shaping Your Rolls with Love
With your dough having puffed up like a soft cloud, it’s time for one of my favorite parts: shaping the rolls! Gently punch down the dough—it might feel a little counterintuitive, but this step releases any excess gas that’s built up during rising, allowing for an even texture in each roll. Then, divide the dough into 12 equal pieces; I usually just eyeball it—perfection isn’t necessary here! The joy of homemade bread lies in its rustic charm.
Once divided, take each piece and shape it into a smooth ball. To do this, gently stretch the edges of the dough towards the center before rolling it between your palms until it feels soft and round. This technique creates surface tension on the outside of the roll, encouraging them to rise upwards rather than outwards while baking. Arrange these little spheres of goodness in your prepared skillet or baking pan with some space between them; they’ll expand as they bake and need room to breathe! Watching them puff up is like watching magic unfold right before your eyes!
Step 7: The Second Rise – A Lesson in Patience
Now that your rolls are shaped and nestled comfortably in their pan, it’s time for another round of rising—a process lovingly known as proofing. Cover them gently with aluminum foil or a clean kitchen towel; this keeps them warm and cozy while they work their magic. Allow them to rise again for about 45-60 minutes; during this time, you’ll notice them getting puffy and voluminous. It’s such an uplifting sight!
Why do we allow this second rise? Essentially, it gives our yeast another opportunity to produce carbon dioxide gas, which contributes to that wonderfully airy texture we crave in bread. Think of it as giving those tiny yeast creatures more time to party! You’ll know they’re ready when they’ve significantly expanded—almost double in size—and if you gently poke one with your finger, it should spring back slowly but not completely bounce back immediately; that’s how you know they’re at their peak readiness for baking.
Step 8: Prepping for Baking Bliss
With your rolls beautifully risen and ready for action, now comes the moment we’ve all been waiting for—the baking! Before we dive into preheating our oven at 350°F (177°C), let’s make sure everything is set up perfectly. Adjusting the oven rack to a lower position is essential because we want those rolls baked towards the bottom of the oven where heat is more direct; this helps ensure that they get golden brown underneath without burning on top.
As you preheat your oven, take a moment to enjoy that delightful anticipation wafting through your kitchen—a promise of warmth and comfort soon to come! When you slide those rolls into the hot oven after about 23-27 minutes of baking time (and don’t forget to rotate halfway through!), keep an eye on them—they should develop a lovely golden hue on top. If at any point you see them browning too quickly (which can happen depending on individual ovens), don’t hesitate to loosely tent them with aluminum foil—this is absolutely paramount in preventing over-baking while still allowing the inside to cook perfectly.
And there you have it—your very own batch of Sea Salt & Herb Skillet Rolls! Whether enjoyed fresh from the oven or stored away for later indulgence (they can last up to a week when properly covered), I hope these rolls bring as much joy into your kitchen as they do into mine. Happy baking!
Storage and Enjoyment Tips for Your Sea Salt & Herb Skillet Rolls
Now that you’ve created these magnificent Sea Salt & Herb Skillet Rolls, it’s time to revel in the joy they bring! I can already imagine the warm, inviting aroma enveloping your kitchen, enticing everyone to gather around the dinner table. But here’s an extra special tip: if you find yourself with a few leftover rolls (though I doubt they will last long!), don’t fret! I’m here to guide you on how best to preserve that delightful freshness and flavor.
Storing Leftover Sea Salt & Herb Skillet Rolls
To keep your Sea Salt & Herb Skillet Rolls as fluffy and delicious as the moment they came out of the oven, place them in an airtight container or wrap them tightly in plastic wrap. Storing them at room temperature is ideal for up to 2-3 days; however, if you want to extend their life, you can pop them into the refrigerator for up to a week. A little pro tip from my kitchen: placing a slice of bread inside the container helps maintain moisture and keeps those rolls soft—trust me, this is crucial for preserving that pillowy texture! And even after a few days, when you reheat them in the oven or microwave, they’ll still provide that warm hug of flavors, reminiscent of the first bite. Just remember to brush on a bit of melted butter before reheating—it’s like giving your rolls a cozy blanket!
Freezing Sea Salt & Herb Skillet Rolls for Later
If you want to savor your Sea Salt & Herb Skillet Rolls down the line, freezing is an excellent option! To freeze them properly, ensure they are completely cooled after baking. Then wrap each roll individually in plastic wrap and place them in a freezer-safe bag or container. They can be stored in the freezer for up to three months. When you’re ready to indulge again, simply remove as many rolls as you’d like and let them thaw at room temperature; then pop them into a warm oven for a few minutes until they’re heated through. This method ensures that every bite is just as delightful as when they were fresh from the skillet—what could be more convenient? The beauty of freezing is not only about extending shelf life but also about having homemade goodness ready at your fingertips whenever you’re craving comfort food!
Sea Salt & Herb Skillet Rolls
Indulge in the delight of Sea Salt & Herb Skillet Rolls—fluffy, herb-infused bread rolls that perfectly complement any meal. Imagine pulling apart a warm roll, its soft interior infused with savory herbs, and topped with flaky sea salt. These rolls are not only a treat for your taste buds but also an easy and rewarding baking project for any skill level. Ideal for family dinners, casual gatherings, or as a comforting snack, they embody warmth and nostalgia in every bite. Follow this straightforward recipe to create your own batch of irresistible rolls that will soon become a staple in your home.
- Prep Time: 30 minutes
- Cook Time: 25 minutes
- Total Time: 55 minutes
- Yield: Makes approximately 12 servings 1x
- Category: Bread
- Method: Baking
- Cuisine: American
Ingredients
- 1 cup whole milk (warmed)
- 2 and 1/4 teaspoons active dry yeast
- 2 tablespoons granulated sugar (divided)
- 1 large egg (room temperature)
- 1/4 cup unsalted butter (melted + slightly cooled)
- 1 teaspoon salt
- 2 teaspoons each: dried rosemary, dried basil, & dried parsley
- 1 teaspoon garlic powder
- 3 cups bread flour (spooned & leveled)
- Flaky sea salt (for topping)
Instructions
- Activate the yeast by whisking together warm milk, yeast, and 1 tablespoon of sugar in a bowl. Cover and let sit for about 5 minutes until frothy.
- Mix in remaining sugar, egg, melted butter, salt, dried herbs, garlic powder, and then gradually add flour until a dough forms.
- Knead the dough on a floured surface or using a mixer with a dough hook for about 5 minutes until smooth.
- Place the dough in a greased bowl, cover it, and let it rise in a warm place until doubled in size (about 1–2 hours).
- Punch down the dough and shape it into 12 equal rolls. Arrange them in a greased skillet or baking pan with space between each roll.
- Cover again and let rise for another hour until puffy.
- Preheat oven to 350°F (177°C). Bake for 23–27 minutes until golden brown. Brush with melted butter and sprinkle sea salt on top before serving.
Nutrition
- Serving Size: 1 serving
- Calories: 150
- Sugar: 2g
- Sodium: 200mg
- Fat: 5g
- Saturated Fat: 3g
- Unsaturated Fat: 2g
- Trans Fat: 0g
- Carbohydrates: 22g
- Fiber: 1g
- Protein: 4g
- Cholesterol: 30mg