Strawberry Buttermilk Doughnuts Recipe
The sweet scent of freshly baked doughnuts wafting through the kitchen is more than just a delightful aroma; it’s a warm embrace that speaks of love, comfort, and shared moments. Each bite of these Strawberry Buttermilk Doughnuts transports me back to sun-drenched mornings spent with family, gathered around the table, sharing laughter and stories while savouring the delightful sweetness of ripe strawberries. These doughnuts are not merely a recipe; they are a celebration of flavor and nostalgia, bridging the gap between childhood memories and the joy of baking today. I promise you, once you take your first bite, you’ll understand why this Strawberry Buttermilk Doughnuts Recipe holds such a special place in my heart.
As we embark on this culinary adventure together, think about what makes certain recipes resonate with us—they often tell a story or evoke cherished memories. The vibrant pink hue from fresh strawberries combined with the tender crumb that buttermilk brings creates an utterly intoxicating experience. The lightness of these baked doughnuts—yes, no frying here—gives them an airy quality that feels almost like indulgence without guilt! Whether you’re hosting brunch for friends or simply treating yourself to something sweet after dinner, these doughnuts are versatile enough to fit any occasion. So gather your ingredients, roll up your sleeves, and let’s dive into this delicious journey!
Strawberry Buttermilk Doughnuts Recipe: A Delightfully Sweet Treat
I’m absolutely thrilled to share this Strawberry Buttermilk Doughnuts Recipe with you! It’s so easy to whip up and will leave your kitchen smelling heavenly. Trust me when I say that every bite brings not just satisfaction but also joy—a symphony of flavors that will have you reaching for seconds (or thirds!). Let’s get started on bringing these beautiful creations to life!
Ingredients:
Before we dive into the actual baking, let’s gather our ingredients. Each component plays an essential role in crafting these delectable doughnuts, so it’s important to understand what they contribute to our wonderful creation.
- 2 cups all-purpose flour. This is the foundation of our doughnut recipe; it provides structure and texture. When selecting flour, look for all-purpose varieties that have a balanced protein content—too much protein can lead to dense doughnuts instead of the light fluffiness we’re aiming for. If you’re feeling adventurous or want a healthier twist, consider substituting half with whole wheat flour; just be aware that it may alter the final texture slightly.
- ½ cup sugar. Ah, sugar—the beloved sweetener! In this recipe, sugar does more than just add sweetness; it also contributes to the browning process during baking and helps create that tender crumb texture we crave in baked goods. Granulated sugar works perfectly here, but you can experiment with coconut sugar for a more caramel-like flavor if desired.
- 2 teaspoons baking powder. This is one ingredient you don’t want to skip! Baking powder is our leavening agent that ensures our doughnuts rise beautifully in the oven. It’s important to check its expiration date before use; old baking powder won’t provide the lift needed for fluffy treats.
- ½ teaspoon salt. Salt is often overlooked in sweet recipes but trust me—it enhances flavors dramatically! It balances out the sweetness and elevates every other ingredient’s taste profile.
- ¼ teaspoon nutmeg. This aromatic spice adds warmth and depth to our doughnuts without being overpowering. Nutmeg has a unique ability to bring out the natural sweetness of strawberries while adding a hint of cozy comfort reminiscent of grandmother’s kitchen!
- 4 Tablespoons butter (melted). Butter is liquid gold in baking! Its fat content enriches our doughnut batter and gives it a rich flavor that’s simply divine. Be sure to melt it gently; overheating can lead to burnt notes which we definitely want to avoid.
- 2 eggs. Eggs provide moisture and structure; they help bind everything together while contributing richness as well. For those avoiding eggs entirely, you can substitute each egg with 1/4 cup unsweetened applesauce or 1/4 cup mashed bananas for similar binding properties.
- ¾ cup buttermilk. This ingredient is non-negotiable in my book! Buttermilk not only adds moisture but also reacts with baking soda or powder to yield tender results due to its acidity—think fluffy clouds instead of dense rocks! If you don’t have buttermilk on hand, you can make your own by mixing regular milk with a tablespoon of vinegar or lemon juice—let it sit for about five minutes before using.
- 1 Tablespoon vanilla extract. Pure vanilla extract infuses our doughnut mix with warmth and complexity—a must for any dessert! Always opt for pure over imitation if possible; it really makes a difference in flavor.
- 2 Tablespoons strawberry jam. Adding jam into our batter gives bursts of concentrated strawberry flavor throughout each bite! Plus, who doesn’t love surprises? You could even use homemade jam if you’re feeling inspired!
- 1 cup fresh strawberries (diced small). Fresh strawberries bring brightness and juiciness that’s absolutely essential in this recipe—they lend their natural sweetness while transforming every mouthful into sheer bliss! Look for berries that are vibrant red without any bruises or mushiness when purchasing.
- ½ cup fresh strawberries (diced small) (for glaze). Just like above—these fresh strawberries will elevate our glaze’s flavor profile when mixed together; their juicy essence will shine through beautifully against the powdered sugar base!
- 1 Tablespoon heavy whipping cream (optional). This cream adds richness and helps create a smooth glaze consistency that glides over our doughnuts effortlessly—making them all too irresistible!
- 1 Tablespoon strawberry jam (for glaze). A touch more jam brings everything together beautifully in our glaze as well while keeping things cohesive—all about those layers of strawberry goodness!
- 2 ½ cups powdered sugar. Finally, powdered sugar is required for making our sweet glaze! Its fine texture dissolves easily into liquids creating silky smooth finishes—ensuring every bite is unapologetically decadent!
Equipment You’ll Need:
Now that we’ve gathered all our ingredients like excited little elves preparing for Christmas morning let’s talk about equipment! Having the right tools makes all the difference when creating masterpiece desserts like these delightful Strawberry Buttermilk Doughnuts.
- Doughnut pans – Essential! You’ll need at least one (or two) non-stick cake donut pans designed specifically for shaping perfect rings because we’re not frying here—we’re going for baked goodness! These pans help achieve evenly shaped treats while ensuring they release easily after baking.
- Mixing bowls – A set of mixing bowls in various sizes will greatly assist in separating dry from wet ingredients efficiently; glass or stainless steel work best as they’re sturdy yet lightweight enough to handle vigorous mixing sessions!
- Whisk – This handy tool helps incorporate dry ingredients together seamlessly while blending wet components effortlessly—ensuring there are no lumps left behind!
- Rubber spatula – A must-have companion when folding diced strawberries into batter gently without crushing them—the flexibility allows you precise control over how much pressure is applied!
- Measuring cups & spoons – Accurate measurements are crucial in baking since precision leads us closer towards achieving those perfect ratios needed within each batch!
With everything gathered together along with enthusiasm coursing through your veins let’s finally get onto preparing this scrumptious Strawberry Buttermilk Doughnut recipe together!
Preparing the Strawberry Buttermilk Doughnuts Recipe
Step 1: Prepping Your Oven & Pans
First things first: preheat your oven to 425 degrees Fahrenheit (220 degrees Celsius). This step might seem simple but it’s absolutely paramount because starting off at the right temperature ensures your doughnuts cook evenly throughout—creating those beautiful puffy shapes we all adore! While waiting for it reach temperature prepare your donut pans by lightly greasing them with non-stick cooking spray or brushing them gently with melted butter—a crucial measure ensuring smooth releases later on after baking!
Step 2: Whisking Dry Ingredients
In a large mixing bowl combine 2 cups flour, ½ cup sugar, 2 teaspoons baking powder, ½ teaspoon salt, and ¼ teaspoon nutmeg using your trusty whisk until fully blended—this process helps distribute all elements uniformly throughout ensuring consistency across every single donut later down line! Take care here—not rushing through this step means avoiding lumpy textures which nobody wants when biting into their delicious creation later on so indulge yourself taking time getting it right before moving forward.
Step 3: Blending Wet Ingredients
Now let’s turn attentions towards another bowl where we’ll mix together all those luscious wet components: pour in four tablespoons melted butter followed by two eggs (crack them open gently), three-fourths cup buttermilk along with one tablespoon pure vanilla extract plus two tablespoons flavorful strawberry jam—all these magical mixtures combine beautifully resulting creamy goodness ready joining forces next round… Why do we separate dry from wet? It allows us better control over how much each element interacts during final mixing stages leading smoother texture overall once finished cooking too—it’s truly an art form worth mastering if aiming professional quality at home!
Step 4: Combining Everything Together
Once both sets have been prepared now comes most exciting part: pouring wet mixture directly onto dry blend merging them slowly until everything appears combined perfectly—that luscious batter should look thick yet smooth at same time allowing some chewy bits from diced strawberries included earlier too—but don’t forget fold those delicate pieces gently rather than stirring aggressively otherwise risk breaking apart creating mushy results rather than lovely chunks bursting forth upon tasting later on… Now carefully spoon batter evenly into prepared donut pans until filled approximately three-fourths full ensuring room left top rise beautifully during bake time ahead next steps await…
Stay tuned as we continue crafting these delightful confections step-by-step toward sweet perfection—you won’t regret following along each moment shared here today!
Step 5: Bake the Doughnuts to Perfection
Now that you’ve carefully spooned your luscious doughnut batter into the pans, it’s time to transform this delightful mixture into something truly special. Preheat your oven to a sizzling 425 degrees Fahrenheit—this high temperature is absolutely crucial. You see, baking at a higher heat allows those doughnuts to rise beautifully and develop a golden crust while keeping the inside soft and tender. Trust me, you want that contrast of textures! Once your oven has reached the desired temperature, place your filled doughnut pans on the center rack. Set a timer for 7 to 9 minutes but don’t just walk away—this is where the magic happens!
As they bake, keep an eye on them through the oven door (no peeking too soon!) and watch for that lovely golden hue forming around the edges. To test for doneness, insert a toothpick into one of the center doughnuts; it should come out clean with no wet batter clinging to it. If it does have some batter stuck to it, simply give them another minute or two in the oven; underbaking can leave you with a gummy texture that we definitely want to avoid. Remember, every oven behaves a little differently—what works in mine might not be identical in yours, so adjust accordingly. The aroma wafting through your kitchen will be utterly intoxicating and will surely have everyone wandering in, eager for a taste!
Step 6: Cooling Your Doughnuts
Once you’ve pulled those beautiful doughnuts from the oven and they are lightly golden brown, it’s time for the cooling phase—a step that’s often overlooked but oh-so-important! Carefully transfer them to a wire rack using a spatula; this allows air to circulate around them and prevents any sogginess from forming at the bottom. Let them cool completely before we dive into glazing them—that’s right, patience is key here! If you attempt to glaze while they’re still warm, you’ll end up with a melty mess instead of that satisfying layer of glaze we’re aiming for.
While they cool, take this time to admire your handiwork and anticipate how delicious they’ll taste once everything comes together. The cooling process also allows the flavors to settle and deepen; it’s like giving your doughnuts a moment to breathe after their hot oven workout. As they rest on their racks, perhaps take a moment to prepare your workspace for glazing—this will make things feel seamless when you’re ready to add that glorious finishing touch.
Step 7: Preparing Your Irresistible Glaze
Now onto one of my favorite parts—the glaze! This isn’t just any ordinary topping; we’re going for an utterly indulgent frosting that will elevate these strawberry buttermilk doughnuts beyond belief! In a medium bowl, combine 2 ½ cups of powdered sugar with 1 tablespoon of heavy whipping cream and 1 tablespoon of strawberry jam. The powdered sugar serves as our base—it dissolves easily and creates that luscious sweetness that pairs perfectly with our strawberry flavor profile. The heavy cream adds richness and an almost velvety texture, while the strawberry jam brings that essential fruity flavor which ties everything back to our star ingredient.
Using a whisk or spatula, stir until everything is combined into a smooth, thick mixture that somewhat resembles liquid gold. Depending on how thin or thick you prefer your glaze (and how sweet you want it), you can adjust by adding more cream or powdered sugar accordingly. I promise you—achieving that perfect consistency is non-negotiable; it’s what gives each bite its divine finish! And don’t hesitate to sample some along the way—you deserve it!
Step 8: Glazing Those Beautiful Doughnuts
With your doughnuts now cooled and your glaze prepared, let’s get down to business! It’s time for each doughnut to receive its well-deserved coat of sweetness. Using either a spoon or simply dipping each doughnut top directly into the bowl of glaze (my personal favorite method!), make sure each doughnut is generously covered—you want every inch gleaming with sweetness! As you do this, allow any excess glaze to drip off back into the bowl before placing them back onto the wire rack.
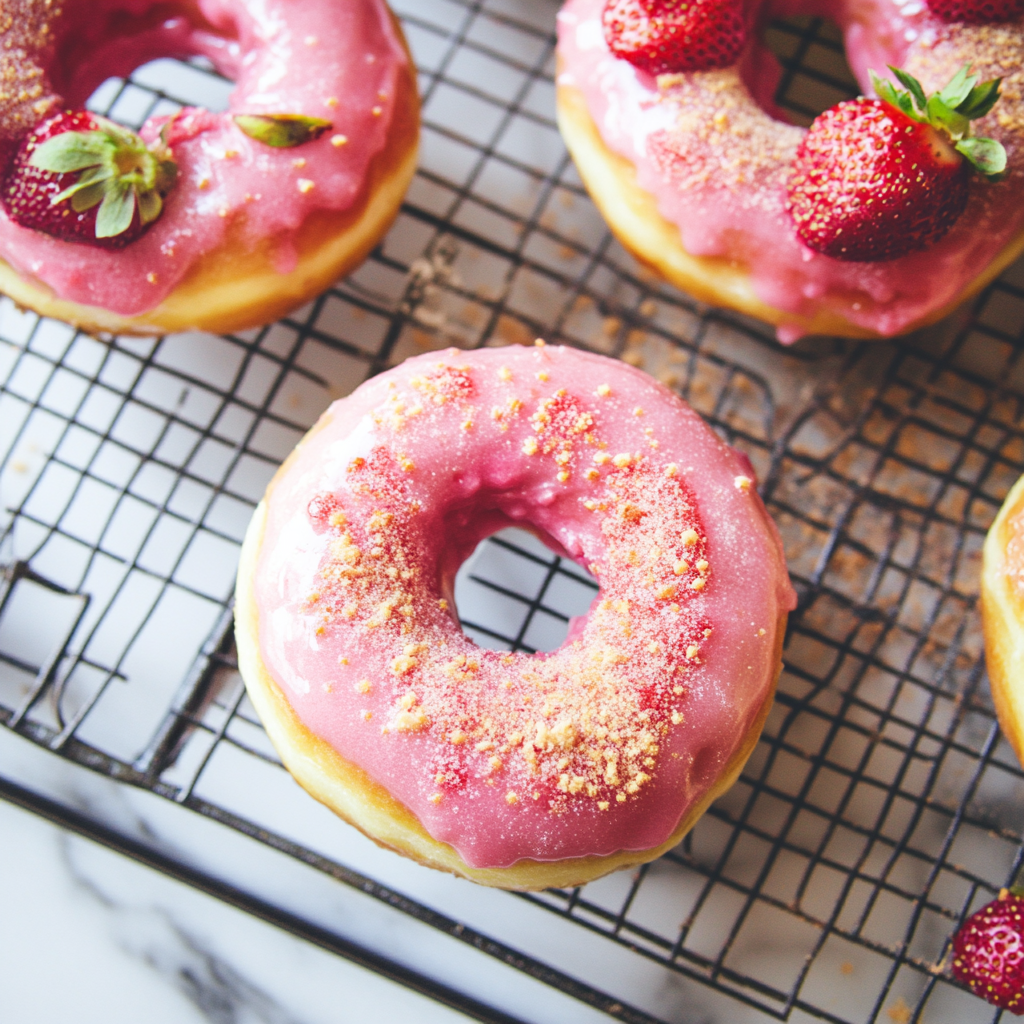
But wait—here’s where things get even more exciting! If you feel adventurous (and I know you do), sprinkle some finely diced fresh strawberries atop each glazed doughnut while the glaze is still wet. This not only enhances their visual appeal but also adds an extra burst of fresh flavor when bitten into—just imagine biting through that sweet outer layer into soft cake enriched with juicy strawberries! After glazing all of them (you should have about 12 heavenly creations), let them sit for about 5-10 minutes, allowing the glaze to set slightly before diving in.

Next Major Phase – Final Touches
Finally, let’s talk about serving these delightful treats because trust me when I say—they deserve all the accolades! Once glazed and set, arrange your strawberry buttermilk doughnuts on a beautiful platter or cake stand; presentation matters! Perhaps pair them with some additional fresh strawberries on the side or even serve alongside a cup of freshly brewed coffee or tea—the warm aromas mingling together are simply irresistible.
These baked goodies are perfect for brunch gatherings or as a sweet afternoon snack while curled up with your favorite book. They’re light yet indulgent enough to satisfy any sweet tooth without leaving you feeling heavy afterward—what more could you ask for? So go ahead; slice one open and revel in that stunning interior dotted with pieces of strawberry goodness—you’ve earned every bite after all this effort! Enjoy every moment spent savoring these extraordinary strawberry buttermilk doughnuts—you deserve it all!
Storage and Enjoyment Tips for Your Strawberry Buttermilk Doughnuts Recipe
Ah, the moment has finally arrived! Your Strawberry Buttermilk Doughnuts are ready to be devoured, and I can already imagine the delightful aroma wafting through your kitchen. These scrumptious treats promise to be a hit at any gathering or cozy afternoon snack. But what if you find yourself with a few leftovers? Fret not, my friends, for I have some fantastic tips to ensure you savor every last bite of these heavenly doughnuts!
Storing Leftover Strawberry Buttermilk Doughnuts Recipe
To keep your delicious doughnuts fresh and inviting, it’s essential to store them correctly. I recommend placing them in an airtight container—this is crucial for preserving their soft texture and irresistible flavor. A simple plastic or glass container will do wonders; just make sure to layer parchment paper between the doughnuts if you’re stacking them. When stored this way at room temperature, they’ll stay delightful for about 2-3 days. If you want to maintain that just-baked quality, here’s a pro tip: place a slice of bread in the container with them. This non-negotiable trick keeps moisture levels balanced so that your doughnuts remain soft and moist rather than dry or stale. After a day or two, while they might lose a bit of their original fluffiness, they’ll still offer that burst of strawberry flavor that makes each bite profoundly satisfying. For those looking to enjoy them warm again, simply pop them in the microwave for about 10 seconds—trust me; it’s like reliving that first bite all over again!
Freezing Strawberry Buttermilk Doughnuts for Later
If you’re like me and love to plan ahead, freezing these delectable doughnuts is an excellent option! To freeze them properly while ensuring maximum flavor retention, let the doughnuts cool completely after baking. Then, wrap each one tightly in plastic wrap or foil before placing them in a freezer-safe zip-top bag. This way, they can stay fresh in the freezer for up to three months! When you’re ready to indulge again (and trust me—you will be!), simply remove as many as you’d like from the freezer and let them thaw at room temperature for about 30 minutes. Alternatively, you can reheat them directly from frozen in the oven at 350 degrees Fahrenheit for about 10-12 minutes until warmed through. The convenience of having these delightful treats on hand is absolutely paramount; whether it’s an impromptu brunch with friends or a sweet surprise for your family after dinner, you’ll thank yourself later!
Strawberry Buttermilk Doughnuts
Indulge in the delightful experience of baking with this Strawberry Buttermilk Doughnuts Recipe. These baked doughnuts are fluffy, light, and bursting with fresh strawberry flavor, making them a perfect treat for breakfast or brunch. The combination of tangy buttermilk and sweet strawberries creates a tender crumb that melts in your mouth. With a sweet glaze drizzled on top, these doughnuts not only taste divine but also look stunning on any table. Whether enjoyed fresh from the oven or at your next gathering, they are sure to bring joy and nostalgia to everyone who tries them.
- Prep Time: 15 minutes
- Cook Time: 9 minutes
- Total Time: 24 minutes
- Yield: Approximately 12 servings 1x
- Category: Dessert
- Method: Baking
- Cuisine: American
Ingredients
- 2 cups all-purpose flour
- ½ cup sugar
- 2 teaspoons baking powder
- ½ teaspoon salt
- ¼ teaspoon nutmeg
- 4 tablespoons melted butter
- 2 eggs
- ¾ cup buttermilk
- 1 tablespoon vanilla extract
- 2 tablespoons strawberry jam (for batter)
- 1 cup fresh strawberries (diced small)
- 2 ½ cups powdered sugar (for glaze)
- ½ cup fresh strawberries (diced small) (for glaze)
- 1 tablespoon heavy whipping cream (optional, for glaze)
- 1 tablespoon strawberry jam (for glaze)
Instructions
- Preheat the oven to 425 degrees Fahrenheit (220 degrees Celsius) and lightly grease doughnut pans.
- In one bowl, whisk together flour, sugar, baking powder, salt, and nutmeg.
- In another bowl, mix melted butter, eggs, buttermilk, vanilla extract, and strawberry jam until smooth.
- Combine wet ingredients with dry ingredients and gently fold in diced strawberries.
- Spoon the batter into the prepared pans until three-fourths full.
- Bake for 7 to 9 minutes or until golden brown; check doneness with a toothpick.
- Cool on wire racks before glazing.
Nutrition
- Serving Size: 1 doughnut (50g)
- Calories: 170
- Sugar: 12g
- Sodium: 150mg
- Fat: 5g
- Saturated Fat: 3g
- Unsaturated Fat: 2g
- Trans Fat: 0g
- Carbohydrates: 29g
- Fiber: 1g
- Protein: 3g
- Cholesterol: 30mg