Tex Mex Chicken and Zucchini Recipe
There’s something undeniably magical about the way food has the power to bring us together, weaving a tapestry of memories and flavors that transcend time. The Tex Mex Chicken and Zucchini Recipe is one such dish, an ode to vibrant colors and bold tastes that awakens the senses. As you step into your kitchen, imagine the sizzling sounds of chicken meeting a medley of fresh vegetables, each ingredient contributing to a symphony of flavors that will leave your taste buds dancing. This one-pan wonder isn’t just a meal; it’s an experience that reflects my passion for cooking—a bridge between cherished traditions and the excitement of modern culinary creativity. I promise you, this dish is not only quick to prepare but also a profound celebration of wholesome ingredients, uniting comfort and nutrition in every bite.
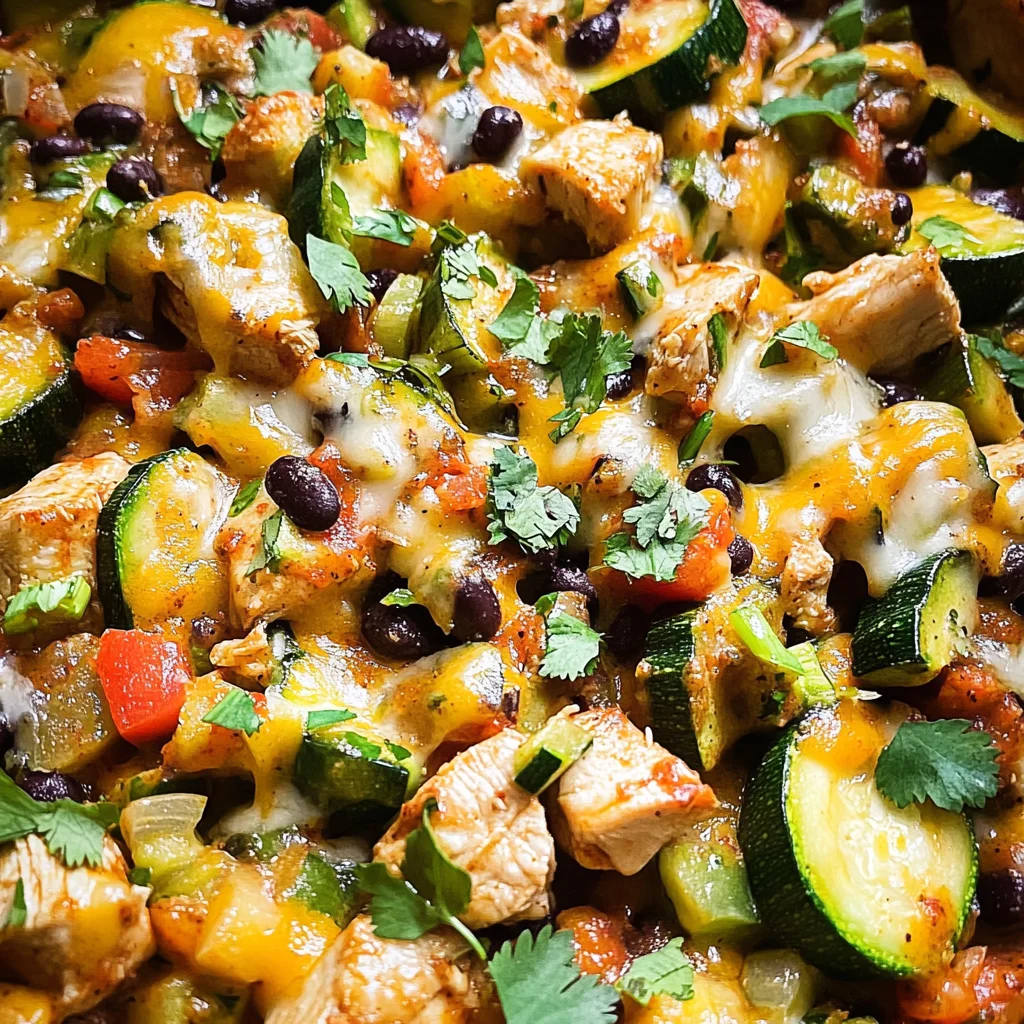
Why is this recipe so beloved? Perhaps it’s the way it effortlessly combines textures and flavors—tender chicken pieces mingling with crunchy zucchini, sweet bell peppers, and hearty black beans—all topped with a blanket of melted cheese that beckons you closer. It’s perfect for weeknight dinners when time is tight but your desire for something delicious is high. Or maybe it’s the memories spent around the dinner table with family or friends, sharing laughter over plates heaped with vibrant food. Whether you’re looking to impress guests or simply nourish yourself after a long day, this Tex Mex Chicken and Zucchini Recipe is here to remind us all that cooking can be both simple and extraordinary.
Tex Mex Chicken and Zucchini Recipe: A Colorful Culinary Adventure
Are you ready to embark on this delightful culinary journey? This recipe is not just about throwing ingredients into a pan; it’s about creating something beautiful and nourishing from scratch. Each step invites you to connect with your food, ensuring that each flavor shines while harmonizing beautifully with others. Plus, it’s all done in just 30 minutes! So grab your apron, let’s dive into making this mouthwatering dish together!
Ingredients:
As we gather our ingredients for this scrumptious Tex Mex Chicken and Zucchini Recipe, it’s essential to understand their roles in crafting this delightful meal. Each component brings something unique to the table—let’s explore them in detail!
- 1 lb boneless & skinless chicken breasts (cut into 1 pieces): This lean protein serves as the heart of our dish. Boneless and skinless chicken breasts cook quickly and evenly while soaking up all those wonderful spices and flavors. When purchasing chicken, look for meat that feels firm and has a pinkish hue—a sign of freshness. Trust me, avoiding excess moisture will enhance the texture significantly, ensuring that each bite is tender yet juicy.
- 2 large zucchini (diced): These green marvels add not only color but also a subtle sweetness and crunchiness that balances perfectly against the savory elements of our dish. When selecting zucchini at the store or market, opt for ones that are firm with shiny skin—those are typically younger and more flavorful! Dicing them allows their flavors to meld beautifully during cooking while maintaining their structure.
- 2 medium bell peppers (chopped): I adore how bell peppers contribute both sweetness and crunch—their vibrant colors elevate any dish visually while enhancing flavor complexity. Choose bell peppers that feel heavy for their size; they should have smooth skin without blemishes. You can mix colors if you’d like; red adds sweetness while green gives an earthy note!
- 1 medium onion (finely chopped): Onions are truly foundational in many recipes—this humble vegetable brings depth through its natural sweetness when sautéed. Finely chopping it ensures even cooking and releases those aromatic oils that envelop your kitchen in warmth as they sauté.
- 3 large garlic cloves (minced): Garlic is like a secret handshake in cooking; its pungent aroma transforms dishes from ordinary to extraordinary! When minced finely, garlic releases its oils quickly during sautéing, infusing every ingredient with its unmistakable fragrance—a crucial element that ties everything together.
- 1 cup corn (frozen or fresh): Corn adds delightful bursts of sweetness and texture—it’s like little golden nuggets throughout our dish! If using frozen corn (which I often do), there’s no need to thaw it beforehand since it will cook perfectly during our quick preparations.
- 1 tbsp oil (for frying): Choosing the right oil matters! A neutral oil such as canola or avocado oil works well here because it allows other flavors to shine without overshadowing them. This small amount helps sauté our veggies beautifully without sticking while adding healthy fats essential for flavor development.
- 14 oz can low sodium black beans (drained & rinsed): Black beans bring heartiness to our recipe along with protein and fiber—incredibly nutritious! Rinsing them removes excess sodium while enhancing their natural flavor; trust me when I say this simple step makes all the difference!
- 14 oz can low sodium diced tomatoes (not drained): The juicy goodness from canned tomatoes creates a lovely sauce base for our dish. Using them undrained enriches the overall texture while adding moisture necessary for cooking other ingredients thoroughly.
- 1 tsp store bought or homemade taco seasoning: This seasoning blend imparts authentic Tex Mex flavors without requiring extra effort on your part! Feel free to customize it according to your heat preference; remember though—this small addition packs quite a punch!
- 1 tbsp cumin (divided): Cumin’s warm earthy notes deepen flavor complexity significantly throughout our meal—it truly shines here! Dividing it allows us first to season chicken properly before enhancing all other components later on.
- 1 tsp salt: Salt amplifies flavors like nothing else; it’s absolutely paramount in proper seasoning! Be cautious not overdo it since we’re using low-sodium products already—but just enough will elevate everything beautifully.
- Ground black pepper (to taste): Freshly ground black pepper adds warmth without overwhelming heat—it’s key for balancing flavors harmoniously across all ingredients used.
- 1 cup Tex Mex or Colby Jack cheese (shredded): Cheese makes everything better! Melting cheese on top creates an irresistible layer of creamy goodness—the kind of comfort food we crave at day’s end after busy lives filled with responsibilities!
- 1/2 cup green onions (chopped): Green onions contribute freshness along with mild oniony notes—they’re fantastic as both garnish and additional flavor enhancer throughout preparation!
- 1/2 cup cilantro (chopped): Cilantro introduces brightness which lifts heavier elements present within this dish—it’s refreshing yet aromatic too! Make sure not skip out on garnishing before serving—everyone appreciates visual appeal accompanied by fragrant herbs!
Equipment You’ll Need:
Having the right tools at your disposal can turn what might feel like an overwhelming task into an absolute joyride through deliciousness—and trust me when I say these essentials will make all the difference in achieving success with this recipe!
- Large deep skillet – A solid investment; having ample surface area ensures even cooking without overcrowding ingredients during sautéing stages—this helps retain textures!
- Cutting board & knife – Every home chef needs reliable tools for chopping veggies effortlessly! A sharp knife paired with sturdy cutting board promotes safety while speeding up prep time significantly.
- Wooden spoon – Perfectly designed for stirring mixtures gently yet effectively without scratching nonstick surfaces—you’ll want one handy!
Step 1: Sautéing Aromatics
Let’s start by preheating our large deep skillet over low-medium heat—this gentle start allows flavors from onions, garlic, and bell peppers to develop fully without burning them too quickly. Once heated adequately, swirl in some oil until it coats the bottom beautifully—that liquid gold will help prevent sticking while providing luscious flavor enhancement during cooking!
Now add your finely chopped onions first since they take longer than garlic or peppers—they’ll need about three minutes until softened—which means stirring occasionally becomes crucial here too; watch closely as they begin turning translucent—that’s when you know you’re off on the right foot towards building layers of flavor!
Just when those aromatic notes start filling up your kitchen like magic spells being cast upon unsuspecting diners patiently waiting nearby—you’ll want next to toss in minced garlic followed swiftly by chopped bell pepper pieces… oh my goodness—the scent wafting through air at this point promises good things ahead!
Step 2: Cooking Chicken
Once those colorful aromatics have danced around happily together for about three minutes now—you’ll want to gently push them aside using your wooden spoon creating space within skillet middle where we’ll introduce our chicken pieces next! Sprinkle them generously with cumin, salt & pepper allowing spices time enough mingle properly before beginning their transformation through heat exposure—don’t rush this step since we aim for flavorful browning achieved here alongside tender juicy bites later upon serving time!
Cook these beauties undisturbed initially allowing edges sear nicely against hot pan surface—for roughly five minutes total keeping watchful eyes peeled throughout ensuring evenness continues reigning supreme across entire batch! Stir occasionally afterward checking if any pieces stick stubbornly down below until golden brown appears marking readiness signaling transition towards next stage ahead…
Step 3: Introducing Veggies & Seasonings
Time now arrives where we welcome back previously sautéed veggies alongside fresh corn kernels straight outta freezer bag—no need defrosting beforehand folks—we’re about bringing harmony between sweet crunchiness inherent within these morsels meeting earthy depth brought forth via canned beans along juicy diced tomatoes!
At this point sprinkle remaining cumin plus taco seasoning over entire mixture giving chance another toss around ensuring even distribution happens before covering skillet lid sealing steam inside nicely promoting softening action amongst dicing zucchini too… let everything simmer peacefully on low-medium setting roughly ten minutes total till delicious fragrance fills entire home enticing everyone nearby urging patience until final presentation unfolds soon enough!!
Step 4: Melting Cheese Topping
Here comes perhaps most exciting part—I encourage everyone witnessing transformation process unfolding within skillet right now… once distinct aromas permeate air creamy cheesy goodness beckons next urging immediate attention towards sprinkling shredded cheese atop veggies combined seamlessly beneath!! Cover again allowing melting magic transpire underneath cozy lid wrapping warmth around entire ensemble until bubbly perfection achieved—or approximately three minutes max depending upon cheese type chosen… keep eye peeled lest overcooking occurs leaving behind sad rubbery mess instead desired gooey bliss!!!
Stay tuned as we finish off garnishing steps shortly revealing secrets elevating presentation beyond mere sustenance alone transforming guests’ experiences forevermore!!
Step 5: Melting the Cheese to Perfection
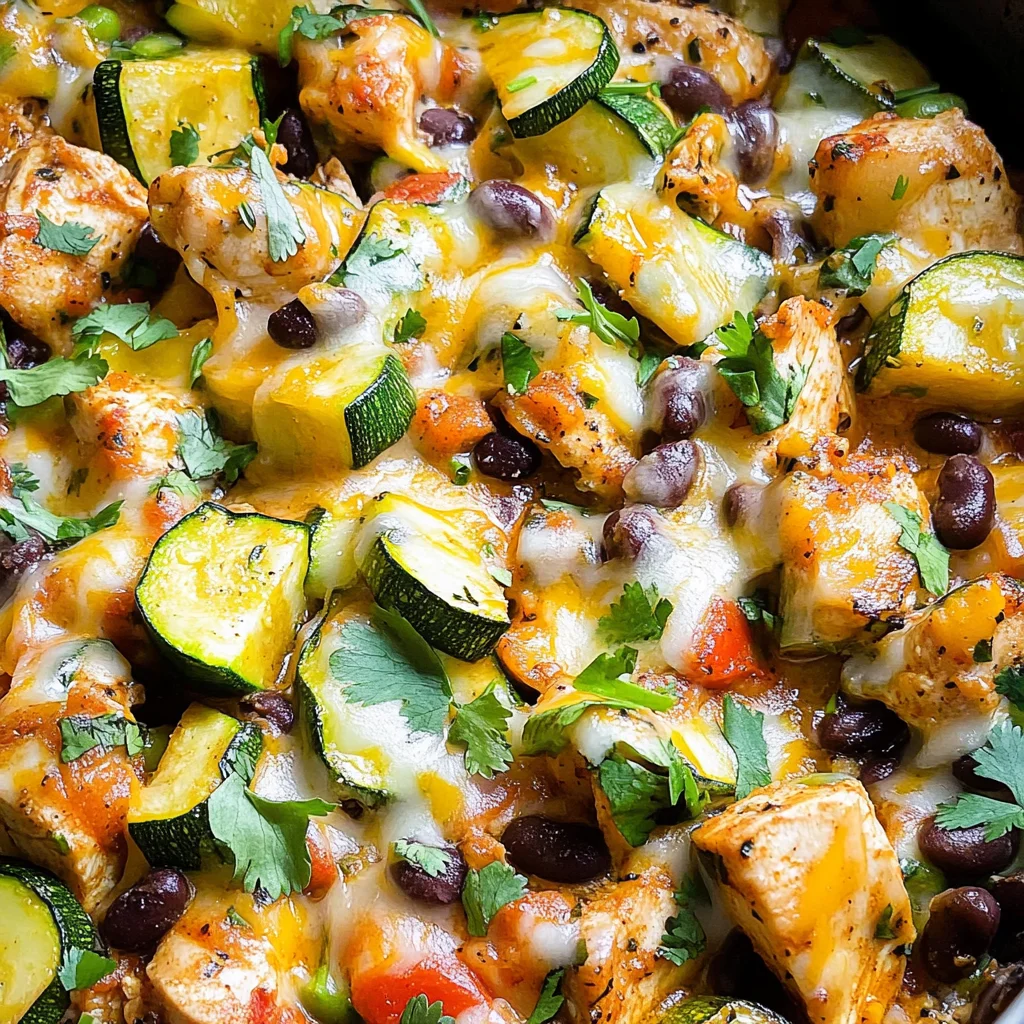
Now comes one of my favorite moments in this Tex Mex Chicken and Zucchini Recipe—the glorious melting of the cheese! Once you’ve let the vibrant mixture of chicken, beans, corn, tomatoes, and zucchini cook together for about 10 minutes, you’ll want to sprinkle a generous cup of shredded Tex Mex or Colby Jack cheese over the top. This is not just a finishing touch; it transforms your dish into a warm, gooey embrace. Cover the skillet with a lid and allow it to cook for an additional few minutes. The steam created under that lid will work its magic, gently melting the cheese until it’s bubbling and beautifully golden.
You might wonder why we cover it at this stage. Well, covering the skillet traps heat and helps melt the cheese evenly without burning or drying out any part of your dish. You’re looking for that perfect moment when the cheese has melted into a luscious blanket over your colorful medley, enticing you with its aroma. When you lift the lid after a few minutes, take a moment to appreciate that sight—the way the cheese stretches as you move your spatula through it is pure bliss! This step is absolutely paramount; if you rush it, you risk having clumpy or unevenly melted cheese, which just won’t deliver that comforting experience we all crave.
Step 6: Adding Freshness with Green Onions and Cilantro
Once your cheese has melted into that irresistible layer, it’s time to elevate your dish further with fresh green onions and cilantro. These vibrant herbs are not merely garnishes; they are essential components that add brightness and depth to this Tex Mex Chicken and Zucchini Recipe. Sprinkle half a cup of chopped green onions over the top along with another half cup of freshly chopped cilantro right before serving. These ingredients not only provide a beautiful pop of color but also introduce fresh flavors that cut through the richness of the melted cheese.
As you add these herbs, notice how their crispness contrasts with the creamy texture below. The green onions bring a mild onion flavor that’s slightly peppery while cilantro adds a refreshing citrus note that can make each bite feel incredibly light despite how hearty this dish is. Trust me on this—don’t skip these fresh additions! They are what truly ties all those comforting flavors together, transforming an already delightful meal into something truly extraordinary.
Step 7: Serving Suggestions That Elevate Your Meal
Now that your dish is beautifully garnished and ready to go, let’s talk about how best to serve this masterpiece! One of my favorite ways to enjoy this Tex Mex Chicken and Zucchini Recipe is on its own—hot and bubbling right out of the skillet—but there are so many wonderful options to consider. If you’re looking for something heartier or wish to stretch it further for family or friends, I recommend serving it alongside some Instant Pot brown rice or quinoa. The nutty flavor of quinoa complements the spices beautifully while brown rice provides a wholesome base.
But don’t stop there! Imagine dolloping some cool sour cream on top after plating—this adds a creamy element that balances out all those spicy notes from the taco seasoning and cumin. You could also use sliced avocado for an extra layer of richness or even garnish with black olives if you’re feeling adventurous! And let’s not forget about crushed tortilla chips; they add an exciting crunch that enhances each bite. You can even turn this delightful mixture into filling for low-carb wraps if you’re aiming for something different. Each option brings its own character to this joyful dish!
Step 8: The Art of Plating
Finally, let’s talk about plating because presentation matters just as much as taste! As you scoop out generous portions from your skillet onto plates or bowls, take care in how you arrange everything—it makes such a difference. Start by placing a hearty spoonful in the center; then consider adding some extra garnishes around it—perhaps an additional sprinkle of green onions or cilantro around the edge for color contrast. Remember those crushed tortilla chips? A little pile on one side can create visual interest while also inviting everyone to dive in.
Don’t be afraid to play around with heights either; layering ingredients thoughtfully can make every plate look like it came straight out of a culinary magazine! The colors should sing—deep reds from tomatoes against bright greens from zucchini and herbs will make your heart flutter every time you serve this dish. It’s not just about nourishing our bodies; it’s about feeding our souls too! Every detail counts in creating an experience that feels special—not only does it taste amazing but looks utterly intoxicating as well!
Final Touches: Savoring Every Bite
As we reach the end of our cooking journey together with this Tex Mex Chicken and Zucchini Recipe, I want you to remember one important thing: savor every single bite! Take time at the table; share stories with loved ones as you enjoy what you’ve created together in your kitchen. This recipe isn’t just food; it’s about connecting with those around us over shared meals where laughter fills the air amidst delicious aromas wafting through your home.
And if there happen to be leftovers (which I honestly doubt because it’s just so good!), they reheat beautifully in either a skillet over low heat or in the microwave—just be sure to cover them so they don’t dry out! I promise you’ll find yourself reaching for seconds (or thirds) because once you’ve tasted this warm symphony of flavors, there’s no going back. Enjoy every moment spent cooking—and even more joyfully eating—this lovely creation made from my heart to yours!
Storage and Enjoyment Tips for Your Tex Mex Chicken and Zucchini Recipe
Now that you’ve created this vibrant, mouthwatering Tex Mex Chicken and Zucchini Recipe, it’s time to dive into the delightful experience of savoring it! The aroma wafting through your kitchen is intoxicating, and you can almost taste the symphony of flavors that awaits. But what if you find yourself with leftovers? Fear not! I have all the tips you need to ensure that each bite stays as delicious as the first.
Storing Leftover Tex Mex Chicken and Zucchini Recipe
To preserve your leftover Tex Mex Chicken and Zucchini, I recommend storing it in an airtight container. Glass containers work beautifully because they prevent any unwanted odors from mingling and help maintain the dish’s integrity. If you’re using plastic, make sure it’s BPA-free for added safety. When stored properly in the refrigerator, this dish can last up to three days without losing its enchanting taste. To keep things fresh, consider placing a slice of bread in the container; yes, it sounds quirky but trust me! It absorbs excess moisture and keeps everything just right. As for reheating, a gentle warm-up on the stovetop with a splash of water or broth will bring back that saucy goodness. Imagine taking your first bite again; the tender chicken mingles with perfectly cooked zucchini—absolutely divine!
Freezing Tex Mex Chicken and Zucchini for Later
Freezing this culinary gem is another fantastic way to prolong your enjoyment! For best results, let the dish cool completely before transferring it into freezer-safe bags or containers—this is key to avoiding freezer burn. You can freeze it for up to three months, which makes meal prep a breeze during those busy weeks when cooking feels like a chore. When you’re ready to indulge again, simply thaw it overnight in the refrigerator or use the microwave on defrost mode for a quicker option. This convenience factor is truly remarkable; imagine having a hearty, home-cooked meal ready at your fingertips without any fuss. The flavors meld beautifully during freezing too, often becoming even more profound when reheated!
Tex Mex Chicken and Zucchini Recipe

Dive into a culinary adventure with this vibrant Tex Mex Chicken and Zucchini Recipe that brings together flavorful ingredients in just 30 minutes! This one-pan dish features tender chicken pieces mingled with crunchy zucchini, colorful bell peppers, and hearty black beans, all topped with melted cheese for a comforting finish. Perfect for busy weeknights, this recipe not only satisfies your taste buds but also nourishes your body with wholesome ingredients. Whether you’re cooking for family or entertaining friends, this dish promises to create unforgettable memories around the dinner table.
- Prep Time: 10 minutes
- Cook Time: 20 minutes
- Total Time: 30 minutes
- Yield: Serves 4
- Category: Main
- Method: Frying
- Cuisine: Tex Mex
Ingredients
- 1 lb boneless & skinless chicken breasts (cut into 1" pieces)
- 2 large zucchini (diced)
- 2 medium bell peppers (chopped)
- 1 medium onion (finely chopped)
- 3 large garlic cloves (minced)
- 1 cup corn (frozen or fresh)
- 1 tbsp oil (for frying)
- 14 oz can low sodium black beans (drained & rinsed)
- 14 oz can low sodium diced tomatoes (not drained)
- 1 tsp taco seasoning
- 1 tbsp cumin (divided)
- Salt and ground black pepper (to taste)
- 1 cup Tex Mex or Colby Jack cheese (shredded)
- 1/2 cup green onions (chopped)
- 1/2 cup cilantro (chopped)
Instructions
- In a large deep skillet, heat oil over medium heat. Sauté onions for about three minutes until softened, then add minced garlic and bell peppers; cook until fragrant.
- Push the vegetables aside and add the chicken pieces. Season with half the cumin, salt, and pepper. Cook for about five minutes until browned.
- Stir in zucchini, corn, black beans, diced tomatoes, remaining cumin, and taco seasoning. Cover and simmer for about ten minutes.
- Sprinkle shredded cheese on top and cover again for three more minutes until melted.
- Garnish with green onions and cilantro before serving.
Nutrition
- Serving Size: About 1 cup
- Calories: 335
- Sugar: 6g
- Sodium: 350mg
- Fat: 10g
- Saturated Fat: 3g
- Unsaturated Fat: 7g
- Trans Fat: 0g
- Carbohydrates: 34g
- Fiber: 8g
- Protein: 29g
- Cholesterol: 70mg