Thai Peanut Chicken Bowls: An Incredible Essential Recipe
There’s something utterly enchanting about the way food can create connections—between generations, cultures, and even friends. When I first stumbled upon the concept of Thai Peanut Chicken Bowls, it felt like a revelation that bridged the vibrant, aromatic streets of Thailand with my cozy kitchen. The moment you mix the creamy peanut sauce, with its luscious texture and intoxicating aroma, you’re not just cooking; you’re embarking on a journey through flavor and warmth. Every bite is a symphony of crunch from fresh vegetables and tender chicken, merging seamlessly over a bed of wholesome brown rice or quinoa. Trust me when I say this dish is more than just sustenance; it’s an experience that dances on your palate and lifts your spirits.
The beauty of this recipe lies in its simplicity and versatility. Imagine gathering your loved ones around the table, each person eagerly anticipating their bowl filled with colorful ingredients that tell their own story. This recipe isn’t just perfect for a quick weeknight dinner; it’s also ideal for meal prep or even entertaining guests who will be utterly captivated by its vibrant colors and flavors. The balance of sweet and savory from the peanut sauce combined with crisp vegetables creates a dish that’s profoundly satisfying—one that promises to become a staple in your culinary repertoire.
Thai Peanut Chicken Bowls: An Incredible Essential Recipe: A Heartfelt Culinary Adventure
Welcome to the delightful world of Thai Peanut Chicken Bowls! This recipe is not just another dinner idea; it’s a celebration of flavors that nurtures both body and soul. As we venture into preparing this incredible essential recipe together, you’ll find it effortless yet fulfilling—a perfect blend for any occasion.
Ingredients:
To embark on this culinary journey, let’s gather our ingredients—a selection that speaks to the heart of this dish. Each element plays a vital role in creating those unforgettable flavors we’re aiming for.
- 1 lb boneless, skinless chicken breast, sliced. This lean protein serves as the foundation of our dish, providing substance while allowing the rich peanut sauce to shine through. When selecting chicken breasts, look for ones that are firm and have no discoloration. Fresh options are always preferable, but if you’re pressed for time, frozen chicken can work too—just ensure it’s fully thawed before cooking to avoid uneven textures.
- 2 cups broccoli florets. These little green trees not only add vibrant color but also provide essential nutrients like vitamin C and fiber. Their slight bitterness balances beautifully with the sweetness of the peanut sauce. If you want to experiment or can’t find broccoli, feel free to swap in snap peas or green beans—just keep an eye on cooking times as they may differ slightly!
- 1 red bell pepper, sliced. The sweetness inherent in red bell peppers brings a delightful contrast to our savory elements while adding a lovely crunch. Its bright color is visually appealing and signifies freshness; when choosing bell peppers, opt for ones that feel heavy for their size and have smooth skin without blemishes.
- 1 carrot, julienned. Carrots contribute both sweetness and crunch to our bowls—their orange hue adds warmth to the overall presentation too! To achieve those beautiful julienne strips easily, simply cut them into thin slices first before stacking them up for precise cuts. If you’re short on time or prefer convenience, pre-cut carrots work equally well!
- 2 tablespoons vegetable oil. This ingredient may seem simple but is absolutely paramount for sautéing our chicken evenly while preventing sticking in the pan. I recommend using neutral oils like canola or grapeseed oil which won’t overpower other flavors in our dish.
- 1 teaspoon minced garlic. Garlic is nature’s flavor booster! It enhances every component in our bowl with its aromatic essence—it’s crucial not to skip this step! Freshly minced garlic releases fragrant oils that transform cooking into an art form.
- Salt and pepper, to taste. These two staples are non-negotiable when it comes to seasoning your food properly! They elevate all other flavors present in your dish—think of them as your flavor amplifiers.
- 1 cup cooked brown rice or quinoa (for base). Both options serve as hearty bases that soak up all that delicious peanut sauce while providing additional nutrients! Brown rice brings earthiness while quinoa offers a nutty profile along with extra protein; either choice will complement our dish beautifully.
Equipment You’ll Need:
Before we dive into cooking these Thai Peanut Chicken Bowls together, let’s ensure you have all the right tools at your disposal—having good equipment makes everything smoother!
- Large skillet – A wide skillet is essential here since it allows ample space for stir-frying without overcrowding ingredients; this ensures even cooking and proper browning which enhances flavor immensely.
- Cutting board – A sturdy cutting board protects your countertops while giving you enough room to chop vegetables safely; choose one made from wood or plastic based on your preference.
- Sharp chef’s knife – A sharp knife will make slicing through chicken breast and julienning carrots much easier than struggling with dull blades—this small detail greatly impacts speed and precision!
- Measuring cups and spoons – Accurate measurements help maintain balance among flavors; having these handy ensures you’ll get consistent results every time you whip up these bowls.
Preparing the Thai Peanut Chicken Bowls: An Incredible Essential Recipe
Step 1: Cook Your Base
Before diving into the heart of this recipe—our glorious peanut chicken mixture—we need to prepare our base first! Start by cooking either brown rice or quinoa according to package instructions; both options are nutritious choices that will anchor our bowl beautifully. As they simmer gently away on your stovetop (usually taking about 20 minutes), take advantage of this time by prepping all your vegetables so they’re ready to go once we start frying! Trust me on this: having everything chopped beforehand makes things flow seamlessly during cooking—and who doesn’t love an organized kitchen?
Step 2: Create The Peanut Sauce
Now let’s move onto one of my favorite parts—the peanut sauce! In a mixing bowl (or jar if you prefer), combine creamy peanut butter with soy sauce—a match made in heaven! Add freshly squeezed lime juice for acidity which brightens everything up beautifully while honey or maple syrup introduces some sweetness (you can adjust these quantities based on how sweet you’d like it). Finally, don’t forget a touch of sriracha if you crave heat—it adds depth without overpowering anything! Whisk until smooth; if needed adjust consistency by adding water gradually until you’re satisfied—it should be thick yet pourable like liquid gold!
Step 3: Cook The Chicken
With our base and sauce ready now comes perhaps one of my favorite steps—cooking up that succulent chicken! Heat vegetable oil over medium heat in your large skillet until shimmering; season sliced chicken breasts generously with salt and pepper before placing them gently into hot oil (this creates an amazing sear!). Allow them space between each piece so they cook evenly—don’t rush this step as achieving golden-brown edges enhances flavor tremendously! After about 5-7 minutes when they’re no longer pink inside (the internal temperature should reach 165°F), use tongs to transfer cooked pieces onto a plate temporarily while we turn our attention toward those vibrant veggies!
Step 4: Add Garlic And Vegetables
With chicken resting peacefully off heat now it’s time we bring life back into that same skillet where all those delicious juices linger waiting patiently! Add minced garlic first—it’ll perfume everything instantly—and then toss in broccoli florets along with sliced red bell pepper followed by julienned carrots next (feel free experimenting here!). Stir-fry these beauties together until they soften slightly but remain crisp—a process usually takes about 5 minutes max—that crunch factor is absolutely crucial here since it balances against creamy sauce later on!
As we cook these steps progressively unfold like magic revealing enticing aromas wafting through kitchen air…
Stay tuned for more steps where we’ll bring everything together into one harmonious bowl filled delightfully rich flavors bursting forth at every bite—you won’t want miss it!
Thai Peanut Chicken Bowls: An Incredible Essential Recipe
Creating Thai Peanut Chicken Bowls is truly an experience, a beautiful fusion of flavors and textures that dance together on your palate. Each bite resonates with the vibrant notes of fresh vegetables, the succulent chicken, and that creamy, dreamy peanut sauce that just wraps everything in a warm embrace. I promise you, once you’ve tried this dish, it will become an essential part of your culinary repertoire. Let’s dive deeper into the steps to bring this extraordinary meal to life!
Step 5: Infusing Flavor with Garlic and Vegetables
Now, let’s elevate our chicken by adding a symphony of garlic and colorful vegetables. Once your chicken has cooked for about 5-7 minutes—look for those beautiful golden edges—it’s time to introduce minced garlic to the party. This is where things start to get aromatic; as soon as the garlic hits the skillet, you’ll be enveloped in its intoxicating fragrance. I always say garlic is like magic—it transforms every dish into something truly special! Trust me on this; let it sauté for about 30 seconds until it’s fragrant but not browned, as burnt garlic can turn bitter.
Next, we’re going to add our broccoli florets, sliced red bell pepper, and beautifully julienned carrots. The vibrant colors alone are enough to make anyone’s heart sing! Stir-fry these veggies with the chicken for another 5-7 minutes. You want them tender but still crisp—that perfect balance between cooked and crunchy is key here. This technique is called stir-frying; it keeps the nutrients intact while providing that satisfying crunch that plays so beautifully against the tender chicken. Watch closely; when the broccoli turns a bright green and the bell pepper softens just slightly, you know you’re right on track.
Step 6: Marrying Flavors with Peanut Sauce
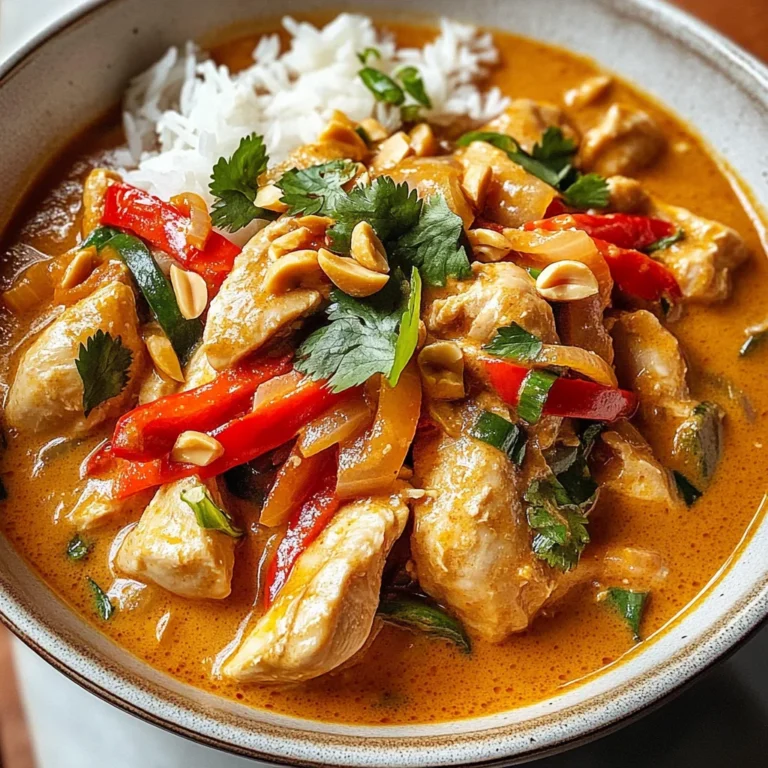
Here comes one of my favorite parts—the grand unification of flavors! Carefully pour your luscious peanut sauce over the sautéed chicken and vegetables in the skillet. The creamy peanut butter brings richness while the soy sauce adds depth with umami notes that are absolutely paramount in Asian cuisine. As you pour this liquid gold over your ingredients, take a moment to marvel at how it transforms everything into a glossy masterpiece! Use a spatula or wooden spoon to gently toss everything together; this step ensures every piece of chicken and vegetable is evenly coated in that heavenly sauce.
Let everything cook together for an additional 2-3 minutes over medium heat. This is crucial because it allows the flavors to meld beautifully—think of it as a warm hug for all your ingredients! You’ll see small bubbles forming in the sauce as it thickens slightly from the residual heat; don’t rush this step because allowing them to mingle creates an utterly intoxicating flavor profile that will have everyone begging for more!
Step 7: Assembling Your Thai Peanut Chicken Bowls
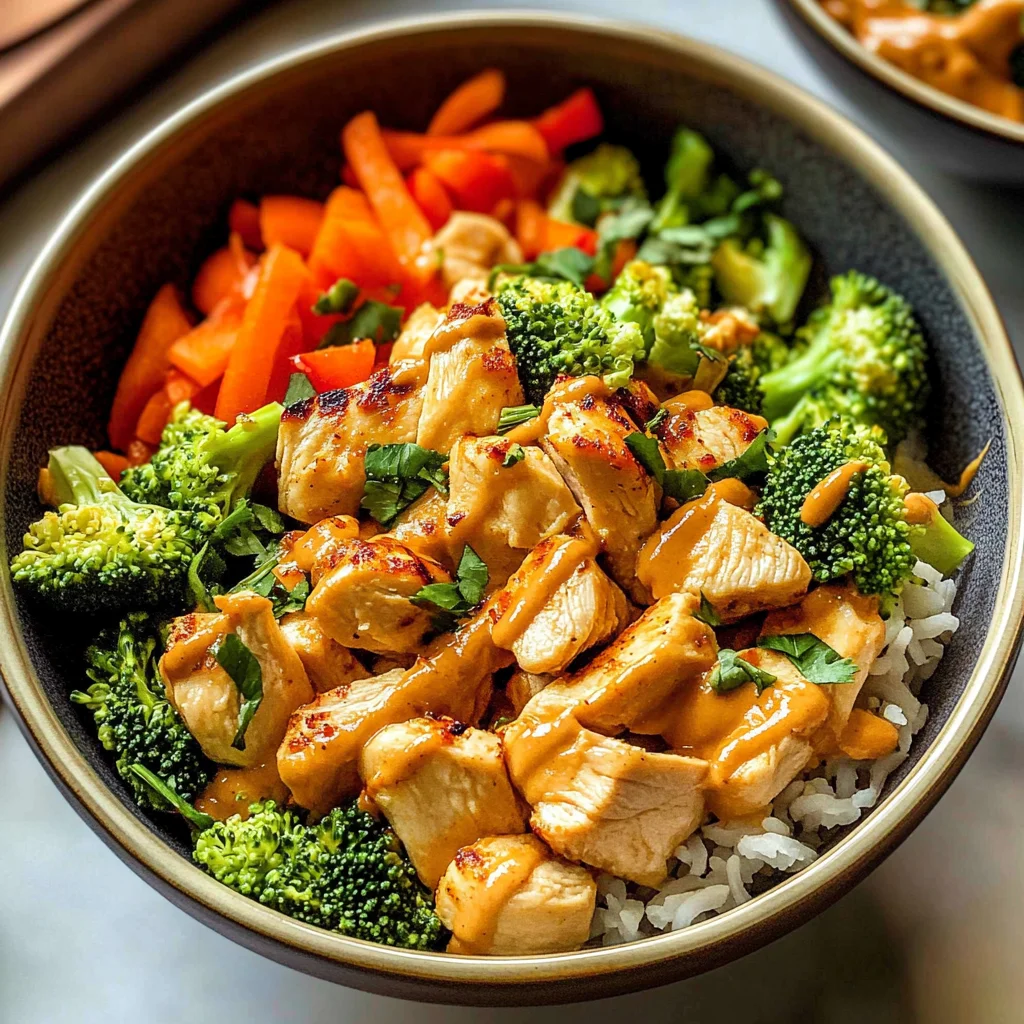
Now comes the creative part where we assemble our bowls—a chance for you to let your culinary artistry shine! In serving bowls, start by layering your base: either fluffy brown rice or nutty quinoa—whichever you prefer or have on hand will work beautifully here! When choosing between them, consider what texture you desire; brown rice offers chewiness while quinoa adds a delightful pop when bitten into.
Once you’ve laid down that hearty foundation—visualize it as a little nest waiting to cradle all those incredible toppings—it’s time to generously spoon over your peanut chicken and vegetable mixture. Don’t skimp here; each bowl should feel abundant and inviting! The colors will contrast stunningly against the beige of rice or quinoa—the vibrant greens and reds will beckon anyone who lays eyes on it.
Step 8: The Finishing Touches
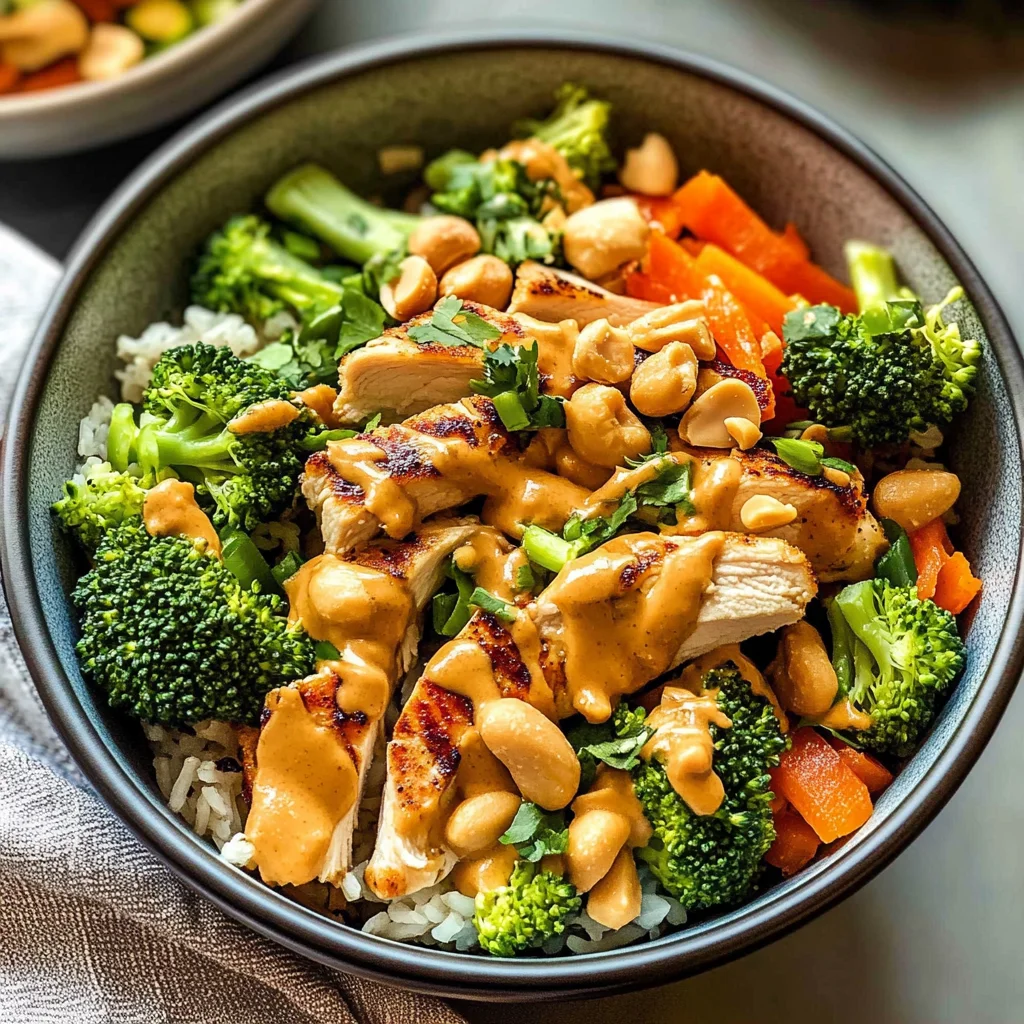
Finally, let’s sprinkle some joy on top before diving in—garnish with chopped peanuts and fresh cilantro if you’re feeling adventurous! The crunch from peanuts adds another layer of texture while cilantro brings freshness that cuts through the richness of peanut sauce—it’s like adding a breath of fresh air after a long day! Remember to give yourself permission to savor these final moments; presentation matters because we eat first with our eyes before indulging our taste buds.
As you prepare to serve these Thai Peanut Chicken Bowls, take a moment to appreciate your hard work—you’ve transformed simple ingredients into something profoundly satisfying! Each element complements each other perfectly: creamy sauce meets crunchy veggies meets tender chicken—all embraced by hearty grains. I can already imagine how deliciously comforting this meal will be at your dinner table!
Final Touches: Enjoying Your Creation
Now that you’ve assembled your bowls topped with those delightful garnishes, it’s time for everyone to dig in and enjoy their creations! Encourage everyone at your table (including yourself) to take their first bite simultaneously—it’s such an exhilarating moment! As they do, watch their faces light up with delight as they experience that burst of flavors coming together harmoniously.
I encourage you not just to enjoy this dish today but also consider how versatile these Thai Peanut Chicken Bowls can be for meal prep throughout your week or even during special gatherings with friends or family. This recipe is more than just food; it’s about sharing love through cooking—and trust me when I say there’s nothing quite as rewarding as watching loved ones relish something you’ve created from scratch. Enjoy every bite; you’ve earned it!
Storage and Enjoyment Tips for Your Thai Peanut Chicken Bowls: An Incredible Essential Recipe
Now that your kitchen is filled with the enticing aroma of Thai Peanut Chicken Bowls, it’s time to dig in! But let’s not forget about the delightful leftovers—if you manage to have any, that is! I promise you, this dish tastes just as fabulous the next day. To keep that symphony of flavors intact, it’s essential to store your leftovers properly.
Storing Leftover Thai Peanut Chicken Bowls: An Incredible Essential Recipe
When it comes to storing your Thai Peanut Chicken Bowls, opt for airtight containers to ensure freshness. I recommend using glass or BPA-free plastic containers that seal tightly; this keeps moisture in and helps maintain those vibrant flavors. If stored correctly in the refrigerator, your leftovers will stay delicious for about 3-4 days. A little tip I learned from my grandmother: if you’re concerned about sogginess, placing a slice of bread in the container can help absorb excess moisture while still keeping your chicken tender! The taste after storage remains profoundly satisfying, with the peanut sauce soaking into every nook and cranny of the chicken and veggies. When it’s time to enjoy again, simply reheat in the microwave or on the stovetop until warmed through—don’t rush this step; savoring each bite deserves your full attention!
Freezing Components for Later
If you find yourself with extra servings—or if you just want to prep ahead—freezing is a fantastic option! To freeze your Thai Peanut Chicken Bowls properly, let everything cool completely before transferring it into freezer-safe containers or heavy-duty freezer bags. This method helps prevent freezer burn and keeps everything tasting fresh. When sealed well, they can be stored in your freezer for up to 2-3 months. The best part? You can pull out portions as needed and reheat them straight from frozen—just add a splash of water or broth to maintain moisture during reheating. It’s incredibly convenient for busy weeknights when you desire that comforting meal without any fuss. Trust me on this: having a batch tucked away in the freezer will bring a smile to your face on those hectic days!
Dinner
Thai Peanut Chicken Bowls: An Incredible Essential Recipe
Indulge in the vibrant flavors of Thai Peanut Chicken Bowls—a delightful fusion of tender chicken, fresh vegetables, and a creamy, rich peanut sauce. This recipe brings together wholesome ingredients and effortless preparation, making it perfect for weeknight dinners or meal prep. With a colorful array of broccoli, carrots, and bell peppers atop a nourishing base of brown rice or quinoa, each bowl is a celebration of taste and nutrition. Enjoy the satisfaction of cooking a dish that not only tantalizes the taste buds but also nurtures connections around the dinner table. Discover how easy it is to make these delicious bowls that promise to become a staple in your culinary journey!
- Prep Time: 15 minutes
- Cook Time: 20 minutes
- Total Time: 35 minutes
- Yield: Serves 4
- Category: Dinner
- Method: Stir-frying
- Cuisine: Thai
Ingredients
- 1 lb boneless, skinless chicken breast, sliced
- 2 cups broccoli florets
- 1 red bell pepper, sliced
- 1 carrot, julienned
- 2 tablespoons vegetable oil
- 1 teaspoon minced garlic
- Salt and pepper to taste
- 1 cup cooked brown rice or quinoa
- ½ cup creamy peanut butter
- 3 tablespoons soy sauce
- 2 tablespoons lime juice
- 1 tablespoon honey or maple syrup (optional)
- Sriracha to taste (optional)
Instructions
- Cook brown rice or quinoa according to package instructions.
- In a mixing bowl, whisk together peanut butter, soy sauce, lime juice, honey or maple syrup, and sriracha until smooth.
- Heat vegetable oil in a large skillet over medium heat. Season chicken with salt and pepper. Add to the skillet and cook for about 5-7 minutes until golden brown and cooked through.
- Add minced garlic to the skillet for about 30 seconds until fragrant. Then add broccoli florets, red bell pepper slices, and julienned carrots. Stir-fry for another 5 minutes until veggies are tender but still crisp.
- Pour the peanut sauce over the chicken and vegetables; toss to coat evenly. Cook for an additional 2-3 minutes until everything is heated through.
- Serve over cooked brown rice or quinoa.
Nutrition
- Serving Size: 1 bowl (approximately 350g)
- Calories: 550
- Sugar: 8g
- Sodium: 700mg
- Fat: 25g
- Saturated Fat: 4g
- Unsaturated Fat: 18g
- Trans Fat: 0g
- Carbohydrates: 60g
- Fiber: 8g
- Protein: 28g
- Cholesterol: 70mg