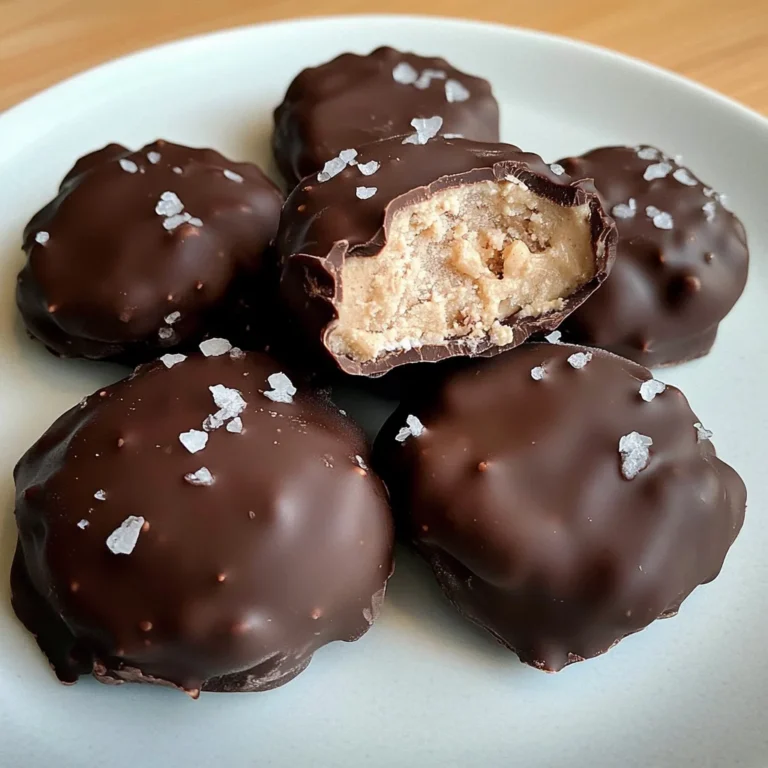
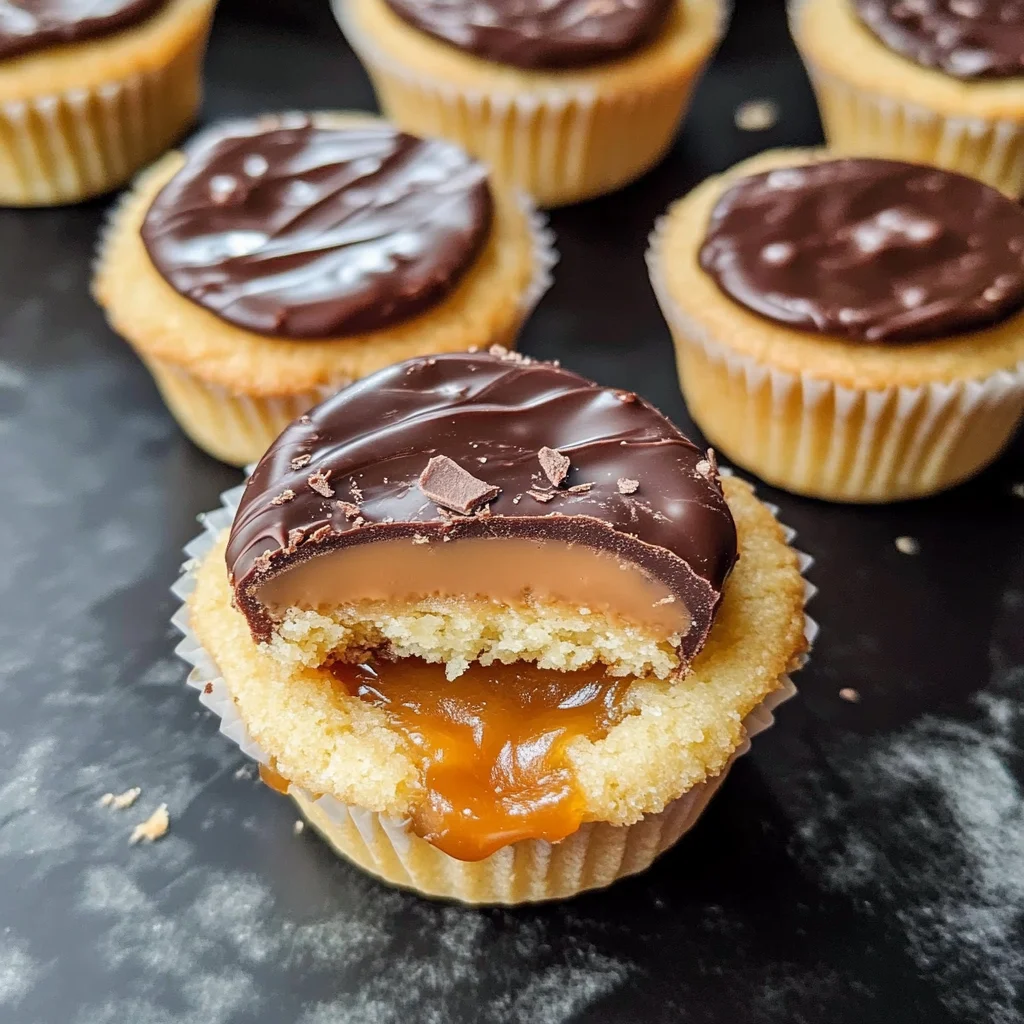
Twix Cookie Cups
If you’re looking for a dessert that brings a smile to everyone’s face, let me introduce you to my favorite Twix Cookie Cups! These little delights are the perfect combination of soft sugar cookie crust, creamy caramel, and rich milk chocolate. They capture the essence of that beloved candy bar but in a fun and homemade way. Whether you’re preparing for a cozy family gathering or just want to treat yourself after a busy week, these cookies are sure to impress!
What I love most about Twix Cookie Cups is how easy they are to whip up. The simple ingredients come together quickly, making them a fantastic choice even on those hectic weeknights when you crave something sweet. Plus, they’re always a hit with kids and adults alike!
Why You’ll Love This Recipe
- Easy to Make: With just a few simple steps, you’ll have delicious cookie cups ready in no time.
- Family-Friendly: Everyone loves the gooey caramel and chocolate topping—perfect for sharing!
- Make Ahead: You can prepare these cookie cups in advance; they stay delicious for days.
- Versatile Treat: Great for any occasion—from birthday parties to movie nights at home.
- Satisfies Sweet Cravings: Each bite is packed with flavor, making it hard to stop at just one!
Ingredients You’ll Need
To make these delightful Twix Cookie Cups, you’ll need some simple and wholesome ingredients that you might already have in your pantry. Here’s what you’ll need:
For the Cookie Base
- 1/2 cup (111g) salted butter
- 1/2 cup (115g) granulated sugar
- 1 tsp vanilla extract
- 1 egg white
- 1 1/2 cups (228g) all-purpose flour
- 1 tsp baking powder
For the Topping
- 20 caramels (unwrapped)
- 1 tbsp milk
- 2 cups (400g) milk chocolate chips
Variations
The great thing about Twix Cookie Cups is how flexible they can be! Feel free to get creative with your toppings and flavors.
- Add Nuts: Toss in some chopped nuts like pecans or almonds for an extra crunch.
- Use Dark Chocolate: If you prefer a richer taste, swap out the milk chocolate chips for dark chocolate.
- Try Different Caramels: Experiment with flavored caramels—sea salt caramel can add an exciting twist!
- Make It Gluten-Free: Substitute all-purpose flour with a gluten-free blend to cater to dietary needs.
How to Make Twix Cookie Cups
Step 1: Preheat Your Oven
Start by preheating your oven to 350°F (175°C). This step is crucial because it ensures that your cookies bake evenly and rise nicely.
Step 2: Cream Together Butter and Sugar
In a mixing bowl, cream together the salted butter and granulated sugar. This process incorporates air into the mixture, resulting in fluffy cookies when baked.
Step 3: Add Egg White and Vanilla
Add the egg white and vanilla extract, mixing until well combined. The egg white helps bind everything together while adding moisture.
Step 4: Mix Dry Ingredients
In another bowl, combine the all-purpose flour and baking powder. Gradually mix this dry blend into your wet ingredients until fully incorporated. This creates the perfect cookie dough consistency.
Step 5: Roll Out Dough and Cut Shapes
Roll out the dough until it’s about 1/4 to 1/2 inch thick. Using a round cookie cutter, cut out circles. Place them on an ungreased pan. This is where your cookies will take shape!
Step 6: Bake Cookies
Bake at 350°F (175°C) for about 6-8 minutes. Keep an eye on them; you’ll know they’re ready when they’re puffy and no longer glossy on top.
Step 7: Cool Cookies
Transfer the baked cookies to a wire rack and allow them to cool completely. Cooling is important so they can hold up under the toppings without getting soggy.
Step 8: Prepare Caramel Topping
While your cookies cool, microwave the caramels with milk for about one minute. Stir halfway through until smooth and creamy—this will become your delicious caramel layer.
Step 9: Spoon Caramel onto Cookies
Carefully spoon some caramel over each cookie once they have cooled down. Spread it almost all over the cookie for that gooey effect we love!
Step 10: Chill Cookies Again
Place your caramel-topped cookies in the fridge for about 10-15 minutes until everything is nice and cold. Chilling helps set the caramel before adding chocolate.
Step 11: Melt Chocolate Chips
In short intervals of 30 seconds, melt your milk chocolate chips. Stir until fully melted and smooth; this will be the final layer of goodness atop your cookie cups.
Step 12: Spread Chocolate on Cookies
Finally, spread a small amount of melted chocolate over each cooled cookie cup. Allow them to set before serving so that every bite is perfectly decadent.
Now you’re ready to enjoy these heavenly Twix Cookie Cups! They’re sure to become a cherished favorite in your home just as they are in mine. Happy baking!
Pro Tips for Making Twix Cookie Cups
Making Twix Cookie Cups is a delightful adventure, and these tips will help you achieve the perfect treat every time!
- Use room temperature butter: This ensures that your butter creams well with the sugar, resulting in a light and fluffy cookie base that’s perfectly soft.
- Don’t overbake: Keep an eye on your cookies! They should be puffy and just set; overbaking can lead to a dry texture rather than the soft, chewy cookie you want.
- Cool completely before adding caramel: Allowing the cookies to cool ensures the caramel stays on top instead of melting into the cookie. You want that delicious layer of gooeyness!
- Melt chocolate slowly: Melting chocolate in intervals helps prevent it from seizing up. Stirring between intervals ensures a smooth, creamy topping for your cookies.
- Chill after adding caramel: Refrigerating the cookies after adding caramel helps it firm up so that you get a nice bite when you take a piece. It’s all about that satisfying texture!
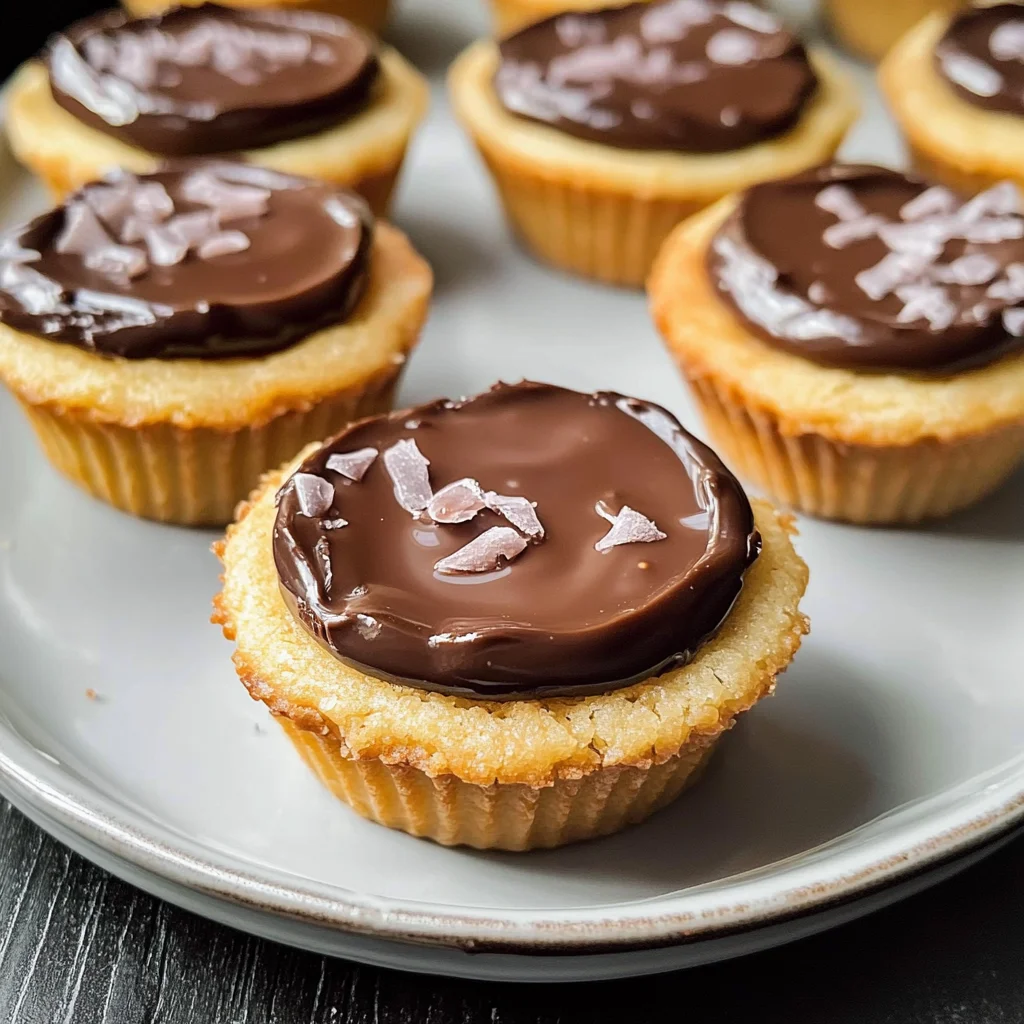
How to Serve Twix Cookie Cups
Presenting your Twix Cookie Cups can turn them from simple treats into show-stopping desserts! Here are some fun ideas to elevate your serving game.
Garnishes
- Chopped nuts: Sprinkle some finely chopped nuts like pecans or almonds on top for added crunch and flavor.
- Drizzle of chocolate: A light drizzle of melted chocolate over the top can enhance their visual appeal while adding extra chocolaty goodness.
- Sea salt sprinkle: A light dusting of sea salt brings out the sweetness of the caramel and balances the flavors beautifully.
Side Dishes
- Vanilla ice cream: The creamy richness of vanilla ice cream pairs perfectly with the sweet cookie cups, creating a delightful contrast between warm and cold.
- Fresh fruit salad: A refreshing fruit salad provides a light, fruity accompaniment that balances out the indulgence of the cookie cups.
- Chocolate mousse: For serious chocolate lovers, serving these cookies alongside rich chocolate mousse creates a dreamy dessert experience.
- Coffee or tea: A warm cup of coffee or herbal tea makes for a cozy pairing, enhancing the overall enjoyment of your sweet treats.
With these tips and serving suggestions, your homemade Twix Cookie Cups will be a hit at any gathering! Enjoy every moment spent baking and sharing these delectable desserts.
Make Ahead and Storage
These Twix Cookie Cups are perfect for meal prep and make an excellent treat to have on hand for gatherings or just a sweet snack throughout the week. With a few simple storage tips, you can keep them fresh and delicious.
Storing Leftovers
- Allow the cookie cups to cool completely before storing.
- Place them in an airtight container at room temperature for up to 3 days.
- If you prefer, you can refrigerate them for an extended shelf life of about a week.
Freezing
- Let the cookie cups cool completely after making them.
- Arrange them in a single layer on a baking sheet and freeze until solid.
- Transfer to a freezer-safe container or zip-top bag, separating layers with parchment paper, and store for up to 3 months.
Reheating
- For best results, thaw frozen cookie cups in the refrigerator overnight.
- To reheat, place them in the microwave for about 10-15 seconds until warmed through.
- Alternatively, you can pop them in a preheated oven at 350° F (175° C) for about 5-7 minutes.
FAQs
Here are some common questions about making Twix Cookie Cups.
Can I make Twix Cookie Cups without egg?
Absolutely! You can replace the egg white with a flaxseed meal mixture (1 tablespoon flaxseed meal + 2.5 tablespoons water) or use unsweetened applesauce as an alternative. Both options will help bind your ingredients together beautifully.
How do I ensure my Twix Cookie Cups come out soft?
To keep your Twix Cookie Cups soft, avoid overbaking them. As soon as they are puffy and no longer glossy, take them out of the oven. They will continue to firm up as they cool!
Can I substitute other types of chocolate for my Twix Cookie Cups?
Certainly! While milk chocolate gives that classic Twix flavor, feel free to use dark chocolate or even white chocolate if that’s your preference. Just adjust the melting time as needed.
What is the best way to serve Twix Cookie Cups?
These delightful treats can be served warm or chilled. If you’re hosting a gathering, consider adding whipped cream or vanilla ice cream on the side for an extra indulgent experience!
Final Thoughts
I hope you enjoy making these flavorful Twix Cookie Cups as much as I do! They’re not only fun to prepare but also make every bite feel like a special treat. Whether you’re sharing with friends or enjoying them all by yourself, these cookie cups are sure to bring joy. Happy baking!
Twix Cookie Cups

Twix Cookie Cups are a delightful twist on the classic candy bar, combining a soft sugar cookie base with gooey caramel and rich chocolate. These treats are easy to make and perfect for sharing with family and friends at any gathering.
- Prep Time: 15 minutes
- Cook Time: 8 minutes
- Total Time: 23 minutes
- Yield: About 12 cookie cups 1x
- Category: Dessert
- Method: Baking
- Cuisine: American
Ingredients
- 1/2 cup salted butter
- 1/2 cup granulated sugar
- 1 tsp vanilla extract
- 1 egg white
- 1 1/2 cups all-purpose flour
- 1 tsp baking powder
- 20 caramels, unwrapped
- 1 tbsp milk
- 2 cups milk chocolate chips
Instructions
- Preheat oven to 350°F (175°C).
- In a bowl, cream together butter and sugar until fluffy.
- Add egg white and vanilla; mix well.
- Combine flour and baking powder in another bowl, then gradually mix into wet ingredients.
- Roll dough into circles and place on an ungreased baking sheet.
- Bake for 6-8 minutes or until puffy and no longer glossy.
- Cool cookies completely on a wire rack.
- Microwave caramels with milk until smooth; spoon over cooled cookies.
- Chill cookies in the fridge for 10-15 minutes.
- Melt chocolate chips in short intervals; spread over caramel layer.
- Allow to set before serving.
Nutrition
- Serving Size: 1 cookie cup (30g)
- Calories: 150
- Sugar: 12g
- Sodium: 70mg
- Fat: 7g
- Saturated Fat: 4g
- Unsaturated Fat: 3g
- Trans Fat: 0g
- Carbohydrates: 21g
- Fiber: 0g
- Protein: 2g
- Cholesterol: 15mg