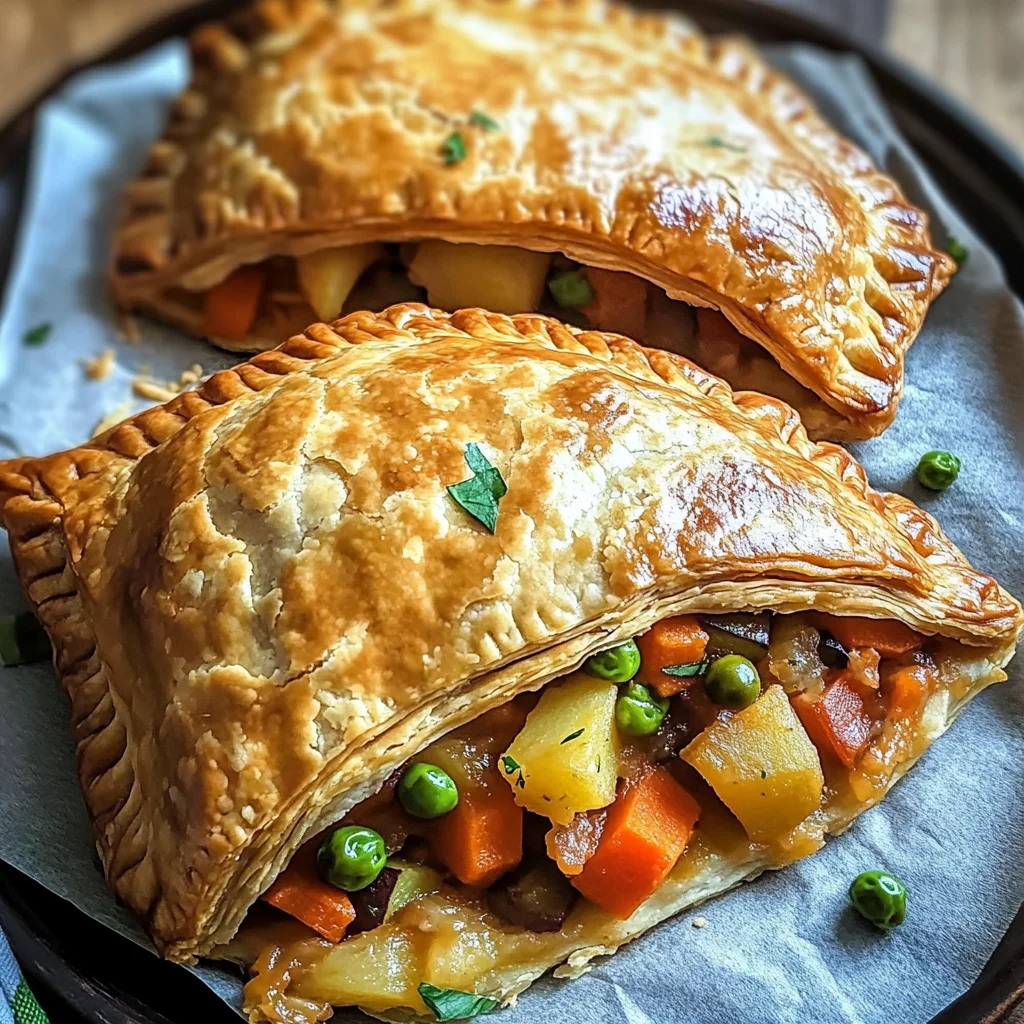
Vegetable Irish Pasties: An Incredible Ultimate Recipe You Must Try
There’s something undeniably magical about the act of cooking, isn’t there? It’s more than just a means to satisfy hunger; it’s a journey through flavors, textures, and memories. When I think of my childhood, I’m often transported back to that cozy kitchen where the aroma of baked goods mingled with savory delights, creating an atmosphere thick with warmth and love. Today, I want to share with you not just a recipe but an experience that encapsulates all those feelings—a dish that sings of comfort and nostalgia: Vegetable Irish Pasties. These delightful pockets of goodness are filled with a colorful medley of vegetables, wrapped in golden pastry, and promise to be a hit at your dinner table. Trust me when I say this is one incredible ultimate recipe you must try.
Imagine biting into a perfectly baked pasty where the flaky crust gives way to a warm filling infused with fresh herbs and seasonal produce. It’s like holding a piece of home in your hands—each bite is an invitation to gather around the table, share stories, and create new memories. Whether you’re looking for a quick weeknight dinner or planning for meal prep over the weekend, these Vegetable Irish Pasties will not only satisfy your taste buds but also nourish your soul. So let’s dive into this wonderful culinary adventure together!
Vegetable Irish Pasties: An Incredible Ultimate Recipe You Must Try: A Comforting Delight
Welcome to the world of Vegetable Irish Pasties! This recipe combines simple ingredients to create something extraordinary. With each step, you’ll find joy in crafting these delicious pastries that are perfect for any occasion—be it a family dinner or a cozy gathering with friends.
Ingredients:
As we embark on this delightful culinary journey together, let’s take a moment to appreciate each ingredient that will contribute to the magic of our pasties. Each component plays its role beautifully in achieving that perfect balance of flavor and texture.
- 2 cups all-purpose flour. The foundation of our pasty is all-purpose flour, which provides structure and stability. When choosing flour, look for brands that are finely milled; they yield a tender yet sturdy crust that’s essential for holding our veggie treasure inside. If you’re adventurous or gluten-sensitive, consider substituting half with whole wheat or even gluten-free flour blends—just be aware that it may affect the texture slightly.
- 1 teaspoon salt. Salt is more than just seasoning; it enhances every flavor in our pasty dough and filling alike. Without salt, dishes can taste flat or bland—so don’t skip this crucial step! It’s like magic dust that brings everything together harmoniously.
- 1/2 cup unsalted butter, chilled and diced. Butter is the secret weapon here—it imparts richness and creates flakiness in our crust due to its high-fat content. Ensure your butter is chilled because when it melts during baking, it creates pockets of steam that lead to that lovely flaky texture we all adore.
- 6-8 tablespoons cold water. This ingredient connects everything! The cold water helps bind the dough without melting the fat too quickly—this is absolutely paramount in achieving that beautifully flaky texture we want out of our pastry.
- 1 tablespoon olive oil. Olive oil adds depth and flavor while keeping our filling moist. Plus, it’s healthier than some alternatives! Feel free to substitute with avocado oil or any light vegetable oil if you prefer.
- 1 large onion, finely chopped. Onions are the aromatic backbone of many dishes—they add sweetness as they cook down and infuse our filling with flavor beyond measure. When chopping onions, try refrigerating them beforehand; it reduces tears significantly!
- 2 cloves garlic, minced. Garlic brings an utterly intoxicating aroma and flavor profile—the kind that makes people linger around the kitchen! Fresh garlic is always best; however, if you’re in a pinch, garlic powder can work too—but use less since it’s more concentrated.
- 1 carrot, diced. Carrots lend natural sweetness and color to our filling while providing crunch—a delightful contrast against softer veggies like peas and potatoes.
- 1 potato, peeled and diced. Potatoes bring heartiness to our pasties; they soak up flavors beautifully while adding creaminess once cooked through. Choose waxy varieties like Yukon Gold for their buttery taste!
- 1 cup peas (fresh or frozen). Peas not only add vibrant green color but also sweetness—like tiny bursts of freshness in each bite! If using frozen peas, there’s no need to thaw them beforehand; they’ll cook perfectly within the filling.
- 1 teaspoon dried thyme & 1 teaspoon dried rosemary. These herbs elevate our filling from good to unforgettable! Thyme has earthy notes while rosemary offers pine-like fragrance—together they create an aromatic symphony that enhances every vegetable’s natural essence.
- Salt and pepper to taste. Seasoning is key! Always taste as you go along—what might seem like enough salt now could change after adding other ingredients.
- 1 egg, beaten (for egg wash). While optional, brushing your pasties with egg wash before baking gives them that gorgeous golden sheen we all crave when serving up something special!
Equipment You’ll Need:
As we prepare our Vegetable Irish Pasties: An Incredible Ultimate Recipe You Must Try, having the right tools at hand makes this process smoother—and trust me, it can turn cooking from chore into sheer joy! Here’s what you’ll need:
- Mixing bowl – A sturdy mixing bowl is essential for combining your pastry ingredients without fear of spills or messes; choose one big enough so you can mix easily without worrying about things flying out everywhere!
- Rolling pin – This tool is critical for rolling out your pastry dough evenly; it ensures consistent thickness throughout so your pasties bake uniformly without burnt edges or undercooked centers.
- Baking sheet lined with parchment paper – Parchment paper prevents sticking while allowing heat circulation for even baking—it’s simply non-negotiable if you want those lovely golden-brown bottoms!
- Knife or pastry cutter – Use this sharp tool for chopping vegetables efficiently—it saves time when you’re prepping your filling components!
Now that we’ve gathered all our ingredients and equipment let’s get started on making these delicious Vegetable Irish Pasties!
Step 1: Crafting the Perfect Pastry Dough
Creating delicious Vegetable Irish Pasties starts with making our pastry dough—a process that’s wonderfully straightforward yet requires a bit of patience and care. In a large bowl, combine 2 cups of all-purpose flour with 1 teaspoon salt—the salt will enhance flavors throughout your dish later on! Next comes my favorite part: incorporating chilled butter into the flour mixture by rubbing it gently between your fingertips until it resembles coarse crumbs—this process is known as cutting in. Why do we do this? The tiny bits of butter create layers in the dough as they melt during baking; resulting in that coveted flakiness we’re after! Don’t rush this step—take your time here because it’s absolutely paramount for achieving perfect results later on.
Step 2: Bringing It All Together
Now comes the crucial moment when we bring everything together by adding cold water gradually—start with 6 tablespoons first then add more if needed until you form a cohesive dough ball (8 tablespoons max). Mix gently until combined—overworking will lead us towards tough pastry instead! Once formed into a ball shape wrap it tightly in plastic wrap then place it in the refrigerator for at least 30 minutes; chilling allows gluten relaxation which makes rolling much easier afterward!
Step 3: Cooking Our Flavorful Filling
While waiting for our pastry dough to chill (don’t skip this!), let’s focus on preparing what goes inside those beautiful pockets: our vegetable filling! In a skillet over medium heat drizzle 1 tablespoon olive oil then add finely chopped onion along with minced garlic sautéing until they become soft & translucent—this should take around 3 minutes maximum so keep an eye out! Following this aromatic duo comes dicing carrots & potatoes into small cubes before tossing them into the pan next; cooking them together allows flavors from onions/garlic infuse nicely while ensuring even tenderness across every veggie involved here! After about five minutes stir through freshly shelled (or frozen) peas along with dried thyme & rosemary sprinkling generously throughout then season lightly using salt/pepper based on personal preferences too!
Step 4: Rolling Out Our Chilled Pastry
Once chilled sufficiently remove from fridge onto floured surface ready for action now roll out dough evenly until reaching approximately ⅛ inch thickness—you want nice thinness without tearing otherwise fillings risk showing through which isn’t ideal aesthetically speaking either haha 😉 Cut circular shapes roughly five-six inches wide using either cookie cutter/round lid depending on preference here; make sure they’re symmetrical otherwise some may bake faster/slower leading uneven results later down line…
Stay tuned as we continue crafting these irresistible Vegetable Irish Pasties together—you’ll soon discover how truly extraordinary they are!
Step 5: Preparing the Flavorful Filling
Now, let’s dive into the heart of these Vegetable Irish Pasties: An Incredible Ultimate Recipe You Must Try—the filling. This step is where we unlock a symphony of flavors that will make each bite an experience to cherish. Start by heating a tablespoon of olive oil in a skillet over medium heat. The moment you add the chopped onion and minced garlic, you’re creating a base that will enhance every ingredient that follows. Sauté them gently until they become soft and translucent, which usually takes about 5 to 7 minutes. This process is crucial because it allows the natural sweetness of the onion and the aromatic qualities of the garlic to emerge, creating an utterly intoxicating fragrance that fills your kitchen with warmth and comfort.
Next, introduce the diced carrot and potato into the pan. These vegetables not only add texture but also bring a delightful earthiness that balances beautifully with the onions and garlic. Cook them for about 5 minutes; you want them to start softening but not fully cooked, as they will finish cooking in the oven later on. Afterward, sprinkle in your fresh or frozen peas along with the dried thyme and rosemary. These herbs are non-negotiable when it comes to flavor—they lend an aromatic depth that elevates this humble filling into something truly extraordinary. Season generously with salt and pepper, stirring everything together until well combined. Allow this mixture to cook for an additional 5 minutes, ensuring all those vibrant flavors meld together. Once done, remove it from the heat and let it cool before assembling your pasties. Trust me on this; letting the filling cool prevents any steam from making your pastry soggy!
Step 6: Crafting Your Pastry Perfection
Now that your filling has cooled down to room temperature, let’s talk about rolling out your pastry—a step I always find immensely satisfying! Preheat your oven to 400°F (200°C) while you prepare a clean, floured surface for rolling out your dough. Take that beautifully chilled pastry you made earlier—this is where all that chilling comes into play! Chilling your dough allows the gluten in the flour to relax, resulting in a tender pastry that’s flaky rather than tough. It’s absolutely paramount; rushing this step can lead to disappointment later on.
Roll out your pastry until it reaches about 1/8 inch thick; this thickness is perfect for achieving that delightful balance between crispy exterior and tender interior once baked. As you roll, don’t be afraid to sprinkle just a bit more flour if necessary—it helps prevent sticking and ensures even rolling. Using a round cutter or simply a small plate, cut out circles about 5-6 inches in diameter. The beauty of this recipe is its flexibility; don’t worry if some circles aren’t perfect! Each pasty will carry its own character, much like each story we share around our dinner tables.
Step 7: Filling Your Pasties with Love
With your pastry circles ready, it’s time for my favorite part—filling them! Place a generous spoonful of your delectable vegetable mixture right at the center of each circle. Don’t skimp here; think of each pasty as a little treasure chest waiting to be sealed with love! Once you’ve filled them all, fold each circle in half over the filling, creating a lovely pocket of flavor. The key here is ensuring that you press the edges together firmly enough to seal them without breaking through—the last thing we want is any precious filling escaping during baking!
To really secure those edges—and add an artistic touch—use a fork to crimp along the seam where you’ve pressed it together. This not only looks beautiful but also reinforces that seal while allowing steam to escape during baking—a vital element for achieving perfectly cooked pasties without sogginess! Now you might feel tempted to rush through this step because anticipation is building, but take your time here; quality always trumps speed when it comes to cooking!
Step 8: Baking Your Perfect Vegetable Irish Pasties
It’s almost time for those pasties to shine! Line a baking sheet with parchment paper—this prevents sticking while allowing for even browning on the bottom. Place each filled pasty onto this prepared sheet with just enough space between them so they can puff up beautifully as they bake. If you’re feeling fancy (and I highly encourage it), brush the tops lightly with beaten egg for that gorgeous golden color once baked—it’s like giving each pasty a little shiny coat!
Now pop those beauties into your preheated oven and set your timer for 25-30 minutes—a magical transformation is about to happen! As they bake, keep an eye on them towards the end; you’re looking for that beautiful golden-brown hue that signals they’re ready to come out of their warm cocoon. The aroma wafting through your kitchen will be utterly intoxicating—trust me when I say it’s worth every minute spent waiting! When they come out of the oven, let them cool on a wire rack for about 5-10 minutes before serving; this resting period allows steam to escape fully so that first bite remains crisp rather than mushy.
Final Touches: Serving Up Joy
Finally, it’s time for everyone’s favorite moment—the tasting! I promise you these Vegetable Irish Pasties are more than just food; they’re crafted pockets of comfort and joy waiting to be shared with loved ones around your table. Serve them warm alongside a fresh salad or perhaps some tangy chutney for dipping—options are endless here! With every bite you’ll discover layers of flavors combining harmoniously—the buttery pastry enveloping tender veggies seasoned perfectly is nothing short of divine.
As you savor these pasties filled with love (and maybe reminisce about family gatherings or cozy nights in), remember how simple ingredients can create profoundly satisfying meals when prepared with care and passion! So gather around with friends or family and enjoy what I assure you will become one of those cherished recipes you’ll return to again and again!
Storage and Enjoyment Tips for Your Vegetable Irish Pasties: An Incredible Ultimate Recipe You Must Try
Now that your Vegetable Irish Pasties are baked to golden perfection, it’s time to enjoy the delightful rewards of your culinary efforts. The aroma wafting through your kitchen is simply intoxicating, and I can practically hear my friends raving about how delicious they are! But what happens if you have a few leftover? Don’t worry; these little pockets of joy can be stored and enjoyed later without losing that comforting charm.
Storing Leftover Vegetable Irish Pasties: An Incredible Ultimate Recipe You Must Try
To preserve the magic of your Vegetable Irish Pasties, I recommend placing them in an airtight container. This is crucial because you want to keep that flaky pastry from becoming soggy. If you’re feeling extra cautious, you can layer parchment paper between them to maintain their delightful texture. Stored this way, they will stay fresh in the refrigerator for about 3-4 days. Trust me, though—these pasties are so delicious that they might not last that long! If you happen to have some left after a few days, don’t fret; they’ll still taste wonderful. When it’s time to indulge again, simply reheat them in the oven at 350°F (175°C) for about 10-15 minutes until they’re warmed through and crispy again. Just imagine biting into that golden crust with a warm, savory filling; it’s pure comfort food bliss!
Freezing Vegetable Irish Pasties for Later
If you want to take your planning to another level, freezing your Vegetable Irish Pasties is an excellent idea! To freeze them properly, make sure they are completely cooled before wrapping each one individually in plastic wrap or aluminum foil. Then place them in a freezer-safe bag or container—this extra layer helps prevent freezer burn, which can dull their flavors. These delightful pastries will keep well in the freezer for up to three months! The convenience factor here is absolutely paramount; when you’re in need of a quick meal or snack, you can pull a pasty straight from the freezer. Simply bake from frozen at 400°F (200°C) for about 30-35 minutes until they’re piping hot and crisped up beautifully. This not only saves time but also allows you to savor homemade goodness even on the busiest of days.
Vegetable Irish Pasties: An Incredible Ultimate Recipe You Must Try

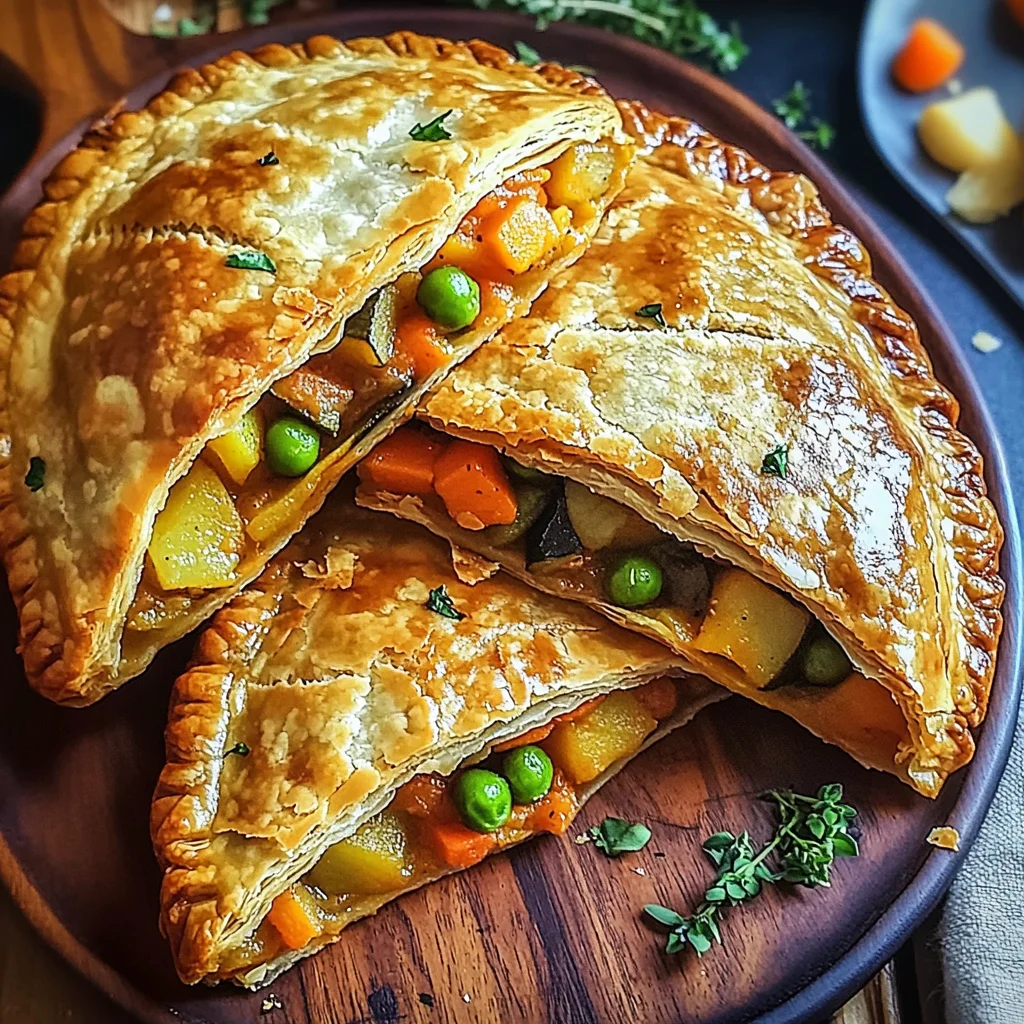
Indulge in the warmth and comfort of homemade Vegetable Irish Pasties, a delightful dish that brings together a colorful medley of vegetables wrapped in a flaky, golden pastry. Perfect for weeknight dinners or gathering with friends, these pastries offer a satisfying bite filled with fresh flavors and nostalgic memories. With crisp crusts and a hearty filling infused with herbs, every pasty is like holding a piece of home.
- Prep Time: 30 minutes
- Cook Time: 30 minutes
- Total Time: 1 hour
- Yield: Serves approximately 4 (makes about eight pasties) 1x
- Category: Main
- Method: Baking
- Cuisine: Irish
Ingredients
- 2 cups all-purpose flour
- 1 teaspoon salt
- 1/2 cup unsalted butter, chilled and diced
- 6–8 tablespoons cold water
- 1 tablespoon olive oil
- 1 large onion, finely chopped
- 2 cloves garlic, minced
- 1 carrot, diced
- 1 potato, peeled and diced
- 1 cup peas (fresh or frozen)
- 1 teaspoon dried thyme
- 1 teaspoon dried rosemary
- Salt and pepper to taste
Instructions
- Make the Pastry Dough: In a large bowl, mix flour and salt. Cut in the chilled butter until it resembles coarse crumbs. Gradually add cold water until the dough comes together. Wrap in plastic wrap and chill for at least 30 minutes.
- Prepare the Filling: Heat olive oil in a skillet over medium heat. Sauté onion and garlic until soft. Add carrot and potato; cook for about 5 minutes. Stir in peas, thyme, rosemary, salt, and pepper. Cook for another 5 minutes then remove from heat to cool.
- Roll Out Pastry: Preheat oven to 400°F (200°C). Roll out the chilled dough on a floured surface to about ⅛ inch thick. Cut into circles (5-6 inches wide).
- Fill and Seal: Place filling in the center of each circle. Fold over and seal edges by pressing or crimping with a fork.
- Bake: Line baking sheet with parchment paper, place pasties on it, brush with beaten egg if desired, and bake for 25-30 minutes until golden brown.
Nutrition
- Serving Size: 1 pasty (120g)
- Calories: 290
- Sugar: 2g
- Sodium: 350mg
- Fat: 15g
- Saturated Fat: 9g
- Unsaturated Fat: 6g
- Trans Fat: 0g
- Carbohydrates: 34g
- Fiber: 3g
- Protein: 6g
- Cholesterol: 30mg