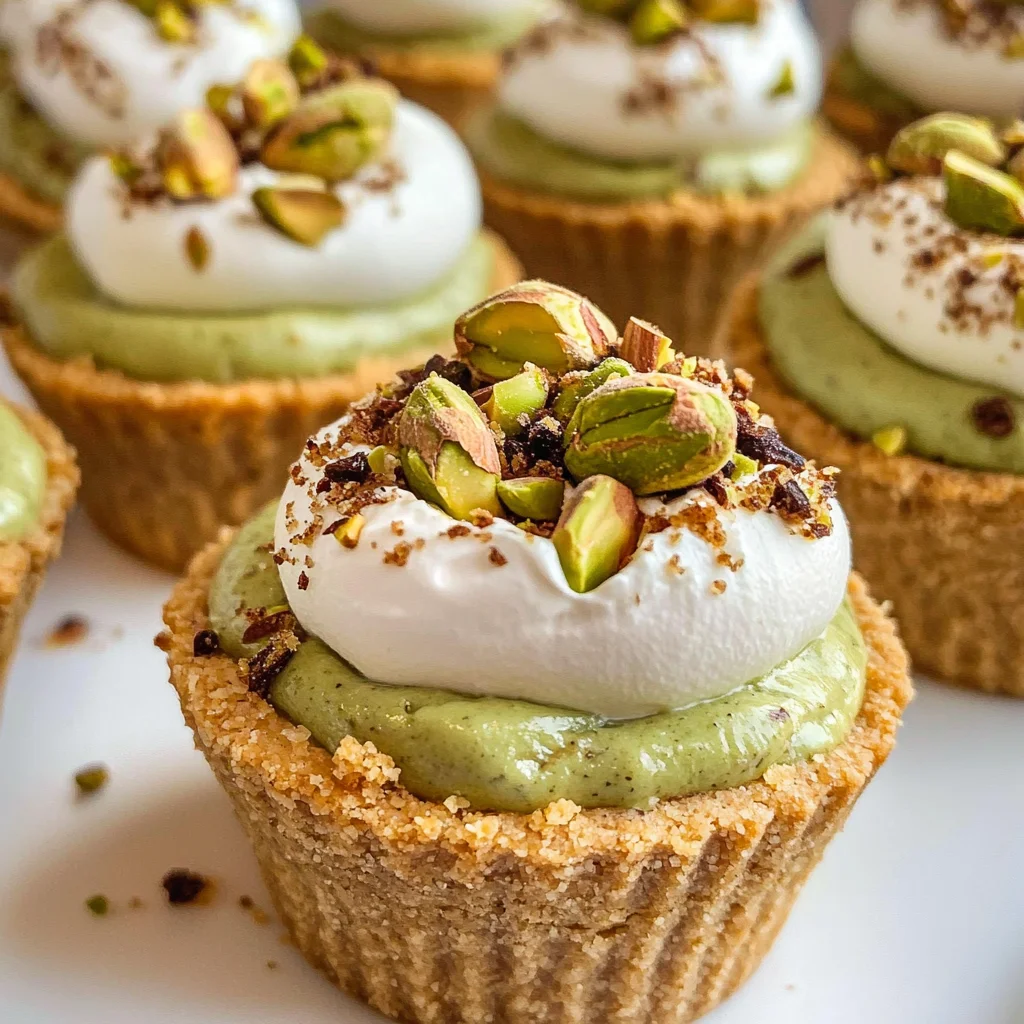
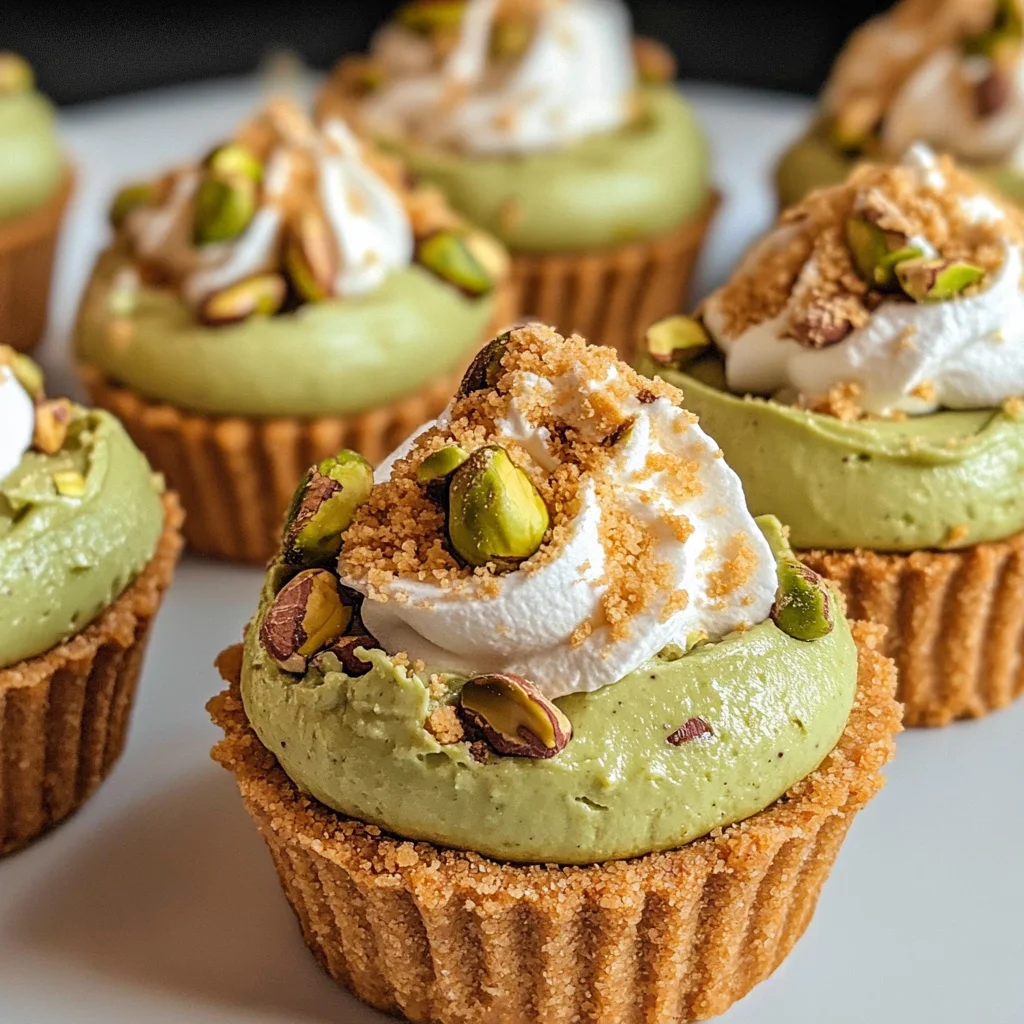
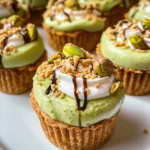
Pistacchio Pie Cups
There’s something profoundly special about sharing a recipe that has the power to transport you back to cherished memories, isn’t there? These Pistachio Pie Cups are not just delightful little desserts; they encapsulate joy and nostalgia in every bite. Imagine the rich, creamy filling with that unmistakable, nutty flavor of pistachios, all cradled in a buttery graham cracker crust that crumbles just perfectly. When you take your first spoonful, you’re not just tasting a dessert—you’re diving into a moment of pure bliss that feels like a warm hug from an old friend. The vibrant green filling, speckled with crushed pistachios and topped with a fluffy dollop of whipped cream, is not only a feast for the palate but also for the eyes. I promise you, these cups are destined to become one of your favorite go-to recipes!
As we embark on this culinary adventure together, let me share what makes these Pistachio Pie Cups so remarkable. It’s all about balance: the sweet yet slightly salty notes of the pistachios mingle beautifully with the creamy cheesecake filling and the crunchy crust. This dessert is perfect for any occasion—be it a cozy family gathering or a festive celebration with friends. Trust me when I say that they’ll disappear off the table faster than you can say “pistachio pie!” Not only do these cups bring smiles, but they also bridge tradition and innovation in a way that feels both comforting and exciting. So let’s roll up our sleeves and dive into this delightful creation that will undoubtedly become a part of your culinary repertoire!
Ingredients:
As we set out to make these delightful Pistachio Pie Cups, let’s take a moment to appreciate each ingredient’s role in creating this little treasure. Every component adds its unique essence to our delicious journey.
- 9 graham crackers (full sheets). These humble crackers are the foundation of our dessert, providing that perfect balance of sweetness and crunch. When crushed and mixed with melted butter, they transform into a crust that holds everything together beautifully. Look for graham crackers that are fresh and crisp; stale ones won’t provide that desired texture. If you’re feeling adventurous or want to add some extra flavor, consider using honey-flavored graham crackers for a subtle twist.
- 4 tablespoons cold butter. Butter is essential here—it’s what brings richness and depth to our crust while helping it hold its shape during baking. Make sure your butter is cold; this helps create a flaky texture in your crust rather than one that’s dense or greasy. If you’re short on butter, coconut oil can be used as an alternative! Just remember to keep it cold for best results.
- 8 oz. cream cheese (softened). The cream cheese is what gives our filling its luxurious creaminess; it’s truly the star of the show! Softened cream cheese blends smoothly without lumps, creating that dreamy texture we crave in cheesecakes. When choosing cream cheese, look for full-fat varieties as they yield better flavor and richness compared to low-fat options.
- 3.4 oz. Jell-O Instant Pistachio Pudding and Pie Filling. This magical ingredient not only infuses our filling with vibrant color but also thickens it beautifully without any need for baking! It’s like having a shortcut to deliciousness while ensuring we achieve that signature pistachio flavor effortlessly. If you’re avoiding artificial flavors or colors, consider using natural pudding mix alternatives available at specialty stores.
- 1.5 cups 1% milk. Milk contributes moisture to our filling while making sure everything comes together smoothly when mixed with cream cheese and pudding mix. While 1% milk works well here for balance between richness and lightness, feel free to use whole milk if you’re seeking an even creamier consistency or almond milk for a dairy-free option.
- 1 cup whipped cream. Light and airy whipped cream adds an indulgent touch atop each cup while offering contrast against the rich filling below. You can either use store-bought or homemade whipped cream—just ensure it’s freshly whipped so it retains its fluffy texture when dolloped on top! For an exciting twist, consider folding in some vanilla extract or citrus zest before whipping.
- ⅓ cup crushed pistachios. Lastly, we mustn’t forget those lovely crushed pistachios! Not only do they add beautiful color and crunch as garnish, but their distinct nutty flavor enhances every layer of this dessert beautifully—truly elevating it from good to extraordinary! When selecting pistachios, look for unsalted varieties so you can control the saltiness in your final dish.
Equipment You’ll Need:
Having the right tools at hand makes all the difference in crafting these Pistachio Pie Cups! Think of them as your trusty companions in this delightful journey—each one plays an essential role in ensuring success as we create something truly wonderful together.
- Muffin tin – This piece of equipment is absolutely paramount since we’re creating individual pie cups! A standard muffin tin will work perfectly here; just ensure it’s sturdy enough to hold up during baking without warping under high heat.
- Muffin liners – These help prevent sticking while adding ease when serving our mini pies later on! Choose colorful or fun printed liners if you want to add an extra pop of personality—after all, presentation matters!
- High-speed food processor – A food processor is invaluable when preparing your graham cracker crust quickly; it ensures even crumbling without breaking out into elbow grease mode! If you don’t have one handy, placing crackers in a plastic bag and using a rolling pin can yield similar results—but trust me on this: investing in a food processor will change your game forever!
- Stand mixer or handheld mixer – Either option works beautifully for whipping up that creamy filling! A stand mixer allows for hands-free mixing while taking care of other tasks around the kitchen—but don’t fret if you only have a handheld mixer on hand; either choice will get those ingredients combined perfectly!
- Spatula – A versatile kitchen tool you’ll find indispensable throughout this process—for scraping down sides of bowls as needed or smoothing out layers within each cup before chilling.
Now that we’ve gathered everything we need let’s dive into preparing our delicious Pistachio Pie Cups!
Step 1: Preheat Your Oven & Prepare Your Muffin Tin
First things first: let’s kick things off by preheating your oven to 350ºF (175ºC). This initial step sets the stage for achieving that golden-brown graham cracker crust we’re after! While it’s warming up, line your muffin tin with muffin liners—this will save us from any messy cleanup later on—and generously spray them with nonstick cooking spray because nobody wants their precious creations stuck inside those tins! This little precaution ensures easy removal once they’re baked and cooled down—a crucial step I promise you’ll appreciate later on!
Step 2: Create Your Graham Cracker Crust
Now onto crafting our graham cracker crust—the heart and soul of these pie cups! In your high-speed food processor (or using my alternative rolling pin method), toss those nine full sheets of graham crackers along with four tablespoons of cold butter straight into its bowl. Process on high until everything resembles coarse crumbs—think sand on the beach but more enticingly aromatic thanks to the butter melting into those cracks!
Once you’ve achieved that crumbly goodness (about 30 seconds should do), it’s time to spoon two heaping tablespoons into each muffin liner you’ve prepped earlier—trust me when I say you’ll have enough crust mixture left over for twelve delightful mini cheesecakes here! Use the back end of your spoon gently pressing down firmly enough so they form nice compact bases—not too hard though; we want them light yet sturdy!
Step 3: Bake That Crust
With our cups filled with graham cracker goodness ready now comes my favorite part—the baking! Slide them carefully into your preheated oven allowing them some time (10 minutes) basking in warmth until lightly golden brown around edges—that’s how you know they’re done! Once time’s up? Gently remove from heat letting them cool completely before adding any filling onto their luscious tops—this cooling period matters significantly because warm crust plus cool filling equals perfect harmony!
Step 4: Whip Up That Creamy Pistachio Filling
While those heavenly layers cool off completely (and believe me—you’ll want every second!), let’s shift gears towards preparing our dream-worthy pistachio filling next! Grab yourself either stand mixer bowl or large mixing bowl if using handheld mixer—and toss in eight ounces softened cream cheese right away—it needs love too after all!
Start mixing at medium-high speed until creamy smooth perfection emerges—which usually takes around two minutes max while keeping an eye out for any stubborn lumps lurking around corners needing attention (scrape down sides occasionally!). Once softened enough? Lower speed gradually pouring in one-and-a-half cups milk slowly until combined smoothly—this process known as emulsifying ensures no separation occurs between components later on which could lead disastrous outcomes…not what we want here at all!
Stay tuned as we delve deeper into finalizing this scrumptious dessert experience together…
Step 5: Whipping Up the Creamy Filling
Now that your graham cracker crust is baked to a lovely golden hue, it’s time to shift our focus to that luscious pistachio filling that will make your taste buds sing! Begin by placing the softened cream cheese into the bowl of a stand mixer (if you don’t have one, a handheld mixer will do just fine). This part is crucial—using softened cream cheese ensures that you can achieve that velvety, smooth texture we’re after. If you skip this step and use cold cream cheese, you’ll be left with lumps in your filling, which nobody wants. So whip it up on high speed for about 2 minutes, until it transforms into a light and fluffy cloud of creamy goodness.
As you mix, take a moment to enjoy the transformation—the way the cream cheese whips air into itself is utterly intoxicating! You might need to pause every so often to scrape down the sides of the bowl with a spatula. This ensures everything gets fully incorporated, especially those stubborn bits that like to cling to the edges. Once your cream cheese is beautifully whipped, reduce the mixer speed to low and slowly pour in 1.5 cups of milk. This gradual addition allows the milk to blend seamlessly into the mixture rather than splashing everywhere or creating an unappealing clump. Trust me on this; patience during this step pays off in spades!
Step 6: Bringing in the Pistachio Flavor
With your cream cheese and milk now harmoniously blended, it’s time for a truly magical ingredient: the pistachio Jell-O Instant Pudding mix! Add this vibrant green powder directly into your mixing bowl and turn the mixer back up to low speed. You’ll want to mix until it’s just combined—around 30 seconds should do it. What makes this step special is how the pudding mix not only adds flavor but also helps thicken our filling beautifully; it creates that wonderfully rich texture we crave in desserts.
As you combine these ingredients, keep an eye out for changes in consistency; you’ll notice it starting to thicken almost immediately! This thickening process occurs because of the cornstarch present in the pudding mix—a magical thickening agent that binds together all those delicious flavors without any animal-derived gelatin involved. It’s important not to overmix at this stage; you want a smooth mixture without incorporating too much air, which can lead to an undesirable texture later on.
Step 7: The Final Blend
Now comes an essential part of ensuring we have a truly cohesive filling: give everything one last thorough mixing session! After adding the pudding mix, take your spatula and scrape down those pesky sides of the bowl again—this guarantees every morsel of ingredients is perfectly blended together. Sometimes, as I’ve learned from experience, pistachio pudding likes to stick at the bottom of the mixing bowl or cling obstinately to the sides. You want every bit of flavor harmonizing with our creamy base.
Once you’ve given it a good mix and are satisfied with its uniformity, take a moment to marvel at that gorgeous green color—the kind that begs for attention! You should have a thick yet silky consistency that’s ready for action; this filling is going to be as delightful as it looks. At this point, if you’re feeling adventurous (and who wouldn’t be?), you could taste a bit of this mixture just for quality control—it’s absolutely scrumptious!
Step 8: Filling Your Graham Cracker Cups
With all your components prepped and ready, let’s fill those graham cracker cups with our heavenly pistachio mixture! Using a spoon or an ice cream scoop (which I find works perfectly), take two heaping tablespoons of that luscious filling and gently spoon it into each graham cracker cup. The key here is not just dumping it in but rather spreading it out evenly across each cup—this ensures every bite has that delightful balance between crust and creamy filling.
As you fill each cup, consider lightly wetting the spoon beforehand—this little trick prevents sticking and makes spreading easier than ever. Don’t rush this step; take your time as you layer that beautiful pistachio filling into each graham cracker shell. As they fill up, look for about three-quarters full—this gives them room as they set and prevents overflow while chilling. Once filled beautifully, they deserve some TLC before heading into their cool sanctuary in the refrigerator.
Next Major Phase – Chilling for Perfection
Chilling your Pistachio Pie Cups may seem like merely waiting around—but trust me when I say this step is crucial for achieving dessert perfection! Place these beauties gently into your fridge and let them set for at least one hour—though if you’re willing to wait longer (and I strongly encourage you), letting them chill for several hours or even overnight allows all those flavors to meld together wonderfully! The cooling process firms up that glorious filling while allowing those nutty pistachio flavors to deepen and intensify.
While they chill out, resist any urge to sneak bites—they’re worth every second of anticipation! With patience comes reward; by allowing them enough time in their cool haven, you’ll discover how beautifully firm yet creamy they become when served chilled—a truly extraordinary treat waiting just for you! When you’re finally ready for serving time—and oh boy will you know when—you’ll be greeted by individual cups brimming with flavor and decadence.
Step 9: The Finishing Touch
The grand finale awaits as we prepare to crown our Pistachio Pie Cups with whipped cream and crushed pistachios! When you’re ready to serve these delightful desserts after their chill time has passed, remove them from their cool resting place with excitement bubbling inside you because we’re almost there! Generously dollop whipped cream on top of each cup—don’t hold back here; let it cascade over like fluffy clouds atop mountains green!
To elevate these cups even further (as if they needed more magic!), sprinkle chopped pistachios over each dollop of whipped cream—this brings not only an added crunch but also enhances their appeal visually with pops of color against that vibrant green backdrop. Each bite will now offer an unforgettable symphony of textures—from creamy cheesecake goodness through crunchy nuts right down through that soft graham cracker crust.
And there you have it—the perfect Pistachio Pie Cups are ready for devouring! Trust me when I say these little gems are not just desserts but experiences waiting to happen—each bite filled with nostalgia and joy alike. Gather friends or family around because sharing these treats doubles their delight; I promise you’ll leave everyone craving more long after they’re gone! Enjoy every single creation moment spent crafting these beauties—you’ve earned every delectable bite!
Storage and Enjoyment Tips for Your Pistacchio Pie Cups
Now that your delightful Pistacchio Pie Cups are ready to shine, let’s talk about how to store them and enjoy every last morsel! These little gems are not just a treat for the tastebuds but also a visual delight that can bring joy to any occasion. Whether you’re preparing them for a gathering or simply indulging yourself at home, knowing how to preserve their deliciousness will make them even more special. Trust me, these cups hold their flavor beautifully, and with a few simple tips, you can savor them longer!
Storing Leftover Pistacchio Pie Cups
To keep your Pistacchio Pie Cups fresh and delectable, it’s best to store them in an airtight container in the refrigerator. A glass or plastic container with a snug lid works wonders, allowing the flavors to meld without any moisture loss. They will stay fresh for about 3-5 days—long enough for you to enjoy them throughout the week! One of my favorite pro tips is to place a slice of bread in the container; this helps maintain moisture and keeps the graham cracker crust from getting too soft while still ensuring that each bite remains wonderfully creamy. After storage, the flavors only deepen, creating an even more profound taste experience when you finally take a bite. When you’re ready to indulge again, just grab one out of the fridge and top it with an extra dollop of whipped cream if desired—because who could resist that?
Freezing Your Pistacchio Pie Cups for Later
If you want to prepare ahead or save some Pistacchio Pie Cups for a later date, freezing is an excellent option! Simply place your completely cooled cups into a freezer-safe container or wrap each cup individually in plastic wrap before placing them in a larger bag or container. They’ll keep beautifully frozen for up to 2 months. When it’s time to enjoy again, pull them out of the freezer and let them thaw in the refrigerator overnight. The convenience of having these delicious treats ready at your fingertips is absolutely magical—the perfect solution for unexpected guests or those sweet cravings! Imagine unwrapping one on a cozy evening with friends or family; it’s like having a little piece of happiness waiting just for you.
Pistachio Pie Cups
Indulge in the delightful experience of Pistachio Pie Cups, where creamy cheesecake filling meets a buttery graham cracker crust. Each mini dessert is a perfect blend of nutty pistachio flavor and smooth texture, crowned with airy whipped cream and topped with crushed pistachios for an extra crunch. These charming individual treats are not only visually appealing but also incredibly easy to make, making them the ideal choice for any occasion—be it a family gathering or a festive celebration. With no baking required, this recipe is quick to prepare and sure to impress your guests and loved ones alike!
- Prep Time: 20 minutes
- Cook Time: 10 minutes
- Total Time: 30 minutes
- Yield: Approximately 12 servings 1x
- Category: Dessert
- Method: Baking
- Cuisine: American
Ingredients
- 9 graham crackers (full sheets)
- 4 tablespoons cold butter
- 8 oz. cream cheese (softened)
- 3.4 oz. Jell-O Instant Pistachio Pudding and Pie Filling
- 1.5 cups 1% milk
- 1 cup whipped cream
- ⅓ cup crushed pistachios
Instructions
- Preheat your oven to 350ºF (175ºC). Line a muffin tin with muffin liners and spray with nonstick cooking spray.
- Crush graham crackers and mix with cold butter until crumbly. Spoon two tablespoons into each muffin liner, pressing down to form a crust.
- Bake for 10 minutes until golden brown, then allow to cool completely.
- In a bowl, beat softened cream cheese until smooth. Gradually add milk and mix until combined.
- Stir in the pistachio pudding mix until thickened.
- Fill each cooled crust with the pistachio mixture and chill in the refrigerator for at least one hour.
- Before serving, top each cup with whipped cream and sprinkle crushed pistachios on top.
Nutrition
- Serving Size: 1 serving
- Calories: 230
- Sugar: 13g
- Sodium: 150mg
- Fat: 14g
- Saturated Fat: 8g
- Unsaturated Fat: 6g
- Trans Fat: 0g
- Carbohydrates: 24g
- Fiber: 1g
- Protein: 3g
- Cholesterol: 30mg