Biscoff Banana Pudding
There’s something undeniably magical about desserts that evoke cherished memories, isn’t there? Each bite can transport you back to a moment in time—perhaps a sun-drenched afternoon spent with family or a cozy gathering of friends. That’s exactly what my Biscoff Banana Pudding does; it’s a luscious blend of creamy goodness, with the unique warmth of spiced cookies and the comforting sweetness of ripe bananas. This dessert transcends mere indulgence—it’s an experience, a delightful journey that bridges nostalgia and innovation. The silky texture, the symphony of flavors, and the tantalizing aroma all come together to create a treat that is not only delicious but also profoundly satisfying.
When I first stumbled upon this recipe, I was enchanted by the idea of using Biscoff cookies—a twist on the classic banana pudding that many of us know and love. Trust me when I say that these cookies, with their hint of cinnamon and caramelized sugar notes, elevate this dessert into an entirely new realm. The combination of creamy vanilla pudding and fresh bananas layered between crunchy cookie crumbles produces an utterly intoxicating experience that will have everyone coming back for seconds (and thirds!). Whether it’s for a special occasion or just a lovely weekday treat, this Biscoff Banana Pudding is sure to become a cherished favorite in your home.
Biscoff Banana Pudding: A Dreamy Delight
Welcome to what might just be your new favorite dessert! This Biscoff Banana Pudding is not only incredibly easy to prepare but also offers layers upon layers of flavor that will leave your taste buds dancing. Think about it: you start with rich vanilla pudding blended with fluffy whipped cream, adding bananas’ natural sweetness and the delightful crunch of crumbled Biscoff cookies. It’s a celebration in every spoonful! Plus, it’s perfect for sharing—or not; I won’t judge if you want to keep it all to yourself.
Ingredients:
As we embark on this culinary journey together, let’s take a moment to appreciate each ingredient’s role in crafting our masterpiece. Every component plays its part in creating the creamy magic that is Biscoff Banana Pudding.
- 350 g milk (cold). Cold milk is essential here as it helps create that perfectly smooth pudding consistency we’re aiming for. The cold temperature ensures that our pudding sets beautifully without any lumps—think of it as the foundation for our dessert’s creamy structure. If you’re feeling adventurous or want to add an extra layer of flavor, consider using almond or oat milk; just make sure they are unsweetened so they don’t compete with the other flavors!
- 397 g sweetened condensed milk (1 can). Sweetened condensed milk is like liquid gold in dessert-making; it brings an incredible richness and sweetness that’s hard to replicate. This ingredient adds depth and creaminess while ensuring our pudding has that decadent feel on the palate. When selecting your can, look for high-quality brands—this will make all the difference in flavor!
- 102 g instant vanilla pudding mix (1 package). This product is crucial because it thickens our mixture without needing any stovetop cooking—perfect for busy days! The instant mix provides a subtle vanilla flavor while creating that luscious mouthfeel we crave in banana pudding. Just remember: this step is non-negotiable; skipping it will result in sad puddles instead of velvety goodness.
- 470 g whipping cream. Whipping cream transforms our dessert from good to extraordinary! When whipped into soft peaks, it introduces air into our mixture, making every bite light and airy. Opt for heavy whipping cream (at least 36% fat) for best results; this should be chilled before whipping for optimal volume and stability.
- 26 Biscoff cookies. These spiced wonders bring a delightful crunch and an aromatic richness to our dish. Their caramelized sugar undertones complement the bananas beautifully, creating layers of flavor you didn’t know you needed! Feel free to crush them up finely if you prefer a more consistent texture throughout.
- 4 large ripe bananas. Bananas are not just fillers in this recipe; they are the stars! Their natural sweetness balances out the richness from the cream while providing that comforting fruitiness we adore in banana pudding. Choose bananas that are speckled with brown spots—this means they’re perfectly ripe and ready to shine!
Equipment You’ll Need:
Having the right tools at your disposal makes all the difference when creating something wonderful—and trust me, you’ll want everything just right when preparing your Biscoff Banana Pudding! While these items may not be ingredients themselves, they are essential partners in bringing this delicious recipe to life.
- Mixing bowls – You’ll need various sizes; medium bowls are perfect for mixing your puddings while large ones are essential for whipping your cream to perfection. Make sure they’re clean and dry before use—any residual moisture can affect how well your whipped cream whips up!
- Electric hand mixer – This tool is absolutely paramount for achieving those soft peaks in your whipped cream effortlessly! If you don’t have one handy, a whisk works too—but be prepared for some serious arm workout time!
- Spatula – A sturdy spatula is essential for folding together your whipped cream and pudding mixture without deflating all that lovely air you’ve incorporated into it! Opt for silicone spatulas which are great at scraping every last bit from your bowl—waste not, want not!
- 9×13-inch baking dish – This size is perfect for layering all those delicious components together! It also makes serving easy since you can scoop directly from it without needing multiple bowls or platters.
Now that we have gathered our ingredients and equipment let’s dive into creating this enchanting Biscoff Banana Pudding!
Step 1: Mixing Our Creamy Base
To begin our adventure towards delectable bliss, grab a medium-sized mixing bowl and whisk together 350 grams of cold milk, 397 grams of sweetened condensed milk from one can, and 102 grams of instant vanilla pudding mix until fully combined—don’t rush here! Take time to ensure no lumps remain; this step lays down the creamy foundation necessary for what’s to come! Once combined smoothly, pop this mixture into your refrigerator—it needs time to set while we whip up some heavenly cream.
Step 2: Whipping Up Liquid Gold
Next up—a critical step indeed—is turning our whipping cream into fluffy perfection! In a large mixing bowl (preferably chilled), pour in 470 grams of heavy whipping cream before grabbing your electric hand mixer fitted with whisk attachments. Start at low speed then gradually increase until soft peaks form—that moment when peaks hold their shape but still appear luscious is what we’re after! Be cautious though; over-whipping can lead us straight into butter territory—not quite what we’re looking for here!
Step 3: Combining Flavors
With both mixtures prepared separately now comes one of my favorite parts: combining them together into something truly spectacular! Gently fold half of your chilled pudding mixture into the whipped cream using your trusty spatula—this technique preserves all those beautiful air bubbles we worked hard on earlier while ensuring everything melds harmoniously together without losing volume or texture.
Step 4: Layering Begins
Now let’s build layers upon layers of pure delight by transferring half of this luscious mixture into our prepared baking dish—the 9×13-inch beauty waiting patiently nearby! Use your spatula again here as you spread evenly across bottom like frosting on cake—we want every corner covered so each bite holds equal charm once served.
I hope you’re feeling inspired so far because trust me when I say there’s more deliciousness just around the corner! Let’s continue layering those bright banana slices next…
Step 5: Layering the Love
Now, let’s dive into the delightful task of layering our creation. Start by taking half of that wonderfully airy pudding mixture we folded together so lovingly and pour it into your prepared 9×13 dish. Using a spatula, spread it out gently into a smooth, even layer—this is where we begin to build the foundation of our Biscoff Banana Pudding. You want to ensure that every bite will be balanced and delicious, so don’t rush this step; take your time to make it look inviting too!
Once you have that first layer set, it’s time to add the bananas. Slice your ripe bananas into about 1/4 thick coins—this thickness is crucial because it allows for just the right amount of softness without turning mushy when layered. You’re aiming for a texture that’s pleasing both visually and in taste. Place approximately 3/4 of these banana slices evenly atop the pudding layer, letting them nestle into that creamy bliss. Now, grab about 18 Biscoff cookies and crumble them generously over the banana slices; this crunchy topping will create a delightful contrast against the smoother elements below. The spice from those cookies mingling with the sweet cream and bananas is an experience in itself—a true symphony of flavors!
Step 6: The Second Pudding Layer
With our first layers complete, it’s time to add the remaining pudding mixture on top. Carefully spoon the rest of that luscious pudding over the banana and cookie layers, spreading it out evenly just as you did before. This second layer is not merely a topping; it’s essential for achieving that beautiful height and structure in your Biscoff Banana Pudding. As you do this, take a moment to appreciate how each component contributes to the whole; this is where patience pays off.
Why is even layering important? Well, it ensures that every scoop you serve up later has an even distribution of those delightful flavors—no one wants to bite into a spoonful that’s all banana or all cookie! As you smooth out this top layer, envision how each slice will reveal those distinct layers of creamy goodness interspersed with crunchy bits and soft fruit. This careful construction also helps maintain stability when serving; no one wants their dessert collapsing under its own weight!
Step 7: Garnishing with Joy
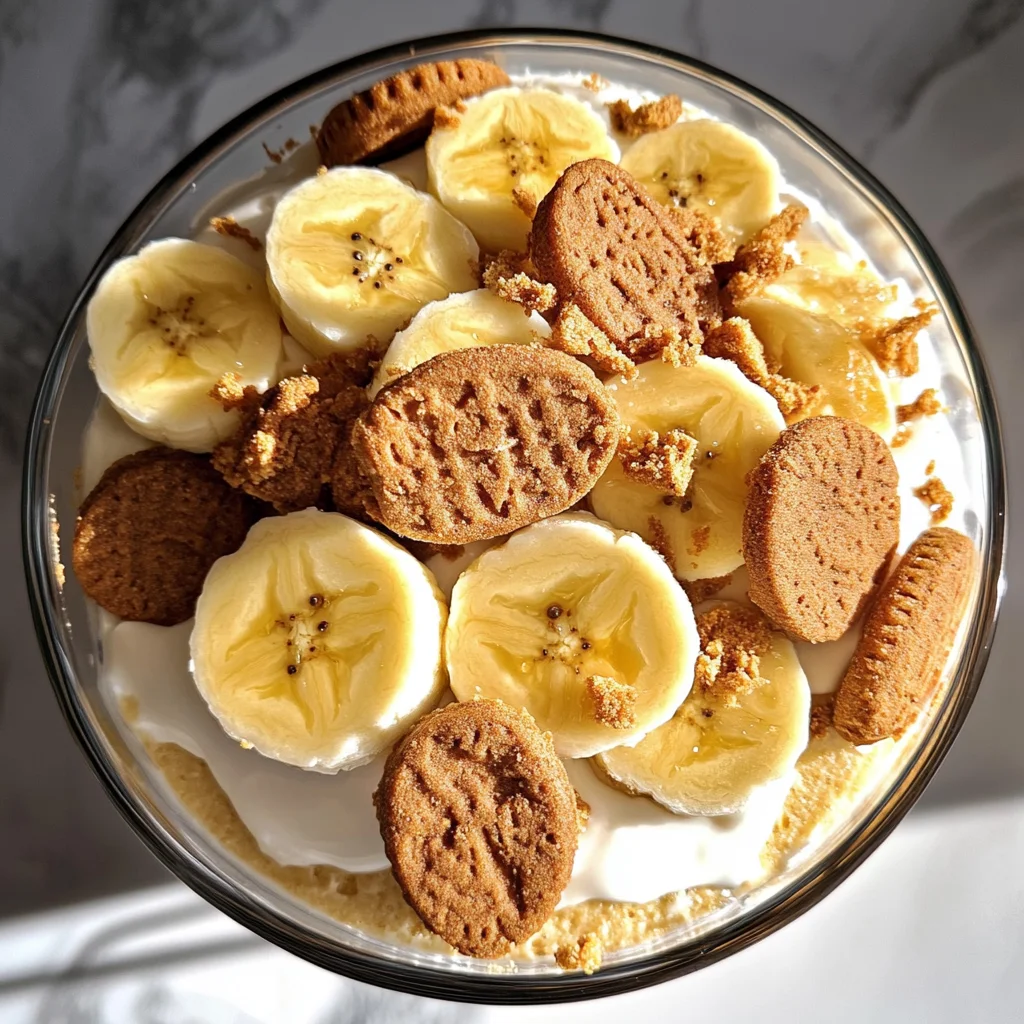
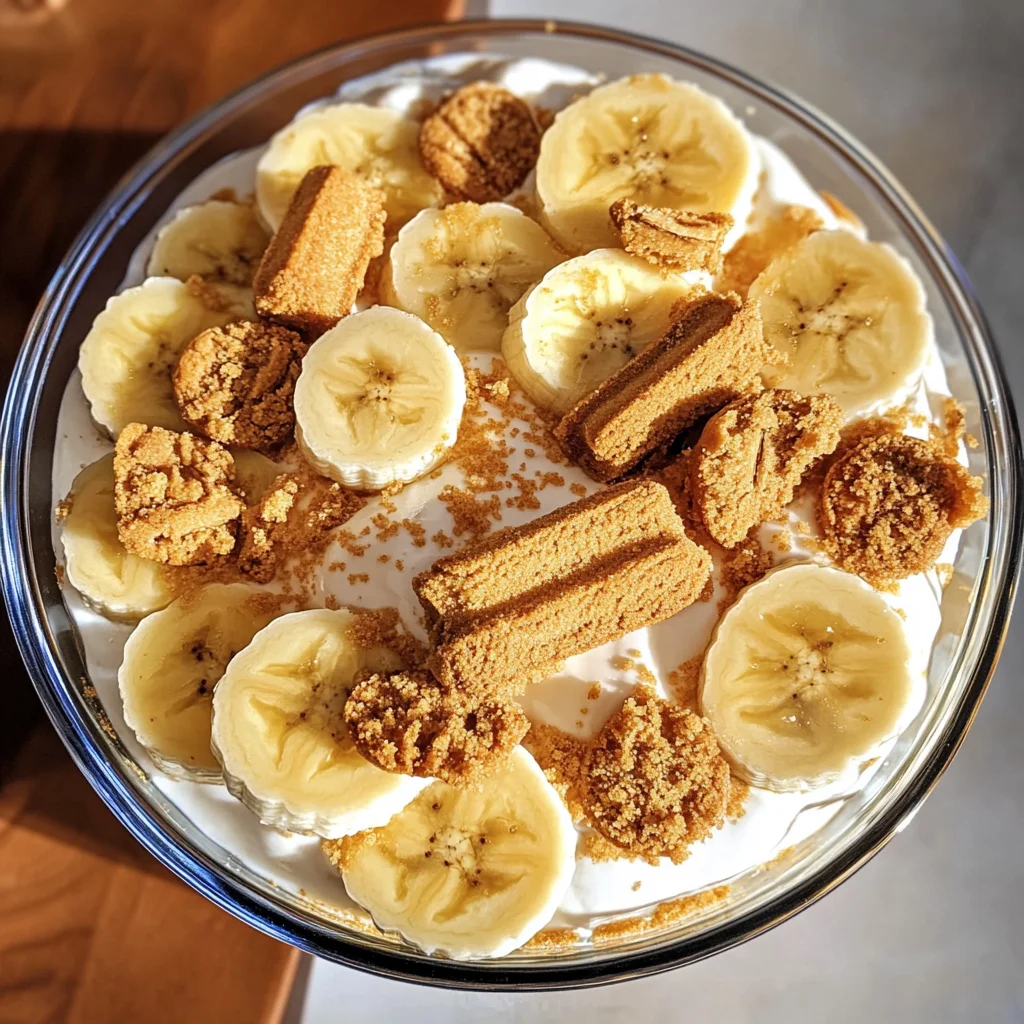
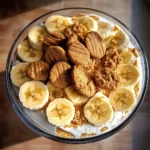
Now comes one of my favorite parts—the garnishing! Sprinkle the remaining Biscoff cookie crumbles over the top layer like confetti at a celebration—it adds an extra touch of elegance as well as flavor. Then, arrange any leftover banana slices on top as well; these beautiful golden circles will entice anyone who lays eyes on your creation! If you’re preparing this for later enjoyment (and trust me, you’ll want to), I recommend holding off on adding those final banana slices until just before serving. This little trick prevents them from browning in your lovely dessert and keeps everything looking fresh and appealing.
It’s truly remarkable how simple garnishes can elevate your dish from ordinary to extraordinary! They create visual interest while also hinting at what delights await within each bite. Remember, presentation matters just as much as taste because we eat with our eyes first! So take pride in this step—make it feel special because trust me, it truly is.
Step 8: The Waiting Game—Chill Time!
Ahh… now we arrive at perhaps one of the most crucial steps in making your Biscoff Banana Pudding truly exceptional: chilling! Cover your masterpiece gently with plastic wrap or a lid and place it in the refrigerator for at least 2 hours—though overnight is ideal if you can wait that long! During this time, something magical happens—the flavors meld beautifully together while the pudding firms up to an enticing consistency.
Why chill? Well, allowing your pudding to rest enables all those incredible ingredients—the creamy pudding, sweet bananas, crunchy Biscoff cookies—to harmonize fully. The chilling process transforms this dessert from good to utterly intoxicating as each flavor deepens and intensifies during its time in cool solitude. Just think about how satisfying it’s going to be when you finally dig in; I promise you won’t regret embracing patience here! When it’s time to serve, check for that perfect balance between firmness and a silky texture—the pudding should hold its shape but still be soft enough to scoop easily with a spoon.
Conclusion:
As we reach the end of our delightful journey through crafting this extraordinary Biscoff Banana Pudding together, I hope my enthusiasm has been contagious! This recipe isn’t just another dessert; it’s a culinary love letter that sings with harmony from every spoonful—the rich creaminess of the pudding paired with those spicy notes from the Biscoff cookies creates an unforgettable symphony of flavors. And let’s not forget the tender bananas that add sweetness and texture; they elevate this classic no-bake dessert into something truly special.
I wholeheartedly believe that this recipe is a must-try not only because of its delicious layers but also due to the joy of creating something so visually stunning and incredibly satisfying. Whether it’s for an afternoon gathering with friends or a cozy family dinner, serving up these generous scoops will bring smiles all around. Picture pulling out that shimmering dish from your fridge, revealing those beautiful layers just waiting to be savored; it’s moments like these that turn cooking into cherished memories.
When it comes to serving suggestions, imagine pairing your creamy Biscoff Banana Pudding with freshly brewed coffee for an afternoon pick-me-up or even alongside a scoop of vanilla ice cream for an added indulgence. For those special occasions where you really want to impress, consider drizzling some caramel sauce over each serving—it adds such a luxurious touch! The possibilities are endless when it comes to enjoying this delightful treat.
Feeling adventurous? This recipe is wonderfully adaptable! You might swap in some chocolate cookies instead of Biscoff for a different twist or experiment with adding peanut butter between layers for an extra layer of flavor that’s downright irresistible. You could also incorporate seasonal fruits like strawberries or raspberries for a refreshing update during warmer months. I invite you wholeheartedly to dive into this creation—share your experiences with me along the way! Your kitchen should be filled with laughter and love as you whip up this sensational Biscoff Banana Pudding; trust me—you won’t regret it!
Biscoff Banana Pudding
Indulge in creamy Biscoff Banana Pudding—a delicious twist on classic dessert! Discover how easy it is to make and enjoy today!
- Prep Time: 20 minutes
- Cook Time: None
- Total Time: 0 hours
- Yield: Serves approximately 10 people 1x
- Category: Dessert
- Method: No-bake
- Cuisine: American
Ingredients
- 350 g cold milk
- 397 g sweetened condensed milk (1 can)
- 102 g instant vanilla pudding mix (1 package)
- 470 g heavy whipping cream
- 26 Biscoff cookies
- 4 large ripe bananas
Instructions
- In a medium bowl, whisk together cold milk, sweetened condensed milk, and instant vanilla pudding mix until smooth. Refrigerate to set.
- In a large chilled bowl, whip heavy cream until soft peaks form.
- Gently fold half of the chilled pudding mixture into the whipped cream until combined.
- Spread half of the pudding mixture into a 9×13-inch baking dish. Layer with banana slices and crumbled Biscoff cookies.
- Add the remaining pudding mixture on top and smooth it out evenly.
- Garnish with remaining crumbled Biscoff cookies and banana slices if desired.
- Cover and refrigerate for at least 2 hours before serving.
Nutrition
- Serving Size: 1/10th of recipe (approximately 180g)
- Calories: 320
- Sugar: 28g
- Sodium: 100mg
- Fat: 20g
- Saturated Fat: 12g
- Unsaturated Fat: 7g
- Trans Fat: 0g
- Carbohydrates: 30g
- Fiber: 1g
- Protein: 5g
- Cholesterol: 60mg