Chicken Cordon Bleu with Swiss Cheese Sauce is delicious.
There’s something utterly enchanting about the experience of preparing a meal that transcends mere sustenance and transforms into a heartfelt celebration of flavors, textures, and memories. When I think of Chicken Cordon Bleu with Swiss Cheese Sauce, I’m transported back to cozy family dinners where laughter mingles with the aroma of roasting chicken and melting cheese. This dish is not just food; it’s a loving embrace on a plate, a fusion of tender chicken wrapped around savory turkey and adorned with creamy Swiss cheese, all drizzled in a rich sauce that beckons you to savor each bite. I promise you, this recipe is an invitation to create joyous moments at your dining table, making it perfect for both weeknight meals and special occasions.
As we embark on this culinary journey together, let’s take a moment to appreciate the beautiful interplay of ingredients that brings Chicken Cordon Bleu with Swiss Cheese Sauce to life. The process may seem intricate, but trust me: every step is a chance to infuse your kitchen with warmth and love. From pounding the chicken breast until it’s just right to the hypnotic sight of breadcrumbs crisping up in the skillet, I assure you that this dish will become one of your cherished go-to recipes. So roll up your sleeves and prepare for an adventure that will not only feed your belly but also nourish your soul.
Chicken Cordon Bleu with Swiss Cheese Sauce is delicious: A Comfort Food Classic
Let me introduce you to one of my all-time favorites: Chicken Cordon Bleu with Swiss Cheese Sauce. This dish marries classic French elegance with homey comfort, making it an absolute showstopper at any dinner table. Imagine juicy chicken wrapped around slices of savory turkey and luscious Swiss cheese, baked to perfection and served with a velvety sauce that enhances every mouthful. It’s the kind of meal that sparks joy in both preparation and enjoyment—a true testament to how food can create connection and lasting memories.
Now let’s dive into this delightful recipe together! It’s time to gather our ingredients and set the stage for culinary magic.
Ingredients:
Embarking on this culinary adventure begins by gathering some essential ingredients that will harmonize beautifully in our Chicken Cordon Bleu with Swiss Cheese Sauce. Each component plays a crucial role in crafting this dish’s delightful symphony of flavors.
- 4 pieces (boneless and skinless) chicken breasts. Choosing high-quality chicken breasts is paramount as they serve as the canvas for our masterpiece. Look for plump, fresh breasts without blemishes or unpleasant odors; organic or free-range options are often more flavorful and tender. By pounding them to an even thickness, we ensure they cook uniformly while retaining moisture—this will give us that juicy texture we’re after!
- 8 slices deli-style turkey. The turkey here adds a delightful smokiness without overpowering the dish’s delicate nature. Opt for high-quality deli meat without added preservatives; it makes all the difference in flavor depth. Layering two slices per breast creates a satisfying salty contrast against the creamy cheese while keeping each roll intact during cooking.
- 4 slices Swiss cheese. Ah, Swiss cheese—the unsung hero! Its nutty flavor melds beautifully into our dish while offering that luxurious melt we crave so much. Look for aged Swiss cheese if possible; its complexity enhances our sauce’s richness wonderfully when melted down later on.
- 1 cup (preferably panko) breadcrumbs. Panko breadcrumbs are key here because they yield an irresistibly crispy coating—think golden perfection! Their lightness allows them to crisp up beautifully without becoming heavy or soggy. If you can’t find panko, regular breadcrumbs will work too; just keep an eye on cooking times as they may brown differently.
- 2 large eggs. Eggs are our binding agents here; they help adhere the breadcrumbs to our rolled chicken while adding moisture during cooking. Be sure to use fresh eggs; their vibrant yolks add both color and richness to our final dish!
- 1 cup flour. Flour serves as the first layer in our breading process, providing structure before dipping into egg wash—a crucial step for achieving that crumbly exterior we adore! Use all-purpose flour here; it’s versatile enough for coating without absorbing too much moisture.
- 1/2 cup milk. Milk in our egg mixture creates creaminess that helps the breadcrumbs cling beautifully while enhancing flavor throughout each bite—trust me when I say it’s non-negotiable for achieving luscious results!
- 4 tablespoons butter. Butter not only infuses every aspect with its rich flavor but also assists in browning during frying—think about how amazing it smells when butter melts! A good quality unsalted butter gives you control over seasoning later on too.
- 1 teaspoon garlic powder. Garlic powder adds depth without overwhelming other flavors—it’s like whispering secrets of flavor throughout! Feel free to adjust based on preference; fresh minced garlic can also be used if you want more punch!
- Salt and Pepper: To taste—these simple seasonings are your best friends! They elevate everything from blandness into bright deliciousness while enhancing natural flavors within each ingredient used here.
With these incredible ingredients ready at hand, let’s move forward into creating something truly extraordinary!
Equipment You’ll Need:
Before we dive into cooking, let’s talk about having the right tools at your fingertips—they’re like trusty companions guiding us along this journey toward deliciousness! Having good equipment makes everything smoother and more enjoyable.
- Kitchen mallet or rolling pin – This tool is essential for pounding those chicken breasts evenly; it ensures uniform cooking throughout while preventing dryness from overcooking thinner parts later on! Don’t rush this step—it helps achieve tenderness!
- Cutting board – A sturdy cutting board is vital; use one specifically designated for protein prep to keep things hygienic—and don’t forget proper cleaning afterward!
- Baking dish – You’ll need something oven-safe (like glass or ceramic) large enough to accommodate all those glorious chicken rolls snugly so they cook evenly without crowding each other out—this avoids steaming instead of roasting!
- Large skillet – A heavy-bottomed skillet distributes heat evenly while browning those coated chicken rolls perfectly before they head into the oven—cast iron works wonders if available!
- Whisk – A good whisk helps blend together egg wash smoothly; no one wants clumps! Choose one that’s comfortable in hand—you’ll be using it often here!
With all these fantastic tools lined up alongside our wonderful ingredients, it’s time to start preparing our Chicken Cordon Bleu with Swiss Cheese Sauce! Let’s make some magic happen together.
Step 1: Prepping Your Canvas
First things first: preheat your oven to 375°F (190°C). This step sets us up perfectly because we want our rolls ready for baking right after frying! Now take each boneless chicken breast and place them between two sheets of plastic wrap or parchment paper—this prevents splatter while pounding—and gently pound them until they’re about 1/2 inch thick using either your kitchen mallet or rolling pin. Why do we do this? This technique tenderizes the meat while ensuring even cooking later on.
Once you’ve achieved uniform thickness across all breasts—which should take only a few minutes—set them aside as you prepare their flavorful filling! Lay two slices of turkey atop each flattened breast followed by one slice of Swiss cheese nestled perfectly within its embrace before rolling tightly from one end toward another (like wrapping a gift!). Use toothpicks or kitchen twine to secure those rolls snugly closed—trust me when I say this step keeps all those yummy fillings intact during cooking!
Step 2: Breading Station Setup
Next up: let’s create a breading station that’ll make assembling these rolls easier than ever before! Grab three shallow bowls or plates—one filled with flour seasoned generously with salt & pepper (don’t skimp!), another containing beaten eggs mixed together with milk (this adds creaminess), and finally third bowl overflowing with panko breadcrumbs combined harmoniously with garlic powder (because who doesn’t love garlic?).
Now comes an exciting part: take each secured roll starting off by coating thoroughly within seasoned flour first before dipping carefully into egg wash mixture ensuring every crevice gets coated well followed by generous sprinkling from breadcrumb bowl until fully covered—all sides should be crispy golden goodness waiting eagerly for frying action ahead! Take your time here—it’ll pay off later when biting into crunchy exterior revealing juicy interior inside!
Step 3: Searing Perfection
Let’s heat things up now by melting two tablespoons of butter inside a large skillet over medium heat until bubbly—that golden liquid gold will impart unparalleled richness onto those coated rolls once placed inside pan! Carefully transfer breaded chicken pieces one at time allowing space between them so nothing sticks together—we want crispiness after all!
Cook each side for approximately four-five minutes until they’re gloriously golden brown—you might even hear that satisfying crackling sound which indicates blissful treasure hidden underneath layers awaits discovery shortly thereafter!
Step 4: Baking Time!
Once seared beautifully on both sides transfer those glorious chicken rolls neatly arranged into baking dish before finishing cooking inside preheated oven set aside earlier readying yourself mentally because aromas wafting through space soon will have everyone flocking toward kitchen anticipating bites filled warmth happiness soon follow suit!
Bake away uncovered allowing moisture escape naturally yielding crispy outer crust surrounding tender meat hidden beneath layers trust me—you won’t regret following through properly at every step along way here towards ultimate success achieved through patience diligence combined efforts invested wholeheartedly throughout entire process leading ultimately toward satisfaction experienced upon tasting bites created together here today onwards forever cherished memories made shared amongst loved ones gathered around table united friendship love expressed through delicious food crafted carefully mindfully heartfully together after all…
And there you have it—the beginning stages laid out lovingly crafted inviting readers forward into realm where comfort meets elegance wrapped tightly within crispy bites waiting eagerly await enjoyment ahead without doubt whatsoever involved whenever serve guests family alike garnished drizzled sweet sauce hot off stove ready dig right away delighted smiles spread across faces surrounding table filled laughter genuine joy shared abundantly always reminds us why cook share love through artistry culinary delights such as these… Now let’s continue exploring further steps creating final touches await completion gathering ingredients needed next stage towards transforming simple meal extraordinary unforgettable experience altogether flourishing fullness hearts bellies alike…
Step 5: The Art of Breading – A Crunchy Embrace
Now that your chicken rolls are prepped, let’s dive into the wonderful world of breading! This step is where the magic truly begins. Set up your breading station, which is absolutely paramount for achieving that perfect golden crust. You’ll want to have three shallow dishes lined up in a row: one filled with flour, another with the beaten eggs mixed with milk, and the last one brimming with panko breadcrumbs combined with garlic powder. The flour acts as a dry barrier that helps the egg stick; think of it as a protective shield for our chicken rolls.
Take each chicken roll and first dip it into the flour, ensuring an even coating – this will help lock in all those delicious flavors we’ve layered inside. Don’t rush this step; take your time to coat every inch of the chicken so that each bite is bursting with flavor. After flouring, gently shake off any excess before dipping it into the egg mixture. The egg is crucial here because it creates a lovely sticky surface for the breadcrumbs to adhere to, which is what gives us that glorious crunch when you bite into it. Finally, roll it in the panko breadcrumbs until it’s completely covered. I promise you, this crispy layer is what transforms a simple dish into something utterly intoxicating.
Step 6: Searing for Flavor – Locking In Juiciness
With your chicken rolls now beautifully coated in their crunchy armor, it’s time to take them to the skillet! Melt 2 tablespoons of butter in a large skillet over medium heat—this will create a rich base that adds such depth to our dish. Once melted and sizzling lightly (you’ll notice small bubbles forming), carefully place each roll in the skillet. The sound they make upon contact should be music to your ears—a gentle sizzle that means they’re starting to cook beautifully.
Cook these golden beauties for about 4-5 minutes on each side. You’re looking for that stunning golden-brown color; not only does this make them visually appealing, but it also enhances their flavor through a process called Maillard reaction—where proteins and sugars react under heat to create complex flavors and aromas. Keep an eye on them; if they start browning too quickly, don’t hesitate to lower the heat slightly—it’s important not to rush this step! You want perfectly seared edges while ensuring they remain juicy inside. As you flip them over, take a moment to appreciate how delightful they look!
Step 7: Baking Time – Ensuring Perfectly Cooked Chicken
Once your chicken rolls have achieved that gorgeous golden hue on both sides, it’s time for them to finish cooking in the oven—a non-negotiable step for ensuring they’re fully cooked through without drying out. Carefully transfer the chicken rolls into a greased baking dish and pop them into your preheated oven at 375°F (190°C). Let them bake for about 20-25 minutes or until their internal temperature reaches 165°F (75°C).
This baking phase allows all those flavors we’ve built up inside—the tender turkey, creamy Swiss cheese—to meld together while ensuring the chicken remains juicy and tender. You can use an instant-read thermometer inserted into the thickest part of one of your rolls to check doneness without cutting them open—nobody wants to lose that precious filling! As they bake away, I encourage you to prepare yourself for an utterly mouthwatering aroma wafting through your kitchen—it’s like a warm hug from your favorite dish!
Step 8: Creamy Swiss Cheese Sauce – The Heavenly Finish
With your chicken rolls baking away beautifully, let’s create that luscious Swiss cheese sauce that will drape over our masterpiece like liquid gold! In a saucepan over medium heat, melt another 2 tablespoons of butter until it becomes bubbly but not browned—this could take about a minute or two. Once melted, whisk in ¼ cup of flour vigorously; trust me on this one—it’s essential for creating a smooth and thick sauce without any lumps.
Continue whisking as you gradually add in ½ cup of milk while stirring constantly; I can’t stress enough how important this constant motion is—this will ensure you achieve that silky texture we all crave in a good cheese sauce! Allow this mixture to cook and thicken just slightly before adding in those glorious slices of Swiss cheese—you want it melted and oozy but not overcooked or separated. Stir continuously until everything melts together beautifully into a creamy concoction bursting with flavor.
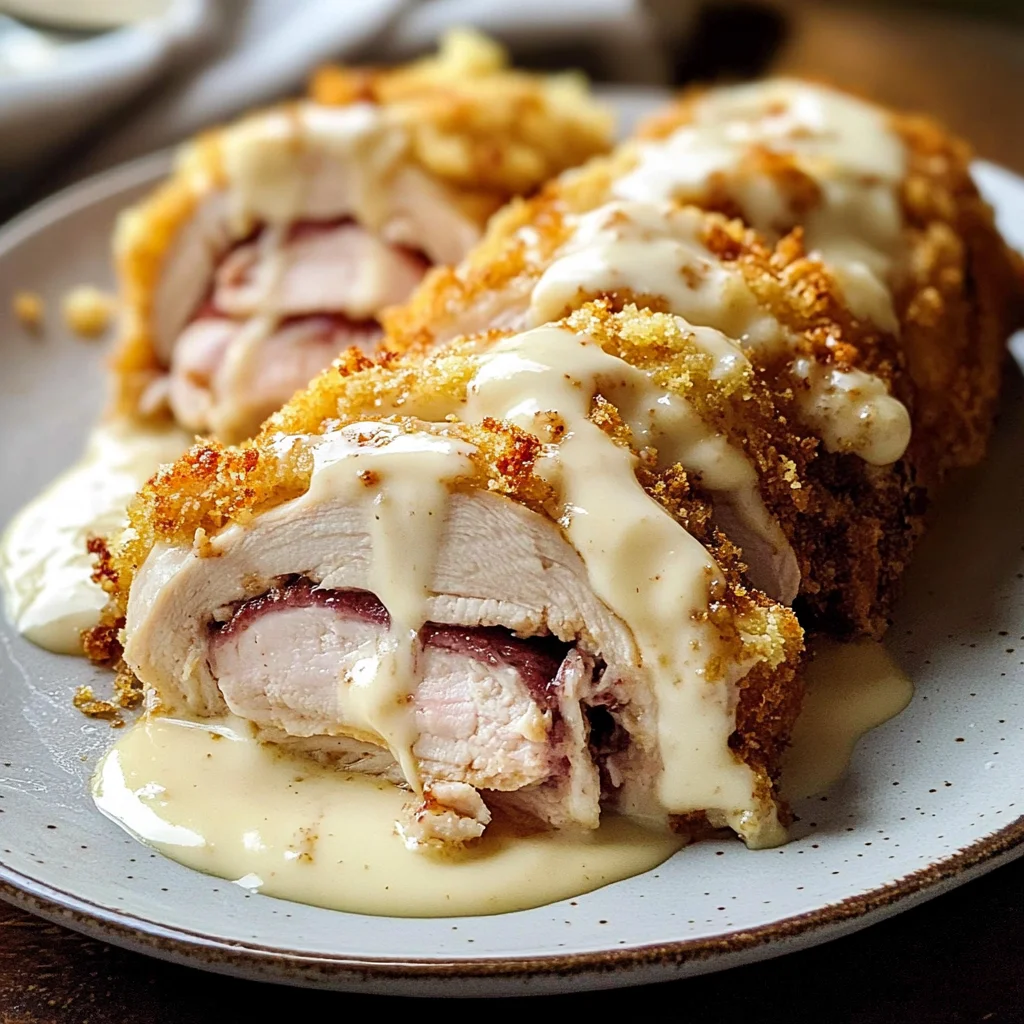
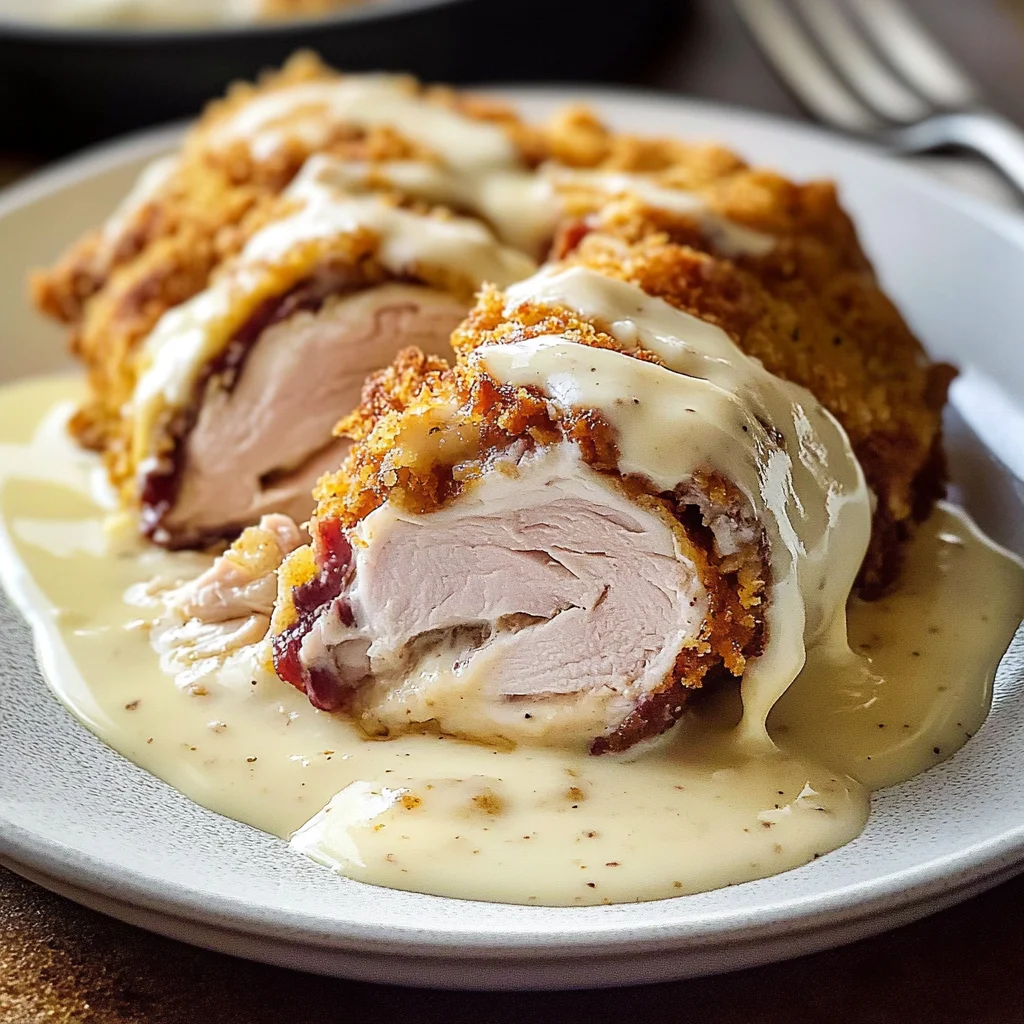
This sauce is not just an accessory; it’s truly transformative! It adds richness and depth while counterbalancing the savory notes from our chicken rolls. As you pour this heavenly sauce over your baked Chicken Cordon Bleu with Swiss Cheese Sauce—oh my goodness—you’ll feel like you’ve created something profoundly satisfying.
Final Touches – Plating Your Culinary Masterpiece
Step 9: Serving Up Love – The Grand Reveal
At last, we arrive at one of my favorite moments—the grand reveal! Carefully remove your Chicken Cordon Bleu from the oven once they have reached perfection—they should be sizzling softly and perhaps even bubbling slightly at the edges from all that cheesy goodness within. Take a moment here; appreciate how beautiful these creations look before diving right in!
To serve, place each roll onto warmed plates and generously drizzle that spectacular Swiss cheese sauce over the top—I mean really let it cascade down like a waterfall of creamy delight! You can also garnish with some fresh herbs like parsley or chives if you’re feeling fancy—this adds not just color but also brightness that contrasts beautifully against all those rich flavors.
As you slice into these delectable bundles of joy, watch how they reveal their hidden treasures: layers of succulent turkey wrapped in tender chicken embraced by gooey cheese—all nestled under that crispy exterior. It’s pure comfort food bliss! This dish isn’t just dinner; it’s an experience filled with warmth and love—a true celebration worthy of family gatherings or cozy nights at home.
I can guarantee this Chicken Cordon Bleu with Swiss Cheese Sauce is delicious—and once you’ve poured yourself a generous serving alongside some roasted veggies or perhaps fluffy mashed potatoes, you’ll understand why I adore sharing this recipe so much. Enjoy every bite—you’ve earned it!
Storage and Enjoyment Tips for Your Chicken Cordon Bleu with Swiss Cheese Sauce is delicious.
Now that you’ve crafted this masterpiece of a dish, it’s time to revel in the joy of serving it up to friends and family! Perhaps you’re gathering around the table, laughter filling the air as the tantalizing aroma wafts through your home. It’s a moment to savor, but what happens when there are leftovers? Fear not, my friend! The Chicken Cordon Bleu with Swiss Cheese Sauce is delicious even on day two, and I’m here to help you preserve that mouthwatering flavor for future enjoyment.
Storing Leftover Chicken Cordon Bleu with Swiss Cheese Sauce is delicious.
To store your leftover Chicken Cordon Bleu, look for an airtight container—this is crucial because it locks in moisture and flavor while keeping out unwanted air. You can pop these delectable rolls into the fridge where they will stay fresh for about three days. If you’re anything like me, you want to ensure that every bite remains as delightful as the first. A little pro tip: consider placing a slice of bread inside the container; this clever trick helps maintain moisture and prevents your breadcrumbs from getting soggy. When you’re ready to indulge again, just know that reheating them in the oven brings back that crispy texture on the outside while keeping the inside warm and gooey—absolutely paramount for replicating that freshly made experience!
Freezing Chicken Cordon Bleu with Swiss Cheese Sauce for Later
If you find yourself with an abundance of leftovers or simply want to prep ahead for those busy weeknights, freezing your Chicken Cordon Bleu is a fantastic idea! To do this properly, let your chicken rolls cool completely before wrapping each one tightly in plastic wrap and then placing them in a resealable freezer bag or an airtight container. This way, they can last up to three months in the freezer without losing their delightful essence. When you’re ready to enjoy them again, simply transfer them from the freezer to the fridge overnight to thaw; then reheat them in a preheated oven until they’re heated throughout. Isn’t it wonderful that such an extraordinary dish can become your go-to convenience meal? Trust me when I say that having these gems stashed away is like having a secret stash of happiness at your fingertips!
Chicken Cordon Bleu with Swiss Cheese Sauce

Indulge in the heartwarming comfort of Chicken Cordon Bleu with Swiss Cheese Sauce, a delightful dish that effortlessly blends classic flavors with home-cooked charm. Picture juicy chicken breasts lovingly wrapped around savory turkey and creamy Swiss cheese, all topped with a luscious sauce that adds depth and richness to every bite. This recipe is not just a meal; it’s an invitation to create cherished memories at your dining table, perfect for both casual weeknight dinners and special celebrations.
- Prep Time: 30 minutes
- Cook Time: 30 minutes
- Total Time: 1 hour
- Yield: Serves 4
- Category: Main
- Method: Baking/Frying
- Cuisine: French
Ingredients
- 4 boneless, skinless chicken breasts
- 8 slices deli-style turkey
- 4 slices Swiss cheese
- 1 cup panko breadcrumbs
- 2 large eggs
- 1 cup all-purpose flour
- 1/2 cup milk
- 4 tablespoons unsalted butter
- 1 teaspoon garlic powder
- Salt and pepper to taste
Instructions
- Preheat your oven to 375°F (190°C).
- Place the chicken breasts between plastic wrap and pound until about 1/2 inch thick.
- Layer two slices of turkey and one slice of Swiss cheese on each chicken breast, then roll tightly and secure with toothpicks.
- Set up a breading station: one bowl with seasoned flour, one with beaten eggs mixed with milk, and one with panko breadcrumbs combined with garlic powder.
- Coat each roll first in flour, then dip in the egg mixture before rolling in breadcrumbs.
- Melt 2 tablespoons of butter in a skillet over medium heat. Sear each roll until golden brown on all sides (about 4-5 minutes).
- Transfer the rolls to a baking dish and bake for 20-25 minutes until cooked through (internal temperature should reach 165°F).
- For the sauce, melt remaining butter in a saucepan, whisk in flour, then gradually add milk while stirring until smooth. Add Swiss cheese until melted.
- Drizzle the sauce over baked chicken rolls before serving.
Nutrition
- Serving Size: 1 serving
- Calories: 420
- Sugar: 2g
- Sodium: 760mg
- Fat: 20g
- Saturated Fat: 10g
- Unsaturated Fat: 7g
- Trans Fat: 0g
- Carbohydrates: 33g
- Fiber: 2g
- Protein: 32g
- Cholesterol: 115mg