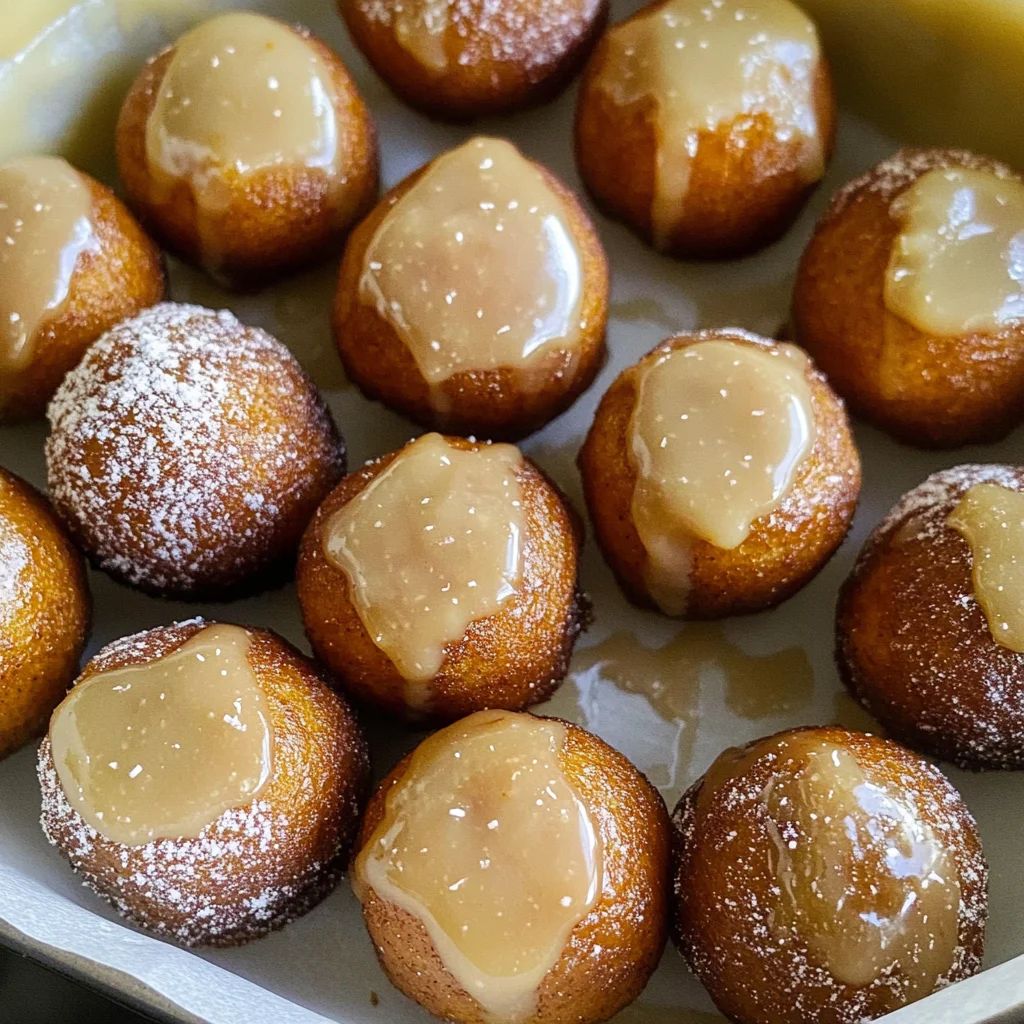
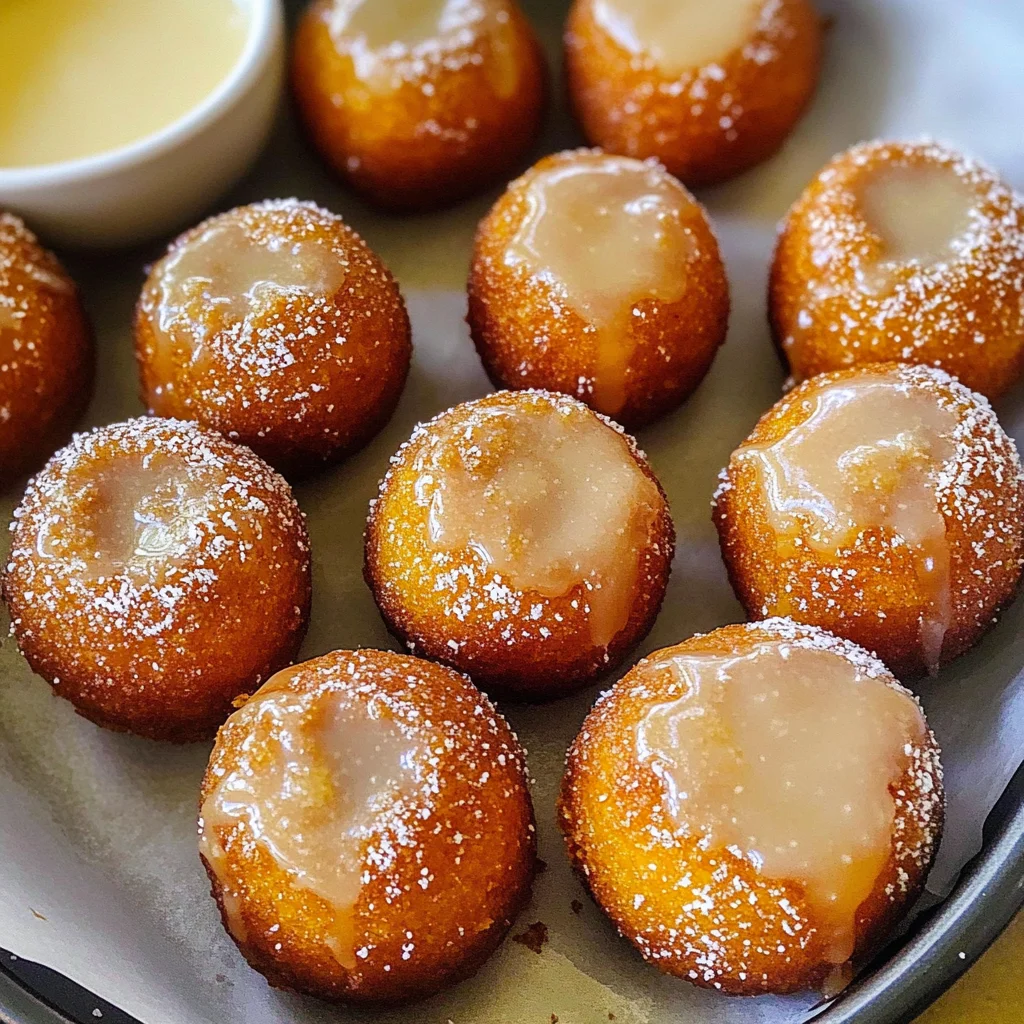
Healthy Pumpkin Donut Holes
When it comes to the heartwarming embrace of autumn, nothing quite captures the essence of this glorious season like the sweet, spicy aroma of pumpkin wafting through your kitchen. As the leaves turn golden and the air becomes crisp, I find myself irresistibly drawn to cozy baking sessions that transform simple ingredients into little bites of joy. Today, I’m thrilled to share with you my recipe for Healthy Pumpkin Donut Holes—a delightful treat that transcends mere dessert; it’s an experience, a celebration of flavor that embodies everything we love about fall. Imagine sinking your teeth into these tiny, moist donut holes, each one perfectly spiced with warm cinnamon and nutmeg, then dipped in a luscious maple glaze that coats them in liquid gold. The joy of creating these delectable morsels is something I simply cannot keep to myself.
These Healthy Pumpkin Donut Holes are not just any dessert; they come with a promise—a promise that you can indulge without the guilt! Crafted with gluten-free and grain-free ingredients, these treats are designed for everyone to enjoy. The star of this show is undoubtedly pumpkin puree, which brings not only moisture but also a beautiful depth of flavor and a vibrant hue to each bite. As we embark on this culinary journey together, I want you to feel empowered and excited about every step. Trust me when I say that you’ll be wanting these little gems in your life all year round—not just during the fall season! So grab your apron and let’s dive into this delightful adventure!
Healthy Pumpkin Donut Holes: A Sweet Autumn Delight
These mini pumpkin donut holes are everything you could dream of and more! With their fluffy texture and rich flavor profile enhanced by warm spices, they are perfect for breakfast or as an afternoon snack. Plus, they’re so easy to whip up that you might find yourself making them on repeat! Let’s get started on crafting these delicious bites together.
Ingredients:
As we gather our ingredients for these Healthy Pumpkin Donut Holes, let’s take a moment to appreciate each component—these aren’t just items on a list; they’re essential players in our recipe’s symphony of flavors.
- 1/4 cup (27g) coconut flour. Coconut flour is an absolute treasure in gluten-free baking; it’s light and fluffy yet packed with fiber. It absorbs moisture like a sponge, which helps create that wonderful texture we crave in our donut holes. When choosing coconut flour, look for finely ground options—this ensures even distribution throughout our batter. If you’re ever in need of a substitute due to allergies or availability issues, you could use almond flour or a gluten-free blend; however, be aware that the absorption rates differ significantly.
- 2 eggs. Eggs play a dual role here—they are both binders and leaveners. They help hold our batter together while also providing structure and moisture. Make sure to use room-temperature eggs as they incorporate more easily into the batter, leading to an even mix without any clumps. This little tip is crucial for achieving those perfectly fluffy donut holes!
- 1/2 cup (125g) pumpkin puree. The beloved pumpkin puree is what gives these donuts their signature flavor and moistness. When selecting pumpkin puree, opt for 100% pure canned pumpkin rather than pie filling (which often contains added sugars and spices). You can even make your own by roasting fresh pumpkins at home; just remember to purée until smooth! This ingredient isn’t just there for taste—it brings nutrients like vitamin A and fiber into our lives.
- 2 tablespoons honey or maple syrup. Both honey and maple syrup add sweetness while also serving as natural humectants—they help retain moisture in our baked goods! If you prefer a distinct flavor profile from your sweetener, go for maple syrup—it adds a lovely caramel note that complements pumpkin beautifully. Alternatively, honey provides its own unique charm with floral undertones; choose what resonates with your palate!
- 1 teaspoon vanilla extract. Vanilla is like the fairy dust of baking—it enhances all other flavors present in our donut holes while adding its own sweet aroma that makes everything feel special. Always opt for pure vanilla extract over imitation varieties when possible; it truly makes all the difference in elevating your dish.
- 1 teaspoon pumpkin spice. This magical blend typically consists of cinnamon, nutmeg, ginger, and cloves—each spice contributing its unique warmth to our donut holes. If you don’t have pumpkin spice on hand, don’t fret! You can easily whisk together equal parts cinnamon and nutmeg along with smaller amounts of ginger and cloves if desired.
- 1/2 teaspoon cinnamon. While already included in our pumpkin spice mixture, adding extra cinnamon amplifies its aromatic presence within each bite—creating an utterly intoxicating experience as they bake in your oven! Cinnamon has warming properties that evoke comfort; it’s essential for creating those cozy vibes during chilly autumn days.
- 1 teaspoon baking powder. This leavening agent is absolutely paramount! Its job is to create air pockets within the batter as it bakes—resulting in those soft donut holes we adore instead of dense disks! Ensure your baking powder is fresh for optimal rise—check expiration dates if you’re unsure!
- 1 tablespoon melted coconut butter. Coconut butter adds richness while enhancing both flavor and moisture content throughout each donut hole—it’s almost like giving them an indulgent hug! It melts beautifully when heated but firms up again upon cooling—making every bite delightfully tender yet satisfying.
- 1 tablespoon dairy-free milk. Any plant-based milk will do here—be it almond milk or oat milk—the goal is to achieve the right consistency for our glaze while keeping things creamy without dairy products involved! This ingredient ties everything together beautifully without overwhelming any flavors.
Now that we’ve gathered all these wonderful elements together let’s set ourselves up for success with some essential tools you’ll need.
Equipment You’ll Need:
Having the right tools at hand makes all the difference in ensuring your baking experience flows smoothly—and trust me when I say you’ll thank yourself later when everything goes according to plan!
- Mini muffin tray: This specialized tray allows us to create those adorable mini donut holes we desire! It’s essential because traditional muffin tins will yield larger portions than intended—so if you’re aiming for cute little bites perfect for sharing (or not!), invest in this tool!
- Mixing bowls: A good set of mixing bowls will serve as your canvas during this culinary creation process! Opt for glass or stainless steel options—they’re durable and allow you to see what’s happening inside as you whisk away happily!
- Whisk: A trusty whisk is key for combining wet ingredients seamlessly before introducing dry ones; using one helps aerate mixtures which leads us towards fluffier results overall—a worthy investment indeed!
- Rubber spatula: This versatile tool can scrape down sides effectively ensuring no clumps remain untouched within mixtures—it helps us achieve uniformity across all portions too which means consistent flavors throughout!
- Measuring cups & spoons: Precision matters greatly when baking! Use standardized measuring tools designed ideally specifically for dry versus liquid ingredients respectively—this guarantees accuracy leading towards delightful outcomes every time!
With everything prepped and ready—let’s jump straight into making those delicious Healthy Pumpkin Donut Holes!
Step 1: Preheat Your Oven & Prepare Your Muffin Tray
First things first—we want our oven heated precisely at 160°C (350°F). Preheating allows us to bake evenly right from the start instead of shocking cold batter into an already hot environment—a definite no-no if we’re striving towards perfection here! While it warms up blissfully ahead of time (just close your eyes and imagine how wonderful it’s going to smell), take out your mini muffin tray—the star vessel where all magic will happen—and grease it generously using coconut oil or spray oil if preferred.
Step 2: Whisking Together Wet Ingredients
In a large mixing bowl—the kind that’ll fit comfortably under both hands—you’ll introduce two eggs alongside half a cup of luscious pumpkin puree followed by two tablespoons each of either honey/maple syrup plus one teaspoon vanilla extract too! Grab that whisk once again because we’ll need it here—it’s time to combine all those ingredients until smooth yet homogenous—a gentle motion will do wonders here allowing everything meld beautifully without overworking them unnecessarily!
Step 3: Incorporating Dry Ingredients
Next comes another important step—we’re going back into action by gently folding coconut flour together with various spices alongside baking powder directly into our previously mixed wet concoction from earlier on. Trust me when I say taking care during this part ensures no lumps remain after combining properly since lumps lead towards undesirable texture later on down road… so proceed cautiously yet confidently until fully incorporated yielding a thick batter resembling cake-like consistency ready soon enough find home nestled within those awaiting muffin cavities ahead…
Step 4: Baking Time!
Now comes perhaps one of most exciting moments—the actual baking process itself! Carefully fill each mini muffin hole approximately three-fourths full using either spoonfuls or perhaps even piping bag depending upon preference level—you’ll want enough room left above surface area since they’ll expand slightly whilst heating up throughout duration spent inside oven environment reaching optimal temperatures needed achieve golden brown perfection shortly thereafter around fifteen minutes mark roughly… Keep close watch though as ovens vary slightly regarding timing aspects so use toothpick test method if necessary checking doneness levels achieved prior pulling out tray safely onto wire rack cool off completely before further adorning surfaces later ahead…
This initial journey gives us such promise—a transformation from simple ingredients into something truly extraordinary awaits us as we prepare glaze next before final assembly takes place involving delightful touches enhancing visual appeal alongside taste alike… Keep at it—you’ve got this friend!!
With excitement brewing around every corner let’s carry forward unveiling secrets shared behind every step taken towards crafting gorgeous indulgences meant cherished moments shared amongst loved ones…
Step 5: Create Your Magical Maple Glaze
Now, let’s talk about that utterly intoxicating glaze that will elevate your Healthy Pumpkin Donut Holes to a level of deliciousness you never knew existed. While your little donut holes are baking away in the oven, take this time to whisk together the ingredients for the glaze. In a medium bowl, combine 1 tablespoon of melted coconut butter, 1 tablespoon of maple syrup, and 1 tablespoon of dairy-free milk. The melted coconut butter acts as a dreamy base, giving the glaze a luscious texture and an inviting aroma, reminiscent of warm vanilla and sweet caramel. If you find that the mixture is too thick (which can happen if the coconut butter has solidified), simply pop it in the microwave for about 30 seconds. This step is crucial because it ensures your glaze is smooth and uniform, allowing it to cling beautifully to each donut hole.
As you mix these ingredients together, be sure to keep an eye on the consistency; it should be pourable but still thick enough to provide a lovely coating without running off completely. Trust me on this—getting the right balance makes all the difference between a simple drizzle and a truly enchanting finish. Once combined, set your glaze aside and allow those yummy scents from the oven to fill your kitchen while you wait for your pumpkin donut holes to come out.
Step 6: Cooling Time – The Sweet Anticipation
Once your timer goes off after about 15 minutes of baking—oh, what joy!—it’s time to check on your donut holes. Carefully remove the tray from the oven and let it sit for just a minute or two; I know this anticipation is tough, but trust me when I say that letting them cool slightly before handling them is non-negotiable! This brief cooling period not only helps set their shape but also makes them easier to remove from the tray without breaking apart. You want each bite to be perfectly intact, bursting with flavor!
After a couple of minutes have passed, gently run a knife around the edges of each donut hole to help release them from their cozy little muffin homes. Then, flip them onto a wire rack or plate to cool completely. Watching these golden-brown beauties emerge from their molds is one of my favorite moments in cooking—the way they glisten in the light is simply magical! Make sure they cool down enough so that when you dip them into that glorious maple glaze, they won’t melt it away; we want our glaze to cling lovingly instead.
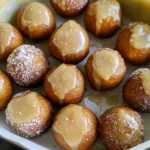
Step 7: Dipping Delights – The Art of Glazing
Now comes one of my favorite parts—dipping those perfectly baked Healthy Pumpkin Donut Holes into that luscious maple glaze! Prepare yourself for pure bliss as you take each cooled donut hole and dip it into your prepared glaze. It’s best if you do this while holding them gently by their tops; this way, you get an even coat without compromising their delicate structure. As you lift each one out of the glaze, give it a gentle shake—this allows any excess glaze to drip back into the bowl rather than pooling at the bottom.
But wait! Before they dry completely, take this opportunity to coat them lightly with either coconut flour or powdered sugar for an extra touch of sweetness and presentation flair. The contrast between the warm flavors of pumpkin spice and cinnamon with that delicate dusting creates an inviting visual treat that beckons you closer with every glance! Remember not to rush this step; taking your time will ensure each donut hole is perfectly dressed in its sweet attire.
Step 8: Final Touches – A Moment of Magic
As you gaze at your beautifully glazed Healthy Pumpkin Donut Holes resting on their plate or platter, allow yourself a moment of pride—you’ve just created something truly extraordinary! These delightful bites are now ready for devouring but hold on just a second; I encourage you to let them rest for at least 10-15 minutes before diving in. Why? Because allowing them some time lets those flavors meld beautifully together while also ensuring that glaze sets up nicely.
During this waiting period, consider brewing yourself a cup of herbal tea or perhaps some warm spiced cider—both pair magnificently with these pumpkin delights! Take note of how delightful your kitchen smells; it’s like stepping into autumn itself! And when you’re finally ready to indulge in these healthy treats, just know that every bite will remind you how much love and care went into making these scrumptious donuts. Each one offers not just flavor but also comfort—a true testament to what home cooking is all about!
Conclusion:
As we wrap up this delightful journey together through the creation of these Healthy Pumpkin Donut Holes, I can’t help but feel excited about all the flavors and joy packed into each little bite! From the first whisk of eggs and pumpkin puree to the intoxicating scent wafting through your kitchen as they bake, every step is infused with love and anticipation. It’s not just about making donuts; it’s about creating memories—ones filled with laughter and indulgence that you can share with family and friends. These donut holes are truly special because they blend warm spices like cinnamon and pumpkin spice with wholesome ingredients that make each bite feel wonderfully indulgent yet guilt-free.
Why should you try making these Healthy Pumpkin Donut Holes? Well, beyond their irresistibly soft texture and rich flavor profile, there’s immense joy in crafting something delicious from scratch that everyone can enjoy—whether you’re hosting a brunch or just treating yourself after a long day. Picture pulling these golden-brown beauties from the oven; the soft thud as they land on your cooling rack creates an anticipation that makes every moment worthwhile. Each bite is bursting with flavor, making it nearly impossible not to share—and trust me; everyone will want to know your secret!
Imagine savoring one of these delectable morsels alongside a steaming cup of chai tea or coffee—the spice mingling harmoniously with the rich pumpkin sweetness creates sheer bliss! For an afternoon pick-me-up, pair them with almond butter spread lightly across their tops for added creaminess; it’s truly heavenly! And if you’re feeling extra indulgent, drizzle some extra maple glaze over one while it’s still warm—oh my goodness, what an experience!
Feeling adventurous? This recipe is wonderfully adaptable too! How about adding dark chocolate chips for an extra splash of excitement? Or maybe subbing out coconut flour for almond flour if you’re looking for different textures? You could even toss in some finely chopped nuts or swap out pumpkin puree for sweet potato puree—it all sounds absolutely divine! I encourage you to dive deep into this recipe’s potential and let your creativity flow. Share your experiences with me—I would love nothing more than to hear how your versions turned out!
Healthy Pumpkin Donut Holes
Indulge in the cozy flavors of fall with these Healthy Pumpkin Donut Holes! Perfectly spiced with cinnamon and nutmeg, each bite is moist and delightful, topped with a luscious maple glaze that adds just the right amount of sweetness. These guilt-free treats are crafted with gluten-free and grain-free ingredients, making them a wholesome option for breakfast or an afternoon snack. Easy to make and utterly delicious, you’ll want to keep this recipe on hand all year round!
- Prep Time: 10 minutes
- Cook Time: 15 minutes
- Total Time: 25 minutes
- Yield: About 12 donut holes 1x
- Category: Dessert
- Method: Baking
- Cuisine: American
Ingredients
- 1/4 cup coconut flour
- 2 eggs
- 1/2 cup pumpkin puree
- 2 tablespoons honey or maple syrup
- 1 teaspoon vanilla extract
- 1 teaspoon pumpkin spice
- 1 teaspoon baking powder
- 1 tablespoon melted coconut butter
- 1 tablespoon dairy-free milk
Instructions
- Preheat your oven to 160°C (350°F) and grease a mini muffin tray.
- In a large bowl, whisk together the eggs, pumpkin puree, honey (or maple syrup), and vanilla extract until smooth.
- Gradually fold in coconut flour, pumpkin spice, baking powder, and melted coconut butter until well combined.
- Fill each muffin hole about three-fourths full with batter.
- Bake for approximately 15 minutes or until lightly golden and a toothpick comes out clean.
- Allow donut holes to cool slightly before transferring them to a wire rack.
Nutrition
- Serving Size: 1 serving
- Calories: 47
- Sugar: 3g
- Sodium: 43mg
- Fat: 2g
- Saturated Fat: 2g
- Unsaturated Fat: 0g
- Trans Fat: 0g
- Carbohydrates: 7g
- Fiber: 2g
- Protein: 1g
- Cholesterol: 0mg