Crispy Quinoa Cacao Cookies (No-Bake!)
There’s something profoundly satisfying about creating a treat that not only pleases the palate but also nourishes the body. These Crispy Quinoa Cacao Cookies (No-Bake!) are more than just a dessert; they represent a delightful intersection of health and indulgence, where every bite is a celebration of flavor and wellness. Imagine the sound of a satisfying crunch as your teeth sink into these little wonders, releasing a rich cacao essence that dances across your taste buds. The sweetness of maple syrup carries you through, while the unique texture of crispy puffed quinoa adds that irresistible crunch. It’s not just food; it’s an experience that invites you to savor each moment, reminding us that healthy eating can be a joyous adventure rather than a chore.
I’ve always been captivated by how simple ingredients can come together to create something utterly extraordinary. This recipe is particularly special because it provides an easy way to enjoy the benefits of wholesome ingredients without the hassle of baking. In just 15 minutes, you can whip up these cookies and have them ready to chill in the freezer. Perfect for when that sweet tooth strikes or when you need a quick pick-me-up after a long day! I promise you, once you stock your fridge with these delicious nuggets of joy, you’ll find yourself grateful for this little gem of a recipe time and time again.
Crispy Quinoa Cacao Cookies (No-Bake!): A Crunchy Delight for Every Sweet Tooth
Join me on this delicious journey as we dive into crafting these delightful no-bake cookies! They are not only gluten-free and vegan but also incredibly simple to make—perfect for both seasoned cooks and kitchen novices alike. Each ingredient plays an essential role in creating this symphony of flavors, ensuring you enjoy every bite without any guilt. Let’s gather our ingredients and get started on this healthy yet indulgent treat!
Ingredients:
As we embark on this culinary adventure together, let’s take a moment to appreciate each ingredient that contributes to our Crispy Quinoa Cacao Cookies (No-Bake!). Each element is carefully selected not just for its taste but also for its nutritional value, making this treat both delightful and nourishing.
- 1/4 cup coconut butter. Coconut butter is truly magical, boasting a creamy texture and subtle sweetness that enhances our cookies beautifully. When melted, it acts almost like glue, binding all the other ingredients while providing healthy fats that promote satiety. If you’re looking for an alternative, coconut oil works well too—though keep in mind it will lend a slightly different texture to your final cookie.
- 1/4 cup unsweetened sunflower seed butter. This nut-free option is perfect for anyone with allergies but don’t underestimate its flavor! Sunflower seed butter brings depth with its rich nuttiness while remaining completely plant-based. It provides protein and healthy fats that are essential for keeping those hunger pangs at bay. Feel free to substitute with any nut or seed butter of your choice if that’s more your style—just be mindful of flavors that could overpower the cacao!
- 1/3 cup maple syrup. Oh, liquid gold! Maple syrup sweetens our cookies naturally while adding its own unique flavor profile—a hint of caramel-like richness that complements our other ingredients wonderfully. When choosing maple syrup, opt for pure varieties over imitation ones; they are less processed and offer superior taste as well as nutritional benefits.
- 1 teaspoon pure vanilla extract. This might seem like a small addition, but trust me—vanilla is absolutely paramount in enhancing the overall flavor profile! The warmth from vanilla rounds out the sweetness perfectly while adding complexity to our chocolatey cookies.
- 3 tablespoons unsweetened cacao/cocoa powder. Cacao powder gives these cookies their chocolatey goodness without any unnecessary sugars or additives found in many commercial chocolates. Its intense flavor pairs beautifully with all other ingredients while providing antioxidants known for their health benefits!
- 1/8 teaspoon salt. Though seemingly minor, salt plays an incredible role in balancing flavors—it amplifies sweetness and enhances depth in every bite! So don’t skip this step; it’s non-negotiable when creating such vibrant treats.
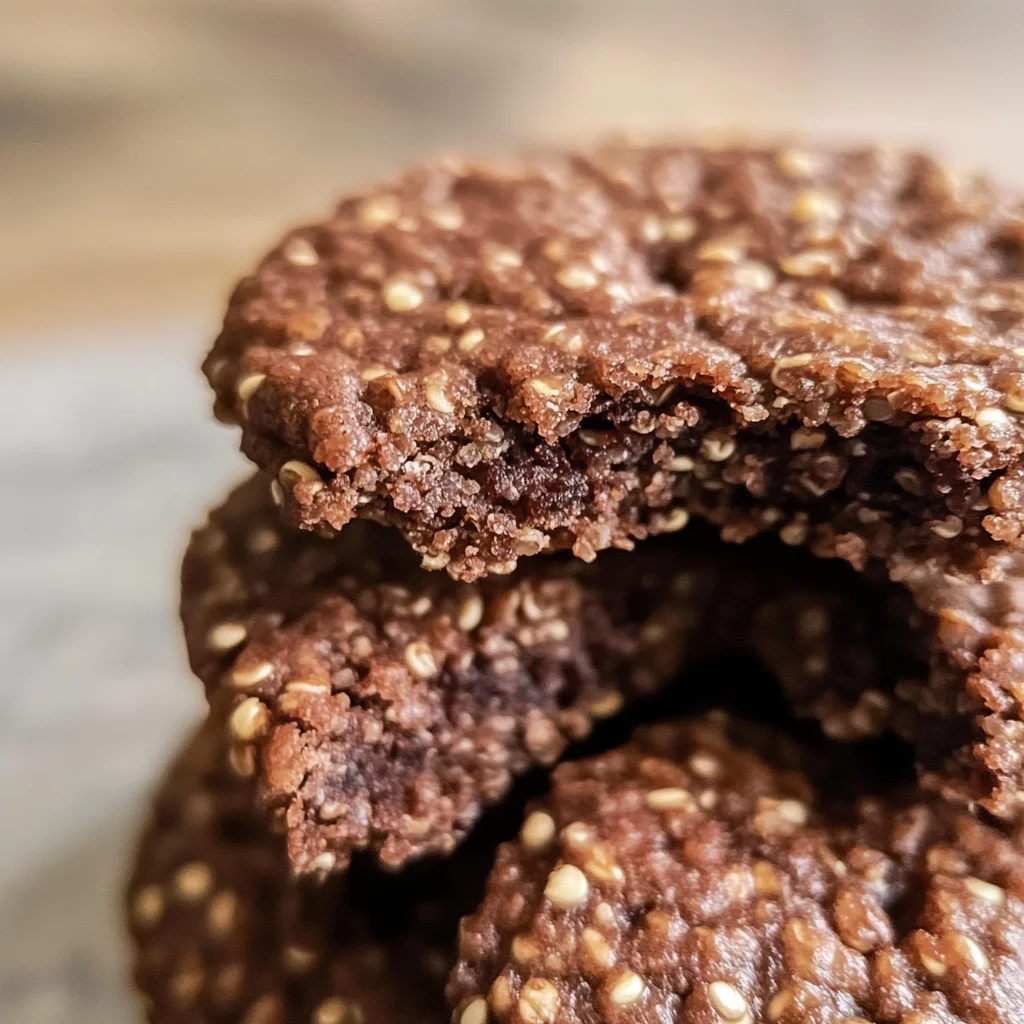
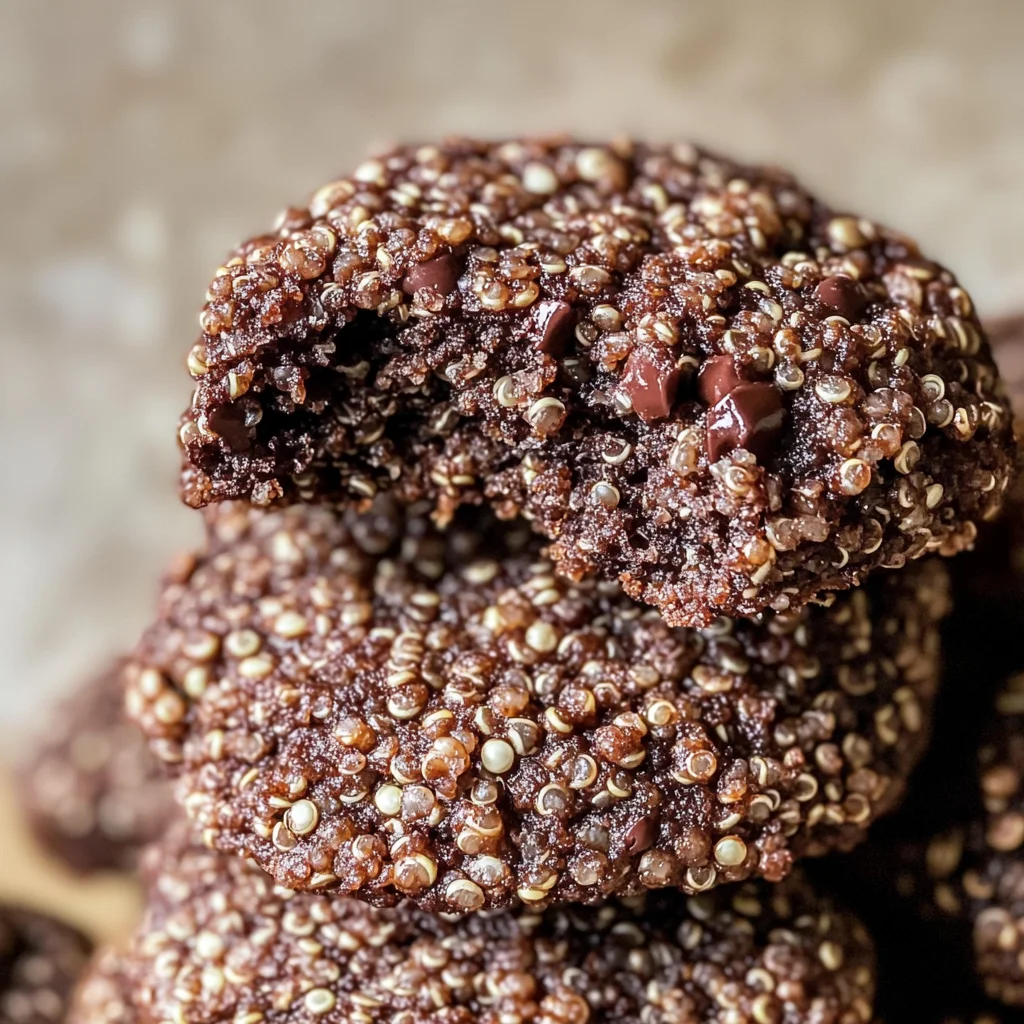
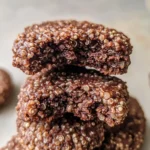
- 2 cups crispy puffed quinoa. This ingredient is what sets these cookies apart! Puffed quinoa offers wonderful crunchiness while being gluten-free and packed with nutrients like protein and fiber—making each cookie feel hearty yet light at the same time!
Equipment You’ll Need:
Before we dive into making these delectable cookies, let’s ensure we have all our tools ready at hand! Having the right equipment makes everything smoother—and trust me; you’ll want this experience to be enjoyable rather than chaotic.
- Parchment paper – A must-have when baking or assembling no-bake treats like ours! It prevents sticking, making removal effortless while preserving those beautiful shapes you’ll create.
- Medium bowl – This will be the heart where our ingredients come together harmoniously before transforming into cookie magic! A sturdy bowl helps when whisking everything vigorously—so choose one that’s both durable and spacious enough.
- Whisk – A trusty whisk allows us to blend our wet ingredients smoothly before incorporating dry ones—a critical step ensuring even distribution throughout our mixture.
- Small cookie scoop or tablespoon – For portioning out those cookies evenly while maintaining consistent sizes throughout each batch! This ensures they set correctly in the freezer without some being too large or small—consistency is key here!
- Freezer-safe container – To store your finished cookies so they’re always on hand whenever cravings strike! Opt for an airtight container to maintain freshness over time.
Now that we have everything prepared let’s move on to crafting those delightful Crispy Quinoa Cacao Cookies (No-Bake!). Trust me; you’re going to love how easy this process is—and how rewarding it feels when you finally indulge in your creations!
Step 1: Melting Our Base
Start by lining a baking sheet with parchment paper—this provides an essential non-stick surface for your cookies later on! In a medium bowl (make sure it’s microwave-safe), combine coconut butter, sunflower seed butter, maple syrup, and vanilla extract before melting them together in the microwave for about 30 seconds. Keep an eye on it; we want everything warm enough to blend smoothly but not boiling hot! Once melted, whisk vigorously until everything becomes one luscious mass—a smooth consistency is crucial here as it ensures even incorporation of flavors later on.
Step 2: Incorporating Flavors
Once you’ve achieved that silky mixture from Step 1, it’s time to introduce cacao powder along with salt into our base! Gently sift them over your melted concoction then whisk again until fully combined—this step isn’t just about mixing; it’s about elevating flavors together into something truly extraordinary! The deep chocolate essence should now envelop everything beautifully—take a moment here to appreciate how rich it’ll taste once set!
Step 3: Folding in Puffed Quinoa
Now comes one of my favorite parts: gently folding in those crispy puffed quinoa pieces! Using a spatula (or wooden spoon), carefully incorporate them without smashing their delicate structure—we want every crunchy nugget intact within each cookie bite after all! As you fold them gently into your chocolate mixture—it’s like watching tiny stars twinkle against dark velvet sky—it’s mesmerizing!
Step 4: Shaping Your Cookies
With everything combined beautifully now comes time for shaping! Using either your small cookie scoop or tablespoon measure out portions onto lined baking sheet until there’s none left behind… how exciting is that? Gently flatten each mound slightly into rounds—or whatever shape suits your heart’s desire—as they’re still quite loose at this point they’ll firm up significantly as they chill later on!
And there you have it—the first few steps towards creating these incredible Crispy Quinoa Cacao Cookies (No-Bake!). Remember patience during chilling will yield wonderfully textured results so don’t rush—we’re nearly there! Let’s continue in our next section as we finish bringing these heavenly bites into fruition…
Step 5: Shape and Scoop with Love
Now, this is where the magic truly begins! Imagine that you’ve just created a luscious chocolatey mixture—it’s velvety and inviting. Using a small cookie scoop or a trusty tablespoon, gently scoop out generous amounts of the mixture onto your prepared baking sheet. Trust me on this: the shape doesn’t have to be perfect right now. You want to form them into delightful little mounds because as they chill, they’ll take on a firm yet tender structure that’s simply irresistible. It’s normal for the mixture to feel a bit loose at this point; it’s all part of the process!
As you scoop, take a moment to appreciate the rich aroma wafting through your kitchen. The combination of coconut butter and sunflower seed butter creates an intoxicating scent that mingles beautifully with the cocoa powder—a true testament to your culinary prowess! Gently flatten each mound with your fingers or the back of a spoon, shaping them into rounds or whatever whimsical form appeals to you. This step is crucial because it helps create even surfaces that will firm up nicely in the next phase. Remember, these cookies are meant to be crunchy yet melt-in-your-mouth delicious!
Step 6: Chill Out for Perfect Texture
Once you’ve shaped all your cookies, it’s time for them to chill out in the freezer. Why chill, you ask? Well, here’s the beauty of patience in cooking—the cooling process allows those flavors to meld together harmoniously while also helping each cookie firm up so they can hold their beautiful shape when you bite into them later. Place your baking sheet in the freezer and set your timer for about 30 minutes. As they chill, keep in mind that this is not just about making them solid; it’s about transforming those layers of flavor into something profoundly satisfying.
During this time, I encourage you to clean up your workspace and reflect on how these simple ingredients have come together to create something truly extraordinary. It’s also an excellent opportunity to prepare yourself for the delightful treat that awaits you! When those 30 minutes are up, peek into the freezer—what you’re looking for is a slight firmness when you press gently on one of the cookies. They should hold their shape but still have a little give; if they’re too hard, they may need more time to soften slightly before serving.
Step 7: Store Your Masterpieces
With your cookies beautifully chilled and ready to go, it’s essential to think about storage now. You might be tempted to dive right in and devour every last morsel (and who could blame you?), but let’s talk about keeping these beauties fresh so that you can enjoy them over several days—or weeks if you’re feeling generous! Carefully transfer your cookies into an airtight container. This step is absolutely paramount because it helps retain their texture and flavor long after they’ve left their chilly abode in the freezer.
I recommend layering parchment paper between each layer of cookies if you’re stacking them; this prevents any sticking—trust me, there’s nothing worse than pulling apart two deliciously sticky cookies! Once packed away snugly, return them to the freezer where they’ll stay perfectly crispy until you’re ready for a treat. And here’s a fun tip: if you ever find yourself needing an energy boost during those afternoon slumps or post-workout cravings, just pop one (or two) straight from the freezer—they’re even more refreshing chilled!
Step 8: Time for Indulgence!
Finally, after all that hard work—and trust me when I say it was worth every minute—it’s time for indulgence! When you’re ready to enjoy these Crispy Quinoa Cacao Cookies, simply take them out of the freezer and let them sit at room temperature for just a few minutes. This brief wait allows them to soften slightly at their edges without losing that satisfying crunch we’ve all been dreaming about since we started making them.
As you take that first bite, close your eyes and savor everything—feel how they crumble delightfully in your mouth while releasing waves of chocolatey goodness mixed with hints of coconut and nutty sunflower seed butter. The texture is like nothing else—crunchy yet tender—and I promise you will be transported straight into cookie heaven! Share them with friends or keep them all to yourself; these cookies are versatile enough for every occasion—from casual snack time with loved ones to impressing guests at a dinner party.
Conclusion:
As we wrap up this culinary adventure together, I hope your excitement matches mine! Creating these Crispy Quinoa Cacao Cookies has been nothing short of exhilarating—the way each ingredient combines into something profoundly satisfying is truly extraordinary. The subtle sweetness from maple syrup perfectly balances the rich depth of cacao while the crispy quinoa adds an unforgettable crunch. These aren’t just cookies; they embody simplicity and joy wrapped up in one delectable bite!
This recipe is not only easy but also incredibly versatile, making it a must-try for anyone looking to indulge their sweet tooth without the guilt. Whether you’re whipping them up for an afternoon pick-me-up or bringing them to share with friends at a gathering, each cookie invites smiles and happy chatter. Picture yourself pulling these from your fridge or freezer—they’re always there when you need them most, promising satisfaction with every bite.
For serving suggestions, imagine savoring one of these delightful cookies alongside your morning coffee or tea; they make for an energizing breakfast treat too! You could crumble some over yogurt for a crunchy topping or pair them with fresh fruit for a truly indulgent dessert experience that feels both luxurious and wholesome. And if you’re feeling adventurous, try dipping them in dark chocolate—what an utterly intoxicating fusion that would be!
Feeling adventurous? This recipe is wonderfully adaptable! You could swap out sunflower seed butter for almond butter if that’s more your style or add some chia seeds or dried fruits for an extra burst of flavor and nutrition. Each variation opens up new dimensions of taste while remaining true to its heart—simple yet spectacularly delicious! I encourage you to try this recipe out for yourself and share your personal touch; let’s connect over this shared love of food and creativity in the kitchen!
Crispy Quinoa Cacao Cookies (No-Bake!)
Crispy Quinoa Cacao Cookies (No-Bake!) are the perfect blend of health and indulgence. These delightful treats offer a satisfying crunch, complemented by rich cacao and sweet maple syrup, making them an ideal snack for any time of day. With their easy no-bake preparation, you can whip up a batch in just 15 minutes, allowing you to enjoy wholesome ingredients without the hassle of baking. Each cookie is not only gluten-free and vegan but also packed with nutrients from puffed quinoa and healthy fats from coconut and sunflower seed butter. Whether you’re looking for an afternoon pick-me-up or a guilt-free dessert, these cookies promise both flavor and wellness in every bite.
- Prep Time: 15 minutes
- Cook Time: 0 minutes
- Total Time: 15 minutes
- Yield: Approximately 12 cookies 1x
- Category: Dessert
- Method: No-Bake
- Cuisine: Vegan
Ingredients
- 1/4 cup coconut butter
- 1/4 cup unsweetened sunflower seed butter
- 1/3 cup maple syrup
- 1 teaspoon pure vanilla extract
- 3 tablespoons unsweetened cacao/cocoa powder
- 1/8 teaspoon salt
- 2 cups crispy puffed quinoa
Instructions
- Line a baking sheet with parchment paper.
- In a microwave-safe medium bowl, combine coconut butter, sunflower seed butter, maple syrup, and vanilla extract. Melt in the microwave for about 30 seconds, then whisk until smooth.
- Add cacao powder and salt to the melted mixture, whisking until fully combined.
- Gently fold in crispy puffed quinoa until evenly coated.
- Scoop portions onto the prepared baking sheet and flatten slightly.
- Place cookies in the freezer for about 30 minutes to firm up.
- Store in an airtight container in the fridge or freezer.
Nutrition
- Serving Size: 1 cookie (30g)
- Calories: 120
- Sugar: 7g
- Sodium: 45mg
- Fat: 7g
- Saturated Fat: 4g
- Unsaturated Fat: 3g
- Trans Fat: 0g
- Carbohydrates: 11g
- Fiber: 2g
- Protein: 3g
- Cholesterol: 0mg