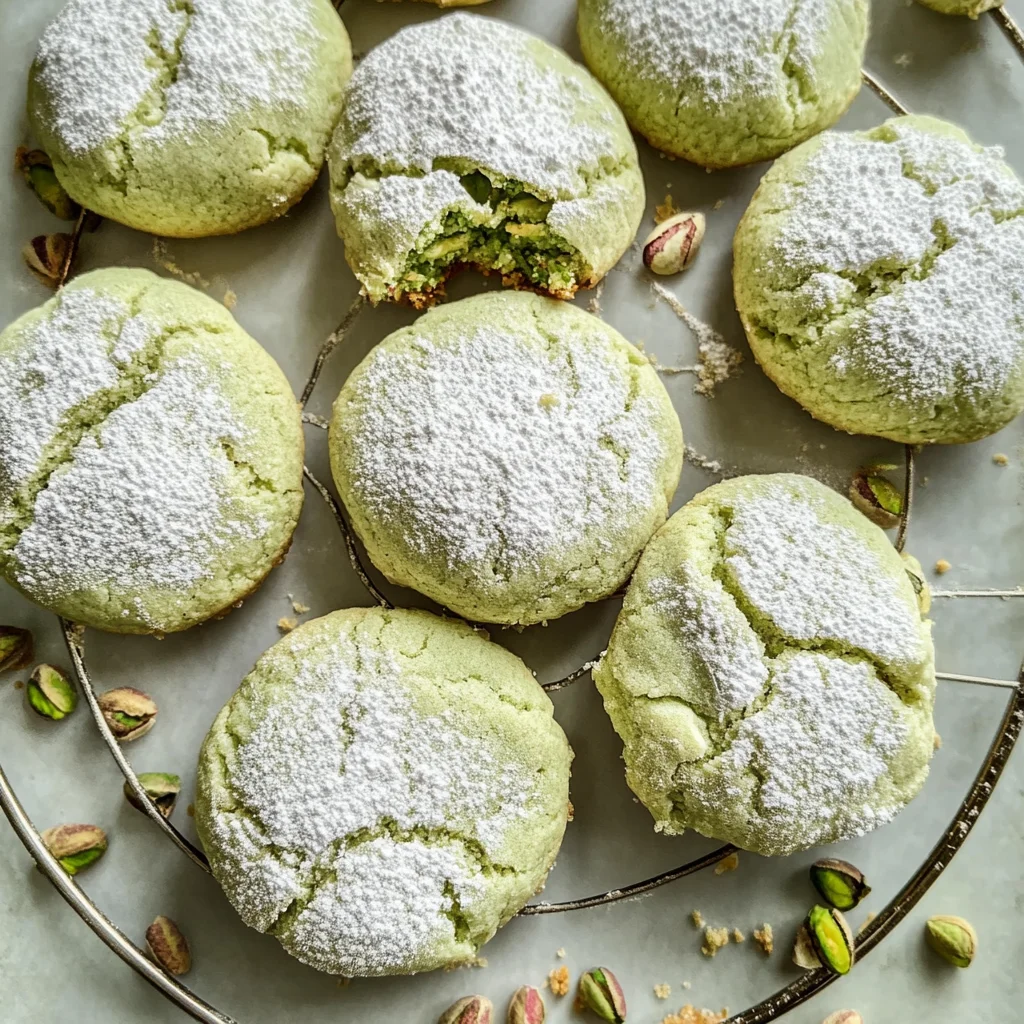
Pistachio Wedding Cookies
There’s something truly magical about the way certain recipes can transport you back in time, wrapping you in a warm embrace of nostalgia and love. For me, Pistachio Wedding Cookies are one of those enchanting treats that evoke memories of joyous celebrations and laughter-filled gatherings. The moment you take your first bite, the delicate crunch followed by a nutty explosion makes your taste buds dance with delight. These cookies aren’t just an indulgence; they are a testament to the joy of baking and sharing good food with those we cherish most. The vibrant green hue of pistachios not only brings a beautiful pop of color but also infuses these cookies with a rich flavor that is utterly intoxicating. Each cookie is like a little hug, offering warmth and comfort, making them perfect for any occasion or simply as a delightful treat during the week.
Baking these Pistachio Wedding Cookies is not just about following a recipe; it’s about creating an experience that connects us to our loved ones and our own culinary adventures. From the moment you start creaming butter to the final dusting of confectioners’ sugar, each step is infused with promise and anticipation. Whether you’re preparing them for a wedding celebration or simply to enjoy at home, I promise you, this recipe will become a cherished part of your baking repertoire. So gather your ingredients, roll up your sleeves, and let’s create something wonderful together!
Pistachio Wedding Cookies: Sweet Moments Wrapped in Flavor
I’m thrilled to share this recipe for Pistachio Wedding Cookies with you! These delightful treats are not only easy to make but also pack a punch of flavor that will leave everyone asking for seconds. With their crumbly texture and subtly sweet taste, these cookies embody everything we love about baking—simple ingredients coming together to create utter perfection.
Ingredients:
As we embark on this culinary journey together, let’s take a moment to appreciate each ingredient that contributes to our Pistachio Wedding Cookies. Every item plays an integral role in creating the symphony of flavors we’re aiming for.
- 1 cup (2 sticks or 226g) unsalted butter, softened. This is crucial for creaming properly and achieving that light, airy texture we’re after in our cookies. Softened butter incorporates air into the dough when beaten, which leads to tender yet slightly crisp edges—a hallmark of perfect cookies. If your butter is too cold, it won’t cream effectively; if it’s melted, the cookies will spread too thin while baking. For best results, I recommend using high-quality butter—European-style butter with higher fat content will elevate the richness and flavor significantly.
- 1 cup confectioners sugar (divided). This ingredient brings sweetness without being overwhelming—it’s essential for achieving that melt-in-your-mouth quality that defines these cookies. The fine granules dissolve easily into the butter during creaming and contribute to both flavor and texture in ways granulated sugar simply can’t match. We’ll be using half in the dough itself and saving the other half for tossing those warm cookies right out of the oven—a step that creates a beautiful finish.
- 2 teaspoons pure vanilla extract. Vanilla is often referred to as the soul of baking; its warm notes elevate all other flavors present in our cookies. Always opt for pure vanilla extract over imitation; the difference in depth and richness is night and day! This simple addition invites an inviting aroma into your kitchen as these delightful little morsels bake.
- 1 3/4 cups all-purpose flour. This staple acts as the backbone of our cookie dough structure while providing just enough stability without making them overly dense or chewy. When measuring flour, it’s vital not to pack it into your measuring cup; gently spooning it in ensures we have just the right amount for tenderness without sacrificing texture.
- 3.4 oz package pistachio instant pudding mix. This may come as a surprise, but this ingredient is what sets our Pistachio Wedding Cookies apart! Instant pudding mix not only adds moisture but also infuses rich pistachio flavor directly into every bite while contributing to that lovely soft texture we crave in baked goods. If you’re feeling adventurous or wish to experiment with flavors, feel free to swap it out for other varieties like almond or vanilla!
- 1/2 teaspoon salt. A pinch of salt enhances all aspects of flavor—it’s absolutely paramount because it balances sweetness while accentuating nutty undertones from our beloved pistachios! It may seem minimal compared to other ingredients, but trust me when I say this little addition has an outsized impact on overall taste.
Equipment You’ll Need:
Having the right tools makes all the difference when you’re baking—it transforms what could be a chaotic endeavor into an enjoyable experience filled with satisfaction and success! While they may not be ingredients themselves, these essential partners help us create something truly wonderful.
- Mixing bowls – A set of mixing bowls in various sizes is key for organizing your ingredients before diving into mixing them together without mess or confusion! Opt for glass or stainless steel bowls—they’re sturdy and usually dishwasher safe for easy cleanup afterward.
- Electric mixer (handheld or stand) – While it’s possible to mix everything by hand (and sometimes therapeutic!), an electric mixer saves time and energy—trust me on this one! Creaming butter until fluffy can be quite labor-intensive by hand; using an electric mixer ensures you’re able to achieve maximum aeration quickly.
- Measuring cups & spoons – Precision matters when baking—your measuring tools should be reliable so you can replicate these delightful cookies each time! Invest in dry measuring cups for solids like flour and liquid measuring cups designed specifically for liquids—this ensures accuracy every time.
- Baking sheets – A sturdy baking sheet lined with parchment paper helps distribute heat evenly while preventing sticking—non-stick varieties work well too if parchment isn’t available! Just remember: don’t overcrowd your sheets; give those cookies room to spread slightly as they bake!
Preparing the Pistachio Wedding Cookies
Step 1: Creaming Butter and Sugar Together
To kick off our adventure into cookie magic, let’s begin by creaming together our softened unsalted butter with half of our confectioners’ sugar until it’s light and fluffy—a process known as creaming! This step is crucial because it incorporates air into our mixture which leads us toward achieving those beautifully tender cookies we dream about biting into later on. You’ll want to beat them together at medium speed until you see pale yellow ribbons forming throughout—the consistency should resemble whipped cream rather than liquid gold (though both are delicious). Aim for about 3-5 minutes here; don’t rush this step! Properly creamed butter allows all subsequent ingredients to blend seamlessly while ensuring even rising during baking—so savor this moment!
Step 2: Adding Vanilla Extract
Once you’ve achieved that delightful fluffy consistency with your sugar-butter mixture, it’s time to add in those aromatic two teaspoons of pure vanilla extract! This simple yet transformative addition does wonders—it adds depth while enhancing overall flavor balance within our dough without overpowering any particular note from pistachios later on! Mix until fully incorporated—about another minute will do—then pause briefly just so you can inhale deeply—the scent wafting through your kitchen will undoubtedly entice anyone nearby!
Step 3: Combining Dry Ingredients
Now comes another exciting part: combining our dry ingredients! In a separate bowl (remember those handy mixing bowls?), whisk together 1 3/4 cups all-purpose flour along with one package (3.4 oz) pistachio instant pudding mix alongside half a teaspoon salt until evenly blended—this ensures no clumps remain hidden away once mixed into wet ingredients later on! Whisking allows air pockets within dry elements which helps avoid dense dough formations down the line—we want lightness here! Gradually fold this mixture gently into your creamy wet base using either spatula or wooden spoon until just combined—be cautious not overmix at this stage as gluten formation can lead us towards tough final textures instead!
Step 4: Chilling Our Dough
Once mixed thoroughly yet still soft enough under pressure from fingertips—you’ve made it through some key steps already! Now divide dough evenly into two halves before rolling each half carefully into balls then wrapping tightly in plastic wrap like precious treasures waiting patiently inside their parcels (because they are!). Placing wrapped dough balls inside refrigerator allows flavors meld beautifully while firming up slightly which assists shaping later while preventing excessive spreading during baking sessions ahead—I recommend letting them chill out there at least one hour—or even overnight if planning ahead feels possible today!
Stay tuned as we continue through these heartfelt steps toward creating truly extraordinary Pistachio Wedding Cookies—the journey has only begun!
Step 5: Shaping the Cookies with Love
Now that your dough has been resting in the refrigerator, it’s time to bring those beautiful Pistachio Wedding Cookies to life! Remove the dough from its chilly embrace, and unwrap it from the plastic wrap. You should feel a slight firmness, which is a sign that your patience has paid off. This chilling process is absolutely crucial because it allows the butter to solidify slightly, ensuring the cookies maintain their shape during baking. If you skip this step, you might end up with flat little discs instead of those delightful cookie puffs we all adore. So trust me on this — the wait is worth it!
Next, prepare your hands for a bit of fun! Using a teaspoon or a small scoop for consistency, take portions of dough and roll them into balls about one inch in diameter. The texture should be soft yet pliable; if it feels too sticky, don’t panic! A light dusting of flour on your hands can help. As you place each ball on the lined baking sheets, remember to give them some space—about an inch apart—because they’ll spread just enough to create that lovely shape we’re aiming for. The anticipation is building; can you smell the sweet aroma already?
Step 6: Prepping for Baking Bliss
With your cookie balls arranged beautifully on the baking sheets, it’s time to preheat your oven to 350 degrees Fahrenheit. This temperature is key because it’s just right for achieving that perfect golden exterior while keeping the insides tender and moist—think of it as creating a warm hug for each cookie! While the oven warms up, take a moment to admire your handiwork; these little spheres of joy are about to transform into something truly extraordinary.
Before sliding them into the oven, gently press down on each cookie ball with your fingertips. This step not only creates that characteristic shape but also ensures even baking throughout. You want them to be slightly flattened yet still thick enough to hold all that deliciousness inside. As you prepare for baking, keep an eye on those cookies as they bake—setting a timer for 9-10 minutes will help prevent overbaking. The cookies should look just barely set and have a hint of golden color around the edges when they’re ready to come out; they’ll continue cooking on the sheet even after being removed from heat.
Step 7: The Magical Moment of Baking
As you slide your trays into the preheated oven, take a deep breath and let that heavenly aroma fill your kitchen—it’s about to become intoxicating! Baking time is where science meets art; during these precious minutes, moisture evaporates while sugars caramelize, creating those delightful flavor notes we crave in every bite. You may notice that as they bake, they puff up ever so slightly—this is normal and exactly what we want!
Remember not to rush this step; patience is key here. Keep an eye on the clock and look for visual cues such as slight browning at the edges and a soft surface that springs back lightly when touched. If you see these signs after about 9 minutes, it’s time to pull them from the oven! Don’t worry if they seem a bit soft initially—they will firm up as they cool down.
Step 8: The Sweet Dusting Ritual
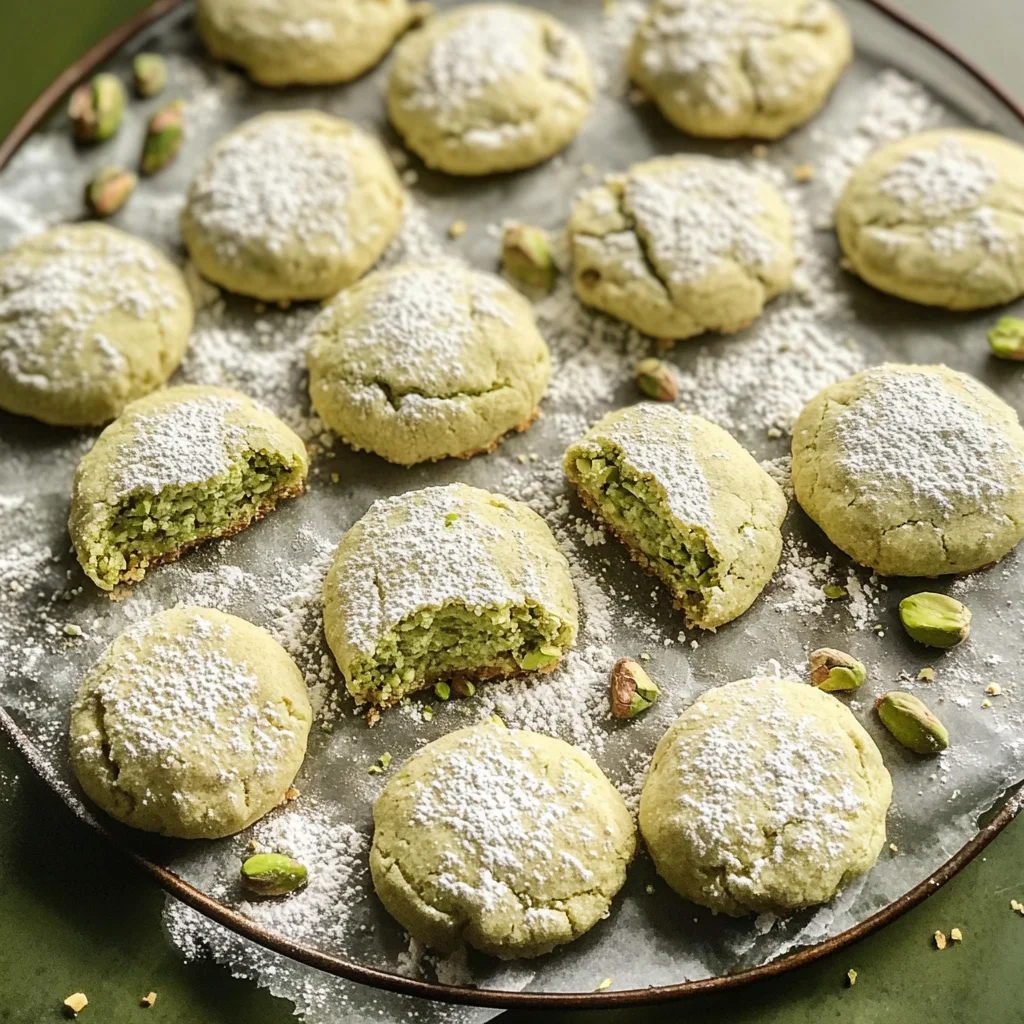
Once baked to perfection, remove those heavenly Pistachio Wedding Cookies from the oven and allow them to rest on their baking sheet for about five minutes. This critical resting period lets them set just enough before transferring them onto wire racks—if you try moving them too soon, they might crumble or lose their delightful shape! As you watch them cool, you’ll notice how they retain their delicate structure while exuding warmth and sweetness.
Now comes one of my favorite parts—the signature finish! While those cookies are still warm but not too hot (this helps prevent sugar clumping), gently toss them in confectioners’ sugar until they’re generously coated. This adds that magical snowy finish which not only makes them visually stunning but also brings an extra layer of sweetness that perfectly balances out their buttery flavor profile. It’s like giving each cookie its own little winter wonderland coat—a truly enchanting sight!
Conclusion:
As we wrap up this delightful journey through making Pistachio Wedding Cookies, I can’t help but feel excited about sharing this family favorite with you! From the moment you mix those creamy ingredients together to the intoxicating aroma wafting through your kitchen as they bake, each step is filled with warmth and joy. The unique combination of buttery richness paired with that subtly nutty pistachio flavor creates a truly extraordinary treat that elevates any occasion—from cozy afternoons at home to festive gatherings with loved ones.
But let me tell you why this recipe is an absolute must-try: it’s not just about satisfying your sweet tooth; it’s about creating memories while baking! The simplicity of these cookies makes them accessible even for novice bakers, yet they deliver such profound satisfaction that they’ll leave everyone asking for seconds (or thirds!). Picture pulling them from the oven: golden edges slightly crisp while the centers remain soft and tender—a sight so inviting you’d want to dive right in! Plus, whether you’re celebrating a special milestone or simply enjoying a quiet evening at home, these cookies are bound to bring smiles all around.
When it comes time to serve your Pistachio Wedding Cookies, imagine savoring one with a steaming cup of herbal tea—it’s sheer bliss! Or perhaps enjoy them alongside some fresh fruit for an afternoon pick-me-up that feels indulgent yet balanced. For those moments when you’re seeking something truly decadent, crumble a cookie over rich vanilla ice cream or drizzle some melted dark chocolate on top—oh my goodness, what a heavenly combination!
Feeling adventurous? This recipe is wonderfully adaptable! Consider incorporating different flavors by adding almond extract instead of vanilla or folding in some mini chocolate chips for an unexpected twist. You could even switch out pistachios for another nut variety like pecans or walnuts if you’re looking to create something new entirely. The possibilities are endless! So gather your ingredients and let your creativity flow; I can’t wait for you all to try this beloved recipe and share your experiences with me—I promise it’ll be fun!
Pistachio Wedding Cookies
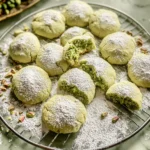
Pistachio Wedding Cookies are a delightful treat that effortlessly blend nostalgia and flavor in every bite. These charming cookies feature a buttery base enriched with the unique, nutty taste of pistachios, making them perfect for celebrations or sweet moments at home. With their melt-in-your-mouth texture and a light dusting of confectioners’ sugar, these cookies are not just a dessert, but an experience filled with warmth and joy. Baking these easy-to-make cookies invites creativity into your kitchen while providing a comforting connection to cherished memories.
- Prep Time: 30 minutes
- Cook Time: 10 minutes
- Total Time: 40 minutes
- Yield: Approximately 24 cookies 1x
- Category: Dessert
- Method: Baking
- Cuisine: American
Ingredients
- 1 cup unsalted butter, softened
- 1 cup confectioners' sugar (divided)
- 2 teaspoons pure vanilla extract
- 1¾ cups all-purpose flour
- 3.4 oz package pistachio instant pudding mix
- ½ teaspoon salt
Instructions
- Cream softened butter with half of the confectioners' sugar until light and fluffy.
- Mix in the vanilla extract until well combined.
- In a separate bowl, whisk together flour, pistachio pudding mix, and salt.
- Gradually fold dry ingredients into the butter mixture until just combined.
- Divide dough into two halves, roll into balls, wrap in plastic wrap, and chill for at least one hour.
- Preheat oven to 350°F (175°C). Shape chilled dough into balls and place on lined baking sheets.
- Slightly flatten each cookie ball before baking for 9-10 minutes or until edges are golden.
- Allow cookies to cool slightly before tossing them in the remaining confectioners' sugar.
Nutrition
- Serving Size: 1 cookie (20g)
- Calories: 100
- Sugar: 6g
- Sodium: 45mg
- Fat: 7g
- Saturated Fat: 4g
- Unsaturated Fat: 2g
- Trans Fat: 0g
- Carbohydrates: 9g
- Fiber: <1g
- Protein: 1g
- Cholesterol: 15mg