Circus Animal Cookie Balls
There’s something profoundly comforting about recreating the whimsical flavors of childhood. I can still remember the excitement of unwrapping those vibrant pink and white circus animal cookies, each one a little treasure, frosted and sprinkled with joy. As I bit into them, the sugary sweetness would dance on my tongue, evoking memories of laughter and carefree days. With these Circus Animal Cookie Balls, we’re not just making a treat; we’re crafting a delightful experience that bridges nostalgia and creativity. Trust me when I say that every bite will transport you back to those joyous moments, where whimsy meets indulgence in an utterly intoxicating way.
Imagine rolling these sweet morsels in your hands as you prepare to coat them in bright candy melts—it’s like bringing a piece of the circus right into your kitchen! The rich cream cheese blends seamlessly with those iconic cookie flavors, creating a symphony of tastes that are not only delicious but also incredibly fun to make. Whether you’re planning a birthday celebration or simply craving a sweet pick-me-up after a long day, these cookie balls become more than just dessert; they become a canvas for creativity and expression. So gather your ingredients and let’s embark on this enchanting culinary journey together!
Circus Animal Cookie Balls: A Nostalgic Sweet Adventure
These Circus Animal Cookie Balls are not just treats; they are delightful bites of happiness that encapsulate the spirit of childhood joy. As we prepare these delectable delights, you’ll find yourself reminiscing about those carefree afternoons spent savoring cookies while surrounded by laughter and love. They are easy to whip up and perfect for sharing with friends or keeping all to yourself—no judgment here!
Ingredients:
Let’s dive into the beautiful array of ingredients that will bring our Circus Animal Cookie Balls to life! Each ingredient plays a pivotal role in crafting these treats, so let’s explore what makes them special.
- 9 ounce package frosted circus animal cookies (I used Mother’s brand). These cookies are the star of our recipe, providing both flavor and texture. You want to choose cookies that are soft enough to crumble easily but sturdy enough to hold their shape when mixed with cream cheese. The vibrant frosting adds not just sweetness but also a nostalgic touch that brightens up our cookie balls. If you can’t find frosted animal cookies, you could substitute with any other soft frosted sugar cookie—just ensure they have that signature sweetness!
- 6 ounces cream cheese (softened). This ingredient is absolutely paramount for achieving that creamy texture we crave in these cookie balls. Softened cream cheese binds everything together while providing a rich mouthfeel that balances the sweetness of the cookies. Make sure it’s at room temperature before mixing; this allows it to blend seamlessly with the cookie crumbs without any lumps. If you’re looking for dairy-free options, there are excellent cream cheese alternatives available that work just as beautifully in this recipe!
- 6 ounces hot pink candy melts. These vibrant candy melts are what give our cookie balls their eye-catching finish! They melt down into a luscious coating that’s not only pretty but adds another layer of sweetness. When selecting candy melts, look for high-quality brands as they will melt more smoothly and evenly—this is crucial for achieving that glossy finish we desire on our treats.
- 6 ounces white almond bark. This is another fantastic coating option that complements the cookie flavors beautifully while providing contrast against the pink candy melts. Almond bark is easy to work with and sets up nicely, ensuring our cookie balls maintain their shape after being dipped. If you prefer dark chocolate or another type of coating, feel free to experiment; just keep in mind how those flavors will meld with our beloved circus cookies.
- Rainbow nonpareil sprinkles (optional garnish). While technically optional, I wholeheartedly encourage you not to skip this final step! The sprinkles add a playful touch reminiscent of carnival fun and provide an extra crunch against the smooth coatings. They make these treats irresistible both visually and texturally—who can resist reaching for one more when they look so festive?
Equipment You’ll Need:
Having the right tools at your disposal can make all the difference in your cooking experience! While we often focus on ingredients, these essential pieces of equipment will ensure smooth sailing as we create our Circus Animal Cookie Balls.
- Food processor or handheld mixer: A food processor makes quick work of crushing those cookies—you’ll achieve fine crumbs effortlessly! However, if you don’t have one on hand, don’t worry; a handheld mixer works wonders too when combining ingredients in a bowl. Just remember to pulse gently so you don’t over-process your cookies into dust!
- Parchment paper: This simple tool is your best friend for easy cleanup! Lining your baking sheet prevents sticking and allows for easy transfer once your cookie balls are ready for chilling or serving.
- Cookie scoop (1 ½ tablespoon): Using a cookie scoop ensures uniformity in size when shaping your dough into balls—trust me on this! It helps maintain even cooking times if you’re making variations later on or simply ensures everyone gets an equally delicious bite.
Now that we’re equipped with all our ingredients and tools, let’s get started on making these sweet delights come alive!
Step 1: Crumble Those Cookies
Begin by placing your frosted circus animal cookies into the food processor—the anticipation builds as you prepare to transform them into crumbly goodness! Pulse them until they’re broken down into small pieces; at first glance, it might seem like chaos as tiny bits fly around, but keep going until they reach fine crumbs—a consistency akin to sand is what we’re aiming for here. This step ensures an even distribution throughout the mixture when combined with cream cheese later on—don’t rush this step; it’s crucial for achieving those perfectly textured cookie balls!
Step 2: Creamy Blending Magic
Next up is adding our softened cream cheese slices directly into the food processor with those lovely cookie crumbs you’ve created. Pulse away until these two components marry perfectly—the result should be a thick yet smooth mixture that’s cohesive without any lumps peeking through. If you’re using a handheld mixer instead, combine everything in a medium-sized mixing bowl while mixing vigorously until fully integrated—it may take some elbow grease but trust me when I say it’ll be worth it when you taste it!
Step 3: Shape Your Delightful Dough
Now comes one of my favorite parts: scooping out portions of your delicious mixture using that handy cookie scoop! Each scoop should be about 1 ½ tablespoons—this size is absolutely perfect for popping into your mouth without feeling overwhelming yet still satisfying enough to satisfy any sweet tooth cravings! Roll each portion gently between your palms until they’re rounded little balls full of promise—and don’t worry if they aren’t perfectly spherical; rustic charm adds character!
Step 4: Chill Time!
Once you’ve rolled all your ball-shaped treasures onto parchment-lined baking sheets, it’s time for them to chill out—in both senses! Place them directly into the refrigerator where they’ll need about 30 minutes to firm up slightly before dipping begins. This chilling process allows everything inside each ball to set nicely while enhancing flavor as well—the longer they chill out together, the better they’ll taste once coated later on!
Stay tuned as we continue crafting these delightful Circus Animal Cookie Balls—from melting our colorful coatings to garnishing them with sprinkles galore—each step brings us closer to enjoying this whimsical treat together!
Circus Animal Cookie Balls: A Journey into Sweet Nostalgia
Ah, the sweet aroma of nostalgia wafting through the air as you prepare your very own Circus Animal Cookie Balls! If you’ve ever bitten into one of those whimsical pink and white frosted cookies, you know exactly what I’m talking about. These delightful treats are incredibly easy to make and offer a wonderful blend of flavors that will instantly transport you back to childhood. I can promise you that each bite is a little journey filled with joy and sweetness, making them the perfect addition to any gathering or simply for treating yourself on a cozy afternoon.
Step 5: Scooping Out Joy
Now that we have our dough perfectly blended, it’s time to bring these little joys to life! Grab your trusty 1 ½ tablespoon cookie scoop—this handy tool is an absolute game changer in the kitchen. It ensures that all your cookie balls are uniform in size, which not only makes for a beautiful presentation but also guarantees even chilling later on. Trust me on this; consistency is key!
As you scoop out the cookie ball dough, let yourself be filled with excitement at the prospect of what’s to come. Each scoop should be heaped just enough to form a nice round ball when rolled between your palms. Place each ball gently onto the parchment-lined baking sheet. The anticipation builds as you repeat this process for all of your dough—don’t rush through it! Take a moment to relish in the process because every single ball represents a little piece of happiness waiting to be devoured.
Step 6: The Power of Patience
Once all your cookie balls are nestled comfortably on the baking sheet, it’s time for them to take a well-deserved chill in the refrigerator for about 30 minutes. You might wonder why chilling is such an important step; I assure you, it’s absolutely paramount! This isn’t just about keeping them cool; chilling helps firm up the cream cheese mixture, making it easier to coat later on without losing shape.
During this time, something magical happens—the flavors meld together beautifully, creating a more profound taste experience. You’ll notice that after chilling, they will feel firmer and ready to handle their upcoming candy coating adventure with grace. So don’t skip this step! Use this half hour wisely—maybe brew yourself a cup of tea or coffee and take a moment to enjoy the delicious aromas wafting through your kitchen.
Step 7: Melting Magic
Now comes one of my favorite parts—the melting of our candy melts and almond bark! This step is where we start transforming our chilled cookie balls into something truly extraordinary. In separate microwave-safe bowls, place your hot pink candy melts and white almond bark. Microwave them in 30-second increments—this method is crucial because it allows for controlled melting and prevents burning.
Keep an eye on them as they melt; you’ll want them smooth and silky, resembling liquid gold! Give each bowl a gentle stir after each interval; this not only helps with even melting but also gives you that wonderful opportunity to admire their transformation from solid to smooth decadence. Once they are fully melted and combined into luscious coatings, set them aside for just a moment while we get ready for some serious dipping action!
Step 8: Dipping into Delight
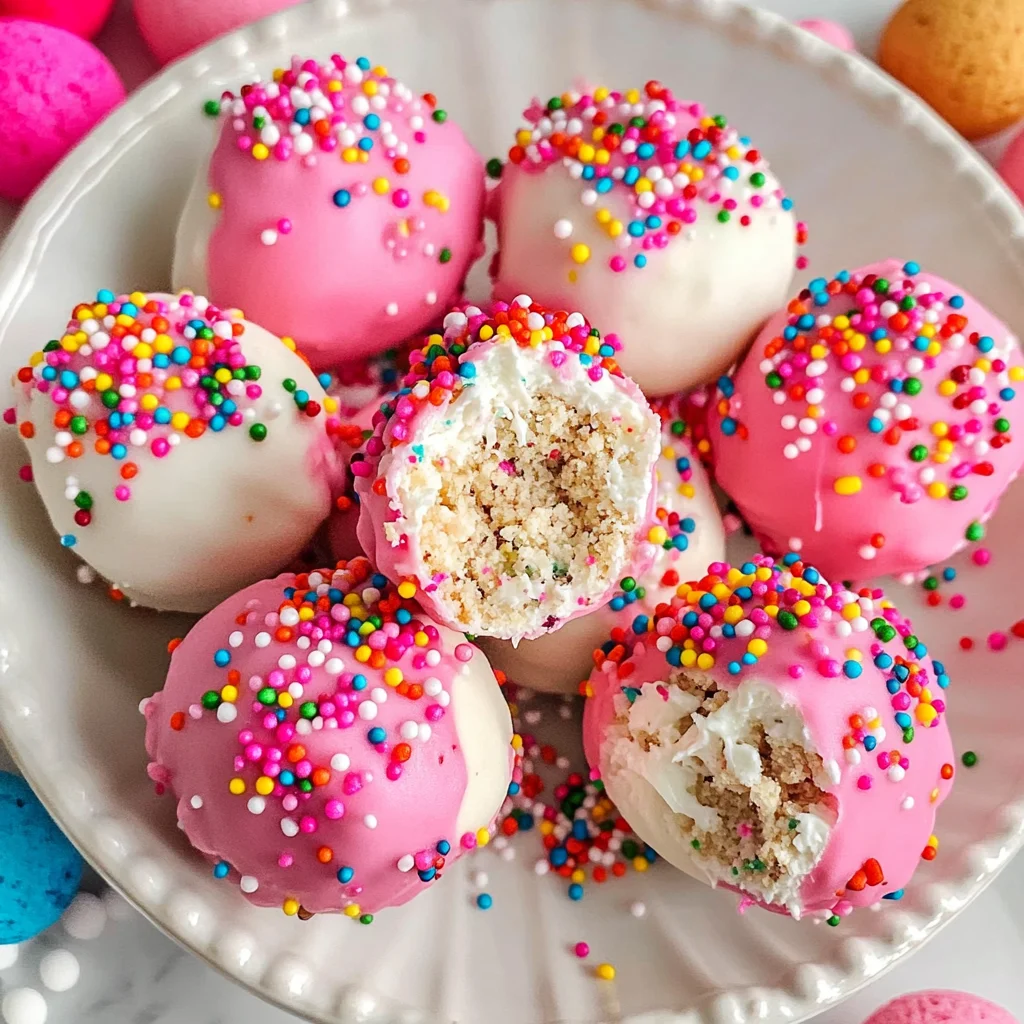
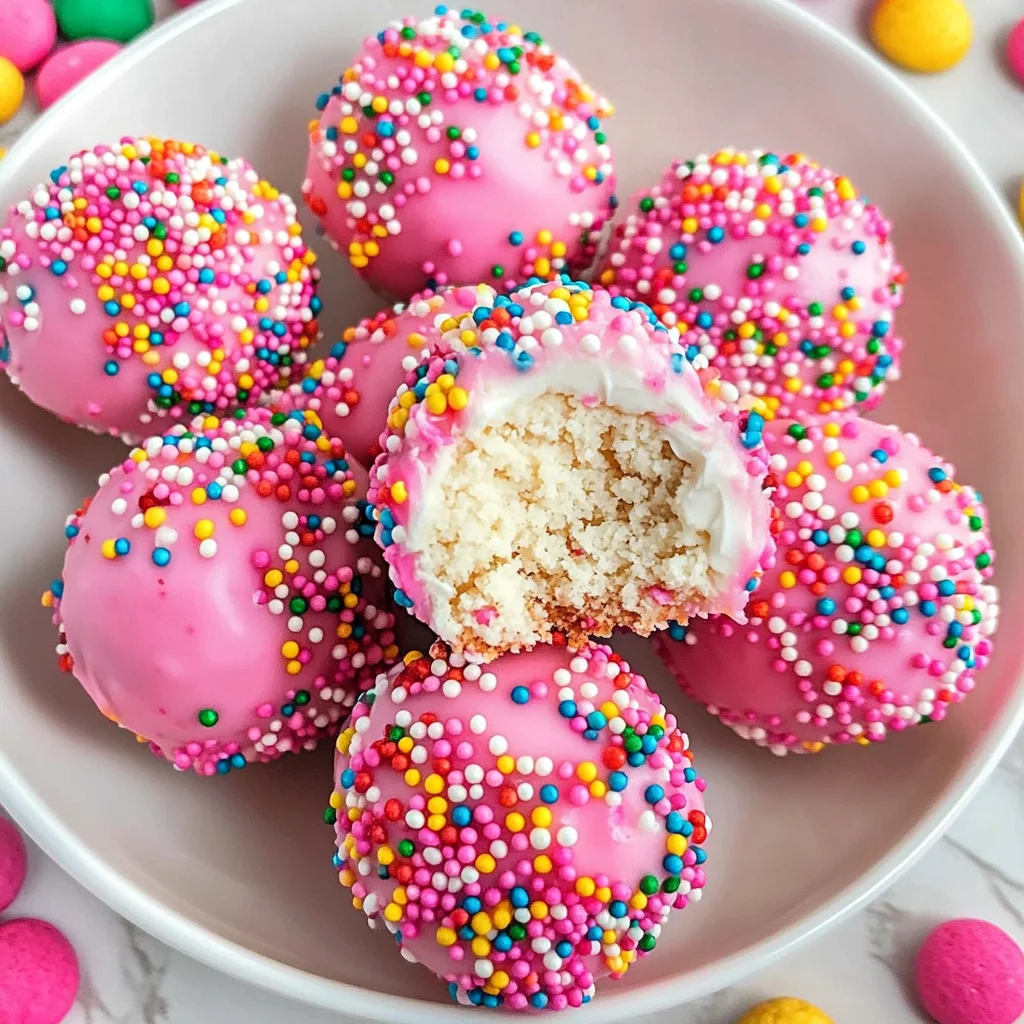
With your cookie balls chilled and both coatings ready, it’s time for the fun part—dipping! Carefully retrieve your first batch of cookie balls from the refrigerator. Using a fork (or if you’re feeling adventurous, your hands), dip each ball halfway into either the hot pink candy melts or white almond bark. As you lift them out, gently tap against the side of the bowl to remove any excess coating; this step is essential because too much coating will create unsightly clumps instead of that smooth finish we’re aiming for.
Visual cues are vital here—your cookie balls should be evenly coated without any drips or puddles forming beneath them on the parchment paper. It takes practice but trust me; you’ll get into a rhythm before you know it! Sprinkle those gorgeous rainbow nonpareil sprinkles over the coating while it’s still wet; this adds an extra pop of color and playful texture that’s simply irresistible. Repeat this process until all your cookie balls are beautifully coated—each has its own unique personality now!
Conclusion:
As we wrap up our delightful journey through making Circus Animal Cookie Balls together, I can’t help but feel a surge of excitement bubbling inside me. Each step we took not only brought us closer to these whimsical treats but also filled my kitchen with laughter and nostalgia—a true testament to how food can connect us across generations. The blend of creamy sweet cream cheese with those iconic frosted cookies creates a symphony of flavors that is simply unmatched. Plus, let’s not forget those vibrant colors! They practically dance on your plate, inviting everyone around to indulge in their charm.
These cookie balls are an absolute must-try—not just because they taste like childhood wrapped in sweetness but because they offer a fun and engaging experience while making them. Imagine gathering your friends or family around as you mix together those crushed cookies and cream cheese; it’s not just baking—it’s creating memories! Whether it’s for birthday parties, holiday celebrations, or just an ordinary Tuesday craving something extraordinary, these little delights shine bright in every occasion. Picture pulling out a tray from the fridge at your next get-together; you’ll see eyes light up with anticipation as everyone eagerly reaches for one (or two!).
For serving suggestions that truly elevate the moment, imagine savoring one while enjoying your afternoon coffee; the rich creaminess complements that warm mug so perfectly. Or perhaps pair these treats with some fresh berries—how about strawberries or blueberries? Their tartness contrasts beautifully against the sugary sweetness of the cookie balls. For an even more decadent experience after dinner, serve these alongside a scoop of vanilla bean ice cream; trust me when I say it’s utterly intoxicating!
Feeling adventurous? This recipe is wonderfully adaptable! You could swap out the candy melts for dark chocolate if you’re craving something deeper and richer; imagine how divine that would be! Or why not experiment with different flavored cream cheeses—maybe something like strawberry or lemon? Each variation will lend its own unique twist while still capturing that playful essence we all love about Circus Animal Cookies. So go ahead—dive into this delightful endeavor and make it your own! I can’t wait to hear how they turn out for you; please share your experiences and connect with me—it warms my heart knowing we’re sharing this love of cooking together!
Circus Animal Cookie Balls

Indulge in the nostalgia of childhood with these delightful Circus Animal Cookie Balls! These sweet, no-bake treats are easy to make and perfect for any occasion. With soft frosted circus animal cookies blended with creamy cream cheese and coated in vibrant candy melts, each bite offers a whimsical burst of flavor that transports you back to carefree days filled with joy and laughter.
- Prep Time: 20 minutes
- Cook Time: 0 minutes
- Total Time: 20 minutes
- Yield: Approximately 24 servings 1x
- Category: Dessert
- Method: No-bake
- Cuisine: American
Ingredients
- 9 ounces frosted circus animal cookies
- 6 ounces softened cream cheese
- 6 ounces hot pink candy melts
- 6 ounces white almond bark
- Rainbow nonpareil sprinkles (optional)
Instructions
- Crumble the frosted circus animal cookies in a food processor until fine crumbs form.
- Add softened cream cheese to the cookie crumbs and pulse until well combined into a smooth mixture.
- Use a cookie scoop to portion out the mixture into balls, rolling them gently between your palms.
- Chill the cookie balls in the refrigerator for about 30 minutes until firm.
- Melt the hot pink candy melts and white almond bark separately in microwave-safe bowls.
- Dip each chilled cookie ball halfway into the melted coatings, tapping off excess. Sprinkle with rainbow nonpareils if desired.
- Return coated cookie balls to the refrigerator to set for another 30 minutes before serving.
Nutrition
- Serving Size: 1 cookie ball (30g)
- Calories: 120
- Sugar: 10g
- Sodium: 50mg
- Fat: 7g
- Saturated Fat: 4g
- Unsaturated Fat: 3g
- Trans Fat: 0g
- Carbohydrates: 12g
- Fiber: <1g
- Protein: 1g
- Cholesterol: 15mg