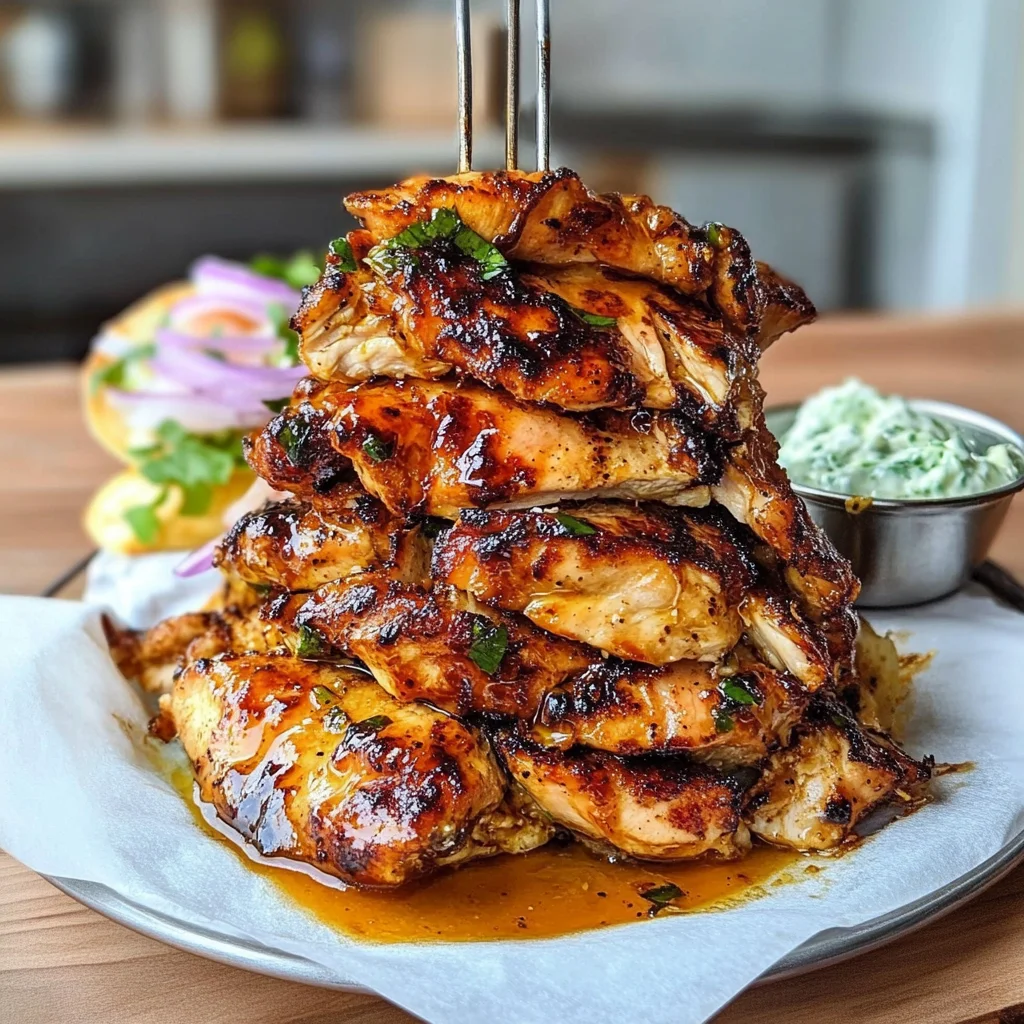
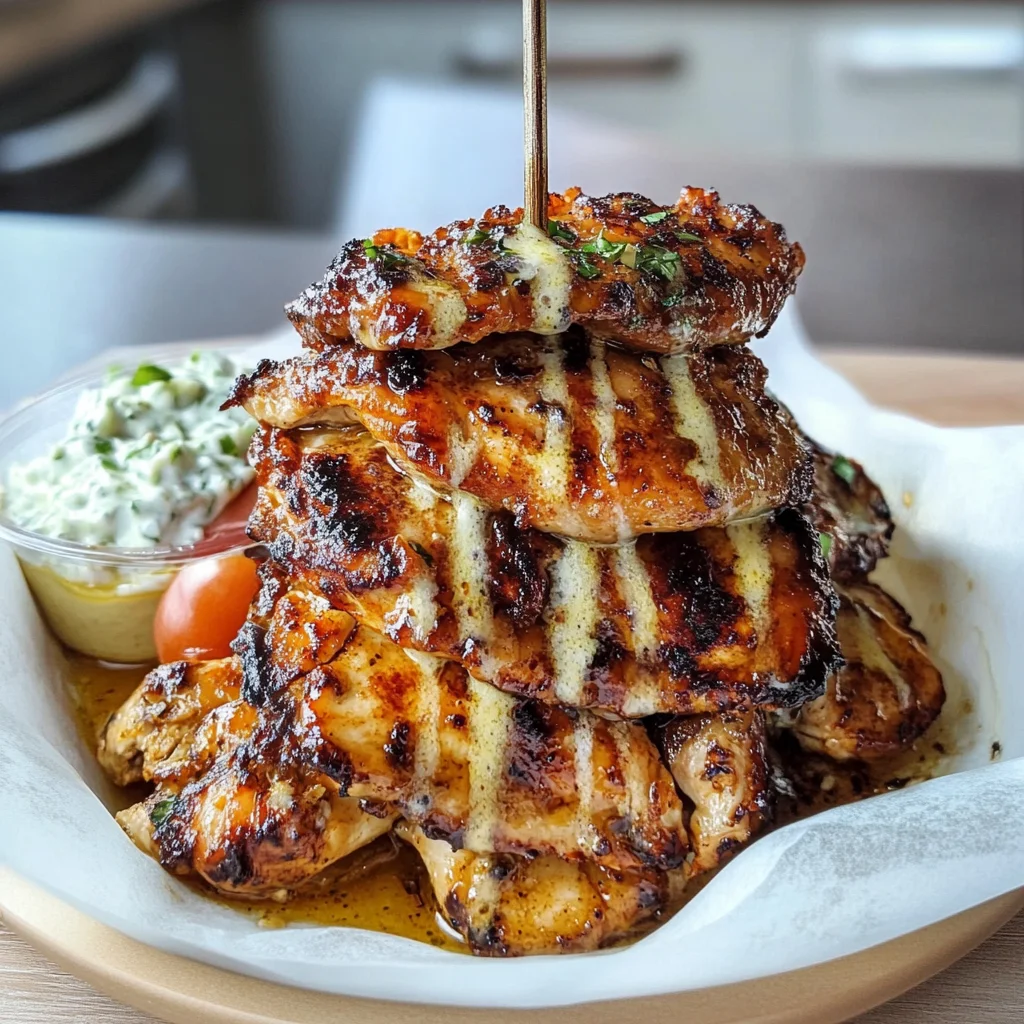
Greek Chicken Gyros
There’s something utterly captivating about the aromas wafting through the kitchen as I prepare a dish that feels like a warm embrace from the Mediterranean. The Greek Chicken Gyros are not just a meal; they’re an experience, a delightful journey that transports you straight to sun-kissed shores, bustling markets, and evenings spent laughing with loved ones over good food. Imagine biting into tender, juicy chicken, perfectly seasoned with a symphony of flavors that dance on your palate while the world seems to slow down around you. This recipe is more than just food—it’s a celebration of love, culture, and community, and I can’t wait to share it with you.
As we delve into this culinary adventure together, let’s talk about what makes these Greek Chicken Gyros so special. It’s not just about how we cook; it’s about the stories behind each ingredient, the memories tied to the preparation process, and the joy that comes from sharing it all. The marinating chicken thighs soak up a delicious concoction of olive oil, honey Dijon mustard, garlic, and herbs—creating an incredibly tender texture that is simply unforgettable. And when you roast them until they’re slightly charred on the outside while remaining succulent inside? Oh my goodness! You’ll feel like a culinary genius in your own kitchen.
Greek Chicken Gyros: A Wholesome Mediterranean Delight
Let’s embark on this delightful journey together! These Greek Chicken Gyros are perfect for weeknight dinners or weekend gatherings when you want to impress your friends and family without spending hours in the kitchen.
Ingredients:
As we gather our ingredients for these mouthwatering gyros, remember that each one plays a pivotal role in crafting the final dish. Allow yourself to appreciate their unique qualities and how they come together in harmony.
- 12 boneless skinless chicken thighs (1.3kg total). The chicken thighs are my go-to choice for this recipe because they are inherently juicy and flavorful compared to chicken breasts. Their higher fat content ensures that they remain moist during cooking—no one likes dry chicken! When selecting your chicken thighs, look for those with a vibrant color and minimal excess fat; freshness is key here for achieving that melt-in-your-mouth texture.
- 1/8 cup olive oil. Known as “liquid gold,” olive oil not only adds richness but also enhances the flavor profile of the marinade. It helps in tenderizing the meat while also keeping it moist during roasting. Always opt for extra virgin olive oil; its robust flavor elevates any dish. And trust me—the quality matters! You can even substitute with avocado oil if you’re looking for something different or have an olive oil sensitivity.
- 2 tablespoons honey Dijon mustard. This ingredient introduces an irresistible tanginess that balances beautifully with the savory elements of this dish. Honey Dijon mustard adds depth without overpowering other flavors; it acts as both a marinade enhancer and a glue for our seasonings. If you don’t have honey Dijon on hand, feel free to mix regular Dijon mustard with a bit of honey—it works wonders!
- 6 cloves minced garlic (or 3 very large ones). Garlic is truly magical—its pungent aroma becomes sweet and mellow when roasted. It infuses every bite with warmth and savory goodness; plus, it’s packed with health benefits! Always use fresh garlic if possible; if you can’t find whole bulbs, pre-minced garlic will do in a pinch but lacks some flavor complexity.
- Lemon zest (from two lemons). The zest captures all those bright oils found in lemon peel, providing an aromatic punch that cuts through richness and brings freshness to our gyros. It’s essential not to skip this step as it truly brightens every element of flavor in your dish. When zesting lemons, be sure to avoid the bitter white pith underneath; just focus on getting that sunny yellow part.
- 1/2 tablespoon salt (you may need less if using regular table salt). Salt is crucial in enhancing flavors—it brings out the best in every ingredient! I recommend using kosher salt if possible because its larger grains dissolve more easily and provide an even seasoning throughout the meat. Adjust according to taste preferences or dietary needs!
- Dry oregano (to taste). Oregano is synonymous with Greek cuisine—it offers earthy notes that complement our chicken beautifully. Feel free to adjust according to your preference; dried oregano tends to be more concentrated than fresh varieties—so start small! If you have fresh oregano available, chop it finely and substitute accordingly for brighter flavor.
- 1 cup water (or stock) for the bottom of the pan. This liquid magic creates steam during roasting which helps keep our chicken juicy while preventing any drippings from burning at the bottom of your baking sheet. Using stock instead of plain water adds another layer of flavor—don’t skip this detail!
Equipment You’ll Need:
Having the right tools at your disposal can turn cooking from daunting into delightful! Each piece of equipment contributes significantly to making this recipe not only successful but enjoyable as well.
- Vertical Gyro Spit Plate (or homemade onion spit setup). If you want authentic gyros at home, investing in a vertical gyro spit plate can take your culinary game up several notches by allowing even cooking while providing that signature layered effect! However, I totally understand if you’re not ready for such an investment yet—just follow my tip about using halved onions secured with skewers instead; creativity knows no bounds!
- Baking sheet lined with parchment paper or aluminum foil. This simple tool makes cleanup easier while ensuring nothing sticks during roasting—you’ll thank yourself later when it’s time to wash up! Parchment paper also provides insulation which helps distribute heat evenly across your chicken thighs.
- Mixing bowl for marinating ingredients: A medium mixing bowl allows ample space for mixing all those exquisite ingredients together without spilling over—a staple you’ll find handy far beyond this recipe!
Now that we’ve gathered everything we need—including our enthusiasm—let’s dive into preparing these scrumptious Greek Chicken Gyros!
Step 1: Preheat Your Oven and Prepare Your Marinade
Before anything else, let’s get that oven preheating at 425°F (220°C). This step is absolutely paramount because starting off at high heat will help us achieve those glorious caramelized edges on our chicken thighs while keeping them incredibly moist inside—a beautiful contrast that’s hard to resist! Now grab yourself a medium-sized mixing bowl where we’ll be creating our marinade masterpiece: combine those succulent chicken thighs with olive oil, honey Dijon mustard, minced garlic cloves, salt, lemon zest—and don’t forget generous pinches of oregano! Mix everything gently yet thoroughly until each piece is lovingly coated in this fragrant concoction; trust me on this—it’s worth taking those extra few moments! Once mixed well together let them marinate—ideally overnight—but even just one hour will do wonders too!
Step 2: Skewering Like A Pro
Now comes one of my favorite parts—the threading process! After letting your chicken enjoy its bath of flavors for a bit longer than mere minutes (oh yes!), we’re going to thread those beauties onto our Vertical Gyro Spit Plate like pros! Take care as you alternate positions while threading each thigh—this ensures proper cooking through even heat distribution along their plump surfaces—you want every inch cooked evenly here! And remember: if you’re improvising by using skewers inserted into onions instead? Just push them through firmly till secure—the goal remains achieving stability throughout their roasting journey!
Step 3: Setting Up Our Roasting Station
With our gyro assembled beautifully atop its rotating perch now comes setting up our roasting station—we’re going back into action mode again friends! Place your gyro contraption onto a sturdy baking sheet lined either way mentioned previously then pour one cup of water or aromatic stock at its base—yes indeed; don’t forget this vital step folks since moisture matters tremendously when roasting any poultry product successfully—it creates steam which keeps everything juicy whilst catching flavorful drippings below too!
Step 4: Covering Up!
Before sending everything off into hot blissful oven territory we must make sure we’re covering up properly so nothing gets burnt prematurely during cooking time—which tends happen fast especially towards topmost pieces exposed directly beneath scorching heat source above us now… Use small pieces foil pierced lightly just enough cover surface area around topmost thigh(s)—this protective shield prevents excessive browning whilst allowing lower sections continue basking under radiant warmth below…
Stay tuned as we continue crafting these delightful Greek Chicken Gyros together—they’re gonna be worth every single second spent here—I promise you that!
Step 5: The Art of Roasting to Perfection
Now that your chicken is beautifully marinated and ready to go, it’s time for the magic to happen in the oven. Preheat your oven to a sizzling 425°F (220°C). This temperature is absolutely crucial—it’s hot enough to caramelize the exterior of the chicken, creating that irresistible golden-brown crust we all crave while locking in the juices inside. Place your Vertical Gyro Spit Plate into the oven with confidence, and don’t forget to add that cup of water or stock at the base of the pan. This will not only keep the chicken moist but also create a deliciously rich sauce that you can drizzle over your gyros later—it’s like capturing all those savory juices in a little liquid gold!
As your chicken roasts, take a moment to appreciate how transformative this step is. The high heat causes Maillard reactions—a fancy term for how proteins and sugars interact when heated, resulting in those wonderfully complex flavors and aromas wafting through your kitchen. You might notice that tantalizing smell starting to fill your home; trust me, it’s going to make your mouth water! Just remember, patience is key here. If you open the oven too soon, you risk letting out precious heat needed for that perfect roast. Instead, let it work its magic for about 75-90 minutes.
Step 6: A Little Foil Goes a Long Way
Now comes a nifty trick that I swear by—using foil! As your chicken cooks away in that cozy oven environment, it’s important to keep an eye on things. The top layer of chicken thighs can sometimes get a little too cozy with the heat and start browning faster than their friends below. To avoid any unfortunate charring, take a small piece of aluminum foil and gently pierce it before placing it over the most exposed chicken thigh. This simple act provides just enough protection from direct heat while allowing everything else to cook through beautifully.
By doing this, you’re ensuring that every bite of chicken remains juicy without sacrificing flavor or texture on top. When you check back after about an hour or so—just peek in without fully opening the door—you’ll notice that beautiful caramelization happening all around. It’s so satisfying! If you see any signs of burning at this point, don’t hesitate to adjust your foil placement as needed. Your attention during this phase is paramount; it ensures that every inch of your Greek Chicken Gyros turns out utterly extraordinary.
Step 7: The Sweet Spot for Doneness
After what feels like an eternity filled with delightful aromas dancing around your kitchen, it’s time to check if our magnificent creation is ready to come out of the oven! After approximately 75-90 minutes (I promise you it will be worth every second), grab your trusty meat thermometer—the unsung hero of cooking—and plunge it into one of the thickest parts of a thigh. You’re aiming for an internal temperature of at least 165°F (74°C) to ensure everything is cooked safely and thoroughly.
But here’s where experience meets intuition: if you’re not quite sure about doneness based solely on temperature (after all, different ovens can behave differently), look for visual cues too! The chicken should be beautifully browned with crispy bits along the edges, and when you make a cut into one thigh, you want those lovely juices running clear—not pink! Patience pays off here; allow yourself a moment of satisfaction as you watch those juices flow free—a sign you’ve achieved tender perfection.
Step 8: Letting It Rest Like a Pro
Once you’ve confirmed your Greek Chicken Gyros are perfectly cooked, resist the urge to dive right in! This step might seem minor but trust me—it’s absolutely non-negotiable: let that glorious chicken rest for at least 10-15 minutes before slicing into it. Why? When meat cooks, its fibers tighten up and push out some moisture due to heat—letting them rest allows those juices to redistribute throughout each piece rather than gushing out onto your cutting board.
Picture this: as you allow the chicken time to settle down after its intense roasting session, it transforms into something profoundly satisfying. That resting period helps achieve juicy results with every bite while ensuring flavor is locked in rather than lost! So grab a cozy chair or whip up some sides while you wait; maybe even prepare some fresh pita bread or tzatziki sauce—because these treats are just begging for company!
Conclusion:
As we wrap up this flavorful journey through my beloved recipe for Greek Chicken Gyros, my heart swells with excitement thinking about all the wonderful moments you’ll create around this dish. It’s not just about preparing food; it’s about bringing people together around a table filled with laughter and joy. This recipe is truly special because it combines savory marinated chicken with bright citrus notes and fragrant herbs—all coming together for an utterly intoxicating experience that elevates your dining game beyond ordinary weeknight meals.
Why is this recipe a must-try? Well, apart from its dazzling taste profile packed with layers of flavor and texture, making these gyros can become an adventure in itself! Imagine pulling them out of the oven—the golden-brown exterior accompanied by those caramelized edges—and feeling the warmth radiate as they rest. It’s not just about eating; it’s about creating memories—perfect for family dinners, casual gatherings with friends, or even cozy nights in when you want something comforting yet extraordinary.
When it comes time to serve these delectable gyros, think beyond just pita! Picture savoring one alongside crispy Greek fries drizzled with lemon juice and fresh herbs or nestled atop a vibrant Greek salad bursting with ripe tomatoes and creamy feta cheese (or perhaps crumbled tofu for a plant-based twist). For an afternoon pick-me-up, why not throw together some tzatziki sauce infused with refreshing cucumber? Each bite becomes an experience—a celebration of flavors that transport you straight to sun-soaked shores.
Feeling adventurous? This recipe is wonderfully adaptable! Try swapping out traditional spices with something unexpected like smoked paprika or adding roasted vegetables for extra color and crunch. Perhaps you’d like to turn these gyros into a wrap filled with fresh greens or experiment by layering on your favorite Mediterranean spreads like hummus or baba ghanoush! I invite you to explore these variations—make this recipe uniquely yours—and don’t forget to share your experiences! Cooking is meant to be joyous; let’s connect over our love for food!
Greek Chicken Gyros

Indulge in the vibrant flavors of the Mediterranean with these Greek Chicken Gyros. This dish transforms juicy marinated chicken thighs into a culinary masterpiece, perfect for any occasion—be it a cozy family dinner or an outdoor gathering with friends. As the chicken roasts to perfection, your kitchen will fill with enticing aromas that transport you straight to sun-soaked shores. Served in warm pita bread and topped with fresh vegetables and creamy tzatziki sauce, these gyros are not just a meal; they’re a celebration of flavor, community, and love.
- Prep Time: 20 minutes
- Cook Time: 90 minutes
- Total Time: 1 hour 50 minutes
- Yield: Serves approximately 8 people 1x
- Category: Main
- Method: Baking
- Cuisine: Mediterranean
Ingredients
- 12 boneless skinless chicken thighs (1.3 kg)
- 1/8 cup olive oil
- 2 tablespoons honey Dijon mustard
- 6 cloves minced garlic
- Zest from two lemons
- 1/2 tablespoon salt
- Dry oregano (to taste)
- 1 cup water or stock
Instructions
- Preheat your oven to 425°F (220°C).
- In a mixing bowl, combine chicken thighs with olive oil, honey Dijon mustard, minced garlic, lemon zest, salt, and oregano. Mix until well coated.
- Let the chicken marinate for at least one hour or overnight for best results.
- Thread the marinated chicken onto skewers or a vertical gyro spit plate.
- Place on a baking sheet lined with parchment paper and add water or stock to the bottom of the pan.
- Cover the top of the chicken lightly with foil to prevent excessive browning.
- Roast in the oven for 75-90 minutes until cooked through (internal temperature should reach 165°F/74°C).
- Let rest for 10-15 minutes before slicing and serving in pita bread with fresh toppings.
Nutrition
- Serving Size: 1 gyro (about 200g)
- Calories: 290
- Sugar: 2g
- Sodium: 450mg
- Fat: 16g
- Saturated Fat: 3g
- Unsaturated Fat: 13g
- Trans Fat: 0g
- Carbohydrates: 14g
- Fiber: 2g
- Protein: 27g
- Cholesterol: 100mg