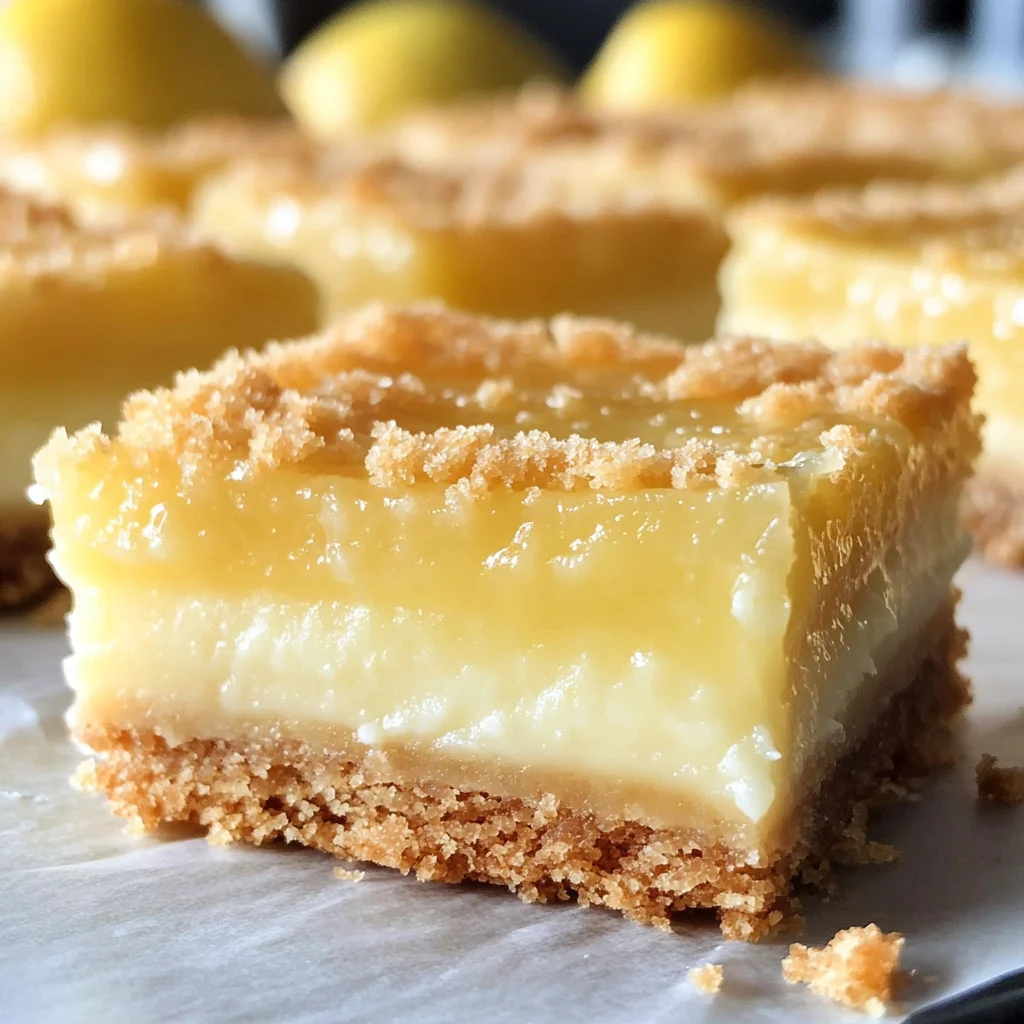
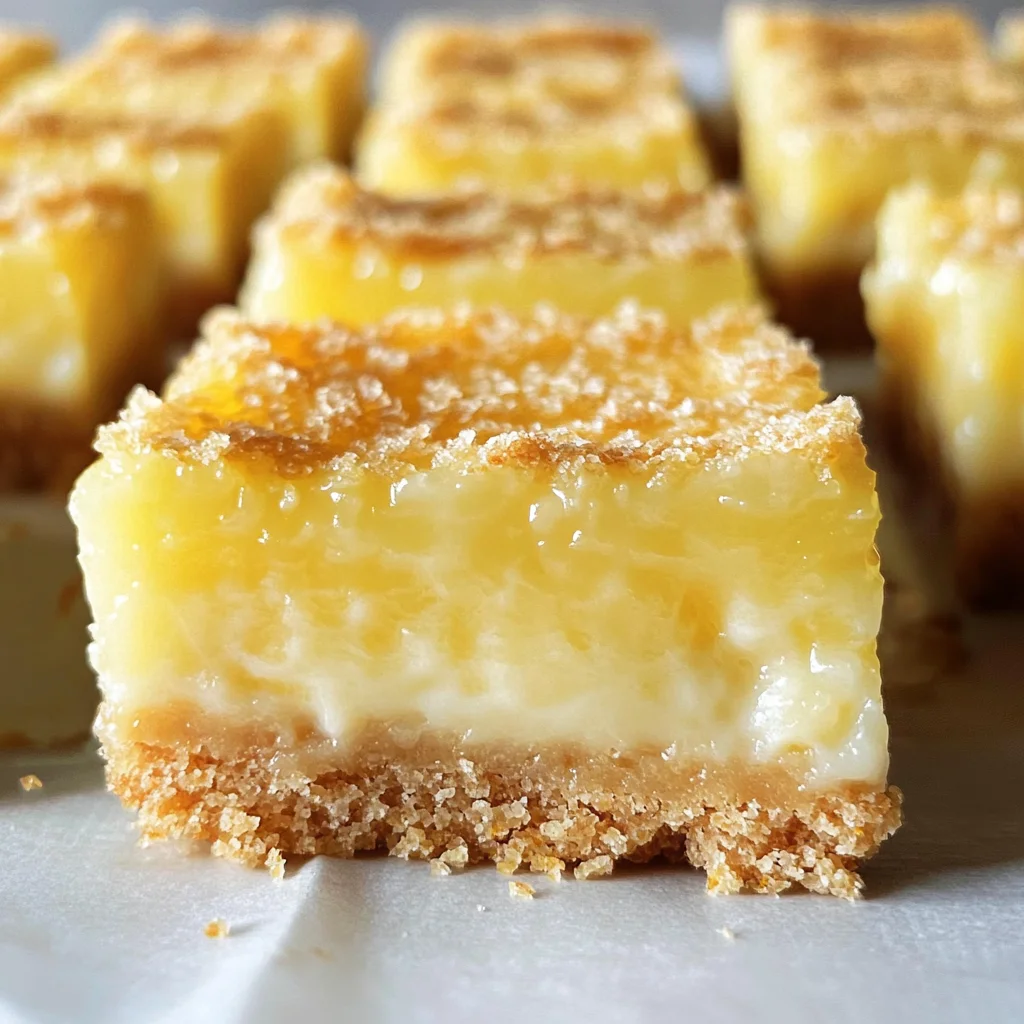
Creamy Lemon Squares
The tangy sweetness of lemon, the buttery crunch of graham cracker crust, and the creamy comfort of a luscious filling all come together in a way that feels like a warm hug on a sunny day. Each bite of these Creamy Lemon Squares is not just a treat; it’s an experience—a delightful journey that takes you from the first zing of citrus to the smooth, comforting finish that lingers on your palate. I’ve always been captivated by how something so simple can evoke such joy and nostalgia. It reminds me of summertime picnics and family gatherings where laughter danced through the air as freely as the scent of fresh lemons. I promise you, these squares are more than just dessert; they’re little slices of sunshine that brighten any occasion.
Now, if you’re wondering what makes these Creamy Lemon Squares so special, let me take you on a quick detour through their vibrant history. The beauty of this recipe lies in its simplicity and versatility. Originating from classic American desserts, lemon bars have evolved into various forms over the years, yet their essence remains unchanged—a balance of sweet and tart that is universally adored. These squares are perfect for any occasion—be it a holiday gathering or just an everyday treat to lift your spirits. And trust me, once you experience that first taste, you’ll understand why they hold such a cherished place in our hearts.
Creamy Lemon Squares: A Slice of Sunshine
Let’s dive into this delightful recipe together! The bright flavors and creamy texture are sure to impress anyone who takes a bite—and believe me when I say that preparing these treats is as enjoyable as eating them. So roll up your sleeves and let’s get started on this culinary adventure!
Ingredients:
As we embark on this delicious journey to create Creamy Lemon Squares, it’s essential to gather all our ingredients with love and care. Each component plays a pivotal role in crafting these irresistible squares.
- 4 tbsp unsalted butter, melted. Freshly melted butter is key here; it brings warmth and richness to our crust while helping all the components stick together beautifully. When choosing your butter, go for high-quality unsalted varieties for better control over salt levels in your dessert—this allows the bright lemon flavor to shine without any competing tastes. Remember, using cold butter won’t yield the same satisfying texture!
- 24 squares graham crackers. These little rectangles pack a punch! They form the base layer for our creamy squares, providing that beloved crunch and foundation we need. When selecting graham crackers, look for those made with whole grains for added fiber; plus, they lend a deeper flavor profile compared to regular ones. Once crumbled, they help create not just texture but also a hint of sweetness that complements our zesty filling wonderfully.
- ¼ cup sugar. Sugar is much more than just sweetness—it enhances flavors and balances out acidity from our lemons in this recipe. It’s absolutely paramount to use granulated sugar here because it dissolves easily into both the crust and filling without affecting their textures too much. If you’re looking for alternatives due to dietary preferences, feel free to experiment with coconut sugar or even maple syrup—though adjustments may be necessary!
- 2 egg yolks. These golden gems contribute richness and help set our creamy filling during baking thanks to their natural emulsifying properties. It’s important to separate them carefully; even a hint of egg white can affect how well your filling thickens up later on! When whisked with other ingredients, they provide that velvety smooth consistency we crave in desserts.
- 1 can (12oz) sweetened condensed milk. This liquid gold is what turns our filling into pure indulgence! It adds creaminess while also bringing sweetness without being overwhelming since it’s already pre-sweetened—a non-negotiable here for achieving that luxurious texture we adore in our squares. Look for brands without artificial additives if possible; quality makes all the difference!
- ½ cup of lemon juice. Freshly squeezed lemon juice brightens every layer with its tartness—this is what elevates these bars from ordinary to extraordinary! It’s crucial to select ripe lemons for maximum juice yield; rolling them gently before cutting helps release even more liquid! Trust me on this—the fresher your juice, the more vibrant your squares will taste.
Equipment You’ll Need:
Having the right tools at hand makes all the difference when embarking on our baking journey! While they aren’t technically ingredients, these kitchen helpers are essential allies in creating something truly wonderful.
- 8-inch square baking pan – This size is perfect for achieving that ideal thickness in your Creamy Lemon Squares; too large a pan will leave them too thin while one that’s too small may cause overflow during baking! Opting for one with straight sides allows for cleaner cuts once they’re cooled—a must-have if you want beautifully presented pieces.
- Parchment paper – A lifesaver when it comes time to remove those delicious squares from their pan! Lining with parchment not only prevents sticking but also makes cleanup effortless—not having it could lead to frustration when you’re trying to extract those heavenly treats after baking.
- Food processor – This handy gadget works wonders when breaking down graham crackers into crumbs quickly and uniformly! If you don’t have one, don’t fret; placing crackers in a zip-top bag and crushing them with a rolling pin works just as well—it’s all about getting creative!
Preparing the Creamy Lemon Squares
Step 1: Prepping Your Oven & Pan
First things first—we need to preheat our oven to 350°F (175°C). This step is absolutely crucial because starting off at the right temperature ensures even baking throughout; otherwise, you might end up with unevenly cooked filling or overly browned edges which no one wants! As it warms up, grab your trusty 8-inch square baking pan and line it with parchment paper—don’t forget to leave some hanging over two sides; this will be your little handles later when extracting those gorgeous squares after cooling!
Step 2: Creating Your Crust
Now comes my favorite part—making that delectable crust! Start by breaking up those graham crackers into smaller pieces before tossing them into your food processor along with sugar and melted butter. Pulse until they resemble coarse sand—this texture allows us to press them firmly into the bottom (and slightly up the sides) of our prepared pan later on without falling apart during baking. Take care not to rush this step; ensuring everything combines well will yield an even base that’s both crunchy yet tender once baked.
Step 3: Baking Your Crust
Once you’ve pressed down that crumb mixture firmly (trust me—it pays off later!), pop your pan into the preheated oven for about 10–12 minutes until lightly golden brown around edges—watch closely so they don’t burn! The goal here is developing flavor through browning while ensuring enough structure remains intact for holding all that luscious filling later on.
Step 4: Whisking Together Your Filling
While waiting patiently (or maybe not-so-patiently) for crusts cool down completely after baking—let’s whip up our creamy filling! In a mixing bowl combine sweetened condensed milk along with egg yolks before whisking vigorously until smooth—you can use an electric mixer if you prefer—but I love doing it by hand since I feel more connected during each step! Then add freshly squeezed lemon juice gradually while continuing mixing until everything harmonizes perfectly together like music playing softly behind closed doors!
And there you have it—the beginning stages toward creating sensational Creamy Lemon Squares filled with love and sunshine encapsulated within every bite! Stay tuned as we continue crafting these beauties together…
Step 5: The Art of Baking the Crust to Perfection
Now that we have our graham cracker mixture beautifully pressed into the pan, it’s time to send it off to the oven for a delightful transformation. Preheat your oven to 350°F (175°C) and allow that warm air to circulate, creating an inviting atmosphere which is crucial for a properly baked crust. When you place the crust in the oven, you’re not just baking; you’re coaxing out those rich, buttery flavors and achieving a golden-brown hue that adds both texture and taste. I like to think of this step as giving your crust a warm hug—it’s essential! Bake for about 10-12 minutes until it’s lightly browned; keep a watchful eye on it because every oven behaves differently, and we want that perfect golden glow.
Why is this step so important? Because a well-baked crust provides the foundation for your Creamy Lemon Squares, ensuring they hold together beautifully when cut. A too-soft or underbaked crust can lead to a soggy bottom—nobody wants that! You’ll know it’s done when you see those edges turning a lovely shade of brown and can smell that intoxicating aroma wafting through your kitchen. Once removed from the oven, let the crust cool completely in the pan before we add our luscious filling. Trust me on this part; patience is key in allowing those flavors to meld beautifully while maintaining a firm structure.
Step 6: Crafting Your Creamy Lemon Filling
Now comes one of the most exciting parts of making these Creamy Lemon Squares—the filling! While your graham cracker crust cools, gather your ingredients for the filling: sweetened condensed milk, egg yolks, and fresh lemon juice. This harmonious trio is what makes these squares truly extraordinary. Begin by adding the condensed milk and egg yolks into a medium-sized bowl; using either an electric mixer or a whisk, blend them together until you achieve a smooth consistency. This process not only combines flavors but also introduces air into the mixture, making it light and airy—just like clouds on a sunny day!
Next, squeeze in that vibrant lemon juice—this is where the magic happens! The fresh citrus not only brightens up our filling but also balances out the sweetness of the condensed milk with its tangy charm. Whisk everything together until thoroughly combined; you want each ingredient to dance together in perfect harmony. I promise you, this filling is going to be utterly intoxicating! Once your mixture is smooth and velvety, it’s time to pour it over our cooled graham cracker crust; don’t rush this step! Pour slowly and evenly so that every corner gets covered with that dreamy lemon goodness.
Step 7: Baking Your Filling to Silky Perfection
With our deliciously creamy filling ready and waiting, it’s time to return our dessert masterpiece back into the oven for one final bake. Carefully place your pan back into that preheated oven and let it work its magic at 350°F (175°C) for about 15-20 minutes. As it bakes, keep an eye on it; you’ll see the edges gently puffing up while the center will remain slightly jiggly—that’s exactly what we want! Think of it as slowly setting up its gorgeous custard-like texture without becoming rubbery—a delicate balance we must achieve.
This baking phase is absolutely paramount as it transforms our simple mixture into something profoundly satisfying and flavorful. The heat helps to set those egg yolks while simultaneously allowing all those heavenly flavors to meld together beautifully. You’ll know it’s ready when the edges are just barely starting to brown and there are no longer any wet spots in the center—trust me on this visual cue! Once you’ve reached this stage, remove it from the oven but refrain from cutting just yet; let those lovely lemon squares cool completely in their pan on a wire rack.
Step 8: The Importance of Cooling & Chilling
Once you’ve allowed your Creamy Lemon Squares enough time to cool at room temperature—about 30 minutes—it’s time for an optional yet highly recommended step: chilling them in the refrigerator for at least two hours (or even overnight!). Why chill? Well, cooling helps firm up those luscious squares even more, making them much easier to cut into perfect little pieces while enhancing their flavor profile as well. Imagine slicing into these little squares only to find them soft and runny—that’s not what we’re aiming for!
As they chill, think about how those flavors deepen; all that zesty lemon goodness mingling with sweet creaminess creates an experience that’s simply delightful with every bite. So don’t rush this step! After they’ve chilled adequately (and trust me—you’ll be rewarded!), grab that pan out of the fridge. Gently lift your beautiful creation out using those parchment paper handles you cleverly left hanging earlier—what a lifesaver! Transfer them onto a cutting board for easy slicing.
Conclusion:
What a journey we’ve taken together through this delightful recipe! From gathering ingredients that sing with vibrant flavors to baking up a pan of sweet sunshine, I hope my excitement has been contagious. These Creamy Lemon Squares are not just dessert; they embody everything wonderful about fresh lemons—their zesty brightness balanced by creamy sweetness creates an experience that transcends ordinary sweets. It’s like summer captured in each square—a true testament to how simple ingredients can result in something profoundly satisfying.
You simply must try making these squares yourself because beyond their irresistible taste lies the pure joy of crafting something beautiful in your kitchen. They shine brightly during sunny picnics, festive gatherings, or cozy family dinners where everyone gathers around the table with smiles and laughter. Picture pulling them from the oven; golden edges glistening as their aroma wafts through your home—it’s nothing short of magical. Not only do they brighten any occasion, but they also invite connections over shared bites and warm moments.
Imagine savoring one alongside a steaming cup of herbal tea on a quiet afternoon or perhaps serving them as a refreshing finish after a hearty meal with friends. For an elevated experience, drizzle some homemade lemon glaze over each square or pair them with fresh berries bursting with juice—what better way to highlight their sunny disposition? The possibilities are endless when it comes to how you choose to enjoy these lemony delights!
Feeling adventurous? This recipe is wonderfully adaptable! You could swap out traditional graham crackers for crushed almond cookies for a gluten-free variation that adds an intriguing nutty flavor. Or why not experiment by folding in some finely chopped mint leaves into the filling? It would create an utterly intoxicating combination of lemon and mint that dances on your tongue! You might even consider adding other citrus juices like lime or orange for a playful twist on flavor profiles—each variation brings its unique charm while keeping within that beloved creamy texture we all adore. I encourage you to make this recipe yours and share your journey with me—I’m excited to hear about all the delicious discoveries you make along the way!
Creamy Lemon Squares
Creamy Lemon Squares are a delightful dessert that perfectly balances tangy citrus with creamy sweetness. Each bite offers a burst of sunshine, reminiscent of warm summer days and joyful gatherings. With a buttery graham cracker crust and a luscious lemon custard filling, these squares are not only easy to make but also sure to impress friends and family alike. Enjoy them as a refreshing treat at picnics, parties, or simply as an indulgent dessert after dinner. This recipe captures the essence of simplicity while delivering rich flavors that elevate any occasion.
- Prep Time: 20 minutes
- Cook Time: 30 minutes
- Total Time: 50 minutes
- Yield: Approximately 16 servings 1x
- Category: Dessert
- Method: Baking
- Cuisine: American
Ingredients
- 4 tbsp unsalted butter (melted)
- 24 squares graham crackers (crumbled)
- ¼ cup sugar
- 2 egg yolks
- 1 can (12 oz) sweetened condensed milk
- ½ cup freshly squeezed lemon juice
Instructions
- Preheat your oven to 350°F (175°C). Line an 8-inch square baking pan with parchment paper.
- In a medium bowl, combine the graham cracker crumbs, melted butter, and sugar. Mix until well combined.
- Press the crumb mixture firmly into the bottom of the prepared pan to form the crust.
- Bake in the preheated oven for 10-12 minutes until lightly golden brown, then allow it to cool.
- In another bowl, whisk together sweetened condensed milk, egg yolks, and lemon juice until smooth.
- Pour the filling over the cooled crust and return it to the oven for another 15-20 minutes until set.
- Let it cool completely before chilling in the refrigerator for at least two hours before slicing.
Nutrition
- Serving Size: 1 square
- Calories: 160
- Sugar: 18g
- Sodium: 50mg
- Fat: 7g
- Saturated Fat: 4g
- Unsaturated Fat: 2g
- Trans Fat: 0g
- Carbohydrates: 23g
- Fiber: <1g
- Protein: 2g
- Cholesterol: 40mg