Pear and Brie Crostini
The very essence of cooking, dear friend, often transcends mere nourishment. It becomes a warm and inviting experience that encapsulates memories, traditions, and the simple joy of sharing good food with loved ones. As I think about our journey into the world of flavors today, I can’t help but feel a flutter of excitement for what we’re about to create together: Pear and Brie Crostini. This delightful appetizer is not just a combination of ingredients; it’s an exquisite symphony of flavors that dances between creamy brie, sweet ripe pears, and aromatic herbs, all resting on a perfectly toasted baguette. Each bite brings warmth and comfort, reminiscent of cozy gatherings where laughter fills the air and stories are shared over delicious bites.
Imagine stepping into your kitchen, the aroma of garlic wafting around you as you prepare these crostini. The buttery softness of brie melts beautifully under the broiler, creating a luscious coating that cradles slices of fresh pear—a fruit that bursts with juiciness as you take your first bite. And let’s not forget those fragrant herbs! Fresh rosemary and thyme add layers of flavor that uplift this dish from ordinary to extraordinary. I promise you; this recipe is destined to be a staple in your repertoire—perfect for everything from casual weeknight dinners to festive holiday parties. So let’s roll up our sleeves and embark on this culinary adventure together!
The Irresistible Allure of Sweet and Salty
What makes these Pear and Brie Crostini truly special is their uncanny ability to marry sweet and savory in such a harmonious way. The creamy brie offers a rich counterpoint to the crisp sweetness of the Anju pear while the balsamic reduction adds an intoxicating tang that elevates each ingredient’s natural flavors. This dish is so versatile—it can serve as an elegant starter at your next dinner party or simply as a comforting snack while lounging at home. Friends will rave about how impressive it tastes while you’ll smile knowingly; it’s deceptively easy to make! This effortless blend of textures and tastes is sure to become one of those cherished recipes that you find yourself returning to time after time.
Ingredients:
Embarking on our culinary journey begins with gathering vibrant ingredients that will elevate our Pear and Brie Crostini into something truly memorable. Each component plays a vital role in crafting this delightful appetizer, so let’s explore them together.
- 1 Baguette (about 25 inches long). The foundation of our crostini lies in this classic bread—a baguette provides the ideal crunch when toasted while maintaining a soft interior that soaks up all the delicious toppings. Choose a freshly baked baguette if possible; its crust should be golden brown with a slight give when pressed gently. If you can’t find a baguette, any rustic bread with a sturdy crust will do just fine—think ciabatta or sourdough.
- 10 oz Brie. This creamy cheese is an absolute star in our recipe! Its rich, buttery texture creates a luxurious mouthfeel that pairs beautifully with the crispness of our toasted bread and the freshness of pears. When selecting brie, look for wheels that are well-ripened but not overly runny; it should have slight indentations when pressed gently but still hold its shape slightly. You can substitute other soft cheeses like camembert if needed, but trust me—brie is non-negotiable here for that authentic taste!
- 1 Anju pear. With its sweet juiciness and smooth skin, an Anju pear is the perfect choice for our crostini! It’s slightly firmer than other varieties yet ripens beautifully to bring out its natural sugars without being overly mushy. When choosing your pear, opt for one that yields slightly when pressed near the stem—this indicates ripeness while still maintaining structure for slicing. If Anju isn’t available, feel free to use Bosc or Bartlett pears; they’ll impart similar flavors.
- 2 Tbsp Olive oil. Olive oil isn’t just for drizzling; it plays an essential role in enhancing flavor while providing moisture during baking! A good quality extra virgin olive oil will lend fruity notes to your crostini—look for oils labeled “first cold press” for maximum flavor impact! Lightly brushing each slice helps achieve that beautiful golden-brown color while adding richness without overwhelming other ingredients.
- 1 Clove Garlic (crushed). Garlic brings depth to our dish with its aromatic qualities! By crushing it before mixing it into the olive oil, we release those pungent oils that infuse every bite with savory goodness. Don’t rush this step; letting garlic sit for even a few minutes after crushing allows its flavor compounds to blossom fully before mingling with the oil.
- 2 Tbsp Fresh rosemary (finely chopped). Fresh herbs are like little bursts of magic in cooking! Rosemary imparts earthy notes that complement both cheese and fruit perfectly—the key here is using fresh rather than dried rosemary since its flavor profile is far more vibrant when used fresh—plus it adds lovely visual appeal on top!
- 2 Tbsp Fresh thyme (finely chopped). Like rosemary, thyme adds complexity without overpowering subtle flavors present in brie or pears—their aromatic qualities work harmoniously together! Just like rosemary, fresh thyme is paramount here—its delicate leaves pack so much flavor compared to dried versions—and trust me: seeing those vibrant green flecks on top makes all the difference visually too!
- 2-3 Tbsp balsamic reduction. Ahh…the pièce de résistance! A balsamic reduction elevates everything by introducing sweetness balanced by acidity—this liquid gold drizzled over our finished crostini ties everything together beautifully! You can make your own reduction easily by simmering balsamic vinegar until it thickens or purchase pre-made versions which are equally delightful.
Equipment You’ll Need:
Before diving into preparation mode, let’s gather some essential tools that’ll make our cooking experience smoother and more enjoyable! Having these items at hand ensures you’re ready to tackle this recipe confidently.
- Baking sheet – A sturdy baking sheet serves as your platform for broiling those beautiful baguette slices until they reach perfection! Look for one with raised edges to prevent any drips or spills from escaping—you want every bit of melted cheese contained safely until it reaches your plate!
- Sharp knife – A sharp knife makes slicing through both bread and cheese effortless—it’s crucial here since we want neat cuts without mashing either ingredient down too much! Investing in a good-quality chef’s knife will pay off not just today but in countless future endeavors within your kitchen.
- Basting brush – This simple tool might seem trivial at first glance but trust me—it’s invaluable when brushing on olive oil evenly across each slice before broiling! You could use paper towels instead if necessary—but nothing beats having control over how much oil goes onto each piece without making them greasy!
Now that we’ve gathered everything needed let’s embark on preparing those scrumptious Pear and Brie Crostini together!
Preparing the Pear and Brie Crostini
Step 1: The Perfect Slice
Begin by slicing your baguette diagonally into pieces about ½ inch thick—this angle creates larger surface areas for topping later while also showcasing those lovely golden edges once toasted! Take your time here; don’t rush through this step because uneven slices can result in some pieces browning faster than others during broiling—keeping them uniform ensures even cooking throughout every batch! Once sliced up nicely, arrange them neatly on your baking sheet ready for their moment under heat.
Step 2: Cutting Cheese & Pears
Next comes perhaps my favorite part—the artistry involved in cutting both brie and pears into delicate slices! With a sharp knife at hand again (we’re using it frequently today!), carefully cut thin rounds from brie ensuring they remain intact; we want them melt-in-your-mouth but also holding their shape atop warm crostinis later on during baking process itself! For pearls—slice thinly as well aiming roughly similar thicknesses akin toward what we achieved earlier with bread slices—that way everything melds beautifully once layered together!
Step 3: Infusing Flavor
In this step we’re going to infuse some liquid gold goodness into our base layer—a mixture comprising crushed garlic combined alongside olive oil awaits us next! Simply crush one clove before adding two tablespoons worth directly into small bowl then mix thoroughly until fully blended together—it shouldn’t take long at all since aromas will permeate instantly filling kitchen around us invitingly already hinting towards what lies ahead once baked next…
Step 4: Brushing Those Slices
Once infused nicely let’s get back onto original task ahead—we’re going back towards prepped slices lying patiently awaiting attention now patiently upon baking sheet previously set aside earlier… Lightly brush each side using basting brush dipped within garlic-infused olive oil mixture created earlier doing so generously yet careful enough avoiding excess pooling underneath preventing sogginess down road during baking phase afterward instead focusing solely onto achieving crispy exterior desired whilst maintaining soft inside texture overall ultimately leading towards perfection achieved later post-baking session finally completed after few moments spent underneath broiler eventually reaching luscious heights attained afterwards altogether at last…
Stay tuned as we continue creating these delightful bites filled with love just waiting patiently until served straight away soon enough altogether finally…
Step 5: Toasting the Baguette to Perfection
Now that we have our baguette slices ready, it’s time for one of the most crucial steps in making your Pear and Brie Crostini – toasting that bread. This process isn’t just about giving the bread a little crunch; it’s about creating a golden canvas for all the delightful toppings that will soon grace its surface. Start by preheating your broiler, which is an important step because it provides intense, direct heat from above, allowing for quick browning while keeping the inside soft and airy. Lightly brush each side of those baguette slices with the garlic-infused olive oil you prepared earlier. This infusion not only adds flavor but also helps achieve that beautiful golden color as they toast.
Arrange those oil-brushed slices on a baking sheet in a single layer to ensure even cooking – crowded slices are bound to steam rather than toast, which is not what we want. Slide them under the broiler for about 2 minutes; keep a watchful eye during this time! The goal here is to achieve a lightly toasted exterior without burning—this can happen quickly if you’re not vigilant. After two minutes, flip each slice over and return them to the broiler for another 2 minutes until they start turning a lovely golden brown. The visual cue you’re looking for is that gorgeous caramelization that will add depth and flavor to your crostini. Trust me on this, because achieving that perfect toastiness is absolutely paramount for elevating your final dish!
Step 6: Melting the Brie – The Creamy Foundation
Once your baguette slices have reached that perfect toasted state, it’s time to layer on the star of our show – the brie cheese! With a sharp knife, cut your brie into thin, even slices. It’s important to keep these slices uniform so that they melt evenly when we return them to the oven; uneven pieces can lead to some bites being gooey while others remain solid—a culinary tragedy! Remember, brie has such a luxurious texture; it practically melts like liquid gold when warmed just right.
Place a slice of brie on top of each toasted baguette piece and then return them to the broiler for about 2 minutes again. This step is more than just about melting cheese—it’s about creating an utterly intoxicating aroma that will waft through your kitchen and make everyone feel at home. Keep an eye on them during this short broiling period so you can catch them just as they begin to melt—not too much or else you’ll lose that gorgeous creaminess we crave! As you watch, notice how the edges start to bubble slightly; this visual cue indicates you’re on the right track toward achieving that perfect creamy texture.
Step 7: Topping with Fresh Pears and Aromatic Herbs
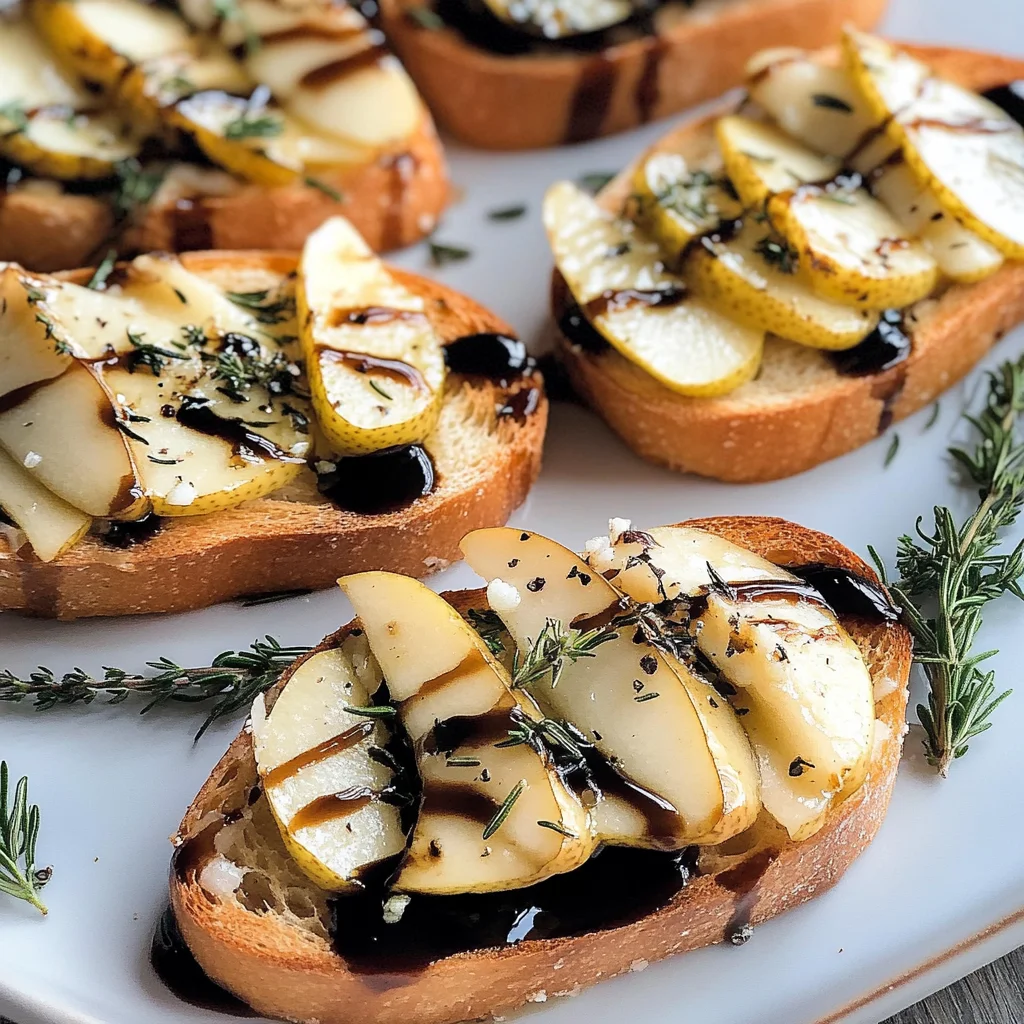
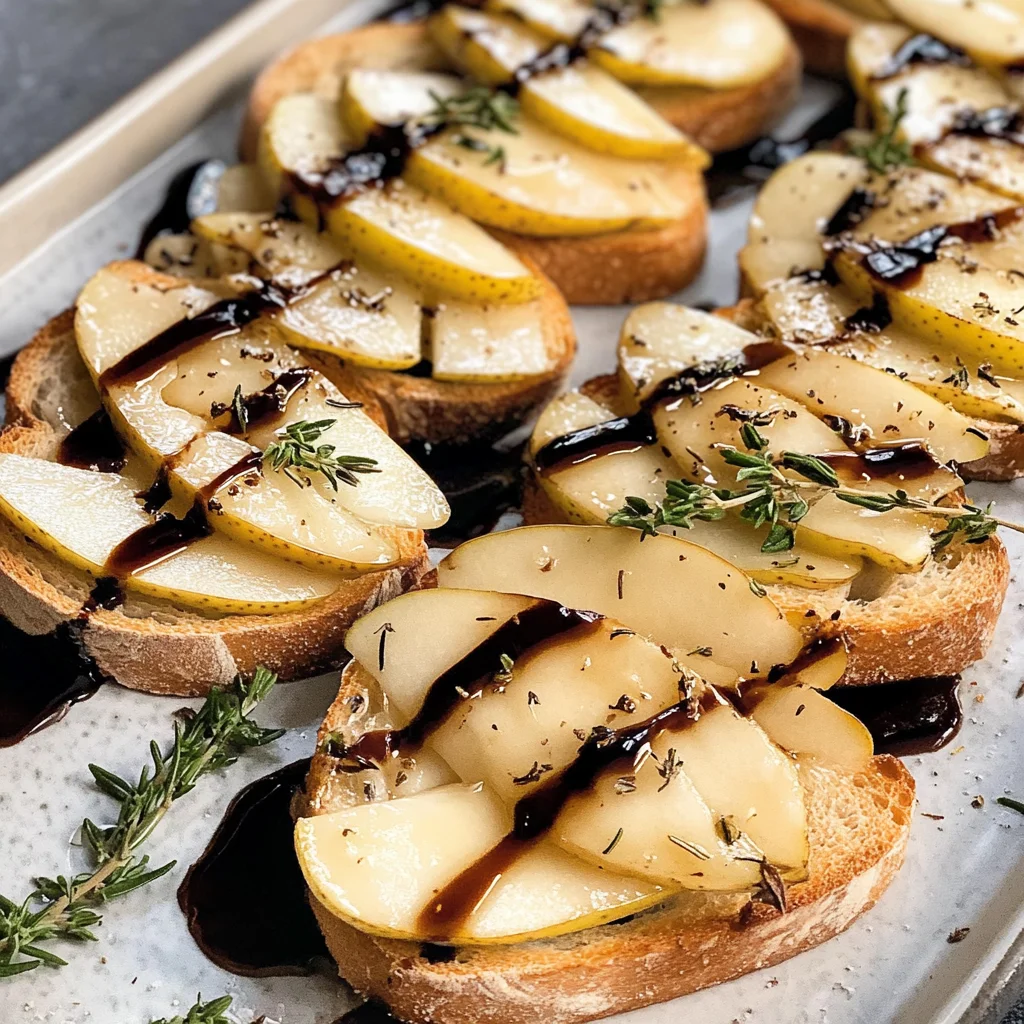
Now comes one of my favorite moments in preparing these crostinis—the addition of fresh pears and aromatic herbs! With your melted brie serving as a luxurious base, take those carefully sliced pear pieces and place two atop each crostini. The contrast between the warm, gooey brie and sweet, crisp pear is truly extraordinary! Look for ripe Anjou pears; their juicy sweetness pairs perfectly with rich cheese while adding refreshing brightness to every bite.
After laying down those succulent pear slices, sprinkle finely chopped rosemary and thyme over each piece. These herbs aren’t just there for decoration—they play an essential role in enhancing flavors with their earthy notes that beautifully complement both the cheese and fruit. I promise you; taking this extra minute to add fresh herbs makes all the difference in taste! You’ll want to return these assembled beauties back under the broiler one last time—just until you can start smelling those fragrant herbs dancing in harmony with the other ingredients. That moment when their aromas fill your kitchen? It’s magical!
Step 8: Final Heating & The Transformative Scent
As your crostini bake one last time under high heat, allow yourself to savor this moment of anticipation! This final heating is critical because it allows all those incredible flavors to meld together beautifully while ensuring everything stays warm and inviting for your guests (or yourself—we won’t judge!). Set your timer for just one minute; we’re aiming for those aromatic herbs’ fragrance without overcooking any elements.
Keep an eye out during this brief period—you’ll know they are ready when you begin catching whiffs of rosemary mingling with melting cheese and sweet pears wafting through your space like an olfactory hug! Once this heavenly scent envelops you completely, grab those crostinis from the oven—with care! They’ll be hot but oh-so-worth-it! At this stage, consider placing them onto a serving platter where they can shine like stars on display before diving into their deliciousness.
Conclusion:
As we wrap up this culinary journey together through the creation of these delightful Pear and Brie Crostini, I can’t help but feel an overwhelming sense of excitement that I hope resonates with all of you. From the first slice of baguette kissed by olive oil to the final drizzles of balsamic reduction glistening like liquid gold, every step is steeped in love and flavor. The unique blend of creamy brie paired with sweet Anjou pears creates a symphony of flavors that is simply extraordinary—a true testament to how simple ingredients can elevate an everyday experience into something profoundly satisfying.
This recipe is an absolute must-try not only because it delivers on taste but also because it brings joy into cooking. Imagine preparing these beauties for an impromptu gathering with friends or as an elegant starter at your next dinner party; they are incredibly versatile! The moment they come out of the oven—the aromas filling every nook and cranny—it’s hard not to feel elated as people gather around with eager anticipation. Each bite invites compliments and conversation, fostering connections over food that create lasting memories.
When it comes to serving suggestions, think beyond just enjoying them on their own. Imagine savoring one with a crisp glass of sparkling water infused with mint or perhaps pairing them with assorted nuts for added crunch. For an afternoon pick-me-up while lounging on the couch or even as part of a lavish spread at brunch—you truly can’t go wrong! And if you want something extra decadent? Consider adding a drizzle of honey atop each crostini; it transforms each bite into pure bliss.
Feeling adventurous? This recipe is wonderfully adaptable! You could switch out pears for figs during autumn or swap out herbs based on what’s available—think basil or even microgreens for added freshness! Or try adding a sprinkle of crushed red pepper flakes if you’re craving some heat; it’s all about personalizing it to your taste buds! So go ahead—give this recipe a try, share your beautiful creations with family and friends, and connect over this extraordinary dish that celebrates both simplicity and elegance!
Pear and Brie Crostini

Indulge in the delightful harmony of flavors with our Pear and Brie Crostini, a perfect appetizer for any occasion. This elegant dish combines the creamy richness of brie cheese with sweet, juicy Anjou pears, all atop perfectly toasted baguette slices. Infused with aromatic herbs like rosemary and thyme, and finished with a drizzle of balsamic reduction, each bite offers a delectable balance of sweet and savory that will impress your guests and leave them craving more. Whether you’re hosting a dinner party or enjoying a cozy night in, these crostinis are quick and easy to prepare, making them an essential addition to your culinary repertoire.
- Prep Time: 15 minutes
- Cook Time: 6 minutes
- Total Time: 21 minutes
- Yield: Serves 12 crostinis 1x
- Category: Appetizer
- Method: Baking
- Cuisine: American
Ingredients
- 1 Baguette
- 10 oz Brie cheese
- 1 Anjou pear
- 2 Tbsp Olive oil
- 1 Clove Garlic (crushed)
- 2 Tbsp Fresh rosemary (finely chopped)
- 2 Tbsp Fresh thyme (finely chopped)
- 2–3 Tbsp balsamic reduction
Instructions
- Preheat your broiler.
- Slice the baguette diagonally into ½ inch thick pieces.
- Crush garlic and mix with olive oil; brush this mixture onto both sides of the baguette slices.
- Toast the slices under the broiler for about 2 minutes on each side until golden brown.
- Layer brie slices on top of the toasted baguettes and return to the broiler for another 2 minutes until melted.
- Top each crostini with pear slices, sprinkle with fresh herbs, and drizzle balsamic reduction before serving.
Nutrition
- Serving Size: 1 crostini (30g)
- Calories: 120
- Sugar: 4g
- Sodium: 180mg
- Fat: 7g
- Saturated Fat: 3g
- Unsaturated Fat: 4g
- Trans Fat: 0g
- Carbohydrates: 10g
- Fiber: 1g
- Protein: 3g
- Cholesterol: 15mg