Hot Italian Sub Sliders
There’s something truly magical about gathering around a warm platter of sliders, isn’t there? The aroma wafting through the air, the laughter of friends and family, and that first tantalizing bite that transports you to a place of comfort and joy. These Hot Italian Sub Sliders are not just a meal; they’re an experience—a delightful fusion of flavors that capture the spirit of both American and Italian cuisines. Each slider is like a little treasure chest filled with juicy turkey, savory chicken ham, and zesty peppers, all enveloped in soft, sweet rolls. I can barely contain my excitement as I tell you about this recipe, which has quickly become a staple at my gatherings.
Imagine this: You’ve had a long day, and you want something that’s not only delicious but also simple to prepare. These sliders come together in just 35 minutes! They’re perfect for tailgating or any casual get-together, and I promise you they will be the star of the show. The combination of melted provolone cheese and tangy marinara sauce creates an utterly intoxicating experience that will have everyone coming back for seconds (and thirds!). Trust me on this one—you’ll want to keep this recipe close at hand because once you serve these sliders, your friends will be begging for the secret behind them!
Hot Italian Sub Sliders: Flavorful Bites of Joy
Let’s dive into the heart of this recipe—preparing Hot Italian Sub Sliders that bring warmth and satisfaction in every bite! This dish blends tender turkey with zesty pepperoni and a touch of tang from pickled peppers, all nestled within soft rolls that practically melt in your mouth. It’s like a hug on a plate!
Ingredients:
As we embark on this culinary journey together, let’s take a moment to appreciate each ingredient. Every single one contributes to the symphony of flavors that make these sliders so special.
- 12 pack rolls, halved lengthwise (I recommend Kings Hawaiian rolls). These rolls are simply divine! Their sweet flavor complements the savory fillings beautifully and provides that perfect balance we aim for in our Hot Italian Sub Sliders. The softness of these rolls is absolutely paramount—they cradle all those delicious ingredients without falling apart. If you can’t find Kings Hawaiian rolls, look for other soft dinner rolls; however, I can’t stress enough how much the sweetness enhances the overall taste experience.
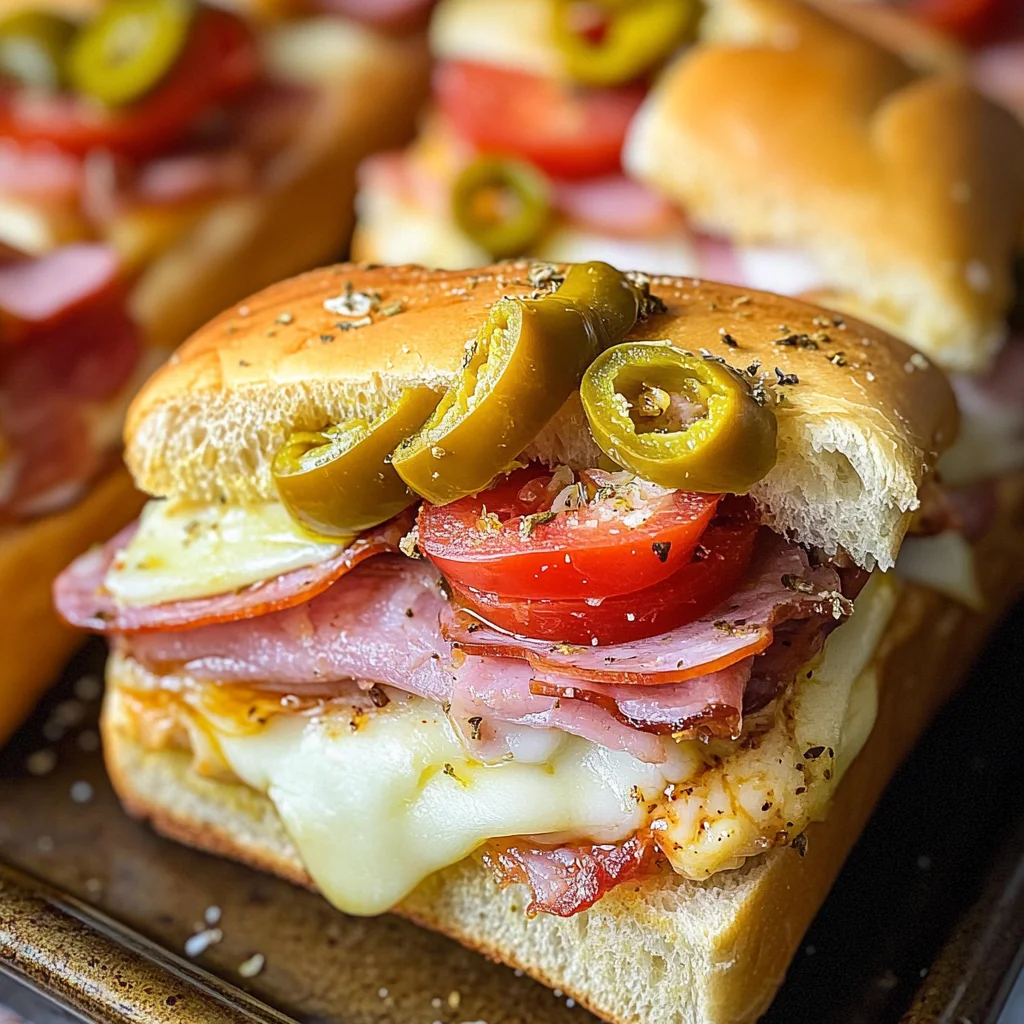
- 6 oz package of chicken ham, thinly sliced. Chicken ham adds a wonderful smokiness without overwhelming the palate. It’s less fatty than traditional pork ham yet still packs a punch in terms of flavor. When shopping for chicken ham, look for high-quality brands without artificial preservatives or additives; it makes all the difference in taste and texture. Plus, its tenderness works perfectly with our other ingredients.
- 5 oz package of turkey slices, thinly sliced. The turkey slices serve as a lovely base layer in our slider construction—lean yet flavorful. They help keep everything moist while adding depth to each bite. As with any deli meat, check for low-sodium options if you’re mindful about salt intake; this ensures you can enjoy these sliders guilt-free while still savoring every mouthful.
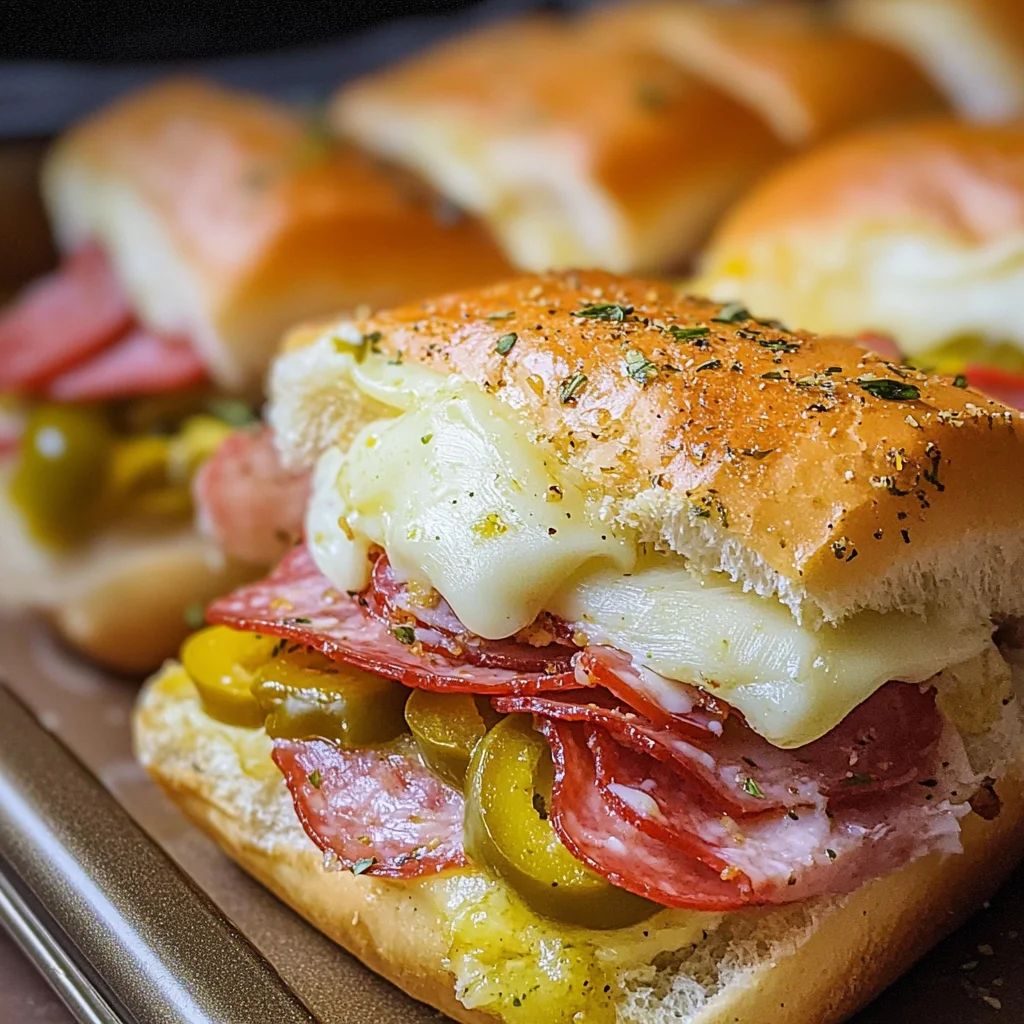
- 5 oz package of turkey pepperoni, thinly sliced. Oh boy! This ingredient is what takes our sliders from good to extraordinary! Turkey pepperoni brings that signature spicy kick without being too heavy or greasy. It layers beautifully on top of the turkey slices and pairs wonderfully with provolone cheese—creating an utterly harmonious flavor profile.
- 9 slices provolone cheese. Provolone is creamy and melts like liquid gold—it’s absolutely crucial for creating that ooey-gooey texture we all crave in a slider! When shopping for cheese, opt for fresh slices from the deli counter if possible; they tend to have richer flavors compared to pre-packaged options. A good provolone will enhance every element in your sandwich while providing just enough stretch when melted.
- 1/3 cup pepperoncini, sliced. These little green peppers add zing! Their mild heat and tangy flavor elevate our sliders to new heights—trust me when I say they’re non-negotiable here! Pepperoncini are often found jarred or fresh; either works well as long as you slice them thinly so they distribute evenly throughout each slider.
- 1/3 cup pickled hot cherry peppers, sliced. For those who love an extra kick (like me!), hot cherry peppers offer an explosion of flavor! They balance out the richness from the cheese and meats wonderfully while adding some color that’s oh-so visually appealing! Make sure to slice them carefully so they spread their heat evenly across each slider.
- 1/4 cup salted butter, melted. Butter is where we get our rich flavor and beautiful golden crust on top of the sliders—it’s truly transformative! Melting it allows us to brush it over our assembled sliders easily; don’t skip this step! Opt for salted butter since it will enhance all those delicious flavors we’ve built up already.
- 1 tsp Italian seasoning. This blend brings together herbs like oregano and basil which evoke memories of classic Italian cooking—absolutely essential here! It infuses every bite with an aromatic quality that makes these sliders feel gourmet while remaining incredibly simple.
- 2 cloves garlic, crushed (I recommend fresh over jarred). Fresh garlic infuses your dish with vibrant flavor; it becomes aromatic when mixed into melted butter! Garlic not only enhances taste but also elevates your entire kitchen experience by filling it with an intoxicating scent as it cooks—who could resist?
- 1 cup marinara sauce. Finally comes the marinara sauce—a dipper’s dream! It adds moisture while complementing all those rich flavors inside each slider perfectly—it’s like having pizza in sandwich form! Choose your favorite store-bought brand or make your own if you’re feeling adventurous; either way will elevate your slider game immensely!
Equipment You’ll Need:
To create these delightful Hot Italian Sub Sliders smoothly, having the right tools makes all the difference in ensuring success—and trust me when I say it’s worth investing in quality equipment!
- Baking sheet or pan: A sturdy baking sheet is essential here because it holds all those delectable sliders together while allowing them to bake evenly without getting squished or burnt at edges—trust me on this one!
- Aluminum foil: Covering your sliders with foil during baking helps retain moisture while ensuring even cooking throughout—this step prevents dryness which no one wants after putting so much effort into making these beauties!
- Brush: A pastry brush makes applying that luscious butter mixture effortless; it’ll help you coat every nook generously without losing any flavorful goodness along the way!
Now that we’ve gathered our ingredients and equipment let’s dive into creating these heavenly Hot Italian Sub Sliders!
Step 1: Preheating Your Oven
Preheat your oven to 350 degrees F before diving into assembly—this step is crucial because it ensures everything cooks evenly once we pop those sliders inside later on! While waiting for your oven temperature to reach its sweet spot (you know it’s ready when you hear that gentle hum), take time to gather everything else needed so you’re fully prepared ahead…
Step 2: Assembling The Slider Base
Once preheated correctly begins laying out those halved rolls onto lined baking sheets or pans—the bottom halves should be facing up since they’ll hold all our delicious fillings together beautifully during baking time later too! Start layering by placing down slices of chicken ham generously across—they act as both flavorful base layers while also keeping moisture locked within further ingredients added next…
Step 3: Building Flavor Layers
After laying down chicken ham comes turkey slices followed closely by layers upon layers—oh yes ladies (and gentlemen), let’s pile on some turkey pepperoni next followed finally by melty goodness from provolone cheese atop everything else below… Feel free here though if desire more crunch try adding extra toppings such as roasted red peppers too—they add vibrancy beside their delightful textures alongside spicy elements resulting from pepperoncini & hot cherry peppers added afterwards too…
Step 4: Brushing On That Buttery Goodness
With each layer thoughtfully placed now comes time for brushing buttery mixture lovingly crafted earlier into bowl containing melted butter mixed well combined previously alongside garlic cloves crushed finely plus sprinkle from Italian seasoning sprinkled carefully throughout till thoroughly coated before covering whole assembly yet again using aluminum foil beforehand placing inside oven set approximately thirty minutes until golden brown blissfully emerges revealing fragrant aromas surrounding kitchen area leaving mouths watering eagerly awaiting first bites post-baking session completed successfully…
Stay tuned as we continue bringing life into these incredible Hot Italian Sub Sliders through further steps leading toward ultimate culinary triumph ahead!
Baking Your Perfect Hot Italian Sub Sliders
Step 5: Preparing the Flavorful Butter Mixture
Now we come to a step that’s absolutely paramount for imparting those rich, savory notes throughout your Hot Italian Sub Sliders—creating the delicious butter mixture. In a small bowl, you’ll want to combine 1/4 cup of melted salted butter with 1 teaspoon of Italian seasoning and 2 cloves of freshly crushed garlic. This is where the magic happens! The melted butter acts as a carrier for the flavor from the garlic and herbs, ensuring that every bite is infused with that utterly intoxicating essence. After mixing, take a moment to breathe in the aroma; it should be fragrant and inviting, setting the stage for what’s to come.
Trust me on this: brushing your sliders with this seasoned concoction is non-negotiable. It not only enhances the overall taste but also helps achieve that golden-brown crust you’re aiming for during baking. As you brush it over the top of the rolls, make sure to get into all those nooks and crannies; every corner deserves that buttery love! You’re not just adding flavor here; you’re enhancing texture and creating a beautifully appealing finish. So don’t rush this step—take your time and enjoy it!
Step 6: Baking with Care
With your sliders prepared and brushed with that delectable butter mixture, it’s time to cover them with foil. This step is crucial because it helps retain moisture while baking; think of it as creating a warm steam bath for your sliders. Place them in that preheated oven at 350 degrees Fahrenheit for about 30 minutes. Watch as they begin to transform—the heat will melt the provolone cheese into a gooey delight while softening all those luscious meats.
As they bake, keep an eye on them towards the end of the cooking time. You’ll want to look for visual cues like a slight puffiness in the rolls and a beautiful golden hue beginning to form on top. The melted cheese should be bubbling ever so slightly, indicating everything inside is melding into a symphony of flavors. If you peek underneath the foil at around 20 minutes in and notice they’re already browning too quickly, feel free to lower your oven temperature slightly or keep them covered longer until they reach that heavenly state of doneness.
Step 7: The Transformative Cooling Period
Once your timer goes off after 30 minutes, it’s time to remove those succulent Hot Italian Sub Sliders from the oven—oh, my goodness! The sight alone is enough to make anyone swoon! But before you dive right in (I know it’s tempting!), I implore you to let them sit for about 5-10 minutes before slicing into them. Yes, waiting can feel agonizing when something smells so divine, but trust me on this one! Allowing them to cool slightly ensures that all those flavors have time to settle and mingle together better than old friends at a reunion.
During this cooling period, you’ll notice how much easier it becomes to slice through those layers without everything falling apart. If you cut too soon while everything is still hot and melty, you risk losing precious fillings out onto your cutting board—a heartbreaking scenario indeed! So practice patience here; I promise it’s worth every single second as you prepare yourself for a bite of pure comfort food bliss.
Step 8: Slicing and Serving Your Masterpiece
Now comes one of my favorite parts: slicing up these mouthwatering Hot Italian Sub Sliders! With a sharp knife (because we want clean cuts), gently slice through those buns where they were originally joined together. You’ll find that each slider holds its shape beautifully thanks to our careful baking method earlier on—no soggy bottoms here! Arrange these beauties on a platter or serve directly from the baking sheet if you’re feeling casual (and who wouldn’t?).
This is also when I like to introduce a delightful sidekick—your favorite marinara sauce served warm in a bowl for dipping or drizzling atop each slider enhances both flavor and experience tremendously. Imagine biting into that melty cheese paired with spicy pepperoncini and zesty turkey pepperoni dipped into rich marinara—it’s truly extraordinary! As you gather around with friends or family sharing these sliders at your next gathering or tailgate party, remember every ingredient was chosen carefully, every step taken thoughtfully; this isn’t just food—it’s love served on a bun!
Final Touches
Step 9: Presenting Your Culinary Creation
Finally, it’s time for presentation—a vital part of any meal! While these Hot Italian Sub Sliders are undeniably delicious straight from the oven, taking an extra moment to present them beautifully can elevate your dining experience even further. Consider garnishing your platter with fresh parsley or basil leaves for an added pop of color—they not only look stunning but also add an aromatic freshness that complements all those rich flavors beautifully.
As everyone gathers around excitedly awaiting their first taste of these sliders, take pride in knowing you’ve created something truly special from scratch. Each slider encapsulates warmth and hospitality; they’ve got stories woven into each layer just waiting to be shared amongst friends or family gathered close by. So grab some plates, serve each guest generously while soaking up their delighted reactions—you deserve every ounce of joy coming back at you!
And there you have it—your complete guide on making irresistible Hot Italian Sub Sliders! From the initial prep all the way through serving up smiles at your table (or tailgate!), I hope this recipe becomes one of your cherished go-tos as it has become mine over time. Enjoy every bite!
Storage and Enjoyment Tips for Your Hot Italian Sub Sliders
Now that your kitchen is filled with the intoxicating aroma of freshly baked Hot Italian Sub Sliders, it’s time to dig in and enjoy every last bite! These delightful little sandwiches not only shine at the dinner table but also have a remarkable ability to hold their own for later. Whether you’re savoring them right away or saving some for later, I’ve got you covered with tips on how to keep that flavor and freshness intact.
Storing Leftover Hot Italian Sub Sliders
To preserve the mouthwatering goodness of your leftover Hot Italian Sub Sliders, I recommend placing them in an airtight container. This will help maintain their soft texture while keeping any potential moisture at bay. If you’re planning on enjoying them within a couple of days, simply store them in the refrigerator where they will stay fresh for up to three days. For those who want to extend their life a little longer, wrapping each slider tightly in plastic wrap before placing them in a container can be a game changer—this keeps them from drying out and allows you to pull out just what you need without losing quality. When it comes time to enjoy these scrumptious sliders again, trust me when I say that even after refrigeration, they still taste divine! Just pop them back into the oven at 350 degrees F for about 10-15 minutes, so they warm through beautifully and regain that lovely golden crust.
Freezing Hot Italian Sub Sliders for Later
If you’re looking to take your meal prep game up a notch, freezing these sliders is an excellent option! To freeze them properly, let your sliders cool completely before wrapping them individually in aluminum foil or plastic wrap. This helps lock in moisture and flavor, ensuring each bite remains as delicious as when they were first baked. They can stay in the freezer for up to three months—perfect for those busy nights when you need a quick meal without any fuss. When you’re ready to enjoy your frozen treasures, simply unwrap and bake straight from the freezer; just add a few extra minutes to the baking time until they are warmed through. The convenience of having these tantalizing treats ready at your fingertips makes this method not only practical but also incredibly satisfying!
Hot Italian Sub Sliders

Discover irresistible Hot Italian Sub Sliders perfect for gatherings! Easy to make and packed with flavor—try this delightful recipe today!
- Prep Time: 15 minutes
- Cook Time: 30 minutes
- Total Time: 45 minutes
- Yield: Approximately 12 servings 1x
- Category: Appetizer
- Method: Baking
- Cuisine: Italian-American
Ingredients
- 12 pack of soft rolls (Kings Hawaiian recommended)
- 6 oz thinly sliced chicken breast
- 5 oz thinly sliced turkey breast
- 5 oz thinly sliced turkey pepperoni
- 9 slices provolone cheese
- 1/3 cup sliced pepperoncini
- 1/3 cup sliced pickled hot cherry peppers
- 1/4 cup melted salted butter
- 1 tsp Italian seasoning
- 2 cloves crushed garlic
- 1 cup marinara sauce
Instructions
- Preheat your oven to 350°F.
- Place the halved rolls on a baking sheet with the cut sides facing up.
- Layer the chicken, turkey, turkey pepperoni, provolone cheese, pepperoncini, and hot cherry peppers on the bottom halves.
- In a bowl, mix melted butter with crushed garlic and Italian seasoning. Brush this mixture over the sliders generously.
- Cover with aluminum foil and bake for about 30 minutes until golden brown and bubbly.
- Allow cooling for 5-10 minutes before slicing and serving with warm marinara sauce.
Nutrition
- Serving Size: 1 slider (approximately 85g)
- Calories: 320
- Sugar: 2g
- Sodium: 650mg
- Fat: 18g
- Saturated Fat: 7g
- Unsaturated Fat: 8g
- Trans Fat: 0g
- Carbohydrates: 27g
- Fiber: 1g
- Protein: 15g
- Cholesterol: 40mg