Oatmeal Chocolate Chip Zucchini Cookies
From the moment you take a bite of these Oatmeal Chocolate Chip Zucchini Cookies, you’ll understand that this is not just a recipe; it’s a heartfelt embrace baked into chewy goodness. Each cookie encapsulates the warmth of home-baked treats, with every morsel inviting you to linger a little longer in the joy of sweet indulgence. The soft, chewy texture combines beautifully with the rich, melty chocolate chips and the subtle hint of cinnamon, creating an experience that transcends mere snack time. And let’s be honest—who could resist the allure of zucchini hiding within these decadent treats? It’s like a little secret ingredient that adds moisture and nutrition without stealing the spotlight, making these cookies not just delicious but also a clever way to incorporate veggies into your day.
What I love most about baking these Oatmeal Chocolate Chip Zucchini Cookies is how they bring people together. Whether it’s an afternoon treat with friends or a late-night snack while watching your favorite movie, each bite is filled with nostalgia and warmth that reminds us of simpler times. As you gather your ingredients and preheat the oven, think about those moments you’ve shared over food with loved ones—this recipe is destined to create more cherished memories in your kitchen. I promise you, once you take that first warm bite, you’ll understand why everyone raves about them!
Oatmeal Chocolate Chip Zucchini Cookies: A Delightfully Chewy Experience
Let me walk you through this delightful recipe that brings together simplicity and comfort in every bite. These cookies are not only easy to whip up but also incredibly satisfying, perfect for any occasion. You’ll find yourself reaching for one more cookie—trust me!
Ingredients:
As we embark on this culinary adventure together, it’s essential to gather our ingredients thoughtfully. Each component plays a vital role in crafting the perfect Oatmeal Chocolate Chip Zucchini Cookies, so let’s dive into what makes them so special.
- 2 cups quick oats: Quick oats are the unsung heroes here! They provide that lovely chewiness that makes oatmeal cookies so comforting. Unlike steel-cut oats that take ages to cook and can be too hearty for cookies, quick oats soften beautifully without becoming mushy during baking. When shopping for oats, look for brands that have minimal additives—pure oats are what we want! If you’re in a pinch or prefer whole grains, rolled oats can be substituted but may lead to a slightly different texture.
- 2/3 cup all-purpose flour: This is crucial for providing structure to our cookies. The flour binds everything together while allowing them to rise just enough for that perfect chewiness. When measuring flour, always spoon it into your measuring cup and level it off with a knife—this ensures accuracy and prevents dense cookies! If you’re looking for gluten-free options, consider using almond flour or oat flour; just keep in mind that results may vary slightly.
- 2 tbsp cocoa powder: Ahh, cocoa powder—the magical dust that elevates our cookies from ordinary to extraordinary! It adds a rich depth of flavor and an enticing hint of chocolate without overwhelming the palate. Always choose unsweetened cocoa powder for balance since we’ll be adding plenty of sweetness elsewhere. I encourage you to opt for high-quality cocoa—it’s worth it for the flavor!
- 1/2 tsp baking soda: This little agent is non-negotiable for achieving those perfectly puffed cookies! Baking soda interacts with acids (like brown sugar) in our dough to produce carbon dioxide bubbles during baking, giving rise to soft yet chewy cookies. Make sure your baking soda is fresh; if it’s been sitting around for too long, it may lose its potency.
- 1/4 tsp salt: Salt acts as the ultimate flavor enhancer—it brings out all the other flavors lurking in our cookie dough! Just a sprinkle elevates sweetness and deepens chocolate notes. Don’t skip this step; even though it seems small, it’s absolutely paramount to balancing flavors.
- 1/2 tsp cinnamon: Cinnamon adds warmth and nostalgia; it’s like wrapping yourself in a cozy blanket on a chilly evening. It complements both chocolate and zucchini beautifully while imparting an aromatic quality that fills your kitchen as they bake. Feel free to adjust this spice based on your taste preferences—some might enjoy a little extra warmth!
- 1/2 cup packed brown sugar: Brown sugar contributes moisture as well as rich caramel notes thanks to its molasses content—it’s what gives these cookies their irresistible chewiness! Be sure to pack it tightly when measuring; this ensures we get all its goodness into our dough.
- 1/2 cup butter (melted, slightly cooled): Butter is where the magic happens! Melted butter allows us to mix everything smoothly while contributing richness and flavor depth that’s truly unparalleled in baking. Letting it cool slightly prevents cooking the egg when combined—no one wants scrambled eggs in their cookies!
- 1 large egg: Eggs add structure as well as moisture; they help bind everything together beautifully while contributing protein which makes our cookies fluffy yet sturdy. Always go for room temperature eggs if possible—they mix better into batters than cold ones straight from the fridge.
- 2 tsp vanilla: Vanilla extract is like sunshine in your cookie dough—it enhances flavors beyond measure! Choose pure vanilla extract over imitation; you’ll thank yourself later when those delightful aromas waft through your kitchen.
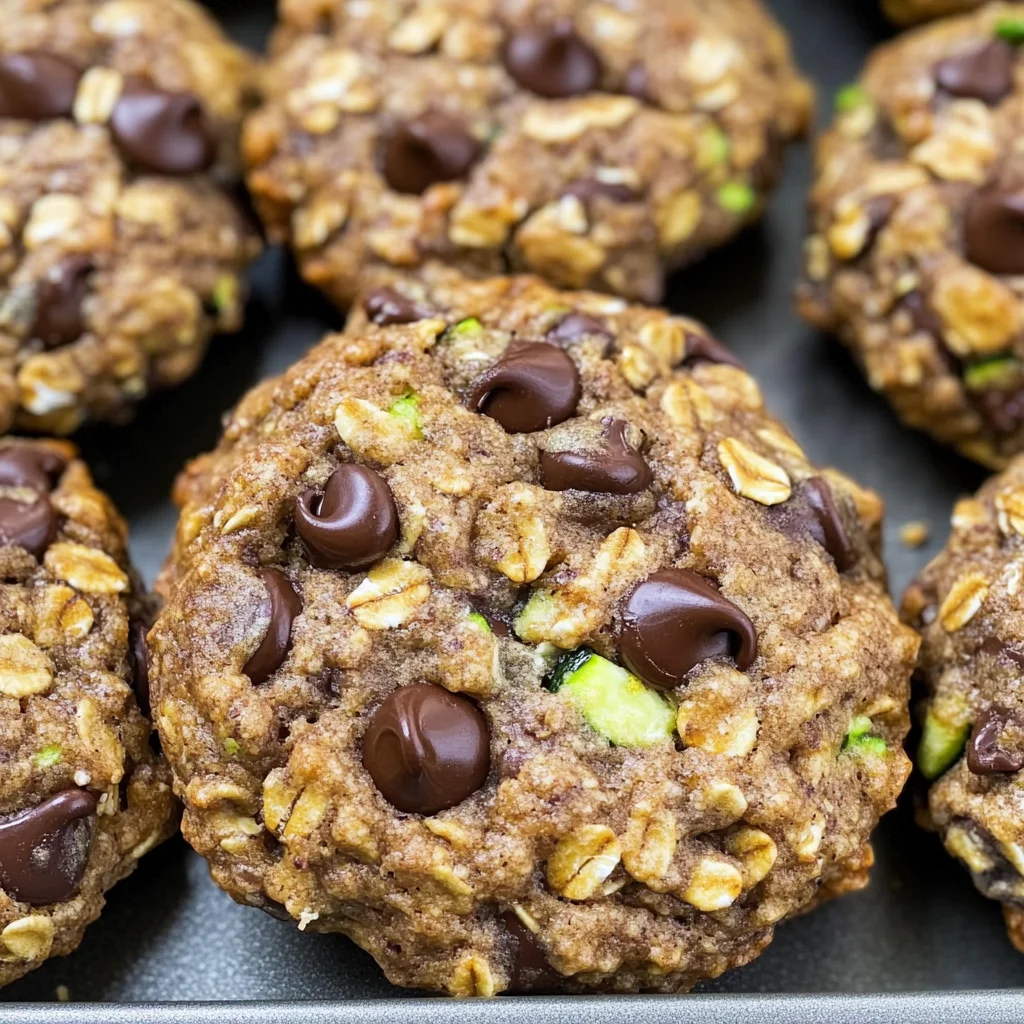
- 1 1/2 cups grated zucchini: Here comes our secret weapon! Grated zucchini adds incredible moisture without altering taste—your guests will be none the wiser about their veggie intake! Opt for small zucchinis for maximum juiciness; larger ones can be watery and bland.
- 1 1/2 cups semi-sweet chocolate chips (divided): Chocolate chips are where indulgence meets comfort in these cookies! Using semi-sweet allows for balanced sweetness against all those other flavors. Dividing them means some melt beautifully into the batter while others remain chunky on top—a delightful contrast when biting into each cookie!

Equipment You’ll Need:
Before we start mixing and baking away happily, let’s ensure we have all our essential tools ready at hand because having the right equipment makes everything smoother and more enjoyable!
- Large mixing bowl: A sturdy bowl is key as we combine wet and dry ingredients without spilling everywhere! Look for one that’s big enough so your mixture can expand without risk of overflow during stirring.
- Small mixing bowl: This will help keep things organized when whisking together wet ingredients separately before combining them with dry components—a technique that ensures even distribution throughout!
- Whisk: A good whisk helps blend everything effortlessly—from dry ingredients’ clumps breaking apart to emulsifying butter with egg nicely until smooth consistency forms.
- Baking sheets (with parchment paper or silicone mats): These are essential partners in ensuring even baking while preventing sticking disasters! Parchment paper also helps achieve crisp edges without burnt bottoms.
- Measuring cups & spoons: Precise measurements are non-negotiable here; using dry measuring cups versus liquid ones keeps ratios accurate throughout recipes ensuring perfect outcomes every time!
Now that we’ve gathered everything needed let’s dive right into preparing those delicious Oatmeal Chocolate Chip Zucchini Cookies!
Preparing the Oatmeal Chocolate Chip Zucchini Cookies
Step 1: Whisking Up Dry Ingredients
Start by grabbing that large mixing bowl and add your quick oats, all-purpose flour, cocoa powder, baking soda, salt, cinnamon, and brown sugar—all at once! Whisk them together thoroughly until they’re evenly blended; this step ensures every spoonful has balanced flavors throughout each cookie instead of random pockets of sweetness or saltiness lurking unexpectedly within bites later on down line—we wouldn’t want any surprises ruining our delightful experience now would we?
Step 2: Combining Wet Goodness
In another smaller bowl (yes—you’ll appreciate having two!), melt some butter gently until it’s just warm but not bubbling hot—aiming instead for smooth silky liquid gold here folks! Once melted down sufficiently cool slightly before whisking vigorously along with an egg followed by adding vanilla extract—all three should marry beautifully together creating luscious creamy consistency which binds everything superbly!
Step 3: Marrying Dry & Wet Elements
Pour those luscious wet ingredients directly onto your dry mixture from Step 1—and don’t forget about that star player—the grated zucchini! Gently stir until thoroughly incorporated—it might feel thick initially so don’t panic if resistance meets spoon upon first few tries—it’ll yield eventually yielding perfectly succulent dough worthy enough heading straight towards oven soon after finishing up here today!
Step 4: Dropping Dough onto Baking Sheets
Now comes perhaps one of my favorite parts—scooping out generous rounded tablespoonfuls (think golf-ball size!) onto prepared sheets lined either parchment paper or silicone mats—and flatten slightly using fingertips pressing down gently so they spread out evenly during bake time ahead coming along quickly afterward next few minutes ahead promising heavenly scents filling air soon thereafter leaving mouths watering impatiently waiting nearby waiting eagerly anticipating tasty offerings ahead shortly thereafter finally emerging victorious moments later…
I hope you’re feeling excited because we’re almost ready to bake these beauties! As we continue refining each step leading toward completion remember patience pays off here—not rushing through any phase means better results overall ultimately leading towards satisfaction achieved upon enjoying delectable results shortly thereafter…
Stay tuned as we wrap up final steps leading us toward heavenly arrival post-baking awaiting exciting rewards…
Oatmeal Chocolate Chip Zucchini Cookies: The Sweet Symphony of Baking
Step 5: Crafting the Perfect Cookie Shape
Now that you’ve got that thick, luscious batter ready, it’s time to bring these Oatmeal Chocolate Chip Zucchini Cookies to life! Using a rounded tablespoon, drop generous spoonfuls of the dough onto parchment paper or a silicone mat-lined baking sheet. Think of each scoop as a little edible treasure waiting to be discovered. It’s crucial to make these mounds fairly golf ball-sized; this ensures they bake evenly and achieve that delightful chewy texture we’re after. Remember, trust your instincts here—don’t rush this step! The beauty of these cookies lies in their shape and size. After placing them on the baking sheet, gently flatten each mound slightly with the palm of your hand or the back of a spoon. This technique helps them spread just enough while baking, creating that wonderfully tender interior we all crave.
As you work through this process, take a moment to appreciate how utterly intoxicating your kitchen now smells! That mingling aroma of cinnamon and chocolate is truly something special—it’s like a warm hug wrapped in spice and sweetness. And let’s not forget those extra chocolate chips we’ll be pressing into the tops of these beauties! Pressing 4-5 additional semi-sweet chocolate chips onto each cookie before they go into the oven isn’t just for looks; it creates molten pockets of chocolate that will melt irresistibly in every bite. This finishing touch is absolutely paramount for giving your cookies that decadent appeal and enhancing the overall experience.
Step 6: The Art of Baking
With your cookies shaped and adorned with chocolate chips, it’s finally time for them to meet the heat! Preheat your oven to 350 degrees Fahrenheit—the sweet spot for baking these delicious treats. Once it reaches temperature, slide your baking sheets into the oven and set your timer for 12-15 minutes. Now here comes an important part: don’t walk away just yet! Keep an eye on those cookies during the last few minutes of baking—this is when the magic happens. You’ll want to look for visual cues: when the edges start turning a light golden brown and the centers appear set (they should no longer look wet), you know you’re close!
Baking is truly a science, my friends. The combination of heat and moisture creates a transformation—the butter melts into liquid gold, allowing all those flavors to meld beautifully while also helping the cookies rise slightly as they cook. If you’ve ever wondered why we bake at particular temperatures or for specific times, it’s because our ingredients undergo structural changes that are crucial for achieving that perfect texture. Remember, every oven is different—some run hotter or cooler than others—so it’s smart to rotate your baking sheets halfway through if you’re using multiple trays at once.
Step 7: Mastering Cookie Cooling
As soon as your timer rings, resist the urge to dive straight in! Instead, remove the cookies from the oven and allow them to cool on the baking sheets for about 2-3 minutes before transferring them to wire racks. This step might seem trivial, but it’s absolutely vital for achieving that ideal chewy consistency while ensuring they hold their shape. The residual heat from the baking sheet continues cooking them slightly while also allowing some steam to escape. If you were to move them too quickly onto a cooling rack, they could break apart or become overly soft in texture—definitely not what we want!
When you transfer those warm wonders over to wire racks, give them space; this prevents any potential steaming from making them soggy on the bottom—nobody wants a soggy cookie! As you watch them cool down, take a moment to breathe in that heavenly aroma wafting through your kitchen—it’s nothing short of blissful! And don’t forget—these cookies will continue firming up as they cool completely, so patience is key here.
Step 8: Storing Your Delicious Creations
Once your Oatmeal Chocolate Chip Zucchini Cookies have cooled completely (and I know it’s hard not to sneak one right off the rack!), it’s time for storage—a crucial step if you want these delectable treats to last beyond today (though they probably won’t!). Place them in an airtight container; this simple act keeps them fresh and maintains their soft texture longer than any other method could manage. Trust me on this one—if stored properly at room temperature, these cookies can remain wonderfully chewy for several days.
However, if you’re like me and find yourself overwhelmed by cookie temptation (because who could resist?), consider freezing half of them! Just let them cool completely first, then place layers separated by parchment paper in an airtight freezer-safe container or bag. When you need an instant pick-me-up treat later on, simply pop one out and thaw it at room temperature or microwave it briefly until warm—a truly extraordinary treat waiting at your fingertips!
Final Thoughts on Your Oatmeal Chocolate Chip Zucchini Cookies Journey
There you have it—the complete guide to making irresistibly soft and chewy Oatmeal Chocolate Chip Zucchini Cookies! From mixing together simple ingredients packed with love to watching those glorious morsels bake into perfection, I hope this recipe brings as much joy into your kitchen as it has brought into mine over the years. Whether enjoyed fresh out of the oven with a glass of cold almond milk or shared with friends during cozy gatherings, each bite is bound to deliver warmth and happiness.
So gather around with loved ones and indulge in these delightful creations together—I promise you’ll be creating memories that last far beyond just satisfying cravings! Happy baking!
Storage and Enjoyment Tips for Your Oatmeal Chocolate Chip Zucchini Cookies
Now that you’ve baked a batch of these delightful Oatmeal Chocolate Chip Zucchini Cookies, it’s time to sit back and revel in your accomplishment! The aroma wafting through your kitchen is absolutely intoxicating, and I can already feel the joy bubbling up as you anticipate that first warm bite. But let’s talk about what happens once you’ve indulged (or if you just want to save some for later). Proper storage is key to keeping those chewy delights fresh, so here are my best tips!
Storing Leftover Oatmeal Chocolate Chip Zucchini Cookies
To keep your Oatmeal Chocolate Chip Zucchini Cookies in peak condition, I recommend storing them in an airtight container at room temperature. This keeps them soft and chewy, just the way we love them! They should last about 4-5 days, but trust me when I say they won’t last that long in my house! If you want to take it a step further, consider placing a slice of bread in the container; it works wonders for maintaining moisture. Yes, you heard me right! That little trick helps absorb excess air while keeping those cookies delightfully soft. After a day or two, these cookies will still taste wonderful, but if you’d like to enjoy them warm again, simply pop them in the microwave for about 10-15 seconds—just enough to melt those chocolate chips slightly and remind you of their freshly baked glory.
Freezing Oatmeal Chocolate Chip Zucchini Cookies for Later
If you’ve made a larger batch (or if you’re just a cookie enthusiast like me), freezing these cookies is an excellent option! To freeze them properly, allow your cookies to cool completely before placing them in a single layer on a baking sheet. Once frozen solid (about 1-2 hours), transfer them into a freezer-safe bag or container—this will prevent them from sticking together and make it easy to grab one whenever the craving strikes! When stored correctly, they can last up to three months in the freezer without losing their delightful texture. When you’re ready for a treat, simply remove how many you’d like and let them thaw at room temperature or pop them directly into the oven at 350 degrees for about 10 minutes. This way, you’ll be reminded of why these cookies are so special every time you indulge—and what could be more convenient than having homemade cookies on hand whenever that sweet tooth calls?
Oatmeal Chocolate Chip Zucchini Cookies

Indulge in the delightful world of Oatmeal Chocolate Chip Zucchini Cookies—where wholesome ingredients come together to create moist, chewy bites that are as nutritious as they are delicious. Each cookie is packed with the goodness of oats and the subtle surprise of zucchini, ensuring a treat that feels indulgent yet offers a boost in fiber and vitamins. The rich semi-sweet chocolate chips melt into every bite, creating an irresistible contrast with a hint of cinnamon for warmth. Perfect for sharing with friends or enjoying during quiet moments at home, these cookies make baking both fun and fulfilling. Get ready to create cherished memories in your kitchen!
- Prep Time: 15 minutes
- Cook Time: 15 minutes
- Total Time: 30 minutes
- Yield: Approximately 24 cookies 1x
- Category: Dessert
- Method: Baking
- Cuisine: American
Ingredients
- 2 cups quick oats
- 2/3 cup all-purpose flour
- 2 tbsp cocoa powder
- 1/2 tsp baking soda
- 1/4 tsp salt
- 1/2 tsp cinnamon
- 1/2 cup packed brown sugar
- 1/2 cup butter, melted
- 1 large egg
- 2 tsp vanilla extract
- 1 1/2 cups grated zucchini
- 1 1/2 cups semi-sweet chocolate chips
Instructions
- Preheat your oven to 350°F (175°C). Line baking sheets with parchment paper.
- In a large bowl, whisk together quick oats, flour, cocoa powder, baking soda, salt, cinnamon, and brown sugar until evenly combined.
- In a smaller bowl, mix melted butter with egg and vanilla extract until smooth.
- Add the wet ingredients to the dry ingredients and fold in the grated zucchini until just combined.
- Drop rounded tablespoonfuls of dough onto prepared baking sheets and gently flatten them.
- Bake for 12-15 minutes or until edges are golden and centers appear set.
- Allow cookies to cool on the baking sheet for a few minutes before transferring them to wire racks.
Nutrition
- Serving Size: 1 serving
- Calories: 130
- Sugar: 9g
- Sodium: 55mg
- Fat: 6g
- Saturated Fat: 3g
- Unsaturated Fat: 3g
- Trans Fat: 0g
- Carbohydrates: 18g
- Fiber: 2g
- Protein: 2g
- Cholesterol: 10mg