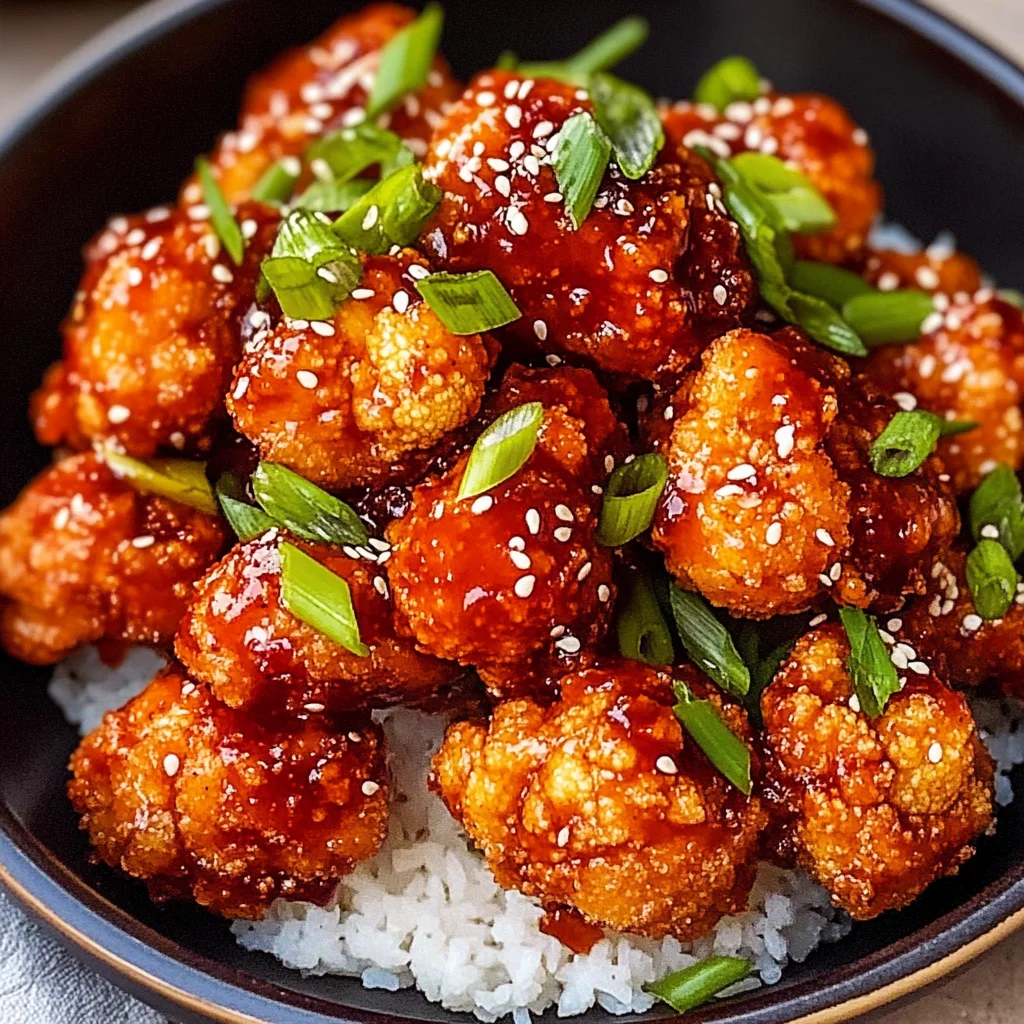
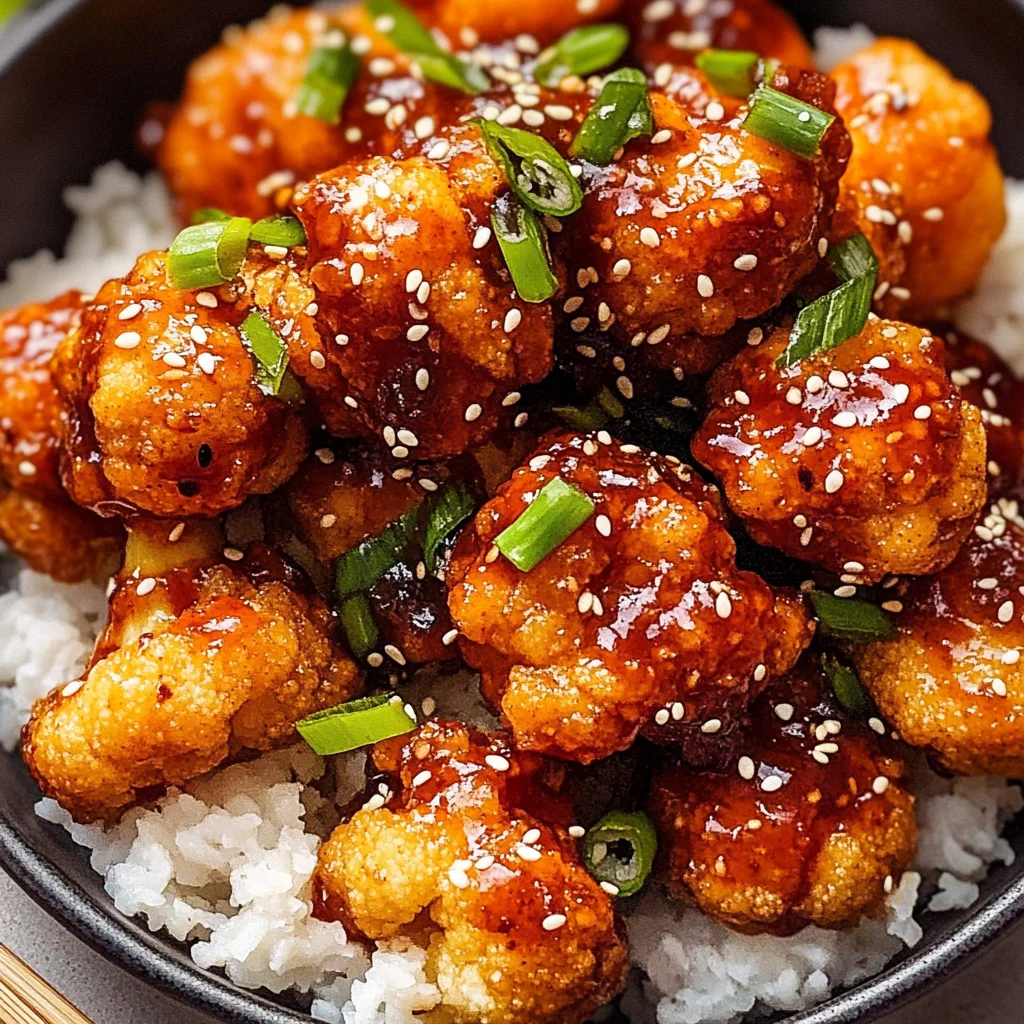
Air-Fried Korean Chili Cauliflower (Gochujang)
There’s something profoundly satisfying about cooking, isn’t there? It’s not just the act of preparing a meal; it’s a journey, an adventure through flavors and aromas that connect us to our roots and to each other. Today, I’m thrilled to share with you my recipe for Air-Fried Korean Chili Cauliflower (Gochujang). This dish isn’t merely food; it’s a celebration of vibrant tastes and textures that dance on your palate—a beautiful fusion of crispy cauliflower enveloped in a sticky, spicy gochujang sauce. As you take that first bite, the crunch gives way to tender goodness, perfectly balanced by the deep umami notes of soy and the warmth of garlic and ginger. Trust me, this is more than just a side dish; it’s an experience.
I’ve always been captivated by the bold flavors of Korean cuisine, especially how it can transform humble ingredients into something utterly intoxicating. Gochujang—a sweet and spicy fermented chili paste—brings a magical quality to this dish. It elevates simple cauliflower into a sublime culinary creation that feels both indulgent and wholesome at the same time. Perfect for gatherings or cozy family dinners, this recipe will win hearts (and taste buds) without breaking a sweat! So grab your apron, let’s embark on this delightful culinary adventure together.
Air-Fried Korean Chili Cauliflower (Gochujang): A Flavorful Vegan Delight
This recipe for Air-Fried Korean Chili Cauliflower is not only gluten-free but also packed with flavor and texture. It’s perfect for those evenings when you’re craving something special yet healthy!
Ingredients:
As we embark on this culinary journey together, let me introduce you to the star players in our dish—the ingredients! Each one has its own role in crafting this masterpiece.
- 2 medium heads cauliflower (cut into florets, about 650g). The cauliflower is undeniably the heart of our dish. When prepared correctly, its natural sweetness shines through while providing an incredible texture contrast to the crunchy batter. Choose fresh heads with tightly packed florets for the best results—this ensures they’ll roast beautifully without becoming mushy.
- 1 ½ cups gluten-free flour blend (or brown rice flour). This flour blend serves as the base for our tempura batter. The right blend not only provides structure but also helps achieve that coveted crispiness when air-fried or baked. If using brown rice flour, remember it has a slightly nuttier flavor—it adds depth to our dish while keeping it gluten-free.
- 2 tbsp cornstarch. Cornstarch is crucial here as it helps create that light, airy texture we crave in tempura-style dishes. It absorbs moisture and creates a barrier between the cauliflower and heat—keeping everything crispy while locking in flavor.
- 1 tbsp baking powder. This ingredient gives our batter that extra lift, making it wonderfully fluffy as it cooks. It’s absolutely paramount for achieving that lightness we all love in fried foods.
- 1 tsp salt. Salt isn’t just about flavor; it enhances every ingredient’s natural characteristics. In this case, it balances out the sweetness from our other ingredients while amplifying their inherent flavors.
- 1 tsp garlic powder. Garlic powder brings convenience without sacrificing flavor! It melds seamlessly into our batter, ensuring every bite bursts with garlicky goodness without any chunks left behind.
- ¼ tsp black pepper. A pinch of black pepper adds warmth and depth to our dish—it’s like an invisible hand that rounds out flavors beautifully without overpowering them.
- 1 ¾ cups seltzer water (extra cold). Using very cold seltzer water is key! The carbonation creates air pockets in the batter during cooking, resulting in that irresistibly crispy exterior we’re after—don’t skip on this step!
- ½ cup maple syrup (or agave nectar – reduce to ¼ cup if sensitive to sweetness). Maple syrup adds a delightful hint of sweetness that balances out the heat from gochujang perfectly. Plus, its rich flavor complements the other ingredients beautifully.
- 6 tbsp soy sauce (use low-sodium if sensitive to salt). Soy sauce introduces umami depth and saltiness; opt for low-sodium if you’re watching your salt intake—this way you can control flavors better throughout cooking.
- ¼ cup light brown sugar. This addition furthers the sweet-savory balance we crave! The molasses content in brown sugar brings an additional layer of flavor complexity while helping achieve that sticky glaze later on.
- 3 tbsp minced garlic (about 2–3 cloves). Fresh garlic packs an unbeatable punch of flavor! Mince finely so its potent essence can infuse throughout our sauce—hinting at aromatic notes with each bite.
- 2 tbsp minced fresh ginger. Ginger’s warm spiciness brightens up our dish while adding another dimension of depth—it’s truly extraordinary what fresh ginger can do!
- 2 tbsp apple cider vinegar. This tangy component cuts through richness and enhances overall brightness in flavors—don’t underestimate its power!
- 1 tbsp toasted sesame oil. Adding toasted sesame oil infuses nutty undertones that complement gochujang perfectly; it’s liquid gold in terms of flavor!
- 5 tbsp Korean Chili Paste or sauce. Here comes the star ingredient! Gochujang delivers heat alongside subtle sweetness—it’s essential for capturing rich Korean flavors.
- ¼ cup mirin. Mirin contributes sweetness along with acidity—it’s non-negotiable if you want authentic depth! If unavailable, consider substituting with additional maple syrup mixed with vinegar for balance.
- 2 tbsp cornstarch (to thicken sauce). We’ll use more cornstarch here as we prepare our luscious glaze—it ensures everything clings beautifully while maintaining an appetizing consistency!
- Toasted sesame oil (or vegetable oil) for spraying or brushing on cauliflower before air-frying or baking—this helps develop that crisp exterior we’re after!
- ¼ cup chopped green onion for garnish at serving time adds freshness and crunch—a lovely finish that visually elevates presentation too!
- 1 tbsp toasted white sesame seeds for garnish contribute additional nuttiness along with visual appeal—these little gems make everything look extra special!
- 1 lime, cut into wedges for serving provides a zesty kick—the perfect finishing touch after all those bold flavors!
Equipment You’ll Need:
Before we dive into cooking these delightful bites of joy, let’s talk tools! Having the right equipment makes all the difference when creating culinary magic in your kitchen—it streamlines processes so you can focus on enjoying yourself while cooking!
- Air Fryer or Oven – An air fryer is fantastic because it circulates hot air around food evenly while using less oil than traditional frying methods; however, an oven will work just fine too if that’s what you have at home! Whichever route you choose will yield wonderfully crispy results when following instructions closely.
- Parchment Paper or Cooling Rack – If using an air fryer: lining your basket with parchment paper prevents sticking while allowing airflow around food items to ensure crispness; otherwise place parchment over cooling racks when baking so steam doesn’t accumulate underneath causing sogginess!
- Large Mixing Bowl – A spacious bowl allows easy mixing without spills—a larger surface area means effortless stirring without flinging flour everywhere!
- Whisk or Fork – Either will do wonders when combining dry ingredients into wet ones; whisking promotes even distribution ensuring no lumps remain which could compromise texture later on.
With everything prepped and ready to go—the stage is set for creating some unforgettable Air-Fried Korean Chili Cauliflower (Gochujang). Let’s move forward into preparing these bites of bliss!
Step 1: Preheat Your Air Fryer or Oven
First things first: preheating your air fryer to 400°F or your oven to 425°F is crucial because starting off at high temperatures ensures immediate crispness as soon as food enters either appliance! By heating them up beforehand allows moisture within cauliflower florets evaporate quickly yielding optimal texture—you want golden-brown crunchiness rather than limp softness when done cooking!
Step 2: Prepare Your Cooking Surface
Next up: line your air fryer pan with parchment paper if using one—or place a cooling rack onto a baking sheet if opting for oven baking which allows heat circulation around all sides enhancing even browning across surfaces while preventing steam from making things soggy below! Trust me on this; it’s absolutely paramount during cooking processes like these where achieving ideal crispness matters immensely!
Step 3: Cut Your Cauliflower
Now let’s get hands-on! Carefully cut your two medium heads of cauliflower into small florets ensuring uniformity across sizes so they cook evenly later on during frying/baking processes—we want tenderness throughout every bite without overly charred edges ruining enjoyment factor here! Aim for pieces roughly similar in size about 1–2 inches wide—not too tiny though since smaller bits may burn before larger ones are adequately cooked through leading disappointment instead pleasure upon tasting results later down line…
Step 4: Mix Up That Tempura Batter
In a large mixing bowl combine gluten-free flour blend along with cornstarch baking powder salt garlic powder black pepper—whisking gently until well incorporated allowing dry elements merge smoothly prior adding cold seltzer water gradually whilst stirring just until combined forming thick consistency resembling pancake batter! Be cautious here though: don’t overmix; gentle folding keeps bubbles intact resulting lighter texture once cooked compared against dense alternatives otherwise produced through over-mixing efforts yielding disappointing results instead desired fluffiness…
From here onwards we’ll coat those lovely florets evenly making sure each piece receives adequate coverage across surface areas giving rise towards deliciously crispy exteriors once they hit hot air inside fryer/oven shortly thereafter… Stay tuned as we continue exploring steps ahead leading towards final touches atop gorgeous presentation awaiting just moments away now!
Step 5: Coat the Cauliflower and Prepare for Cooking
Now that your cauliflower is beautifully cut into florets, it’s time to introduce them to that tantalizing tempura batter you’ve prepared. In a large mixing bowl, gently toss the cauliflower florets in the thick batter you’ve just made. You want to ensure each piece is evenly coated, creating a delightful shell that will become crispy and golden during cooking. This batter is crucial because it not only provides that wonderful crunch but also helps trap steam inside the florets, keeping them tender and juicy. When you’re coating them, think of it as wrapping each floret in a warm hug of flavor; the more even the coating, the better the texture will be once cooked.
As you arrange these battered beauties on your air fryer basket or cooling rack, remember to give them ample space. Overcrowding can lead to steaming rather than frying, which is something we absolutely want to avoid! If you’re using an air fryer, aim for a single layer—this is non-negotiable if you want that sought-after crispiness. Depending on the size of your air fryer, you may need to work in batches, which gives you a perfect opportunity to savor that anticipation as you wait for your first batch to cook. Trust me on this: patience pays off with perfectly fried results.
Step 6: Air Frying to Perfection
With everything set up, it’s time for the magic! Preheat your air fryer to 400°F (or your oven to 425°F if you’re opting for baking) so it reaches that ideal temperature before your cauliflower goes in. The preheating process is important because it ensures that our little florets start cooking immediately when they hit that hot surface. If your appliance isn’t preheated properly, you risk ending up with soggy bites instead of gloriously crispy ones—definitely not what we want!
Once preheated, place your cauliflower into the basket or onto the cooling rack carefully. Now here’s a little tip: spray or lightly brush those battered florets with cooking spray or about 1-2 tablespoons of oil before cooking. This step enhances browning and contributes to an incredibly satisfying crunch—think of it as giving them their very own spa treatment. Air fry those beauties for about 17 minutes, flipping halfway through for an even cook; keep an eye on them as they start transforming into golden nuggets of deliciousness! You’ll know they’re ready when they look crisp and tantalizingly browned; don’t rush this step—let them achieve their full potential!
Step 7: Creating Your Sauce Symphony
While those gorgeous cauliflower bites are working their magic in the air fryer or oven, let’s turn our attention to making that utterly intoxicating gochujang sauce that will elevate this dish from ordinary to extraordinary! In a medium bowl, combine maple syrup (or agave nectar), soy sauce (low-sodium if desired), light brown sugar, minced garlic, minced ginger, apple cider vinegar, toasted sesame oil, and Korean chili paste or sauce. Each ingredient plays its part in creating a symphony of flavors—a harmonious blend of sweet, savory, and spicy notes that dances on your palate like a warm summer breeze.
Mix everything together until well combined—the goal here is a glossy mixture that glistens like liquid gold. As you stir in the ingredients, take a moment to smell it all coming together; this aroma alone will make your mouth water—and trust me when I say that’s just the beginning! Once you’ve achieved that beautiful balance between sweetness and heat (you can adjust levels according to your preference), set this sauce aside while we finish cooking our cauliflower.
Step 8: The Final Flavors Come Together
Once your cauliflower has reached optimal crispness (about 17 minutes in the air fryer or 20-22 minutes if baking), it’s time for the grand finale: coating those crispy bites with our luscious gochujang sauce! Carefully transfer the cooked cauliflower into a large bowl while they’re still hot; this is essential because warm cauliflower allows the sauce to cling beautifully without sliding off—resulting in every bite bursting with flavor. Grab that heavenly sauce you made earlier and drizzle it generously over the hot florets before gently tossing them together until every piece is enveloped in that sticky goodness.
This step transforms simple roasted cauliflower into something truly profound—a dish worthy of any gathering or cozy night in! Just imagine how deliciously fragrant your kitchen will be as you mix everything together; it’s simply exhilarating! Don’t be shy with the tossing; aim for thorough coverage so each bite is equally flavorful. And remember—the warmth from both the cauliflower and sauce helps meld those flavors together even further; it’s like magic happening right there in front of you!
Conclusion:
As we wrap up this journey through creating Air-Fried Korean Chili Cauliflower (Gochujang), I hope you’re feeling inspired and excited! There’s something incredibly special about this recipe—each step unveils layers of flavor that dance together in a glorious symphony of heat and sweetness. The tender yet crispy cauliflower enveloped in that sticky gochujang sauce creates an experience that transcends ordinary meals and transforms them into moments of joy shared with loved ones. The combination of textures—from the crunch of the cauliflower to the silky glaze—is nothing short of extraordinary.
This recipe is an absolute must-try not only for its vibrant taste but also for the sheer joy it brings during preparation. Whether you’re whipping it up for a casual dinner with friends or serving it at your next gathering, it never fails to impress! Imagine pulling that golden-brown treasure from your air fryer or oven—the enticing aroma enveloping your kitchen like a warm hug. Each bite invites smiles and happy conversations around the table.
As far as serving suggestions go, I can already envision you enjoying these spicy little morsels alongside fluffy jasmine rice or nestled within warm tortillas for a unique taco experience. For an afternoon pick-me-up, serve them alongside fresh vegetables and a zesty dipping sauce—truly elevating your snacking game! Or perhaps pair them with a refreshing side salad bursting with greens and citrus notes for balance; it’s all about crafting an unforgettable meal experience.
Feeling adventurous? This recipe is wonderfully adaptable! You could swap out the gochujang for another favorite chili paste if you’re seeking something milder or add additional veggies like bell peppers or sweet potatoes into the batter for extra nutrition and color. You might even experiment with different dipping sauces—perhaps a tangy tahini drizzle or a creamy avocado dip would complement those rich flavors beautifully! The possibilities are endless! So dear friends, gather around your kitchen counter, try this recipe out yourself, share your experiences with others, and let’s keep this lovely food journey alive together!
Air-Fried Korean Chili Cauliflower (Gochujang)

Air-Fried Korean Chili Cauliflower (Gochujang) is a delightful vegan dish that brings the bold and vibrant flavors of Korean cuisine right to your table. This recipe features crispy cauliflower florets coated in a sticky, spicy gochujang sauce that is both sweet and savory. Perfect for gatherings or a cozy night in, this dish is easy to prepare and offers an explosion of taste in every bite. The combination of crispy texture with rich umami notes from soy sauce, garlic, and ginger makes it a must-try.
- Prep Time: 20 minutes
- Cook Time: 17 minutes
- Total Time: 37 minutes
- Yield: Serves about 4 people 1x
- Category: Appetizer
- Method: Frying
- Cuisine: Korean
Ingredients
- 2 medium heads cauliflower (cut into florets)
- 1 ½ cups gluten-free flour blend
- 2 tbsp cornstarch
- 1 tbsp baking powder
- 1 tsp salt
- 1 tsp garlic powder
- 1 ¾ cups cold seltzer water
- ½ cup maple syrup
- 6 tbsp soy sauce
- 5 tbsp Korean chili paste (gochujang)
- ¼ cup light brown sugar
- Fresh garlic and ginger (minced)
- Apple cider vinegar
- Toasted sesame oil
Instructions
- Preheat the air fryer to 400°F or oven to 425°F.
- Prepare a parchment-lined air fryer basket or cooling rack on a baking sheet.
- Cut cauliflower into uniform florets for even cooking.
- In a large bowl, whisk together gluten-free flour blend, cornstarch, baking powder, salt, garlic powder, and black pepper.
- Gradually mix in cold seltzer water until just combined.
- Coat each cauliflower floret evenly in the batter.
- Place the coated florets in the air fryer or on the cooling rack and spray lightly with oil.
- Cook for approximately 17 minutes, flipping halfway through until golden brown and crispy.
- While cooking, mix sauce ingredients: maple syrup, soy sauce, gochujang, brown sugar, minced garlic/ginger, apple cider vinegar, and toasted sesame oil until well combined.
- Once cooked, toss cauliflower in the sauce until evenly coated before serving.
Nutrition
- Serving Size: 1 cup (150g)
- Calories: 220
- Sugar: 14g
- Sodium: 480mg
- Fat: 4g
- Saturated Fat: 0g
- Unsaturated Fat: 3g
- Trans Fat: 0g
- Carbohydrates: 40g
- Fiber: 6g
- Protein: 5g
- Cholesterol: 0mg