Easy Pickled Carrots Recipe for Asian Food, Salads & Tacos: An Incredible Ultimate Guide
There’s something incredibly special about the act of pickling, isn’t there? The way it transforms simple vegetables into vibrant, tangy bites that can elevate any dish is nothing short of magical. My heart skips a beat every time I pop open a jar and breathe in the intoxicating aroma of vinegar mingling with garlic and spices. This Easy Pickled Carrots Recipe for Asian Food, Salads & Tacos: An Incredible Ultimate Guide is more than just a recipe; it’s an invitation to embrace the art of preserving flavors and the joy of creating your own culinary delights at home. It’s about taking those humble carrots and turning them into a vivid side dish or topping that can play a starring role in your meals.
Imagine a warm summer evening, gathering with friends around a table filled with delicious foods. You reach for those pickled carrots, their brilliant orange slices glistening in the light, and suddenly, your taco is transformed into something spectacular. Each bite bursts with flavor—crunchy, sweet, tangy, with just a hint of spice if you choose to include it. These pickled carrots are not just an accessory; they’re an experience that brings people together and celebrates flavor in its purest form.
Easy Pickled Carrots Recipe for Asian Food, Salads & Tacos: An Incredible Ultimate Guide
Get ready to embark on this delightful culinary journey! Making these easy pickled carrots is not only straightforward but also immensely satisfying. With each step, you’ll see how simple ingredients come together to create something truly extraordinary. Whether you’re using them in spring rolls, salads, or as a zesty taco topping, these carrots will quickly become a staple in your kitchen.
Ingredients:
As we dive into this recipe, let’s take a moment to appreciate each ingredient that plays its part in transforming ordinary carrots into something remarkable. Every element contributes not just flavor but also texture and balance—key components in making this dish so beloved.
- 4 medium-sized carrots, peeled and julienned. Carrots are the star of our show here! Opt for fresh ones that are firm and vibrant in color; this ensures they’ll be crunchy and flavorful once pickled. The act of julienning allows them to absorb the brine more effectively while also presenting beautifully on your plate. Trust me when I say that the thin strips make for an irresistible crunch—perfect for snacking or adding to your favorite dishes.
- 1 cup water. This humble liquid serves as the base for our brine. Many might overlook it, but using clean filtered water can enhance the overall flavor profile of your pickles by ensuring no unwanted tastes creep in from tap water. It’s essential for helping dissolve our sugar and salt thoroughly before we heat things up!
- 1 cup white vinegar (or rice vinegar for an Asian twist). Vinegar is what gives our pickles their iconic tang! While white vinegar works splendidly, rice vinegar introduces a subtler sweetness and depth that complements Asian dishes beautifully. If you go with rice vinegar, you might find yourself falling head over heels for its delicate flavor—it’s absolutely non-negotiable when aiming for that authentic taste.
- 4 tablespoons granulated sugar. Ah, sugar—the sweet counterpart to our acidic vinegar! It balances out the tartness beautifully while enhancing the natural sweetness of the carrots themselves. This step is crucial; without it, you’d be left with a one-note pickle that lacks depth and complexity.
- 1 tablespoon salt. Salt is key here—not just for flavor but also as a preservative! It draws moisture out from the vegetables during pickling which helps keep them crisp while infusing them with savory goodness. Always use sea salt or kosher salt; table salt can contain additives that may affect texture.
- 1 teaspoon red pepper flakes (optional for spice). If you love a little kick in your life (and who doesn’t?), red pepper flakes are an excellent addition! They bring warmth without overwhelming heat; just enough to tantalize your taste buds and keep things exciting.
- 2 cloves garlic, thinly sliced. Garlic adds another layer of flavor—its pungent aroma transforms into sweet notes as it mingles in the brine during pickling. This aromatic addition makes these pickles not only delicious but also adds another dimension that’s utterly intoxicating!
- 1-inch piece of fresh ginger, peeled and julienned (optional). Lastly, ginger brings warmth and zestiness—a perfect complement to both garlic and vinegar! Its bright flavor pairs wonderfully with carrots while making your palate dance with delight—don’t skip it if you have some on hand!

Equipment You’ll Need:
Before we jump into creating our tangy masterpiece, let’s ensure we have all the right tools at our disposal! Having quality equipment makes cooking more enjoyable and allows us to focus solely on crafting something wonderful without any hiccups.
- Cutting board – A sturdy cutting board provides stability while prepping those beautiful carrot strips! Choose one made from bamboo or plastic; both options offer durability while being gentle on your knives.
- Sharp knife – A sharp chef’s knife will make quick work of julienning those carrots! Dull knives can lead to uneven pieces or even accidents during prep—trust me when I say that investing in good knives pays off every time!
- Saucepan – This is where the magic happens! A medium-sized saucepan will work perfectly for combining our brine ingredients over heat until they meld together into something divine.
- Glass jar or heatproof container – We need somewhere lovely to store our finished product! A clean glass jar not only looks beautiful but allows us to witness those vibrant colors as they pickle away inside.
Step 1: Prepare Your Carrots
First things first: we need to make sure those carrots are ready for their transformation! Start by peeling them gently with a vegetable peeler—it’s like removing their winter coat before basking in all that glorious brine sunshine ahead! Once peeled, grab your sharp knife again and julienne them into thin strips—a technique that means cutting them into long matchstick shapes about 1/8-inch thick (roughly). This method isn’t just aesthetically pleasing; it ensures even cooking time during pickling while maximizing surface area exposure to absorb all those incredible flavors from our brine mixture!
Step 2: Boil the Liquid
Now comes one of my favorite parts—making our sweet-sour liquid gold! In your saucepan over medium-high heat, combine 1 cup each of water and white (or rice) vinegar along with 4 tablespoons granulated sugar and 1 tablespoon salt—the holy quartet that brings everything together beautifully! Stirring occasionally until both sugar and salt dissolve completely is crucial; watch closely as bubbles start forming around edges—that’s when you know it’s time to turn down the heat slightly so we don’t boil away too aggressively!
Step 3: Add Flavorings
Once you’ve reached that gentle bubbling point where everything has dissolved nicely (this is pure alchemy!), remove it from heat before adding in those lovely extras: red pepper flakes if desired plus thin slices of garlic alongside ginger shavings if using them today too! Stir well until fragrant aromas waft up towards you—they’ll remind you why we’re embarking on this journey together today!
Step 4: Pack the Jars
It’s time to pack those gorgeous carrot strips tightly yet lovingly into clean jars—you want every inch filled without smashing them down too hard! The idea here is they should fit snugly so they can soak up all fabulous flavors from our brine mixture later on… Imagine how delightful it’ll be biting into juicy bites bursting forth richness after they’ve had time soaking up all surrounding goodness!
With these steps behind us already adding layers upon layers towards achieving ultimate success within this Easy Pickled Carrots Recipe for Asian Food, Salads & Tacos: An Incredible Ultimate Guide—you’re well on your way towards creating something unforgettable! Keep following closely as we dive deeper into pouring over brines next…
The Ultimate Guide to Easy Pickled Carrots: A Flavorful Journey
Step 5: Packing the Jars with Love
Now that your vibrant carrots are perfectly julienned, it’s time to pack them into jars. This isn’t just about getting them into the container; it’s about creating a beautiful presentation and ensuring that each bite is bursting with flavor. I like using a clean glass jar because it allows you to admire the colorful display of orange against the backdrop of the pickling brine. When packing the carrots, be gentle yet firm—think of it as tucking them in for a cozy nap rather than cramming them in. You want them snug but not squished, allowing the brine to seep into every crevice and layer.
As you layer the carrots, consider adding some of those delicious garlic slices and ginger strips between the layers. This step is crucial because it allows the flavors to marry beautifully as they pickle together, creating a symphony of taste that dances on your palate when you take a bite later on. Each jar should be filled to about an inch from the top; this space is essential for when you pour in that heavenly brine—trust me, your future self will thank you for being meticulous here!
Step 6: Pouring on the Liquid Gold
Next up, we’re going to pour that aromatic brine over our lovingly packed carrots. This step transforms simple vegetables into something extraordinary! Carefully take your saucepan with the hot liquid and slowly drizzle it over the carrots, ensuring they are completely submerged. This is important because any exposed carrot will not pickle properly; instead, it may become limp and lack that delightful crunch we’re aiming for.
Watching the steam rise as you pour is almost magical—it’s like watching your kitchen come alive! You’ll also notice how quickly those bright orange strands soak up all that zesty flavor from the vinegar and sugar. As you pour, keep an eye out for any air bubbles trying to escape; if you see any, give them a gentle poke with a chopstick or knife handle to release them. This little technique ensures even distribution of flavor throughout each piece of carrot. Remember, patience is key here; it might be tempting to rush through this step, but taking your time will reward you with perfectly pickled carrots.
Step 7: Sealing In All That Flavor
Once you’ve poured your brine over those beautiful carrots, it’s time to seal everything in with a lid. Make sure your jar’s lid is clean and fits snugly—this is non-negotiable because we want to create an airtight environment for our pickles to thrive in their own little universe! Now comes my favorite part: letting these jars cool down at room temperature before popping them into the refrigerator.
Why chill? Cooling allows all those flavors to meld together beautifully! It’s during this resting period that each carrot absorbs all those sweet, tangy notes from our brine mixture—the garlic infuses its robust essence while the ginger adds its warm spice. You might think they’re ready right away—after all, they smell heavenly! But I promise you, giving them at least one hour (or even better—overnight) in the fridge will elevate them from delicious to utterly intoxicating.
Step 8: The Final Countdown: Refrigeration Magic
Now that you’ve sealed up your jars tightly and let them cool down a bit, it’s finally time to place them in the refrigerator! This step is akin to putting on a cozy sweater as colder days approach—it’s where all magic happens! I recommend letting your Easy Pickled Carrots sit for at least an hour before diving in; however, if you’re feeling adventurous (and patient), leaving them overnight will yield results that are truly extraordinary.
During refrigeration, those vibrant orange sticks will soak up all that zesty goodness from the brine while maintaining their crisp texture—a true testament to what pickling can do! When ready to serve, simply open up that jar and take a moment to appreciate not just how they look but also how they smell—an invigorating blend of vinegar tang and garlic richness wafting through your kitchen is enough to make anyone’s mouth water! The longer they marinate in their flavorful bath, the more pronounced their taste becomes—so don’t rush this step; trust me on this one!
And there you have it—your Easy Pickled Carrots Recipe for Asian Food, Salads & Tacos has been transformed from simple ingredients into something so much more; it’s now part of your culinary repertoire! Enjoy every crunchy bite knowing you’ve created something truly special in your kitchen today!
Storage and Enjoyment Tips for Your Easy Pickled Carrots Recipe for Asian Food, Salads & Tacos: An Incredible Ultimate Guide
Now that you’ve crafted this fabulous Easy Pickled Carrots recipe, it’s time to revel in the joy of preservation! Trust me, the moment you pop open that jar and inhale the tantalizing aroma of your pickled carrots, you’ll understand why I’m so excited about this recipe. These vibrant little beauties are not only a delightful addition to your meals but also incredibly easy to store for future enjoyment. Let’s dive into how to keep these gems fresh and flavorful so they can brighten up your dishes for days to come.
Storing Leftover Easy Pickled Carrots Recipe for Asian Food, Salads & Tacos: An Incredible Ultimate Guide
When it comes to storage, the best option is a clean glass jar with a tight-fitting lid. Glass is my go-to because it doesn’t retain flavors or odors like some plastic containers might, ensuring your pickled carrots taste just as incredible as they did on day one. You can keep your pickles in the refrigerator for about 2-3 weeks—though I promise they won’t last that long because they’re simply too delicious! To maintain their crispness and prevent them from becoming soggy, consider slipping a slice of bread into the jar; this old trick helps absorb excess moisture. As for flavor, the carrots will continue to deepen in taste over time, allowing those enchanting notes of garlic and ginger to infuse every bite even more. When you’re ready to serve them again, there’s no need for reheating—just enjoy them straight out of the fridge as an invigorating snack or accompaniment.
Freezing Easy Pickled Carrots for Later
While pickling may not be the first thing that comes to mind when you think about freezing vegetables, these Easy Pickled Carrots can indeed be frozen if you’re looking for long-term storage options! Just make sure they are packed tightly in an airtight container or freezer bag—removing as much air as possible before sealing. They can keep well in the freezer for up to three months without losing their delightful crunch or flavor. When you’re ready to use them, simply thaw them in the refrigerator overnight—no cooking required! This method is perfect for meal prep enthusiasts who want quick access to vibrant toppings for salads or tacos without having to make a fresh batch every time. The convenience factor here is absolutely paramount; imagine pulling out a jar of these zingy carrots from your freezer whenever you need a burst of flavor!
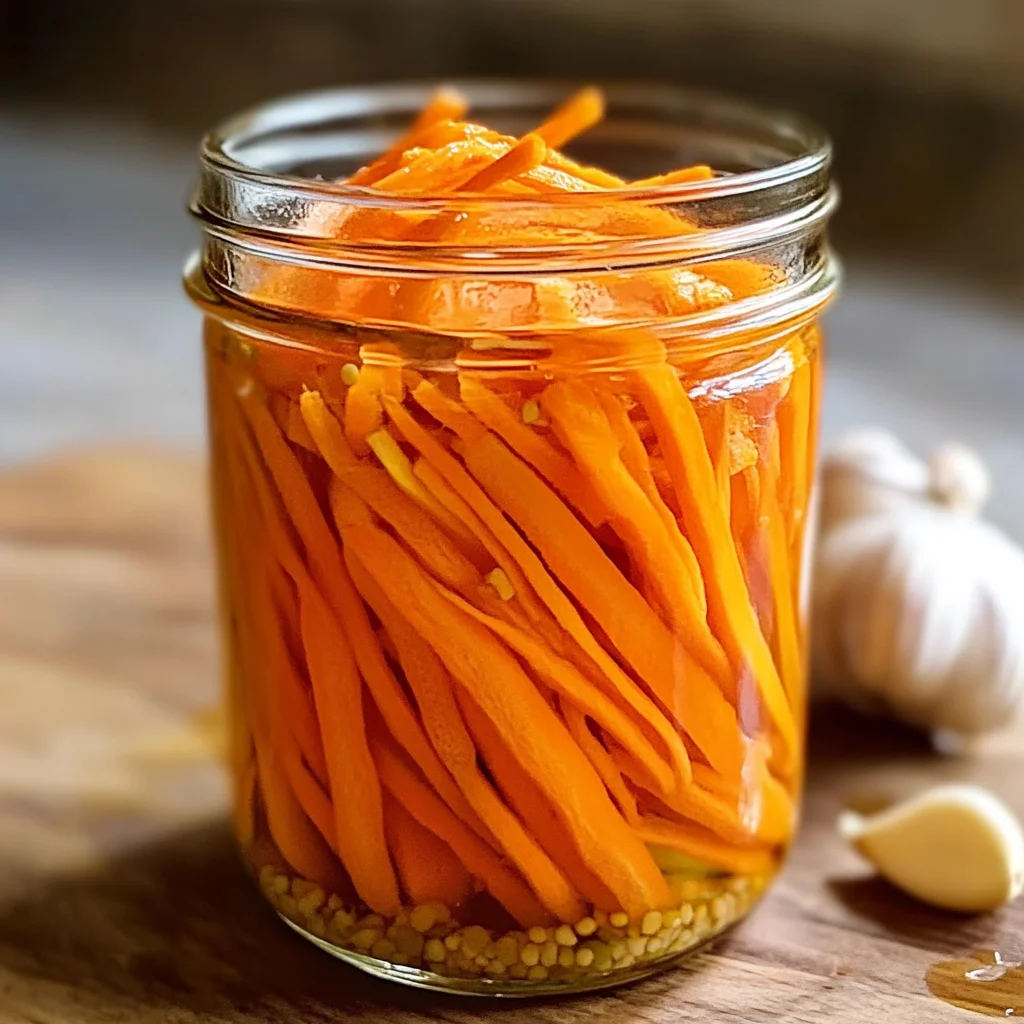
Easy Pickled Carrots Recipe for Asian Food, Salads & Tacos
Experience the vibrant world of pickling with this Easy Pickled Carrots Recipe for Asian Food, Salads & Tacos. Transform ordinary carrots into zesty, crunchy toppings that will elevate your meals and impress your family and friends. The simplicity of the ingredients—fresh carrots, tangy vinegar, and aromatic spices—comes together seamlessly to create a delightful balance of sweet and sour flavors. These pickled carrots are perfect for adding a burst of color and flavor to tacos, salads, or even as a standalone snack.
- Prep Time: 15 minutes
- Cook Time: 5 minutes
- Total Time: 20 minutes
- Yield: Approximately 2 cups (8 servings) 1x
- Category: Side Dish
- Method: Pickling
- Cuisine: Asian
Ingredients
- 4 medium-sized carrots, peeled and julienned
- 1 cup water
- 1 cup white vinegar or rice vinegar
- 4 tablespoons granulated sugar
- 1 tablespoon salt
- 1 teaspoon red pepper flakes (optional)
- 2 cloves garlic, thinly sliced
- 1-inch piece of fresh ginger, peeled and julienned (optional)
Instructions
- Prepare your carrots by peeling and julienning them into thin strips.
- In a saucepan over medium-high heat, combine water, vinegar, sugar, and salt. Stir until dissolved.
- Remove from heat and add red pepper flakes, garlic, and ginger (if using). Stir until fragrant.
- Pack the carrot strips tightly into clean glass jars.
- Pour the hot brine over the packed carrots until fully submerged.
- Seal with lids and let cool to room temperature before refrigerating for at least one hour (overnight for best results).
Nutrition
- Serving Size: 1/4 cup (60g)
- Calories: 30
- Sugar: 6g
- Sodium: 400mg
- Fat: 0g
- Saturated Fat: 0g
- Unsaturated Fat: 0g
- Trans Fat: 0g
- Carbohydrates: 7g
- Fiber: 2g
- Protein: 0g
- Cholesterol: 0mg