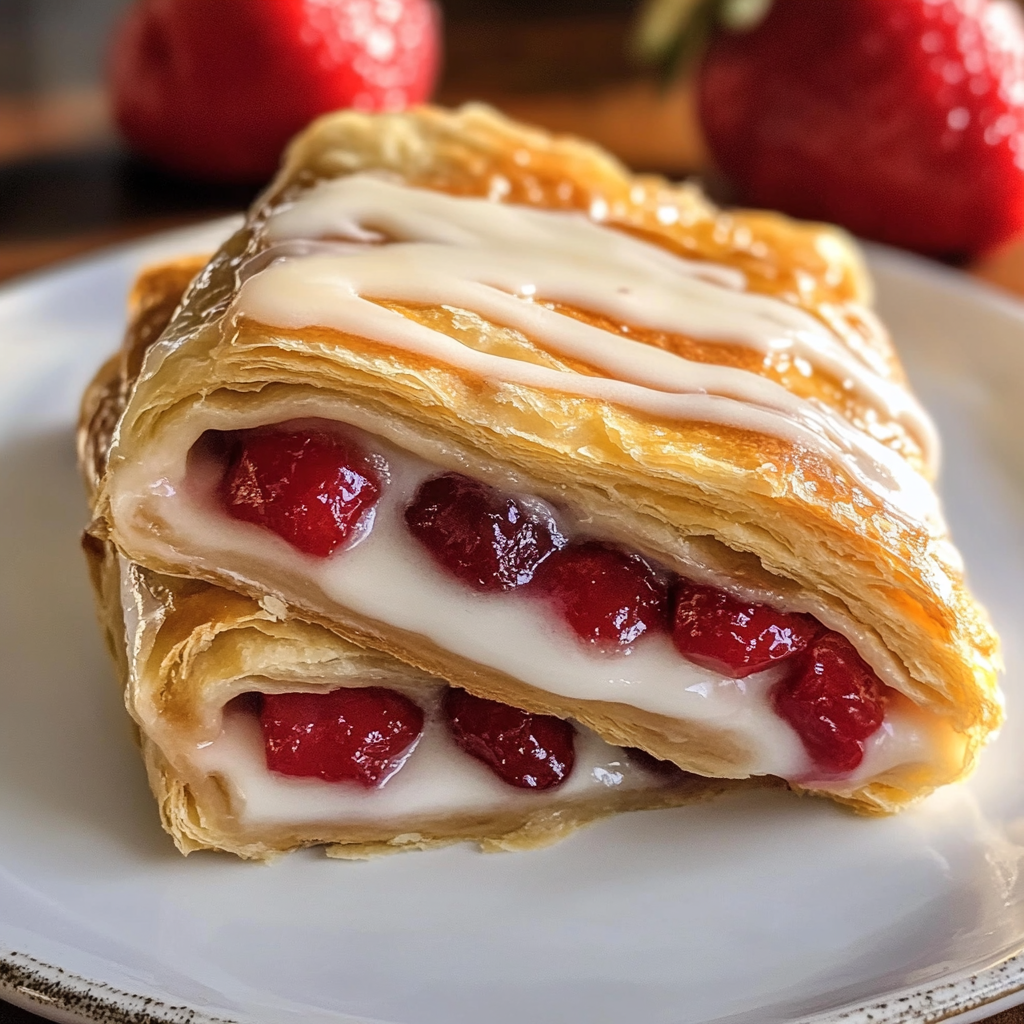
Homemade Toaster Strudel
There’s something truly magical about the warmth of a homemade breakfast, don’t you think? When I think of cozy mornings, the aroma of freshly baked pastries fills my mind, inviting me to linger a little longer at the kitchen table. Homemade toaster strudels are more than just a delightful treat; they are a culinary embrace—a symphony of flaky pastry embracing a luscious filling of sweet berry jam. Each bite is like tasting summer itself, with vibrant flavors bursting forth in a playful dance on your palate. This is no ordinary recipe—it’s an experience that transforms moments into memories.
Imagine waking up to the sound of golden pastries crackling in the oven, filling your home with an utterly intoxicating scent that beckons everyone to gather around. The joy of preparing these homemade toaster strudels is rooted in simplicity and creativity. You can customize them with your favorite jams or even fresh fruits, making them perfect for any occasion, from lazy Sunday breakfasts to special brunches with friends. Trust me when I say that once you try this recipe, you’ll never look at store-bought pastries the same way again.
Homemade Toaster Strudel: A Flaky Delight Filled with Berry Bliss
I can hardly contain my excitement to share this recipe for Homemade Toaster Strudel! This delightful treat not only satisfies your sweet tooth but also offers the joy of creating something beautiful and delicious from scratch. With just a handful of simple ingredients, you’ll be on your way to mastering this classic pastry that’s bound to become a beloved staple in your kitchen.
Ingredients:
As we dive into this culinary adventure, let’s explore the essential ingredients that make our toaster strudels truly special.
- 2 sheets puff pastry (thawed). Puff pastry is the star player in this recipe, bringing its flaky layers and buttery goodness to life. When baked, it puffs up beautifully, creating that signature crisp texture we adore. Be sure to choose high-quality puff pastry—preferably all-butter varieties—to ensure rich flavor and superior flakiness. Thawing it properly allows for easy handling; just remember not to rush this step as it needs time to soften before you roll it out.
- 2/3 cup of berry jam (blueberry, strawberry, raspberry, etc.). The filling is where the magic happens! Using berry jam infuses each bite with sweetness and fruity brightness. You can choose your favorite flavor—or even mix and match for an exciting twist! For enhanced texture and taste, look for jams made with real fruit rather than those loaded with artificial flavors. The cornstarch helps thicken the jam slightly so it won’t ooze out while baking; it’s a small but crucial addition that keeps everything nice and contained.
- 2 tsp of cornstarch. Speaking of cornstarch—it plays an essential role here by thickening our fruit filling and ensuring it doesn’t leak out during baking. This ingredient essentially gives our jam structure, allowing it to stay put inside our flaky pastry while still delivering that burst of flavor when you take a bite. Don’t skip this step; trust me on this!
- 1 large egg. Eggs are versatile heroes in baking—here they’re used for egg wash which gives our strudels their golden color and beautiful shine once they come out from the oven. This glossy finish is not just aesthetic; it adds an extra layer of allure that makes these pastries feel even more luxurious.
- 1 Tbsp of water. Combining water with egg creates an egg wash that’s light enough not to weigh down the pastry but effective enough to help seal everything together during baking. It helps achieve that perfect golden hue while also acting as glue for sealing edges—keeping all that deliciousness safely tucked away inside!
- 1 1/2 Tbsp of salted butter (melted). Butter brings richness and flavor—the kind that makes you sigh contentedly after each bite! Melted butter is brushed over the top before baking to enhance browning and create a delightful crispness on the surface while adding depth to every mouthful.
- 1 cup of powdered sugar. Now we’re getting into icing territory! Powdered sugar provides the foundation for our sweet drizzle—a lovely finishing touch that transforms these strudels from simple pastries into show-stopping treats worthy of any occasion.
- 1 1/2 Tbsp of half and half (and more if needed). This creamy ingredient adds just the right amount of richness to our icing without making it overly heavy or dense—a balance that’s absolutely paramount for achieving drizzling perfection!
- 1/4 tsp of vanilla extract & 1/8 tsp of almond extract—these extracts both bring complexity and warmth to our icing. Vanilla is familiar and comforting while almond adds a subtly fragrant note that’s simply irresistible! Together they create a symphony of flavors that perfectly complements our strudels.
Equipment You’ll Need:
Before we jump into preparing these tantalizing toaster strudels, let’s take a moment to gather some essential tools that’ll make your cooking experience seamless and enjoyable.
- Baking sheet – A sturdy baking sheet ensures even heat distribution while baking those lovely pastries until they’re perfectly golden brown. Consider using one lined with parchment paper or a silicone liner for effortless cleanup—you’ll thank yourself later!
- Rolling pin – While you won’t need to do much rolling with puff pastry since it’s already prepped for you, having a rolling pin handy can help if you want to gently flatten or shape your pastry further.
- Silicone liner or parchment paper – These are lifesavers when it comes time for cleanup after baking! They prevent sticking and make transferring those flaky beauties onto plates so much easier.
- Small bowls – Having several small bowls nearby makes whisking together fillings or glazes much simpler without needing extra cleanup afterward.
Now that we’ve gathered our ingredients and equipment, let’s get down to business—preparing these delicious homemade toaster strudels awaits!
Step 1: Preheat Your Oven – Setting the Stage
First things first: preheating your oven is crucial because starting off at just the right temperature guarantees even cooking throughout your pastries! Set your oven to 400°F (200°C)—this high heat will ensure quick puffing up without drying out any layers too soon during baking time—so don’t skip ahead! While you’re waiting on those gentle whirs from your oven heating up properly, grab your baking sheet and line it with either parchment paper or use a silicone liner; both options help prevent sticking while providing easy cleanup afterward.
Step 2: Cut Your Puff Pastry
Once preheated—and now feeling excited—I want you to work some magic with those sheets of thawed puff pastry! On a lightly floured surface (to avoid any sticky disasters), place one sheet down flat before cutting it into six equal rectangles using either a sharp knife or pizza cutter; precision here isn’t mandatory but aiming for consistency will lead us closer toward equal-sized delectable treats later on! As you cut each rectangle—about 3×5 inches should do nicely—you might notice how beautiful those layers look—not only visually appealing but also key players when we bake them up!
Step 3: Prepare Your Jam Filling
Now comes one of my favorite parts—the filling! In a small bowl, whisk together two-thirds cup berry jam mixed with two teaspoons cornstarch until fully combined; this little mixture will work wonders at thickening up our sweet center so we don’t end up with runaway jam during baking! If you’ve chosen particularly runny jams (you know which ones!), adding cornstarch becomes non-negotiable here as it’ll prevent leaks while keeping everything contained within those delectable layers we’ve created earlier on!
Step 4: Assemble Your Strudels
With everything ready set out before us—the cut pastry rectangles neatly arranged alongside well-mixed berry filling—we’re finally ready for assembly! Spoon approximately one-and-a-half tablespoons worth of prepared jam mixture onto three rectangles (leaving about half-inch space surrounding edges). This part is vital since going too close could lead us into trouble when sealing later on… So take care not rush through this step; savoring each moment makes all difference between good-to-great results!
With these steps completed successfully—oh boy—you’re really getting close now! We’ll continue assembling each layer until all components come together beautifully; I promise you won’t regret taking time crafting such perfect morsels destined delight anyone lucky enough get their hands on them… Stay tuned because next we’ll dive deeper into sealing techniques followed by brushing egg washes atop before sending them off into glorious transformation within warm oven air!
Step 5: Brush and Bake to Golden Perfection
Now that you’ve meticulously sealed your homemade toaster strudels, it’s time for one of the most crucial steps: applying the egg wash. Whisk together your egg and that tablespoon of water until they’re fully combined into a glossy, golden mixture — this is what will give your strudels that irresistible shine and enticing color as they bake. With a pastry brush or even just your fingertip, gently apply the egg wash over the top surfaces of each strudel. This little step may seem minor, but trust me when I say it’s absolutely paramount! The egg wash not only enhances the appearance but also helps create a beautiful crust that’s both crispy and flaky.
Once every strudel is lovingly brushed with the egg wash, it’s time to transfer them to your preheated oven. Baking at 400°F is essential because this higher temperature allows the puff pastry to rise dramatically and puff up beautifully — we want layers upon layers of flaky goodness, right? You’ll want to bake these treasures for about 20 minutes or until they are an alluring golden brown. Keep an eye on them! Ovens can be quirky, and while you’re aiming for that perfect golden hue, every minute counts. When they’re ready, you should see a lovely golden exterior with a slight puffiness that promises deliciousness inside.
Step 6: Cooling and Preparing the Icing
Once your toaster strudels have emerged from the oven, fragrant and golden, resist the urge to dive in immediately; allow them to cool slightly on a wire rack for about five to ten minutes. As they cool, their insides will set up just right while still holding onto that delightful warmth that makes them so comforting. This cooling period is essential because if you icing them too soon, it might melt into a puddle rather than creating a beautiful drizzle that adds both flavor and visual appeal. The anticipation builds as you catch whiffs of buttery pastry mingling with sweet jam.
While they’re cooling, let’s whip up some icing to take these strudels over the top! In a small mixing bowl, combine your cup of powdered sugar with one and a half tablespoons of half-and-half along with your vanilla extract and almond extract. Mix until everything is fully incorporated into a smooth paste; this should be thick yet pourable — think liquid gold! If it seems too thick for drizzling (and trust me; no one wants icing that’s more like cement), add more half-and-half gradually until you reach that perfect consistency. The combination of vanilla and almond extracts creates an utterly intoxicating aroma that wraps around you like a warm hug; it’s truly extraordinary how such simple ingredients can transform something good into something divine!

Step 7: Drizzle with Love
Now comes one of my favorite parts: drizzling the icing over those gorgeous homemade toaster strudels! Using either a small resealable bag or a piping bag fitted with an appropriately sized tip (or even just cutting off the corner of the resealable bag), fill it with your luscious icing mixture. With gentle pressure, squeeze out long strands across each strudel — don’t rush this step! Take your time here because this is where presentation meets flavor; those intricate lines of icing not only enhance their aesthetic but also provide delightful sweetness in every bite.
As you drizzle away, imagine how delighted friends or family will be when they see these beauties laid out on the table! You can get creative here—zigzag patterns or delicate swirls can elevate their visual appeal even further. Once you’ve adorned each strudel with icing perfection, let them sit for just another minute or two so the icing can set slightly; this way, you’ll avoid any messy bites when it’s finally time to indulge in your homemade creations.
Step 8: Savoring Every Bite
Now comes perhaps the most rewarding part of making homemade toaster strudels: taking that first bite after all your hard work! But before you dive in headfirst like I often do (hey, I’m passionate about my pastries!), take a moment to appreciate everything you’ve created. The warm scent wafting through your kitchen is nothing short of magical — it’s like having cozy memories wrapped in flaky pastry!
As you cut through the flaky layers, watch how effortlessly it gives way to reveal luscious jam nestled within. The first bite should be nothing short of profound satisfaction as the buttery pastry melds perfectly with sweet berry flavors dancing on your palate. And let me tell you; there’s nothing quite like being able to share these homemade delights with loved ones while basking in their joy as they savor each mouthful alongside you.
Final Touches
As you’re wrapping up this whole delightful experience, remember that homemade toaster strudels are not just food; they are moments shared around tables filled with laughter and warmth. They can brighten any day—be it breakfast on a bustling Monday morning or dessert during an intimate gathering with friends on a cozy evening. Feel free to get adventurous too; experiment with different jams or even add chocolate chips for something extra special! You’ve mastered this recipe now—own it proudly!
I hope this journey through making homemade toaster strudels has inspired you as much as it inspires me every time I make them. So go ahead—share these delights with those who matter most in your life and watch as they fall in love just as deeply as I have! Enjoy every crumb!
Storage and Enjoyment Tips for Your Homemade Toaster Strudel
Now that your homemade toaster strudels are golden brown and drizzled with that luscious icing, it’s time to savor the fruits of your labor! But let’s be honest—sometimes, we just can’t finish them all in one sitting, and that’s perfectly okay. I promise you, these delightful pastries are just as enjoyable the next day (or even the day after) if you store them correctly. Keeping their flaky texture and mouthwatering flavors intact is key to ensuring that every bite feels fresh and utterly satisfying. So, let’s dive into the best ways to preserve your creations!
Storing Leftover Homemade Toaster Strudel
To keep your homemade toaster strudels as fresh as the moment they came out of the oven, I recommend placing them in an airtight container. This is crucial because it locks in moisture while preventing them from drying out or becoming soggy—nobody wants a sad strudel! You can pop them in the fridge for about 2-3 days; however, I suggest enjoying them sooner rather than later for maximum flavor impact. If you want an extra tip for maintaining quality, try placing a slice of bread in the container with your strudels. The bread will absorb any excess moisture, keeping your pastries delightfully crisp on the outside. When you do indulge in leftover strudels, expect a delightful burst of berry goodness complemented by that flaky puff pastry—a taste sensation that rivals their freshly baked glory! For warming up, simply pop them back into a preheated oven at 350°F for around 5-10 minutes until they’re warmed through; trust me—the aroma will have everyone flocking to the kitchen!
Freezing Homemade Toaster Strudel for Later
If you find yourself with a batch of homemade toaster strudels that you’d like to save for later enjoyment, freezing is a fantastic option! Start by allowing the strudels to cool completely before wrapping each one tightly in plastic wrap or aluminum foil. Then place them in a freezer-safe bag or container, ensuring no air gets trapped inside—this is absolutely paramount to prevent freezer burn. They’ll keep beautifully frozen for up to three months! When you’re ready to enjoy one (or two), there’s no need to thaw; just bake them straight from frozen at 400°F for about 20-25 minutes. This convenience factor makes homemade toaster strudels an ultimate treat for busy mornings or unexpected guests—you can have delicious pastries ready at a moment’s notice! Imagine pulling them out of the oven and enjoying them warm and flaky whenever the craving strikes!
Homemade Toaster Strudel

Indulge in the warmth of Homemade Toaster Strudel, a delightful pastry that brings cozy mornings to life. With layers of flaky puff pastry enveloping a luscious berry jam filling, each bite is a burst of sweet flavor that evokes the essence of summer. Not only are these pastries easy to make, but they also allow for creativity with your favorite jams or fresh fruits. Whether enjoyed at breakfast or as a sweet treat during the day, these strudels promise to transform ordinary moments into cherished memories. Gather around the table with family and friends, and savor the joy of sharing these delicious homemade delights.
- Prep Time: 15 minutes
- Cook Time: 20 minutes
- Total Time: 35 minutes
- Yield: Makes approximately six servings 1x
- Category: Dessert
- Method: Baking
- Cuisine: American
Ingredients
- 2 sheets puff pastry (thawed)
- 2/3 cup berry jam (blueberry, strawberry, raspberry, etc.)
- 2 tsp cornstarch
- 1 large egg
- 1 Tbsp water
- 1 1/2 Tbsp salted butter (melted)
- 1 cup powdered sugar
- 1 1/2 Tbsp half-and-half
- 1/4 tsp vanilla extract
- 1/8 tsp almond extract
Instructions
- Preheat your oven to 400°F (200°C) and line a baking sheet with parchment paper.
- Roll out the thawed puff pastry on a lightly floured surface and cut into six equal rectangles (about 3×5 inches).
- In a small bowl, whisk together the berry jam and cornstarch until well combined.
- Place about 1.5 tablespoons of the jam mixture onto three pastry rectangles, leaving space around the edges.
- Seal the edges carefully and brush each strudel with an egg wash made from whisking together the egg and water.
- Bake in the preheated oven for approximately 20 minutes or until golden brown.
- Allow to cool slightly before drizzling with icing made from powdered sugar, half-and-half, vanilla extract, and almond extract.
Nutrition
- Serving Size: 1 strudel (85g)
- Calories: 275
- Sugar: 12g
- Sodium: 150mg
- Fat: 15g
- Saturated Fat: 8g
- Unsaturated Fat: 6g
- Trans Fat: 0g
- Carbohydrates: 31g
- Fiber: 1g
- Protein: 3g
- Cholesterol: 35mg