Cinnamon Brown Butter Cookies
When it comes to baking, some recipes have a unique way of weaving nostalgia and comfort into every bite. Cinnamon Brown Butter Cookies are one such treat. Picture stepping into a cozy kitchen, the air thick with the warmth of spices and the rich, nutty aroma of brown butter wafting through the house. These cookies are not just a delightful indulgence; they represent moments spent in joyful connection—whether it’s sharing them with friends over coffee or savoring them alone while curled up with a good book. They have an uncanny ability to evoke memories of laughter, love, and perhaps even a little mischief as you sneak one (or two) before dinner. The harmony between the buttery goodness and the fragrant cinnamon creates a symphony that is simply irresistible.
What makes these Cinnamon Brown Butter Cookies truly special is the transformation that occurs when you take simple ingredients and elevate them into something extraordinary. The process of browning butter, for instance, infuses a depth of flavor that is utterly intoxicating, taking your standard cookie dough to new heights. And let’s not forget about the cinnamon—a spice so beloved it can instantly transport you to seasons of joy and celebration. Whether you’re baking these for a holiday gathering or simply indulging in self-care on a quiet afternoon, each bite is an invitation to pause and appreciate life’s little pleasures.
Cinnamon Brown Butter Cookies: A Sweet Escape into Nostalgia
Let’s roll up our sleeves and dive into this delightful recipe together! With each step, I’ll share tips and secrets that will ensure your cookies turn out perfectly every time. I promise you’ll find joy in making these treats as much as in enjoying them!
Ingredients:
Before we embark on this culinary adventure, it’s important to gather our ingredients—each one plays a vital role in crafting these delicious cookies. The beauty of baking lies not just in following a recipe but understanding how each component contributes to the final creation.
- 1 cup (2 sticks or 226g) unsalted butter. This ingredient is crucial for achieving the decadent richness we crave in our Cinnamon Brown Butter Cookies. Unsalted butter allows us to control the salt content precisely, ensuring our cookies are perfectly balanced in flavor. As we brown this butter over medium heat, it transforms from its pale state into liquid gold—nutty and aromatic—adding complexity that elevates these cookies far beyond your average dessert experience.
- 1 cup light brown sugar. This sugar is like a warm hug for your cookies; its molasses content not only sweetens but also adds moisture and richness. It caramelizes beautifully during baking, giving those edges a lovely crispness while keeping the centers delightfully chewy. If you’re ever short on light brown sugar, you can easily make your own by mixing granulated sugar with a bit of molasses—just remember that it’s that touch of molasses that brings warmth and depth.
- 1/2 cup granulated sugar. While brown sugar brings moisture and chewiness, granulated sugar helps achieve that perfect balance of sweetness without overwhelming flavors. It promotes spread during baking, contributing to those beautiful golden edges we all adore in cookies. Always opt for fine granulated sugar for better incorporation; it dissolves more easily into our dough.
- 2 large eggs. Eggs are essential here—they provide structure and stability to our cookie dough while also enriching flavor. When whisked into the mixture, they create an airy texture that helps our cookies rise just right during baking. Make sure your eggs are at room temperature for optimal emulsification; this ensures everything blends seamlessly together.
- 2 cups all-purpose flour. Flour serves as the backbone of our cookie dough; it provides structure and texture, helping our cookies hold their shape while still offering that inviting chewiness we cherish so much. For these cookies, I recommend using all-purpose flour for its versatility—if you’re feeling adventurous or health-conscious, feel free to substitute half with whole wheat flour for added nutrition without sacrificing taste.
- 1 tsp baking soda. Baking soda acts as our leavening agent here; it’s responsible for creating those lovely puffs during baking that contribute to their soft middle while still allowing for crisp edges. Remember that freshness matters—if your baking soda has been sitting around for too long, check its potency by adding a small amount to vinegar; if it bubbles vigorously, you’re good to go!
- 1 tbsp ground cinnamon. Ahh, cinnamon—the star spice! Its warm aroma fills your kitchen with cozy vibes as it bakes into every bite of these delectable cookies. Not only does it enhance flavor but cinnamon also brings warmth and nostalgia reminiscent of home-cooked comforts during family gatherings or chilly evenings spent indoors.
- 1/4 tsp salt. A pinch of salt may seem trivial, but it’s absolutely paramount! Salt enhances all other flavors present in our cookies—it balances sweetness beautifully and rounds out the overall taste profile significantly.
Now that we have gathered everything we need let’s prepare ourselves for an exciting journey into cookie-making bliss!
Equipment You’ll Need:
Having the right tools at hand makes all the difference in transforming this recipe from mere ingredients into something truly magical! Let’s chat about some essential pieces you’ll want close by as we embark on this delicious adventure together.
- Medium saucepan – This is where we’ll work our magic by browning the butter; choose one with a light-colored interior if possible so you can closely monitor its progression from pale yellow to rich amber without missing a beat!
- Mixing bowls – You’ll need at least two bowls: one for combining wet ingredients (like butter and sugars) and another for dry ingredients (flour mix). Opting for glass or stainless steel ensures durability while allowing you visibility throughout mixing—no surprises here!
- Whisk – A sturdy whisk will help bring everything together smoothly when incorporating eggs with melted butter and sugars—a key step toward achieving glossy perfection!
- Rubber spatula – This trusty tool will become your best friend when folding dry ingredients smoothly into wet ones without overmixing—a crucial technique ensuring tender cookies every time!
- Baking sheets & parchment paper – Line your sheets with parchment paper before scooping out those dough balls! Not only does this prevent sticking but also aids cleanup afterward—no one wants sticky pans after all this effort!
With our list complete let’s dive into preparing these delightful Cinnamon Brown Butter Cookies!
Preparing the Cinnamon Brown Butter Cookies
Step 1: The Art of Browning Butter
First things first: let’s get started by browning our unsalted butter! Place your medium saucepan over medium heat (not too high—we don’t want burnt bits!). As it begins to melt gently, keep an eye on it—the transformation from solid yellow blocks to luscious liquid gold is mesmerizing! Stir frequently with your trusty spatula until the milk solids settle at the bottom begin turning golden brown—it should smell nutty and utterly intoxicating! This process takes about 5–7 minutes but trust me—it’s worth every second!
Once you’ve reached that deep amber hue (but remember: no black spots!), immediately remove it from heat—you want those nutty flavors without bitterness creeping in! Pour this glorious browned butter into your mixing bowl where it’ll cool slightly before we add sugars; patience here pays off wonderfully—you’ll be rewarded later with irresistibly rich flavors!
Step 2: Mixing Wet Ingredients
Now let’s add both sugars—the light brown sugar first followed by granulated sugar—to our warm browned butter! Using either an electric mixer fitted with paddle attachment or simply whisking vigorously by hand will do wonders here as they blend beautifully into one cohesive mixture! Aim for smoothness; there shouldn’t be any gritty bits left behind once fully combined (about 2–3 minutes).
Next up are those two large eggs—we’ll whisk them together separately so they can incorporate evenly before joining their sugary companions—this ensures maximum fluffiness throughout! Once added back into our mixture along with any optional vanilla extract if desired (oh yes please!), continue mixing until glossy perfection emerges before moving onto dry ingredient incorporation!
Step 3: Combining Dry Ingredients
In another bowl (remember we talked about having two handy?), combine all-purpose flour mixed alongside baking soda along with cinnamon & salt—it might seem redundant but trust me on this step as sifting ensures even distribution throughout cookie dough later down line! Gently fold dry contents gradually into wet mixtures being careful not too overmix which leads tough textured final product rather than tender bites bursting full flavor goodness…we want softness people!
This is where those warm spices start coming alive—a sensory experience that’ll get anyone excited about what comes next… Can you smell it yet?
Step 4: Chilling Out
Once combined properly until no streaks remain visible within dough (don’t panic if slightly sticky—that’s normal!), cover bowl tightly using plastic wrap then place refrigerator chill time minimum thirty minutes before proceeding onwards toward scooping & baking stages ahead…Why chill? Well apart from firming up consistency preventing excessive spreading during bake session ahead…it allows flavors meld closer together resulting ultimately richer tasting outcome overall too—a win-win really!
Now my friend-who-bakes-together…let’s get ready preheat oven soon so when finished chilling time arrives you’ll be poised perfection awaiting arrival fresh baked goodness filling home once again…
Stay tuned—we’re almost there!
Step 5: The Importance of Chilling — Patience is Key
Now that you’ve mixed your dough into a heavenly blend of flavor and texture, it’s time for one of the most crucial steps: chilling the dough. I know waiting can feel like torture, especially when you have a batch of Cinnamon Brown Butter Cookies that is just begging to be baked. But trust me on this—allowing the dough to chill for at least 30 minutes is non-negotiable if you want cookies that are perfectly chewy and maintain their shape in the oven. This period allows the flour to fully hydrate, which results in a cookie that has a tender crumb rather than one that spreads out like a pancake.
As your dough chills, you’ll notice it firming up, making it much easier to scoop and handle later on. I often pop my dough in the fridge and use this time to clean up my kitchen or make a cup of tea; it’s an ideal moment to reflect on how much joy these cookies will bring! If you’re feeling particularly patient (and I encourage you to be!), consider letting the dough chill for up to an hour or even overnight. This extended rest not only enhances the flavors but also encourages a deeper caramelization during baking, which means each cookie will have that irresistible nutty sweetness we all crave. So, go on and set your timer; great things come to those who wait!
Step 6: Prepping for Perfection — Preheat Your Oven
While your cookie dough is taking its much-deserved chill, it’s time to preheat your oven! This step might seem trivial, but let me tell you—it’s absolutely paramount for achieving that perfect golden exterior while keeping your cookie centers beautifully soft and chewy. Preheat your oven to 350°F (175°C), ensuring that the heat circulates evenly throughout. A properly preheated oven ensures that when your cookies hit the hot surface, they start baking immediately, locking in moisture while forming those delightful crisp edges.
While waiting for the oven to reach temperature, grab your trusty baking sheets and line them with parchment paper. This simple action prevents sticking and facilitates even baking—a little preparation goes a long way! Once your oven is ready and your cookies are chilled, you’ll be well on your way to creating an irresistible aroma that fills your home with warmth and nostalgia. You can feel it in your bones; something magical is about to happen!
Step 7: Scooping — The Art of Portioning
Now comes one of my favorite parts—scooping the chilled dough onto lined baking sheets! Grab a tablespoon or even a cookie scoop if you have one; this tool will help ensure uniformity so each cookie bakes evenly. Using about a tablespoon of dough per cookie ensures they will spread out just enough without losing their lovely shape. Gently roll each portion into a ball between your hands before placing them on the prepared sheets, leaving ample space between each scoop—about two inches apart should do nicely!
This spacing is essential because as these beauties bake, they expand just enough to create those lovely crisp edges while maintaining their chewy center—a true textural delight! Watching them transform from little mounds into beautiful cookies is like witnessing magic unfold before your eyes. As they bake, keep an eye on the color; you’re looking for those golden-brown edges while keeping the centers soft—this contrast is what makes these Cinnamon Brown Butter Cookies so extraordinarily satisfying.
Step 8: Baking — The Transformation
The moment has finally arrived—it’s time to bake! Slide those trays into your preheated oven with excitement bubbling in your chest as you close the door behind them. Set your timer for about 12 minutes; however, keep an eye on them as ovens can vary significantly in temperature accuracy. You’ll want to check around the 10-minute mark—a good visual cue is when the edges begin turning golden brown while the centers still look slightly underbaked. Why? Because we want those chewy centers!
As they bake, take note of that intoxicating aroma wafting through your kitchen; it’s truly one of life’s simple pleasures and serves as a precursor to pure bliss once they’re done. When the timer goes off, remove them promptly but don’t rush—they will continue cooking slightly from residual heat as they cool on the tray. After pulling them from the oven, let them sit for about five minutes before transferring them onto cooling racks; this crucial step allows them to firm up just a bit more while ensuring maximum chewiness in every bite.
Next Major Phase – Final Touches: Enjoying Your Cookies!
Step 9: Cooling & Savoring — The Grand Finale
Ahh, now comes my absolute favorite part—the cooling and savoring phase! Once you’ve transferred those gorgeous cookies onto racks and allowed them some time to cool down (if you can resist!), take a moment to admire their beauty—their golden-brown edges contrasting with slightly softer centers beckon you closer. But wait—before diving right in, let’s talk about how best to enjoy these gems!
I promise you there’s nothing quite like biting into a warm Cinnamon Brown Butter Cookie fresh out of the oven; it’s heavenly! If you’re feeling adventurous, consider adding some lightly toasted nuts or drizzling them with a cinnamon glaze for an extra touch of decadence—after all, why not treat yourself? And remember, these cookies store wonderfully in an airtight container at room temperature for up to a week (though I doubt they’ll last that long!). You can also freeze any leftovers for later enjoyment—a delightful treat waiting patiently for when cravings strike again.
So gather around with friends or family—or perhaps find a cozy nook just for yourself—and enjoy every crumb of these profoundly satisfying cookies crafted from love and patience. Allow yourself this indulgence because life deserves sweet moments like these!
Storage and Enjoyment Tips for Your Cinnamon Brown Butter Cookies
Now that your kitchen is filled with the mouthwatering aroma of freshly baked Cinnamon Brown Butter Cookies, it’s time to enjoy every last crumb! These delightful treats are not only easy to whip up but are also perfect for sharing with loved ones or savoring during those quiet moments when you need a little pick-me-up. But what happens if you find yourself with a few cookies left over? Fear not! I’m here to guide you through storing these gems so that they remain as delicious as the moment they came out of the oven.
Storing Leftover Cinnamon Brown Butter Cookies
To keep your Cinnamon Brown Butter Cookies fresh and delectable, start by placing them in an airtight container. Plastic containers work well, but if you want to elevate your cookie storage game, opt for a glass jar that seals tightly—trust me, it adds a touch of charm to your kitchen counter! Keep these cookies at room temperature, away from direct sunlight and heat sources, and they’ll stay soft and scrumptious for about a week. If you want to maintain their chewy texture, consider placing a slice of bread in the container with them; this non-negotiable trick helps keep moisture levels just right. After a few days, you’ll still be greeted with those glorious flavors and textures—just as satisfying as when they were freshly baked! If you’re feeling adventurous, pop one into the microwave for 10-15 seconds before enjoying; it’s like experiencing a warm hug all over again.
Freezing Cinnamon Brown Butter Cookies for Later
If you happen to have more cookies than you can immediately devour (though I can’t blame you if you try!), freezing is an excellent option to preserve their delightful essence. To freeze these cookies properly, simply arrange them in a single layer on a baking sheet lined with parchment paper and place them in the freezer until firm—this usually takes about an hour. Once solidified, transfer them to an airtight freezer bag or container. They can be stored frozen for up to three months without losing their incredible taste or texture! When you’re ready for another indulgent treat, there’s no need to thaw; just bake them directly from frozen at 350°F (175°C) for about 15 minutes. The convenience of having these delightful cookies on hand is absolutely priceless—they make any day feel like a special occasion!
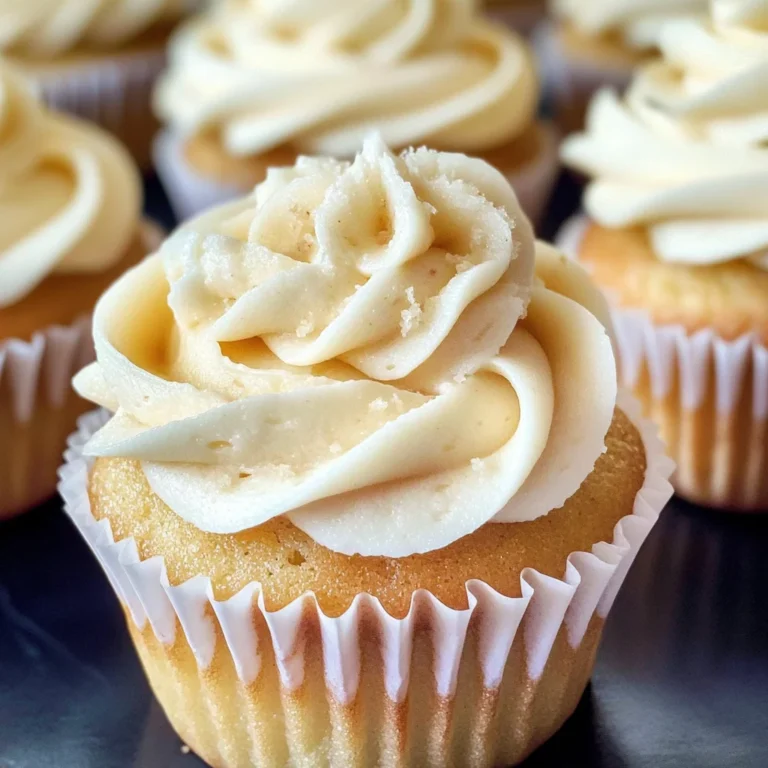
Cinnamon Brown Butter Cookies
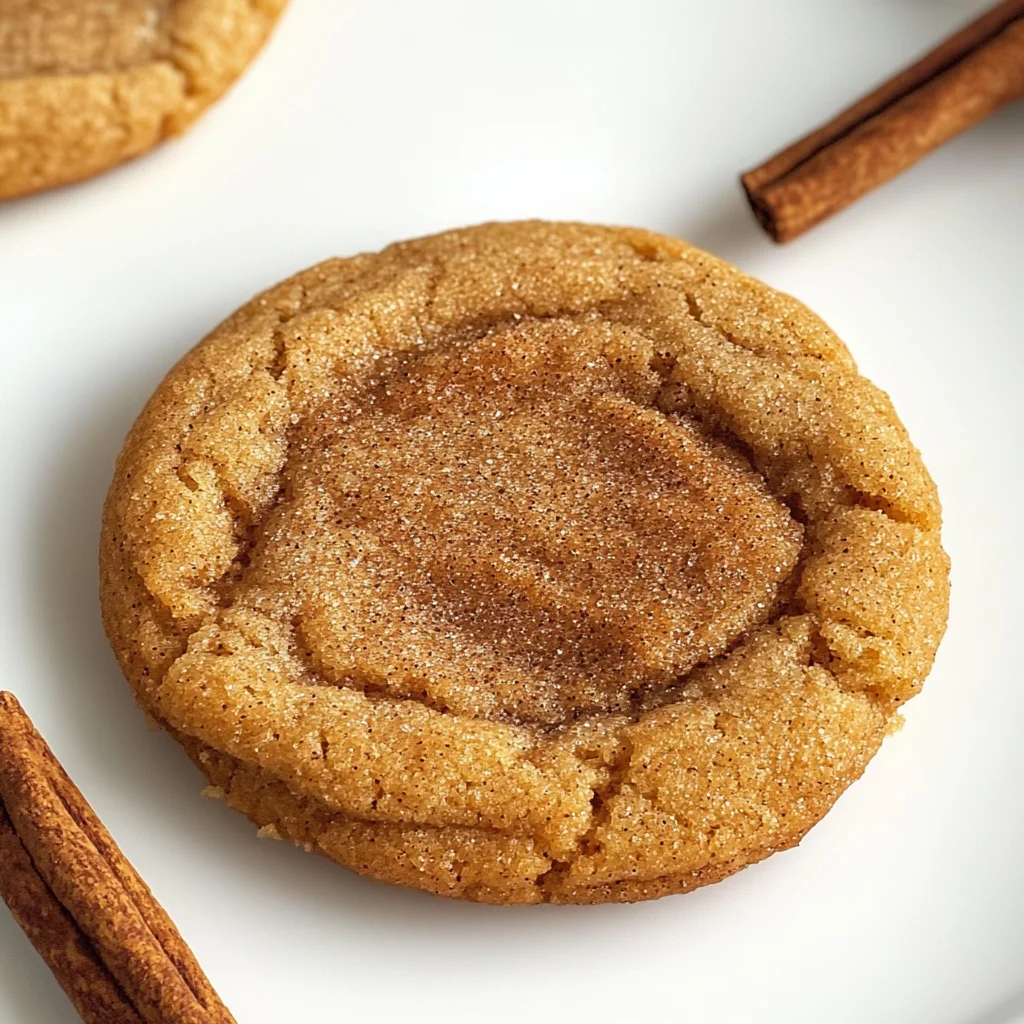
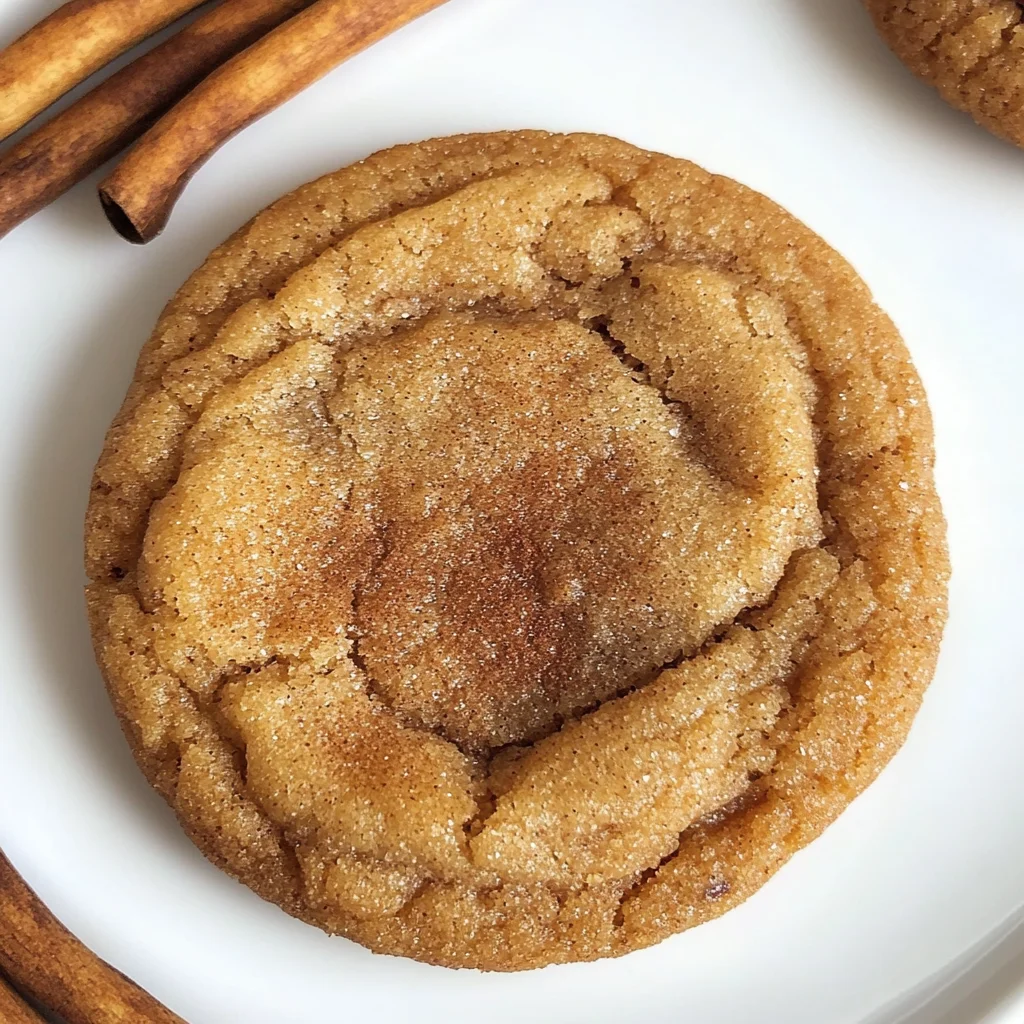
Cinnamon Brown Butter Cookies are a delightful treat that perfectly captures the essence of comfort and nostalgia in every bite. The rich, nutty flavor of brown butter combined with warm cinnamon creates an irresistible cookie that’s perfect for sharing with friends or enjoying solo with a cozy book. These cookies boast a golden exterior and a chewy center, making them the ideal indulgence for any occasion. Whether you’re baking for a holiday gathering or simply treating yourself, these cookies will surely bring joy to your kitchen and heart.
- Prep Time: 15 minutes
- Cook Time: 12 minutes
- Total Time: 27 minutes
- Yield: Approximately 24 cookies 1x
- Category: Dessert
- Method: Baking
- Cuisine: American
Ingredients
- 1 cup unsalted butter
- 1 cup light brown sugar
- 1/2 cup granulated sugar
- 2 large eggs
- 2 cups all-purpose flour
- 1 tsp baking soda
- 1 tbsp ground cinnamon
- 1/4 tsp salt
Instructions
- Start by browning the butter in a medium saucepan over medium heat until it turns golden brown and aromatic. Remove from heat and let cool slightly.
- In a mixing bowl, combine the browned butter with light brown sugar and granulated sugar until smooth. Add eggs and mix until well incorporated.
- In another bowl, whisk together all-purpose flour, baking soda, cinnamon, and salt. Gradually fold the dry ingredients into the wet mixture until just combined.
- Cover the dough and chill in the refrigerator for at least 30 minutes.
- Preheat your oven to 350°F (175°C) and line baking sheets with parchment paper.
- Scoop tablespoon-sized portions of dough onto prepared sheets, leaving space between each.
- Bake for about 10–12 minutes or until edges are golden brown. Let cool on the baking sheet for five minutes before transferring to cooling racks.
Nutrition
- Serving Size: 1 cookie (30g)
- Calories: 150
- Sugar: 9g
- Sodium: 70mg
- Fat: 7g
- Saturated Fat: 4g
- Unsaturated Fat: 3g
- Trans Fat: 0g
- Carbohydrates: 20g
- Fiber: <1g
- Protein: 2g
- Cholesterol: 20mg