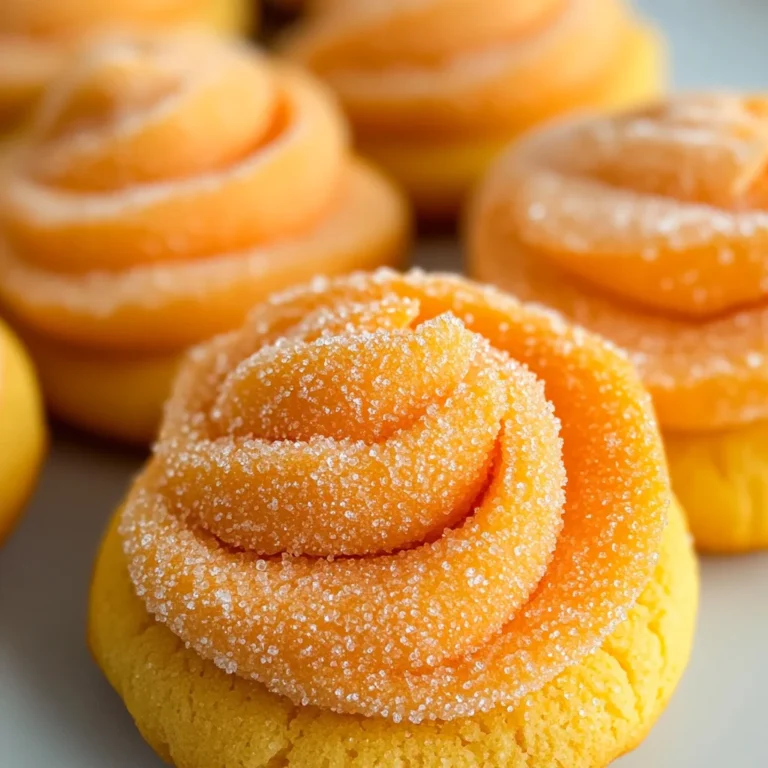
Cookie Butter Cookies
I’m so thrilled to share this delightful recipe for Cookie Butter Cookies with you! Imagine the warmth of your kitchen filled with the comforting aroma of freshly baked cookies, the kind that beckons friends and family to gather around, drawn in by the promise of something utterly scrumptious. These cookies have a unique charm that feels both nostalgic and innovative; they’re a perfect blend of tradition and modern flavor. Each bite is a chewy, rich indulgence, thanks to the velvety cookie butter—commonly known as Biscoff or Speculoos—that brings a symphony of warm spices and caramel sweetness to life. Trust me when I say, once you try these Cookie Butter Cookies, they will become an instant favorite in your home!
What makes these cookies even more special is their simplicity. With just four easy-to-find ingredients, you can whip up a batch in no time. Picture yourself in your cozy kitchen, the gentle glow of afternoon light streaming through the window, as you mix together these humble components into something truly extraordinary. The magic lies not only in how it all comes together but also in the joy they bring when shared with loved ones. Whether it’s during holiday gatherings or simply as an afternoon treat, these cookies are bound to put smiles on faces and warmth in hearts.
Cookie Butter Cookies: A Sweet Indulgence That’s Simply Irresistible
These Cookie Butter Cookies are incredibly easy to make and yield a delightful batch that is simply irresistible. You’ll be amazed at how such simple ingredients can create something so profoundly satisfying! Let’s dive into this baking adventure together; I promise it will be worth every moment spent in your kitchen.
Ingredients:
Before we embark on this joyful baking journey, let’s take a moment to appreciate our ingredients. Each one plays a pivotal role in creating those perfect little bites of happiness.
- 1 cup cookie butter (also known as Biscoff or Speculoos). This ingredient is the star of our show! Cookie butter lends an intoxicating flavor profile that combines caramel notes with hints of warm spices like cinnamon and nutmeg. When selecting your cookie butter, look for high-quality brands that use simple ingredients without unnecessary additives—this ensures a purer taste that shines through in every cookie. If you find yourself without cookie butter, fear not; you can try almond or sunflower seed butter for a similar spreadable texture, though the flavor will vary.
- 1/2 cup sugar. Sugar isn’t just about sweetness; it plays a crucial role in texture too! In our Cookie Butter Cookies, sugar helps create that delightful chewiness while also contributing to the browning process during baking—a beautiful golden color is what we’re aiming for! I suggest using granulated sugar for its ability to dissolve easily into your mixture; however, if you’re looking for a touch more depth, brown sugar can impart some molasses richness.
- 1 large egg. Eggs are often referred to as nature’s glue because they bind our ingredients together beautifully while adding moisture and richness to our cookies. For optimal results, make sure your egg is at room temperature before incorporating it into your batter; this allows for better emulsification and uniform mixing throughout the dough. If you’re vegan or avoiding eggs entirely, consider using a flaxseed egg (1 tablespoon ground flaxseed mixed with 2.5 tablespoons water) as a wonderful alternative!
- 1/3 cup oat flour (add up to 1/2 cup oat flour total if mixture seems too moist). Oat flour adds a nutty flavor and wonderful texture while keeping our cookies gluten-free. It absorbs moisture beautifully without making them dense or heavy. When purchasing oat flour, check that it’s made from whole oats for maximum nutritional benefits—though you can easily make your own by blending rolled oats until finely ground! If you don’t have oat flour on hand, almond flour or gluten-free all-purpose flour can work well too.
Equipment You’ll Need:
Having the right tools at your disposal makes the entire baking process smoother and more enjoyable! While they may not be “ingredients,” these trusty companions are essential partners on our sweet journey.
- Mixing Bowls – A good set of mixing bowls is fundamental for any baking endeavor. Opt for glass or stainless steel bowls as they won’t absorb flavors or odors like plastic might over time. The size matters too; larger bowls allow for easier mixing without worrying about spills!
- Whisk – A whisk is invaluable for ensuring that our egg and sugar blend smoothly together before adding other ingredients. It incorporates air beautifully into the mixture which helps create lightness in baked goods—a silky smooth batter is what we want here!
- Wooden Spoon or Stand Mixer – You’ll need something sturdy to mix everything together! A wooden spoon gives you great control while stirring and feels oh-so-classic when making cookies by hand. If you have a stand mixer handy, it’s an excellent tool for achieving thorough mixing without much effort on your part!
- Parchment Paper – Lining your baking sheets with parchment paper prevents sticking and makes cleanup effortless—no one loves scraping off burnt bits from their pans! Plus, it provides an even surface for cookie baking which helps them spread uniformly.
- Ice Cream Scooper (or tablespoon) – This handy tool ensures uniformity in size when forming your cookie dough balls—this is important because evenly sized cookies bake at the same rate! If you don’t have one on hand, using a tablespoon does just fine; just keep an eye on portion sizes so they all come out perfect!
Preparing the Cookie Butter Cookies
Step 1: Preheat & Whisk Away!
First things first—let’s get that oven preheating to 350°F (175°C). This step might seem simple but trust me—it’s absolutely paramount! Preheating ensures our cookies bake evenly from start to finish rather than sitting idly while waiting for heat to build up later on. While that’s happening, grab a large bowl and whisk together your egg and sugar until you achieve a lovely smooth consistency—about 1 minute should do it! The goal here is to fully incorporate those two ingredients so they work their magic during baking by creating tenderness within each bite.
Step 2: Add That Liquid Gold
Once you’ve achieved that creamy texture with egg and sugar combined beautifully, it’s time to add in our cherished cookie butter. Scoop out that luscious spread into the bowl—it’s like liquid gold—and stir gently until everything is fully blended together again into this irresistible mixture! Why do we want this creamy layer? Well, it’s where all those fantastic flavors come together harmoniously—the fusion of spices from the Biscoff paired with sweet notes creates sheer bliss!
Step 3: Flour Power!
Now comes oat flour—the magical ingredient that ties everything nicely together without weighing us down! Gradually add it into your mixing bowl while stirring gently either with your wooden spoon or paddle attachment if you’re using a stand mixer (I adore my stand mixer!) until no dry spots remain visible. Don’t rush this step; allow each component time to merge correctly—it’s crucial for producing chewy yet tender cookies later! And if at any point during this process things seem too wet? Feel free to sprinkle in an extra tablespoon or two until achieving just-right consistency.
Step 4: Chill Time!
After achieving that divine dough consistency we’ve been working toward so eagerly…it’s time for chilling—yes indeed! Cover your bowl tightly with plastic wrap or transfer everything into an airtight container before placing it inside the refrigerator for about thirty minutes—this waiting game is essential! Chilling allows flavors to meld further while also making handling much easier when rolling out those adorable little cookie balls later on; plus it helps prevent spreading during baking so we end up with perfectly shaped treats rather than puddles!
Stay tuned as we continue crafting these delicious delights—they’re almost ready! The anticipation makes every moment spent worthwhile; soon enough you’ll have golden brown treasures straight from your oven’s embrace…
Step 5: Chill and Let the Flavors Marry
Now that you’ve mixed together your beautifully gooey dough, it’s time for a crucial step that shouldn’t be overlooked: chilling! Cover the bowl with plastic wrap or even a clean kitchen towel, and place it in the refrigerator to rest for 30 minutes. You might be wondering why we need to chill this dough before baking; trust me, it’s absolutely paramount! Chilling not only helps firm up the dough, making it easier to handle, but it also allows those rich flavors of the cookie butter to deepen and develop into something truly extraordinary. Think of this time as a little spa getaway for your cookie dough—while it relaxes, it’s blending all those delicious ingredients into one cohesive symphony of flavors.
During this waiting period, take a moment to reflect on how special these Cookie Butter Cookies are going to be. Imagine the intoxicating aroma wafting through your kitchen as they bake! And don’t rush this step; patience in baking often leads to delightful results. If you find that after chilling, your dough still seems a bit too sticky or wet to form into balls easily, feel free to add an extra tablespoon or two of oat flour until you achieve a consistency that holds its shape better. This adjustment is normal and will ensure that your cookies come out perfectly without losing their delightful chewiness.
Step 6: Forming Perfect Cookie Balls
Once your dough has chilled and you can hardly contain your excitement any longer, it’s time for the fun part—rolling those gorgeous cookie balls! Grab a small ice cream scooper or simply use a tablespoon, and start portioning out your dough. Aim for about 1 tablespoon per ball; this will yield approximately 18 cookies that are just the right size for sharing (or not!). The beauty of using an ice cream scooper here is not just about convenience; it ensures uniformity in size, which is essential for even baking. When they’re all the same size, they’ll cook evenly—no half-baked surprises!
As you roll each ball between your palms, feel free to take a moment to appreciate how smooth and luscious they feel. This tactile experience connects you more deeply with what you’re creating. Place them on a sheet pan lined with parchment paper about 1-2 inches apart; this spacing is crucial because these cookies will spread slightly while baking. Overcrowding them can lead to some unfortunate clumping together which could result in baked blobs instead of beautiful individual cookies. Make sure they have room to breathe!
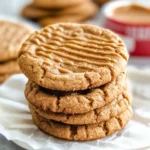
Step 7: Creating Beautiful Patterns
With all your cookie balls beautifully arranged on the baking sheet, it’s time to add that signature touch—making a criss-cross pattern on top! Using the back of a fork (or any other flat utensil), gently press down on each cookie ball to create that classic shape we all know and love. Not only does this step make your cookies look professional and inviting, but it also serves a functional purpose: it helps them cook evenly by creating more surface area for heat distribution during baking.
When you press down, aim for just enough pressure so that they flatten slightly but don’t lose their roundness entirely; think gentle yet firm! This simple technique elevates the presentation from ordinary to extraordinary. As you do this, take note of how satisfying it feels—the way the fork meets the soft cookie dough is almost therapeutic! Plus, those little lines create nooks and crannies that catch hints of caramelization during baking—a visual treat as well as an added texture when you bite into them!
Step 8: Baking Your Cookie Butter Cookies
Now comes the moment we’ve all been waiting for—baking these beauties! Preheat your oven to 350°F (175°C) if you haven’t already; ensuring your oven is at the right temperature before popping in those cookies is non-negotiable for achieving perfect results every time. Once preheated, slide that tray of raw cookie goodness into the oven and set a timer for 6-8 minutes. Keep an eye on them because oven temperatures can vary quite a bit depending on where you position them inside; if yours tends to run hot or cool, adjust accordingly.
You’ll know they’re done when they have turned golden brown around the edges while still looking slightly soft in the center—a sign they’ll continue cooking even after being pulled from the oven due to residual heat. The magic happens here as those warm scents fill your kitchen; I promise you’ll be tempted to sneak one before they even cool down! Let them sit on the tray for about 5 minutes after removing them from the oven before transferring them onto wire racks—this resting time is vital as it allows them to set properly without crumbling apart.
Conclusion:
As we wrap up this delightful journey through making cookie butter cookies, I can’t help but feel overwhelmed with excitement! This recipe isn’t just about creating delicious treats; it’s about celebrating simple ingredients coming together in harmony—each bite bursting with warmth and nostalgia. The unique blend of sweet cookie butter creates an utterly intoxicating flavor experience, while the chewy texture dances on your palate like a delicate waltz. I hope you’ve felt my enthusiasm throughout this process because I truly believe these cookies hold the power to brighten anyone’s day.
What makes this recipe a must-try goes beyond just taste; it’s about the experience of baking together with family or friends and filling your home with love and laughter. Picture yourself pulling these golden-brown beauties from the oven—imagine their inviting aroma wrapping around you like a warm hug! Whether it’s during holiday gatherings or simply enjoying an afternoon snack while curled up on the couch, these cookies bring joy and comfort like no other.
When it comes to serving suggestions, let your imagination run wild! Imagine savoring one with a steaming cup of chai tea or alongside a scoop of vanilla ice cream for an absolutely decadent dessert experience. For an afternoon pick-me-up, enjoy one—or two—with your favorite coffee blend as you take a moment for yourself. And don’t forget: they make wonderful gifts wrapped beautifully in cellophane for friends and family alike; everyone deserves a taste of happiness!
Feeling adventurous? This recipe is wonderfully adaptable! You can easily add chocolate chips or chopped nuts if you’re craving something extra indulgent. Or try incorporating spices like cinnamon or nutmeg for a festive twist that will surely elevate these already extraordinary treats. I encourage you to dive into this recipe with an open heart and mind—experimenting will only enhance your baking journey! Please share your experiences and variations; I would love nothing more than to hear how these cookie butter cookies have found their way into your life!
Cookie Butter Cookies
Indulge in the warmth and comfort of homemade Cookie Butter Cookies, a delightful treat that blends nostalgia with modern flavor. These cookies are incredibly easy to make, requiring just four simple ingredients that come together to create a chewy, rich indulgence. The star ingredient, cookie butter, infuses each bite with caramel sweetness and hints of warm spices. Perfect for sharing during holiday gatherings or enjoying as an afternoon snack, these cookies are sure to become a beloved staple in your home. Whether you pair them with a cup of tea or serve them at your next get-together, they promise smiles and warmth all around.
- Prep Time: 15 minutes
- Cook Time: 8 minutes
- Total Time: 23 minutes
- Yield: Approximately 18 cookies 1x
- Category: Dessert
- Method: Baking
- Cuisine: American
Ingredients
- 1 cup cookie butter (Biscoff or Speculoos)
- 1/2 cup sugar
- 1 large egg (or flaxseed egg for vegan option)
- 1/3 cup oat flour (up to 1/2 cup if needed)
Instructions
- Preheat your oven to 350°F (175°C).
- In a mixing bowl, whisk together the egg and sugar until smooth.
- Stir in the cookie butter until fully combined.
- Gradually add oat flour while mixing until no dry spots remain; adjust with more flour if too wet.
- Chill the dough in the refrigerator for 30 minutes.
- Roll into tablespoon-sized balls and place on a lined baking sheet.
- Flatten slightly with a fork to create a criss-cross pattern.
- Bake for 6-8 minutes or until edges are golden but centers are soft.
- Allow cookies to cool before serving.
Nutrition
- Serving Size: 1 serving
- Calories: 90
- Sugar: 6g
- Sodium: 30mg
- Fat: 4g
- Saturated Fat: 1g
- Unsaturated Fat: 3g
- Trans Fat: 0g
- Carbohydrates: 11g
- Fiber: 0g
- Protein: 1g
- Cholesterol: 20mg