Banana Bread Cookies (gluten free, vegan)
There’s something utterly enchanting about the aroma of freshly baked goods filling your kitchen, isn’t there? It’s like a warm hug that wraps around you, inviting you to take part in a comforting ritual that transcends mere nourishment. Today, I’m thrilled to share with you a recipe that embodies this magical experience: Banana Bread Cookies (gluten free, vegan). These cookies are not just snacks; they are a celebration of flavor and texture, a delightful fusion of the sweet nostalgia of banana bread and the playful spirit of cookies. As you blend together simple ingredients—each one purposefully chosen—you’ll find yourself creating a symphony of flavors that brings joy with every bite.
What makes these Banana Bread Cookies so special? Well, beyond their scrumptious taste and delightful chewiness, they’re incredibly easy to whip up. With only six core ingredients, these cookies can transform overly ripe bananas into heavenly treats that will have your friends and family begging for more. Imagine biting into a cookie that is not only gluten-free and vegan but also packed with wholesome goodness! The beauty of this recipe lies in its versatility; feel free to sprinkle in your favorite add-ins, whether it’s a handful of chopped nuts for crunch or an extra dash of cinnamon for warmth. I promise you, once you make these cookies, they’ll become an instant favorite and a staple in your kitchen.
Banana Bread Cookies (gluten free, vegan): A Joyful Twist on Tradition
Let’s embark on this culinary adventure together! It’s time to gather our ingredients and prepare for some delightful baking. These Banana Bread Cookies are an excellent way to enjoy the natural sweetness of bananas while indulging in a healthy treat that brings comfort without compromise.
Ingredients:
As we get started on our journey to creating these delectable Banana Bread Cookies, let’s take a moment to appreciate each ingredient’s role in crafting these little bites of joy. Each component contributes not only flavor but also texture and nutrition, making them truly special.
-
1 1/2 cups almond flour. This is the heart and soul of our cookies and provides that lovely nutty flavor along with a delicate crumb that’s simply irresistible. Almond flour is gluten-free by nature, making it perfect for those sensitive to gluten or looking for healthier options. When choosing almond flour, look for finely ground varieties for the best texture; coarser flours might create grainy cookies. Plus, almond flour is rich in protein and healthy fats—what’s not to love?
-
1/4 teaspoon baking soda. This humble ingredient is a powerhouse when it comes to leavening our cookies. By creating bubbles when it reacts with the acidic components in our ingredients (like the mashed bananas), baking soda helps give our cookies a lightness that contrasts beautifully with their chewy texture. Be careful not to use too much; excessive baking soda can lead to an unpleasant aftertaste.
-
1/8 teaspoon sea salt. A pinch of sea salt might seem trivial, but trust me when I say it’s absolutely paramount! Salt enhances flavors by balancing sweetness and elevating the overall taste profile of our cookies. It brings out the richness of the bananas and chocolate chips while ensuring every bite is well-rounded and satisfying.
-
1/4 teaspoon cinnamon. Ahh, cinnamon—the spice that evokes warmth and comfort like no other! Adding just the right amount gives our Banana Bread Cookies an aromatic depth that’s both nostalgic and invigorating. Its warm notes harmonize beautifully with the sweetness of bananas, creating an utterly intoxicating scent as they bake.
-
1 tablespoon pure maple syrup. This liquid gold adds just the right touch of sweetness without overwhelming the natural flavors we have going on here from our bananas. Maple syrup also acts as a binder, helping everything stick together while infusing those delightful earthy notes into each cookie bite. Make sure you’re using pure maple syrup instead of imitation syrups for maximum flavor impact!
-
1 1/4 cup overly ripe mashed bananas (about 4 medium bananas). The star player! Overly ripe bananas are sweeter and softer than their firmer counterparts—perfect for mashing into our dough while providing moisture that keeps our cookies tender without needing any added fat from oils or butter. I always mash my bananas before measuring; this ensures accuracy while avoiding any pesky lumps that could disrupt the cookie’s texture.
-
1 egg (or sub 1 flax egg). In this recipe, an egg helps bind everything together perfectly while adding some protein content too! If you’re opting for vegan-friendly alternatives or want to keep things plant-based entirely, substituting with one flax egg works wonders—just mix one tablespoon ground flaxseed with three tablespoons water ahead of time until it thickens!
-
1/2 cup chocolate chips. Because what’s life without chocolate? Adding chocolate chips creates pockets of gooey goodness within each cookie—an absolutely delightful surprise when you take that first bite! Choose dairy-free chocolate chips if necessary; many brands offer delicious options made from coconut or almond milk.
-
2 tablespoons nut butter (optional). Whether it’s creamy almond butter or rich peanut butter, adding nut butter here provides an indulgent creaminess along with healthy fats that’ll keep you satisfied longer.
-
Chopped nuts (optional). Feel free to toss in some chopped walnuts or pecans if you’re feeling adventurous! They add crunchiness that’ll contrast beautifully against the soft cookie base.
-
1/2 teaspoon vanilla extract (optional). Vanilla extract enhances all other flavors present by adding its own beautiful fragrance—a non-negotiable addition in my book!
-
Extra 1/4 teaspoon cinnamon (optional). For those who can’t get enough spice goodness! A little extra cinnamon goes miles toward enhancing those cozy notes even further.
-
Pinch ground cloves (optional). Just a dash adds complexity without overpowering everything else at play here—a subtle hint that rounds out this flavorful medley wonderfully!
Equipment You’ll Need:
Now that we’ve gathered all our ingredients let’s talk about tools—those trusty companions that will make your baking experience smoother and more enjoyable! While they may not be edible themselves, having dependable equipment is essential for navigating through this culinary journey successfully.
-
Mixing bowls – A set of sturdy mixing bowls is crucial for combining dry ingredients separately before integrating wet ones later on—this prevents clumping while ensuring consistency throughout every batch we create!
-
Fork or potato masher – You’ll need something effective to mash those overly ripe bananas into submission! A fork works just fine if you’re going old-school; however, if mashing becomes tedious due to resistance from stubborn lumps within banana skins…you may want something sturdier like a potato masher instead!
-
Silicone spatula – This tool is perfect for scraping down sides during mixing sessions—it ensures no precious batter gets left behind stuck inside corners so everyone gets equal love!
-
Cookie scoop – Using a cookie scoop helps maintain uniform sizes across all cookies baked simultaneously—which means even cooking times will yield consistently perfect results every time!
-
Baking sheet lined with parchment paper – Lining your baking sheet prevents sticking while allowing easy transfer once cooled—saving unnecessary hassle later down track post-baking adventures!
Preparing the Banana Bread Cookies (gluten free, vegan)
Step 1: Preheat & Prepare
To kick things off effectively—and trust me when I say this step sets us up for success—preheat your oven to 350℉ (about 175℃). This temperature is ideal because it allows our cookies enough time during their baking cycle without drying them out prematurely as they cook through evenly instead! While waiting patiently amidst sweet anticipation whilst heat rises steadily within walls surrounding us…take care lining your chosen baking sheet(s) with parchment paper so nothing sticks later down line as we scoop dough onto surface below when ready!
Step 2: Whisk Those Dry Ingredients
In another bowl large enough for mixing purposes comfortably yet still compact enough not overwhelm workspace around us…let’s whisk together almond flour alongside baking soda along with sea salt plus cinnamon until fully incorporated as one harmonious mixture emerges before us! This process ensures both chemical reactions occur correctly once wet elements join party later—trust me; don’t rush this step—it’s non-negotiable since clumps could ruin everything ultimately affecting final product quality noticeably if overlooked entirely!
Step 3: Mash It Up
Now onto what makes these tasty creations truly shine—we’ll need four medium-sized overly ripe bananas ready for mashing action next! I always find mashing first before measuring produces best results since lumps can sneak past otherwise unnoticed when measuring directly beforehand—join me now as we grab fork designated solely towards achieving creamy consistency whilst breaking apart pieces until smooth amalgamation occurs merely takes no time at all really—it becomes second nature once familiarized over time too effortlessly transforming textures rapidly right before eyes like magic unfolding gradually…
Step 4: Mix Wet Ingredients Together
Next up combines everything we’ve prepped thus far including mashed banana marvelously blended into dry mix previously whisked along alongside maple syrup plus egg—or flax egg if chosen alternative route instead—as well stirring gently blending fully incorporating until cohesive dough forms visibly evident upon inspection whilst ensuring no remaining clumps linger behind unaccounted either; feel free stop midway check consistency visually observe how nicely combined appears underneath bright light illuminating surroundings highlighting colors radiantly reflecting vibrant hues glistening enticingly before starting next step leading onward toward ultimate goal fruition achieved soon thereafter!
Stay tuned as we continue crafting these Banana Bread Cookies into delicious reality we can savored moments later…
Step 5: Mix It All Together – The Art of Incorporation
Now that we’ve got all our lovely dry ingredients blending harmoniously, it’s time to add the stars of our show: the bananas and maple syrup. This is where the magic truly begins! Take those overly ripe bananas—those beauties that are speckled with a few brown spots—and mash them in a bowl using a fork. I love this part because it’s so satisfying; you can really let out any stress while transforming those bananas into a smooth, creamy mixture. You want about 1 1/4 cups of mashed bananas, which usually equates to around four medium-sized fruits. The riper they are, the sweeter and more flavorful your cookies will be!
Once you’ve achieved that velvety texture, add your mashed bananas directly into the bowl with your dry ingredients. Then drizzle in the pure maple syrup and, if you’re opting to use one, crack an egg or mix up that flax egg. Combining these ingredients is crucial as it not only sweetens but also binds everything together. Trust me on this; mixing thoroughly ensures that every bite of cookie is bursting with flavor and has that perfect chewy consistency we all crave in a good cookie. Take a moment here to really feel the textures changing as you stir; it’s almost like you’re crafting a masterpiece with each motion!
Step 6: Scoop and Shape – Creating Cookie Perfection
With our dough now fully blended, let’s move on to shaping these delightful treats! Grab a cookie scoop, ideally one that holds about 1.5 tablespoons of dough, which helps maintain consistency across all your cookies—no one likes a cookie that’s too large or too small! As you scoop out the dough onto your prepared baking sheet lined with parchment paper (which also makes cleanup an absolute breeze), give yourself permission to enjoy this tactile experience. There’s something wonderfully meditative about this step; you can almost envision how delicious each cookie will taste when baked.
Now, here’s where I want to encourage you to invest just a bit of extra time: gently flatten each scoop of dough using either the back of a spoon or a fork. Don’t rush this step because flattening helps create an even bake throughout and allows for those delightful edges to crisp up beautifully while keeping the centers nice and soft. This technique is absolutely paramount for achieving that perfect cookie texture! Visualize those golden edges contrasting against the soft centers as they bake—oh, it’s going to be utterly intoxicating!
Step 7: Bake Them to Perfection – The Transformation Begins
We’re getting closer to enjoying these scrumptious Banana Bread Cookies (gluten free, vegan)! Now it’s time for baking magic in your preheated oven set at 350℉. Place your baking sheet in the center rack—this ensures that heat circulates evenly around your cookies for uniform cooking. Set your timer for about 26-30 minutes, but keep an eye on them as they approach the end of that period. You’ll notice them starting to puff up slightly; that’s perfectly normal!
Here comes an essential tip: to check for doneness without compromising their delicate texture, look for visual cues rather than relying solely on time. The middles should no longer appear wet, but instead have set nicely while still being slightly soft when touched lightly with your finger—think of it like giving them a gentle poke! If they collapse back down without leaving any imprint, they need another minute or two in the oven. Patience is key here; it’s worth waiting just a bit longer for those beautifully baked cookies rather than pulling them out prematurely.
Step 8: Cooling Down – The Final Countdown
Once those heavenly cookies have come out of the oven and filled your kitchen with that intoxicating aroma reminiscent of warm banana bread baking away, resist the urge to dive right in! This is where patience comes into play again—the cooling process is essential for allowing them to firm up properly so they don’t fall apart when you try to take one off the baking sheet. Carefully transfer them onto a wire rack using a spatula (this helps avoid any potential sticking), and let them cool there for at least 10-15 minutes.
As they cool, you’ll notice how they begin to develop their final texture—the edges will crisp up while maintaining chewiness at their core. And oh my goodness, can you smell those spices wafting through the air? It’s truly extraordinary! Allowing them time to reach room temperature before indulging ensures each bite is as satisfying as possible—not too soft and not too crumbly—just right! Store any leftovers (if there are any) in an airtight container in your fridge for up to five days—a perfect treat ready whenever you’re craving something sweet yet healthy!
Final Touches – Savor Every Bite!
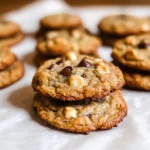
And there you have it—your very own batch of Banana Bread Cookies (gluten free, vegan)! These delectable treats are not just another cookie; they’re infused with love and warmth reminiscent of Sunday afternoons spent lounging at home with family or friends over coffee or tea. Each bite carries a symphony of flavors from cinnamon’s warmth to chocolate’s sweetness—all wrapped up in delightful chewiness that’s simply addictive!
I promise you’ll find yourself reaching for another one before you even realize it! You can also personalize these cookies by adding chopped nuts or an extra sprinkle of cinnamon if you’re feeling adventurous—I’ve even been known to toss in dried fruit now and then for added texture and bursts of flavor. Enjoy sharing these little bites of joy with loved ones or savoring them solo during quiet moments; either way, they’re bound to become a cherished recipe in your household just like they are in mine! Happy baking!
Storage and Enjoyment Tips for Your Banana Bread Cookies (gluten free, vegan)
Now that your delightful Banana Bread Cookies are fresh out of the oven, golden-brown, and smelling absolutely divine, it’s time to talk about how to store these gems so you can savor them longer! Trust me, the joy of having these delicious cookies on hand is something you don’t want to miss. They’re not just a fleeting moment of pleasure; they can be a comforting snack or dessert throughout the week. Proper storage will keep them soft and scrumptious, ensuring that each bite is as good as the first. So let’s dive into the best ways to preserve these little treasures!
Storing Leftover Banana Bread Cookies (gluten free, vegan)
To keep your leftover Banana Bread Cookies in peak condition, I recommend placing them in an airtight container—this is absolutely paramount for preventing any moisture loss or overly dry cookies. You can store them at room temperature for up to five days; however, if you want to extend their freshness even further, consider refrigerating them. This method helps maintain their delightful texture and flavor. A pro tip I swear by is placing a slice of bread inside the container; this simple trick helps keep the cookies moist by providing a bit of extra humidity without making them soggy. After a few days in storage, you’ll find that they still taste incredibly satisfying—the sweet aroma of bananas lingering with every bite will bring a smile to your face all over again! If you’re feeling indulgent, try warming one up briefly in the microwave before enjoying; it transforms into a gooey delight that feels like it just came out of the oven!
Freezing Banana Bread Cookies for Later
If you find yourself with more cookies than you can eat (though I doubt that!), freezing them is an excellent option that keeps their flavors intact. To freeze properly, allow your cookies to cool completely and then arrange them in a single layer on a baking sheet lined with parchment paper. Place the sheet in the freezer until they’re solid—this prevents them from sticking together later. Once frozen, transfer them to an airtight freezer-safe bag or container for optimal protection against freezer burn; they’ll stay tasty for up to three months! When you’re ready to enjoy one or two—or perhaps more—just take out what you need and let them thaw at room temperature or warm them briefly in the microwave. The convenience factor here is fantastic; imagine being able to reach into your freezer for a homemade treat whenever those cravings strike!
And there you have it—your storage guide ensures that your Banana Bread Cookies remain just as irresistible as when they first came out of the oven!
Banana Bread Cookies (gluten free, vegan)
Discover irresistible Banana Bread Cookies (gluten free, vegan) made with just six ingredients! Easy to make—try this recipe today!
- Prep Time: 10 minutes
- Cook Time: 30 minutes
- Total Time: 40 minutes
- Yield: Approximately 12 cookies 1x
- Category: Dessert
- Method: Baking
- Cuisine: Vegan
Ingredients
- 1 1/2 cups almond flour
- 1/4 teaspoon baking soda
- 1/8 teaspoon sea salt
- 1/4 teaspoon cinnamon
- 1 tablespoon pure maple syrup
- 1 1/4 cups overly ripe mashed bananas (about 4 medium bananas)
- Optional: chocolate chips, nut butter, chopped nuts, vanilla extract
Instructions
- Preheat your oven to 350°F (175°C) and line a baking sheet with parchment paper.
- In a mixing bowl, whisk together almond flour, baking soda, sea salt, and cinnamon.
- In another bowl, mash the bananas until smooth. Add the maple syrup and egg (or flax egg) to the mashed bananas and mix well.
- Combine the wet ingredients with the dry mixture until fully incorporated.
- Scoop dough onto the prepared baking sheet and flatten slightly.
- Bake for 26-30 minutes until set but still soft in the middle.
- Allow cookies to cool on a wire rack for at least 10-15 minutes before enjoying.
Nutrition
- Serving Size: 1 cookie (30g)
- Calories: 110
- Sugar: 6g
- Sodium: 45mg
- Fat: 5g
- Saturated Fat: 0.5g
- Unsaturated Fat: 4g
- Trans Fat: 0g
- Carbohydrates: 14g
- Fiber: 2g
- Protein: 3g
- Cholesterol: 0mg