Lavender Buttercream Frosting
There’s something utterly magical about the first hint of spring, isn’t there? The air becomes infused with warmth, flowers bloom in a riot of colors, and everything feels just a little more alive. It’s during these enchanting moments that I find myself drawn to floral flavors, particularly lavender. Lavender Buttercream Frosting is like a delicate whisper of spring, an experience that transcends mere dessert. Each bite is a symphony of flavors that dances on the palate, evoking memories of sun-soaked afternoons and picnics in blooming gardens. This frosting is not just an accompaniment; it’s the star of your cake or cupcake, transforming even the simplest treat into something extraordinary. I promise you, this delightful lavender frosting will become your go-to recipe for any celebration.
Making Lavender Buttercream Frosting is not just about mixing ingredients; it’s about embracing the beauty of cooking and allowing yourself to be inspired by nature. As you embark on this culinary journey, let each step be an opportunity to connect with your food. The subtle floral notes combined with creamy butter create a truly unique frosting that beautifully complements cakes and cupcakes alike. Imagine spreading this luscious buttercream over a vanilla cake or a lemon cupcake—it’s like adding a touch of whimsy to your desserts! So, gather your ingredients and let’s make something truly special together.
Lavender Buttercream Frosting: A Floral Delight for Every Occasion
This Lavender Buttercream Frosting brings not only flavor but also beauty to your desserts. It’s perfect for spring gatherings or summer celebrations, lending a touch of elegance that’s hard to resist. Whether you’re dressing up cupcakes for a birthday party or topping off a simple cake for afternoon tea, this frosting promises to captivate everyone who gets a taste.

Ingredients:
As we prepare to whip up this stunning Lavender Buttercream Frosting, let’s take a moment to appreciate each ingredient that plays its part in creating this masterpiece. Each one contributes not just flavor but also texture and visual appeal.
- 1 cup (2 sticks or 226g) unsalted butter, softened to room temperature. This is crucial for achieving that light and airy texture we desire in our frosting. Room temperature butter emulsifies beautifully when creamed with sugar and provides the right base for our lavender-infused delight. If you use cold butter, it won’t cream properly; if it’s melted, you’ll end up with a greasy mess instead of fluffy frosting. Opt for high-quality unsalted butter so you can control the sweetness better—it’s non-negotiable!
- 1-2 teaspoons ground dried lavender (culinary grade). The star of the show! Culinary-grade dried lavender adds those beautiful floral notes that elevate this frosting from ordinary to extraordinary. When buying lavender, look for buds labeled as culinary grade—this ensures they are safe and flavorful for consumption. Grinding them helps release their essential oils more effectively, enhancing both aroma and taste.
- 1 teaspoon pure vanilla extract. Ahh, vanilla—the comforting companion to our floral notes! Pure vanilla extract lends warmth and depth to the frosting’s flavor profile, balancing out the herbal intensity of lavender beautifully. Always choose pure extracts over imitation; the difference in flavor is absolutely paramount to achieving that rich taste we crave.
- 3-4 cups powdered sugar (approximately 400g). Powdered sugar is what gives our buttercream its sweetness and structure; it dissolves quickly and creates that silky-smooth texture we all love in frostings. Adjusting between 3-4 cups allows you some flexibility depending on how sweet you want your frosting—start with less if you’re unsure! Make sure your powdered sugar is fresh; old sugar can clump and affect the final consistency.
- 2-3 Tablespoons milk (room temperature). Milk adds moisture and creaminess to our buttercream while helping achieve the perfect spreadable consistency. Room temperature milk integrates smoothly into the mixture without chilling down your buttercream too much—trust me on this one! If you want an extra luxurious touch, consider using heavy cream instead.
- 1 part pink and violet gel food coloring. While optional, a dash of color transforms our lavender buttercream into something visually stunning! Gel food coloring is ideal because it doesn’t change the consistency of the frosting—the key here is moderation; start small and build up until you reach your desired hue.
Equipment You’ll Need:
Having the right tools makes all the difference in ensuring your baking experience is smooth and enjoyable! These tools are not just accessories—they’re essential partners in creating something wonderful together.
- Stand mixer or hand mixer: A stand mixer fitted with a paddle attachment makes creaming butter an absolute breeze! The power it offers creates that fluffy texture we’re aiming for without tiring out your arms as you would with a manual whisk. If you don’t have a stand mixer handy, don’t worry—a good hand mixer can do wonders too!
- Spatula: A sturdy rubber spatula is indispensable for scraping down the sides of your mixing bowl during preparation. It ensures every bit of butter and sugar gets incorporated evenly into your mixture—no waste here! Plus, it’s perfect for transferring your gorgeous frosting onto cakes or cupcakes later on.
- Measuring cups and spoons: Precision matters when baking! Using proper measuring cups helps ensure you’re getting exactly what you need without guesswork involved—especially important when dealing with dry versus liquid ingredients!
- Toothpick: For adding food coloring precisely without overdoing it! A toothpick dipped into gel color allows you control over how vibrant you want your frosting while preventing any accidents from pouring too much directly into the mix.
Preparing the Lavender Buttercream Frosting
Step 1: Prepare Your Dried Culinary Lavender
Begin by preparing those beautiful dried culinary lavender buds that will transform our buttercream into something ethereal! Take about 1 to 2 teaspoons of dried lavender buds—remember to choose culinary-grade—to unleash their fragrant essence fully. Place them in a zip-top bag and crush them gently using a rolling pin until they become finely ground but not pulverized into dust. This process releases their aromatic oils without losing texture entirely—a crucial balance since we want those lovely lavender notes prominent yet not overwhelming! Trust me on this; patience pays off here as grinding enhances their flavor profile significantly.
Step 2: Cream Your Butter
Now it’s time to bring some life into our kitchen by creaming that softened unsalted butter! In the bowl of your stand mixer fitted with the paddle attachment (or using your trusty hand mixer), beat one cup of room temperature unsalted butter at medium speed for about one minute until it’s creamy and smooth—a lovely golden hue will emerge as air gets whipped in! After achieving this luscious consistency, add in one teaspoon of ground dried lavender along with one teaspoon pure vanilla extract; these additions infuse our base with floral undertones while enhancing richness simultaneously—this combination works like magic together! Continue mixing until everything is well combined (around another minute) before moving forward; this step sets us up for success by creating an inviting foundation full of flavor.
Step 3: Incorporate Powdered Sugar & Milk
Ready for sweetness? Now comes the fun part where we transform our buttery base into heavenly frosting! Gradually add three-and-a-half cups (about 400g) powdered sugar along with two tablespoons room-temperature milk into the mix—all while keeping things at low speed initially so cloud-like puffs don’t escape from mixing bowl chaos! After thirty seconds have passed—and once most sugar has been absorbed—bump up speeds to medium-high intensity as you beat everything together vigorously for roughly two minutes until smooth yet fluffy perfection emerges before scraping down sides/bottoms occasionally throughout process—this ensures even blending so no lumps remain hidden away at bottom corners!
Step 4: Adjust Your Frosting Consistency
Now let’s fine-tune our decadent concoction until it’s just right! Take a moment here—it’s vital because achieving optimal texture makes all difference when spreading onto cakes/cupcakes later down line! If you’ve tasted it already but find things leaning too thin? Time willing add up half cup more powdered sugar gradually (about quarter-cup increments), mixing thoroughly after each addition until desired thickness achieved—we’re aiming ideally around soft peaks while still maintaining spreadability throughout entire batch without being runny either way though so keep checking back often along way observing visual cues closely during adjustments made carefully!
I can’t wait to see how yours turns out—I promise you won’t regret taking time needed here as every detail builds towards greatness ahead!
Step 5: Infuse the Color of Spring
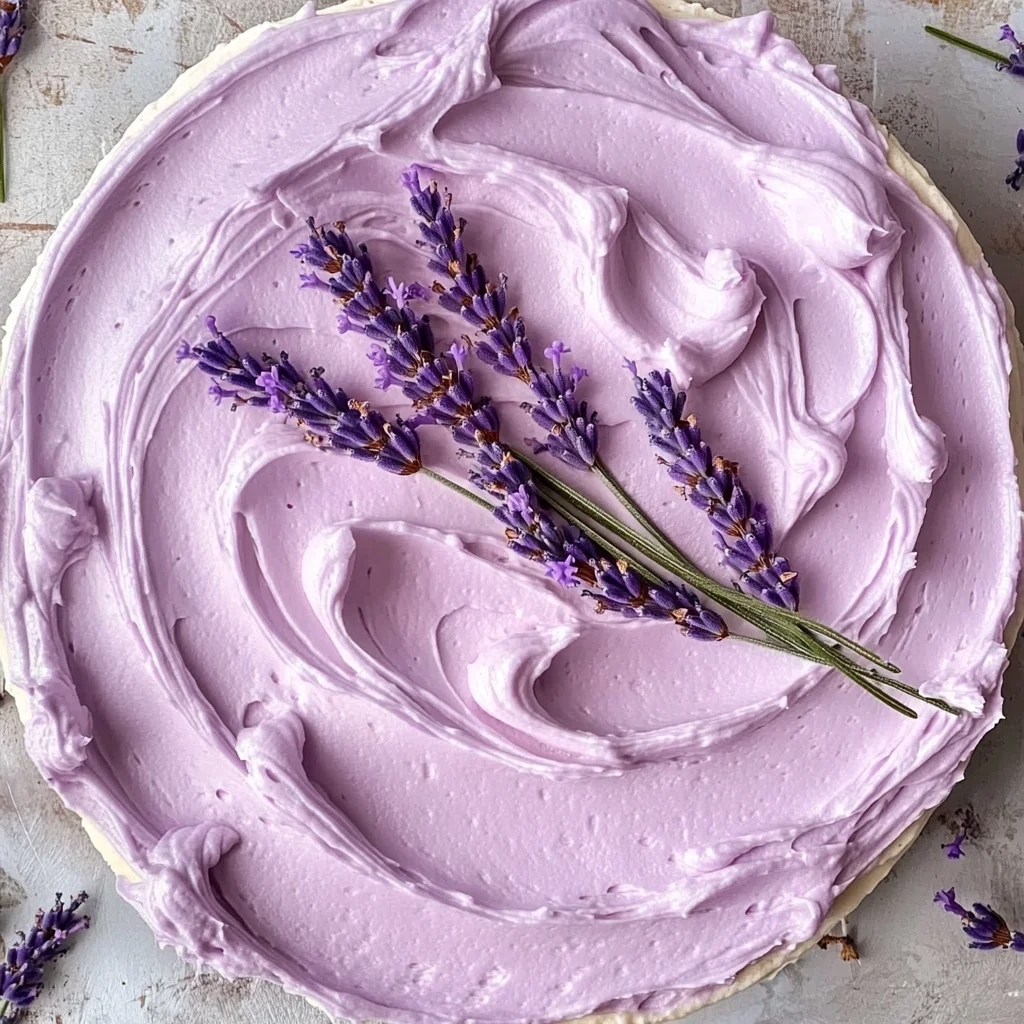
Now comes one of the most delightful parts of creating your Lavender Buttercream Frosting: adding that beautiful pop of color! This step is not merely about aesthetics; it’s all about enhancing the overall experience. The visual appeal of your frosting can elevate a simple dessert into something utterly enchanting. Choose gel food coloring for this task, as it gives you the vibrant hues without altering the consistency of your frosting. Start by dipping a clean toothpick into both pink and violet gel food coloring—just a tiny amount will do! Then, gently swirl it into your buttercream. As you mix, watch the magic happen—the colors blend seamlessly, creating a stunning lavender hue reminiscent of blooming fields in spring.
Don’t rush this step; take your time to achieve your desired shade. Trust me on this: the right color can significantly impact how appetizing your buttercream looks against a cake or cupcake. Remember to taste as you go along! This is crucial because sometimes the addition of color can slightly alter the flavor perception, and you want to ensure that your floral notes still shine through. If you feel inspired to intensify the color, feel free to add more gel but always use a new toothpick each time—this keeps things clean and prevents contamination in your frosting. The end goal here is not just to achieve a gorgeous color but also to create a frosting that feels as good as it looks—a truly extraordinary treat!
Step 6: Store Your Creation with Care
If you’re not using your Lavender Buttercream Frosting immediately, proper storage is essential for maintaining its luscious texture and flavor. You see, buttercream loves to be pampered! Transfer any excess frosting into an airtight container, ensuring it’s sealed tightly to keep out any moisture or odors from your refrigerator. Why does this matter? Well, exposure to air can dry out your buttercream, turning it from that creamy dream we’re aiming for into something less than desirable.
Storing in the refrigerator is perfectly fine for up to a week, but I encourage you to bring it back to room temperature before using it again. When you’re ready to whip up those cupcakes or cakes, take out your frosting and let it sit for about 30 minutes. Once it’s softened slightly, give it a quick re-whip on medium speed for about 30 seconds with a stand mixer or hand mixer. This will restore its light fluffiness and make spreading or piping much easier! Just imagine that moment when you take off the lid and are greeted by that sweet floral scent—it’s like opening a treasure chest filled with memories of warm summer days.
Step 7: Frosting with Flair
Now comes perhaps my favorite part: decorating with this heavenly Lavender Buttercream Frosting! Whether you’re topping fluffy cupcakes or layering between moist cake layers, this step allows for creativity and personal expression. Start by placing your frosting in a piping bag fitted with your favorite tip—my go-to is usually a star tip for those charming swirls—but feel free to experiment! The way you frost is an extension of yourself; don’t hesitate to make bold choices.
When you’re ready, pipe onto each cupcake or cake layer with gentle pressure while moving in circular motions if you’re after that classic swirled effect. It’s important not to rush; allow yourself the space to enjoy this process because it can be incredibly soothing and rewarding at once! As you work, remember that every little swirl holds love and attention—each cupcake becomes an individual masterpiece! Don’t worry if they aren’t all perfect; I promise you they will still taste divine no matter the shape.
Step 8: The Final Flourish
To finish off your beautifully frosted creations, consider adding some extra touches that will make them sing even more. Lightly sprinkle dried culinary lavender buds on top of each frosted treat—this not only enhances their visual appeal but also reinforces that enchanting lavender aroma we all adore. A few edible flowers can add another layer of elegance; think violets or pansies they are not only beautiful but completely safe too!
Once done decorating, take a moment—step back and admire what you’ve created! The vibrant colors against the backdrop of soft buttercream are nothing short of captivating. But patience is key here; allow those frosted delights to sit at room temperature for at least 15-20 minutes before serving or storing them away again. This little pause is non-negotiable because it allows flavors to meld together beautifully while letting the buttercream soften just enough for that perfect bite—a mouthful filled with joy!
Next Major Phase – Enjoying Your Lavender Buttercream Masterpiece
It’s time now for the best part: sharing and enjoying these delightful treats! Whether you’re hosting friends over for tea, celebrating a special occasion, or simply indulging yourself after a long day, I promise you that every mouthful will transport you straight into blissful serenity. Pair these frosted wonders with herbal teas or iced beverages during warm weather gatherings—it creates an utterly intoxicating combination that truly celebrates all things floral.
Remember that cooking isn’t just about following recipes; it’s about connecting with flavors, experiences, and emotions tied closely with food preparation and enjoyment. So gather around family or friends—watch their faces light up as they take their first bite; it’s moments like these that make cooking so profoundly satisfying! Your Lavender Buttercream Frosting isn’t just an ingredient; it’s an invitation to share love through deliciousness in its purest form.
And there you have it—the journey from simple ingredients to luxurious lavender-infused delight awaits you in every step taken toward creating this incredible frosting! Now go forth and bake joyfully—your sweet adventure awaits!
Storage and Enjoyment Tips for Your Lavender Buttercream Frosting
Now that you’ve delicately crafted this Lavender Buttercream Frosting, it’s time to let it shine in all its floral glory! Whether you’re adorning a beautifully baked cake or simply dipping your favorite cookies into this luscious concoction, the experience is bound to be utterly delightful. But what happens if you have some leftovers? Don’t fret! Let’s dive into the best ways to preserve this enchanting treat so you can savor it bit by bit, or use it later for spontaneous baking adventures.
Storing Leftover Lavender Buttercream Frosting
To keep your lavender buttercream frosting in peak condition, transfer it into an airtight container – glass or plastic works beautifully! Make sure to seal it tightly and store it in the refrigerator, where it will happily reside for up to a week. One little pro tip I adore is placing a slice of bread in the container with the frosting; this trick helps maintain moisture, keeping your frosting creamy and dreamy rather than overly firm. After a few days, you might notice that the flavors deepen and blend even more harmoniously, creating a frosting that’s just as delightful as when you first whipped it up. When you’re ready to use it again, simply take it out of the fridge and give it a good stir; if it’s too thick, mix in a splash of milk until it’s back to that glorious, spreadable consistency we all love.
Freezing Lavender Buttercream Frosting for Later
If you want to extend the life of your lavender buttercream frosting even further, freezing is an excellent option! To do this properly, spoon your frosting into freezer-safe containers or zip-top bags, making sure to press out as much air as possible before sealing. You can freeze this beauty for up to three months—how fantastic is that? When you’re ready to indulge again, simply transfer the container from the freezer to the refrigerator and let it defrost overnight. This method not only saves time during busy baking days but also ensures that whenever inspiration strikes—be it for cupcakes at a birthday celebration or a last-minute dessert—you’ll have this luscious lavender treat ready at your fingertips. The convenience factor is truly remarkable; imagine pulling out that vibrant container and knowing you have something special waiting just for you!
Lavender Buttercream Frosting
Indulge your senses with this delightful Lavender Buttercream Frosting, a perfect springtime treat that brings floral elegance to any dessert. The gentle aroma of culinary lavender combined with creamy butter creates a luscious frosting that will elevate your cakes and cupcakes into extraordinary confections. With its silky texture and enchanting flavor, this buttercream is not only a feast for the taste buds but also a visual delight, making it ideal for special occasions or casual gatherings alike. Whether you’re hosting a garden party or simply treating yourself to something sweet, this frosting is sure to impress and inspire.
- Prep Time: 15 minutes
- Cook Time: 0 minutes
- Total Time: 15 minutes
- Yield: About 12 servings 1x
- Category: Dessert
- Method: Baking
- Cuisine: American
Ingredients
- 1 cup unsalted butter, softened
- 1–2 teaspoons ground dried culinary lavender
- 1 teaspoon pure vanilla extract
- 3–4 cups powdered sugar
- 2–3 tablespoons milk (room temperature)
- Gel food coloring (optional)
Instructions
- Start by grinding dried lavender buds until finely ground.
- In a stand mixer, cream the softened butter until smooth. Add ground lavender and vanilla; mix until fully incorporated.
- Gradually add powdered sugar and milk, mixing on low speed until combined. Increase speed to medium-high and beat until fluffy.
- Adjust consistency with more powdered sugar or milk if necessary.
- If desired, add gel food coloring to achieve the desired hue.
Nutrition
- Serving Size: 1 tablespoon
- Calories: 70
- Sugar: 8g
- Sodium: 30mg
- Fat: 4g
- Saturated Fat: 2g
- Unsaturated Fat: 2g
- Trans Fat: 0g
- Carbohydrates: 8g
- Fiber: 0g
- Protein: <1g
- Cholesterol: 15mg