Peach Tart
Every cook needs a good dessert recipe that can be whipped up anywhere—especially when you’re away from your kitchen and its mixer and rolling pin and comforting gadgets. This peach tart is that recipe for me. Imagine the scent of ripe peaches wafting through the air, their sweetness mingling with a buttery crumble, as you gather around the table with friends or family. It’s more than just food; it’s a moment, an experience, a bridge between tradition and innovation. As the golden crust bakes into a warm embrace, it transforms simple ingredients into something profoundly satisfying. I promise you, this Peach Tart will evoke smiles and spark conversations, making it a cherished addition to any gathering.
There is something so utterly intoxicating about biting into a slice of this tart—the juicy peaches glistening under their sugary topping create a symphony of flavors that dance on your palate. This recipe has roots in my childhood kitchen, where my mother would make it on warm summer afternoons when peaches were at their peak. While she meticulously peeled her peaches, I’ve become a bit of a rebel, opting to leave the skins on for both ease and texture. Each bite of this tart tells a story—of lazy summers spent picking fruit from our garden, of laughter shared over warm slices fresh out of the oven. This Peach Tart is not just dessert; it’s an invitation to savor life’s sweetest moments.
Peach Tart: A Slice of Summer Bliss
Let’s dive into this delightful peach tart together! With just a handful of ingredients and minimal equipment required, you’ll find that it’s as accessible as it is delicious. Whether you’re hosting friends or simply treating yourself after a long day, this recipe fits perfectly into any occasion. Let’s get those taste buds tingling!
Ingredients:
As we embark on this culinary journey together, let’s take a moment to appreciate each ingredient that plays its part in creating this Peach Tart masterpiece.
- 1 1/2 cups plus 2 tablespoons all-purpose flour. This is the backbone of our tart crust—providing structure while allowing for that lovely crumbly texture we adore. When choosing flour, go for high-quality all-purpose flour; it should feel soft yet robust in your hands. The extra two tablespoons help absorb moisture from the juicy peaches during baking, ensuring our crust doesn’t turn soggy.
- 3/4 teaspoon kosher salt. Salt may seem small in quantity but trust me—it’s absolutely paramount! It enhances the sweetness of the peaches and balances flavors perfectly throughout our tart. Look for flaky kosher salt; its texture helps distribute evenly without overwhelming any single bite.
- 3/4 cup plus 1 teaspoon sugar. Sugar plays multiple roles here: sweetening our tart while also contributing to that beautiful caramelization during baking. I recommend using granulated sugar for its fine consistency which dissolves easily into both dough and crumble mix—this ensures no gritty bits disrupt your blissful experience!
- 1/4 cup vegetable or canola oil. This liquid gold keeps our crust tender and moist without becoming heavy or greasy. I often use vegetable oil for its neutral flavor but feel free to substitute with canola if that’s what you have on hand; both will work beautifully here.
- 1/4 cup mild olive oil. Adding olive oil brings depth to our flavor profile while still keeping things light—its grassy notes complement the sweetness of the peaches wonderfully! If you’re worried about an overpowering taste, look for mild varieties; they’ll blend seamlessly without stealing attention from our star ingredient.
- 2 tablespoons whole milk. Milk contributes richness to our dough while helping bind everything together beautifully—it’s like giving your crust a cozy hug! Use whole milk for creaminess but feel free to swap in a non-dairy alternative if that aligns better with your preferences.
- 1/2 teaspoon almond extract. This ingredient adds an enchanting aroma and flavor reminiscent of marzipan—the kind that makes you stop and smile as you bake! Ensure you’re using pure almond extract; artificial varieties often lack the depth we crave in our desserts.
- 2 tablespoons cold unsalted butter. Butter is crucial here for achieving that crunchy crumble topping we all adore! Cold butter helps create little pockets within the crumble mixture that will bake up delightfully crispy while ensuring your topping doesn’t end up too dense.
- 3 small ripe peaches (up to 5), pitted and thickly sliced (about 1/2-inch wide). The real star of our show! Ripe peaches are crucial—look for ones that yield slightly to gentle pressure but aren’t overly soft or mushy; we want them firm enough to hold their shape during baking while releasing delicious juices as they cook down into caramelized perfection.
Equipment You’ll Need:
Having the right tools makes cooking so much smoother—and trust me, when it comes time to create this Peach Tart, you’ll want everything at your fingertips!
- 11-inch tart pan – A quintessential tool for shaping our crust perfectly and achieving those lovely fluted edges everyone admires! If you don’t have one handy, feel free to improvise with other pan shapes or sizes—just keep an eye on baking times since they may vary.
- Mixing bowls – You’ll need at least two: one for mixing your dry ingredients and another smaller bowl for blending liquids together before introducing them to flour mixture—this helps incorporate everything uniformly without clumping!
- Fork or pastry cutter – These tools are essential allies when working with butter in your crumble mixture; they allow us to cut in cold butter efficiently until achieving that desired crumbly texture without overworking it.
- Measuring cups & spoons – Accurate measurements are fundamental in baking! I can’t stress enough how important these little helpers are—they ensure we’re hitting those sweet spots every time!
Getting ready? Let’s transform these ingredients into something extraordinary—the kind of treat that’s bound to become part of your culinary repertoire!
Step 1: Prepping Your Dough
First things first—let’s get that oven preheating to 425 degrees Fahrenheit because we want everything hot and ready when we slide our tart in! In a mixing bowl (preferably one large enough), stir together 1 1/2 cups flour along with 3/4 teaspoon kosher salt and 1 teaspoon sugar until well combined; this step allows us to sift those dry ingredients together without needing separate sifting beforehand—a wonderful time-saver! Now grab another small bowl; whisk together the oils (both vegetable/canola and olive), milk, and almond extract until blended smoothly—you’ll notice how fragrant it becomes at this stage; it’s truly tempting! Once combined, pour this wet mixture straight into your flour blend while gently mixing with a fork just enough until dampened—be careful not to overwork it because we want tender dough here!
Now comes one of my favorite parts: transferring the dough into an 11-inch tart pan (or whatever size you’ve decided). Using clean hands, press firmly yet confidently across the bottom while pushing some up along sides too until it’s evenly covering everything—that’s key folks! Aim for about an eighth inch thick all around so it crisps nicely once baked—but don’t fret if there’s excess dough hanging over edges; trim away any excess carefully—that’s just unnecessary weight weighing us down later!
Step 2: Creating Our Crumble Topping
Now let’s switch gears by preparing our crumble topping—a key player in elevating this dish even further! In yet another bowl (yes, I know there are quite a few bowls involved!), combine 3/4 cup sugar alongside those remaining 2 tablespoons flour plus another pinch (1/4 teaspoon) salt before adding those cold unsalted butter pieces straight in there too—it might seem like lots going on but trust me—it’ll be worth every minute spent here! Using either clean fingers or perhaps even fork tools (whichever feels best), begin pinching together until everything starts resembling fine granules mixed with tiny pebbles—that contrast gives us delicious crunch once baked while also balancing out sweetness beautifully against juicy fruit below… divine!
Step 3: Arranging Our Peaches
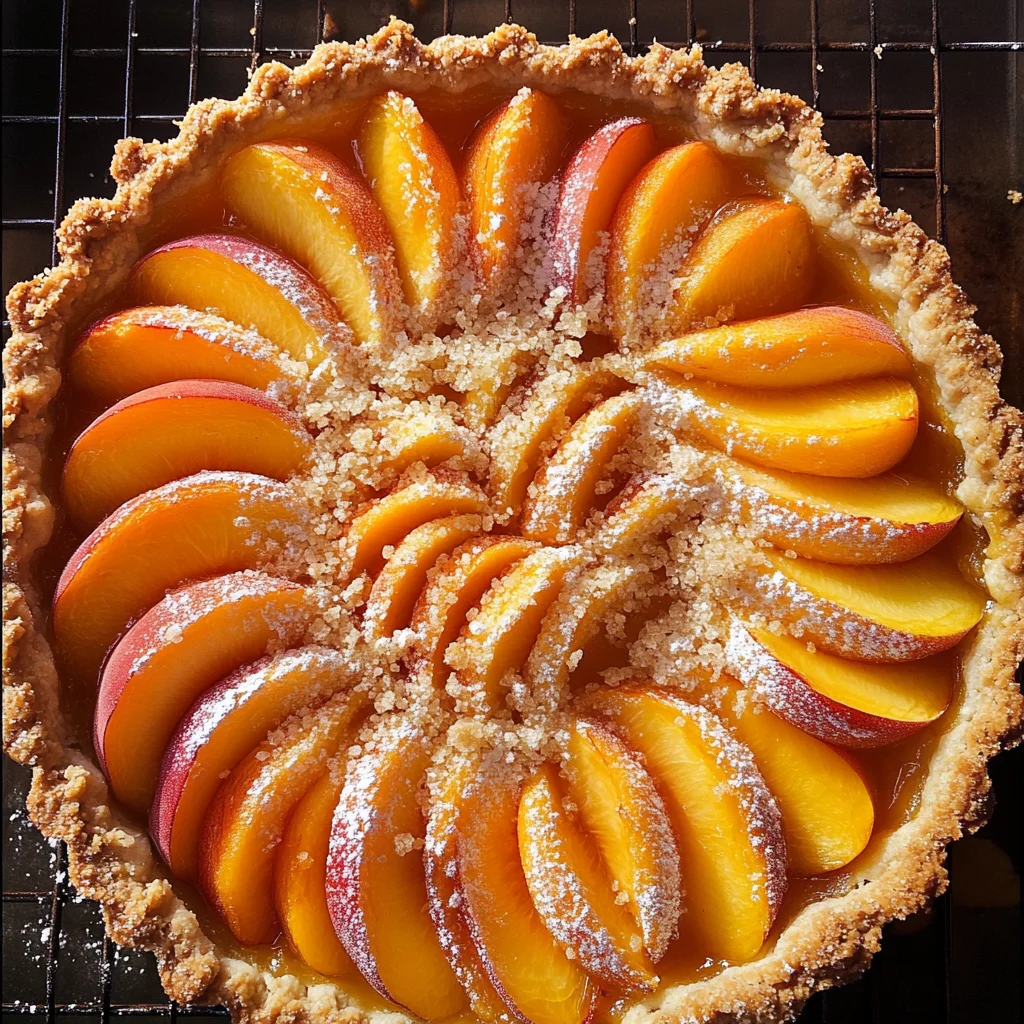
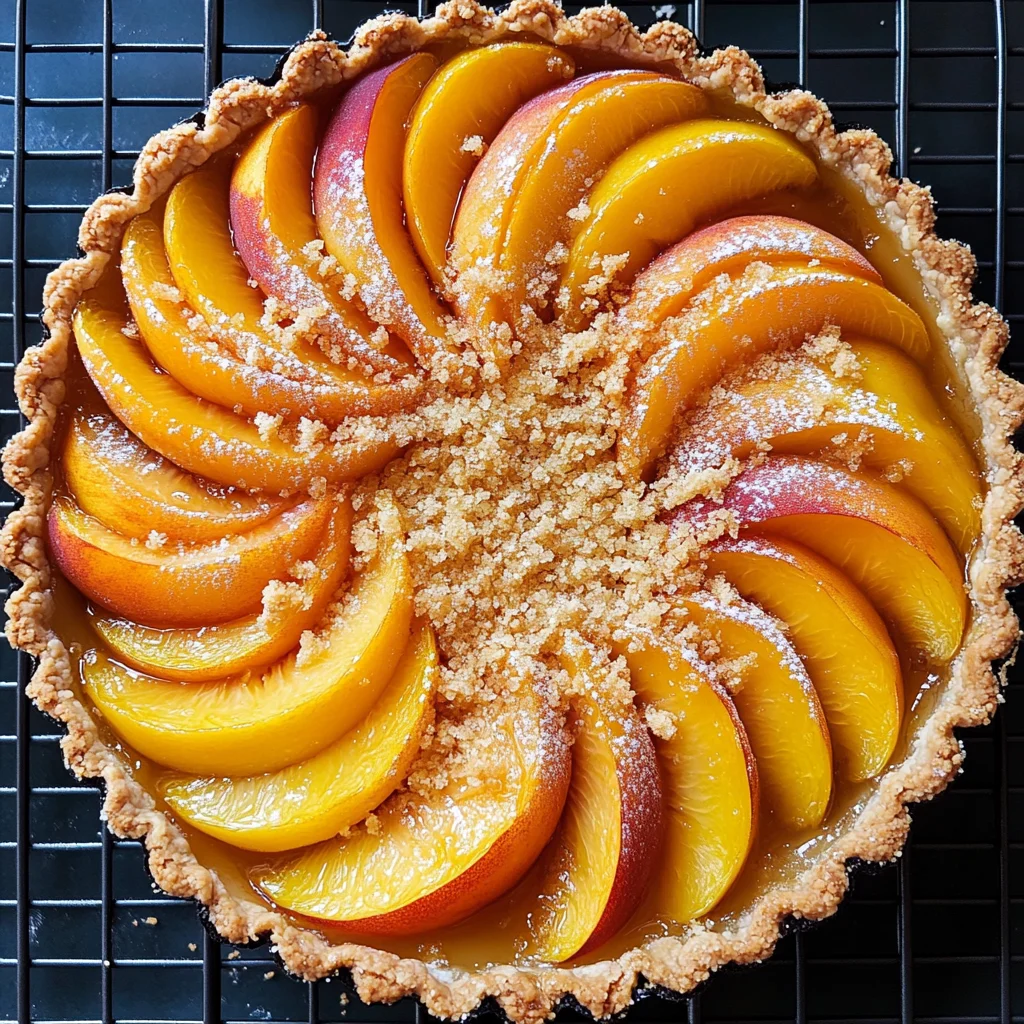
With all components prepped beautifully now comes perhaps my favorite part—the assembling process where artistry meets practicality! Starting from outer edge first layer those luscious slices overlapping one another like petals blooming outward towards center point… fill ‘er up snugly so they fit comfortably yet don’t pile up excessively high either—we want each bite filled with peach goodness bursting forth upon contact due diligence during assembly phase pays off here tremendously later down road trust me on this one! Once arranged neatly sprinkle liberally across entire surface area with pebbly buttery goodness made earlier—yes indeed it might seem like quite a lot going onto there—but fear not dear friend—it’ll melt down during baking bringing heavenly aromas wafting through kitchen soon enough!
Step 4: Baking To Perfection
Once everything looks picture-perfect placed securely within preheated oven awaits thrilling transformation process ahead… Bake away these beauties anywhere between thirty-five forty-five minutes depending upon particularities present within own oven model—you’ll know they’re done once shiny thick bubbles begin enveloping fruits below while crust takes on slight golden hue hinting perfection achieved… patience during cooling period afterward matters greatly too—as fragrant aromas continue teasing senses expectant hearts gathered nearby waiting eagerly partake soon thereafter… oh what joy awaits ahead post-baking magic unfolds right before eyes!
As I guide you through these steps infused with care remember—to enjoy cooking is key ingredient itself throughout journey ahead… savor moments spent crafting memories alongside flavors created lovingly here today!
Step 5: Creating the Crumbly Topping
Now that your dough is pressed into the tart pan and looking lovely, we’re going to whip up that utterly intoxicating crumb topping that’s going to add a delightful contrast to the juicy peaches. In a separate mixing bowl, combine 3/4 cup of sugar, 2 tablespoons of all-purpose flour, and 1/4 teaspoon of kosher salt. This combination of sugar and flour is absolutely paramount because it not only sweetens but helps absorb any juices released by those beautiful peaches as they bake, preventing a soggy crust. Next, take your cold, unsalted butter—this is where the magic happens! Slice it into small pieces and then add it to the dry ingredients. Now comes the fun part! Using your fingers, start pinching the butter into the mixture. You want it to resemble coarse crumbs with a mix of fine granules and tiny pebbles. Don’t rush this step; it’s essential for achieving that perfect crumbly texture that will contrast beautifully with the soft fruit. If your peaches are particularly juicy (a blessing!), feel free to add an extra tablespoon of flour to help soak up those delicious juices.
Step 6: Arranging the Peaches
With your crumb topping ready, let’s turn our attention back to those gorgeous peaches! The way you arrange them can elevate this dessert from simply good to truly extraordinary. Take those slices—about three small ripe peaches, or up to five if you’re feeling especially generous—and begin placing them in an overlapping concentric circle pattern on top of your crust. Starting from the outside and working toward the center not only looks beautiful but ensures even cooking since the edges tend to cook faster than the middle. Aim for snugly packed slices; they should be almost kissing each other as they lay in their fruity embrace. This arrangement allows the flavors to meld together in an exquisite symphony while baking. Once they’re arranged just right, don’t hesitate to sprinkle that crumbly goodness generously over the top—it may seem like a lot at first glance, but trust me on this one! It’s what transforms your tart into a delightful experience with every bite.
Step 7: Baking Your Perfect Peach Tart
Now comes one of my favorite parts—the moment we send our creation off into the oven! Preheat your oven to a sizzling 425 degrees Fahrenheit; this high temperature is crucial because it creates that quintessential crispy crust while simultaneously caramelizing the sugars in both the fruit and topping. Place your tart in the oven and set a timer for about 35 minutes; however, keep an eye on it as you get closer to that mark. You’ll know it’s close when you start seeing thick bubbles forming around the edges of those peach slices—this is where all that juice from the fruit combines with sugar and begins creating liquid gold! As it bakes, you’ll be enveloped by an intoxicating aroma wafting through your home, drawing everyone near like moths to a flame. The crust should be slightly brown and firm when you check for doneness; if it’s still pale and soft after 35 minutes, don’t hesitate to leave it in for another five minutes or so until everything reaches that glorious golden hue.
Step 8: Cooling and Serving Your Peach Tart
Once you’ve pulled your peach tart from its hot oven sanctuary, it’s time for one more crucial step—cooling! Allowing it some time on a rack is incredibly important; this lets steam escape while also giving both crust and filling time to set perfectly without turning mushy. It might be tempting to dive right in because who could resist such beauty? But trust me on this: patience here is rewarding! Let it cool for at least 20-30 minutes before serving—this will enhance those flavors as they mingle beautifully together. When you’re ready to serve, slice up generous pieces; I highly recommend pairing each slice with dollops of whipped cream or perhaps even a scoop of dairy-free ice cream if you’re feeling adventurous! Each bite should transport you straight into summer bliss—a delicate balance between sweet peaches, crunchy crumble, and buttery crust that feels profoundly satisfying.
Final Touches for Your Peach Tart
Step 9: The Finishing Touches
As we prepare our peach tart for its grand reveal at your table, let’s talk about those finishing touches that make all the difference! Just before serving, I love dusting a light sprinkle of powdered sugar over the top—it adds an airiness that feels celebratory without overwhelming any flavors already present. This simple gesture elevates your homemade dessert into something worthy of applause! Additionally, consider garnishing with fresh mint leaves or even slivers of toasted almonds if you’re feeling fancy; these can add a lovely aromatic touch alongside textural contrast. Remember: presentation matters just as much as taste because it’s all about inviting people into an experience filled with warmth and joy. Finally, gather around with friends or family as you dig into this masterpiece—you’ll find that every bite tells a story about summer days spent enjoying sun-ripened fruit at its peak flavor.
And there you have it—the most delightful Peach Tart that’s sure to become a beloved recipe in your home too! I promise you will cherish every moment spent making this dish as much as every delicious morsel you’ll savor later on. Happy baking!
Storage and Enjoyment Tips for Your Peach Tart
Now that you’ve created this mouthwatering peach tart, it’s time to savor the fruits of your labor! But what if there are leftovers? Trust me, you’ll want to make sure you preserve every last crumb of this delightful dessert because it’s just too good to waste. Let’s dive into how to store this sweet masterpiece so you can enjoy it even after your first serving.
Storing Leftover Peach Tart
To keep your leftover peach tart as fresh and delicious as the moment it came out of the oven, I recommend placing it in an airtight container. This will protect it from drying out and maintain that perfect crust texture. If you don’t have a container handy, wrapping it tightly in plastic wrap works just fine too. Ideally, store it in the refrigerator, where it will stay fresh for about 3-4 days. One little trick I swear by is placing a slice of bread in the container with the tart; this helps maintain moisture and keeps your crust from getting too soggy. After a day or two, you might notice that the flavors meld together beautifully, creating a wonderfully comforting taste that might surprise you! When you’re ready to indulge again, simply pop a slice in the microwave for a few seconds or enjoy it cold—either way, I promise you’ll be back for more!
Freezing Peach Tart for Later
If you’re looking to save some peach tart for a future treat (and trust me, you’ll want to), freezing is an excellent option! To do this properly, let your tart cool completely before wrapping it tightly in plastic wrap and then aluminum foil to prevent freezer burn. It can be stored in the freezer for up to 3 months without losing its lovely flavor and texture. When you’re ready to enjoy it again, just transfer the tart to the fridge to thaw overnight; or for a quicker fix, unwrap it and let it sit at room temperature for about an hour. Freezing your peach tart is such a convenient solution because you can whip up something extraordinary any night of the week without all the fuss! Just imagine pulling out a slice on a cozy evening and sharing stories over its warm aroma wafting through your kitchen—pure bliss!
Peach Tart

Indulge in the sweet taste of summer with this delightful Peach Tart! This easy-to-make dessert showcases juicy peaches nestled in a buttery, crumbly crust. Perfect for gatherings or a comforting treat at home, each slice offers a burst of flavor that evokes warm afternoons spent savoring seasonal fruit. The combination of tender peaches and an irresistible crumble topping creates a symphony of textures and tastes that will have your guests coming back for more. Join us in celebrating the simple joys of life with this Peach Tart—a recipe destined to become a cherished favorite.
- Prep Time: 15 minutes
- Cook Time: 40 minutes
- Total Time: 55 minutes
- Yield: Approximately 8 servings 1x
- Category: Dessert
- Method: Baking
- Cuisine: American
Ingredients
- 1 1/2 cups plus 2 tablespoons all-purpose flour
- 3/4 teaspoon kosher salt
- 3/4 cup plus 1 teaspoon sugar
- 1/4 cup vegetable or canola oil
- 1/4 cup mild olive oil
- 2 tablespoons whole milk (or non-dairy alternative)
- 1/2 teaspoon almond extract
- 2 tablespoons cold unsalted butter
- 3 small ripe peaches (up to 5), pitted and thickly sliced
Instructions
- Preheat your oven to 425°F (220°C). In a mixing bowl, combine flour, salt, and sugar.
- In another bowl, whisk together the oils, milk, and almond extract. Pour the wet mixture into the dry ingredients and mix until just combined.
- Press the dough evenly into an 11-inch tart pan.
- In a separate bowl, prepare the crumble topping by combining sugar, flour, and salt. Cut in cold butter until you achieve a crumbly texture.
- Arrange peach slices on top of the crust in an overlapping pattern before sprinkling the crumble mixture generously over them.
- Bake for 35-45 minutes or until golden brown and bubbly. Allow to cool before serving.
Nutrition
- Serving Size: 1 slice (100g)
- Calories: 250
- Sugar: 16g
- Sodium: 150mg
- Fat: 10g
- Saturated Fat: 1g
- Unsaturated Fat: 9g
- Trans Fat: 0g
- Carbohydrates: 38g
- Fiber: 2g
- Protein: 3g
- Cholesterol: 5mg